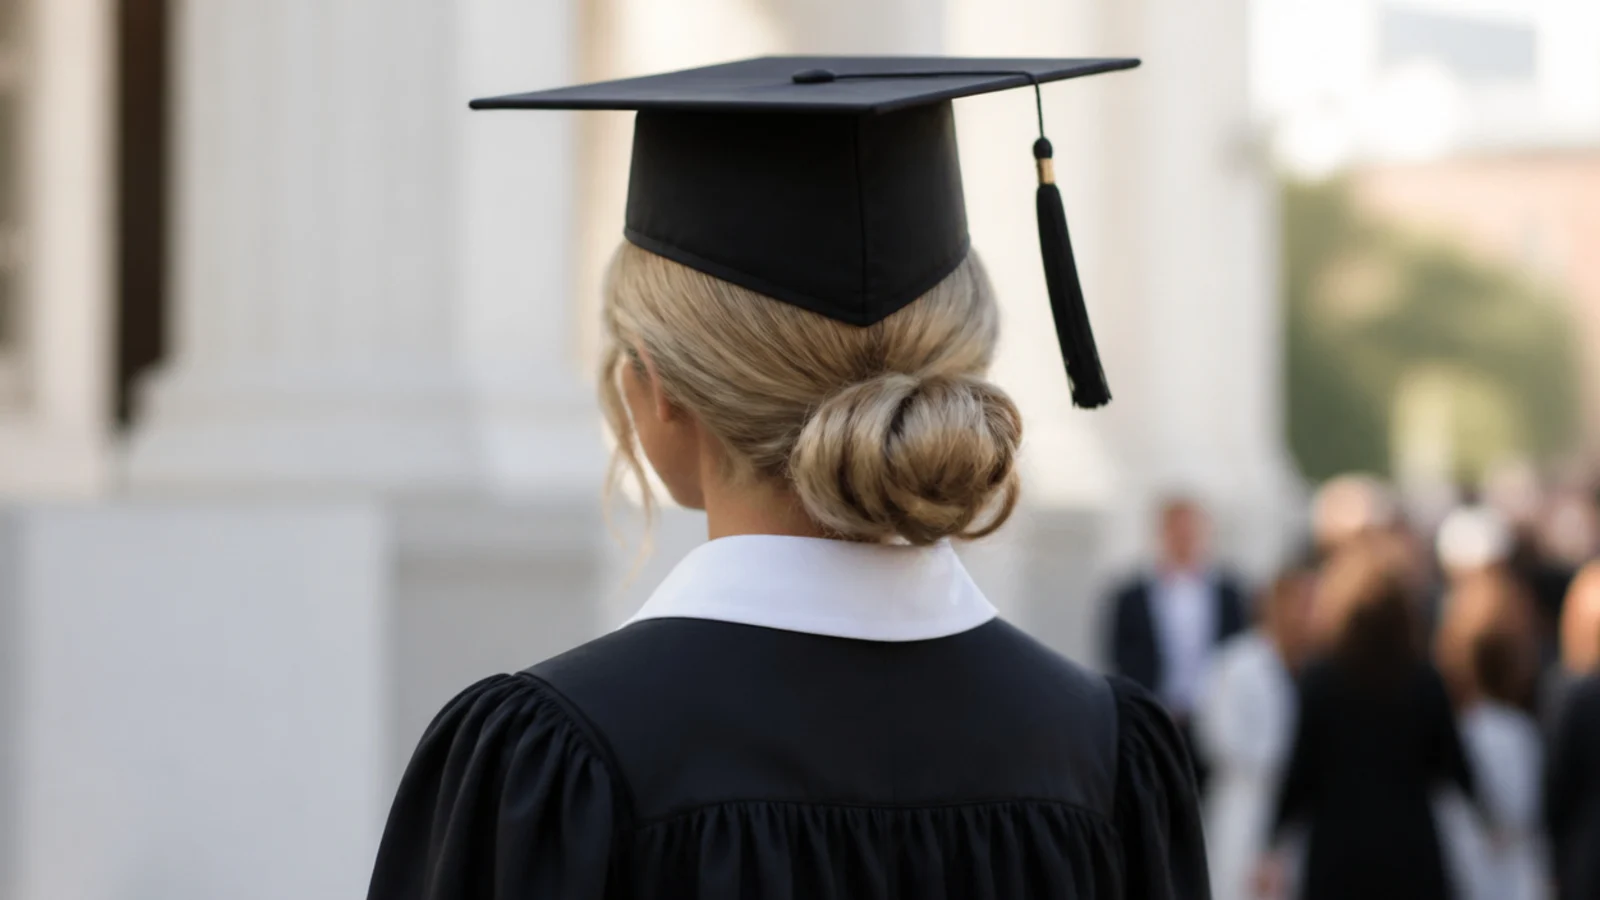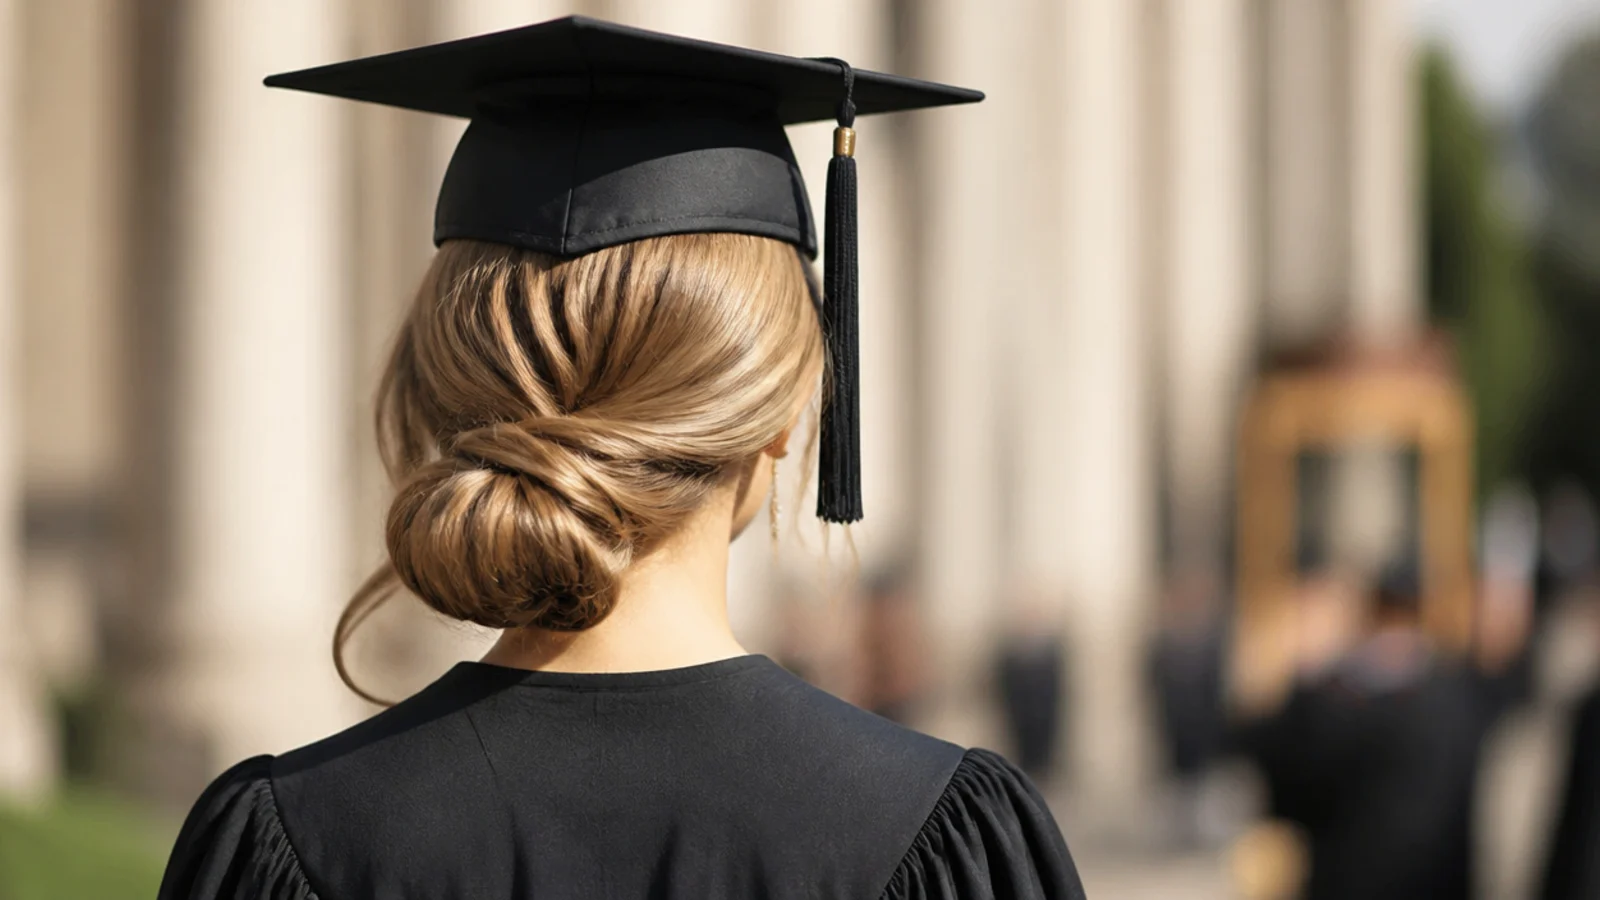
Quick Comparison
| Low Chignon Updo | High Topknot | |
|---|---|---|
| Position on the head | At or below the occipital bone, well under the cap line | On the crown, directly where the mortarboard sits |
| Cap compatibility | Excellent; the cap sits flat and level over it | Poor; the cap perches, tips forward or will not seat at all |
| Time to style | 25 to 35 minutes including prep | 10 to 15 minutes, but it fails the cap test |
| Pins needed | 6 U-pins plus 10 bobby pins, plus 4 for the cap | 6 to 8 pins, plus improvised pinning to hold the cap on |
| Four-hour hold | Holds; the coil is anchored at the base and the cap adds pressure | Loosens; the cap band rubs directly against the bun all ceremony |
| Photo performance with the cap on | Volume shows at the sides and back where the camera sees it | Nothing shows; the cap covers the entire style |
| Look after the cap comes off | Intact, with a light finger-comb at the crown | Flattened base and a visible band line across the crown |
| Comfort under a gown collar | Sits above the collar; no pressure point when you sit back | No collar conflict, but constant pressure from the cap band |
| Best hair length | Chin length through waist length | Shoulder length and longer only |
1. Prep Your Hair 24 Hours Before Graduation Day
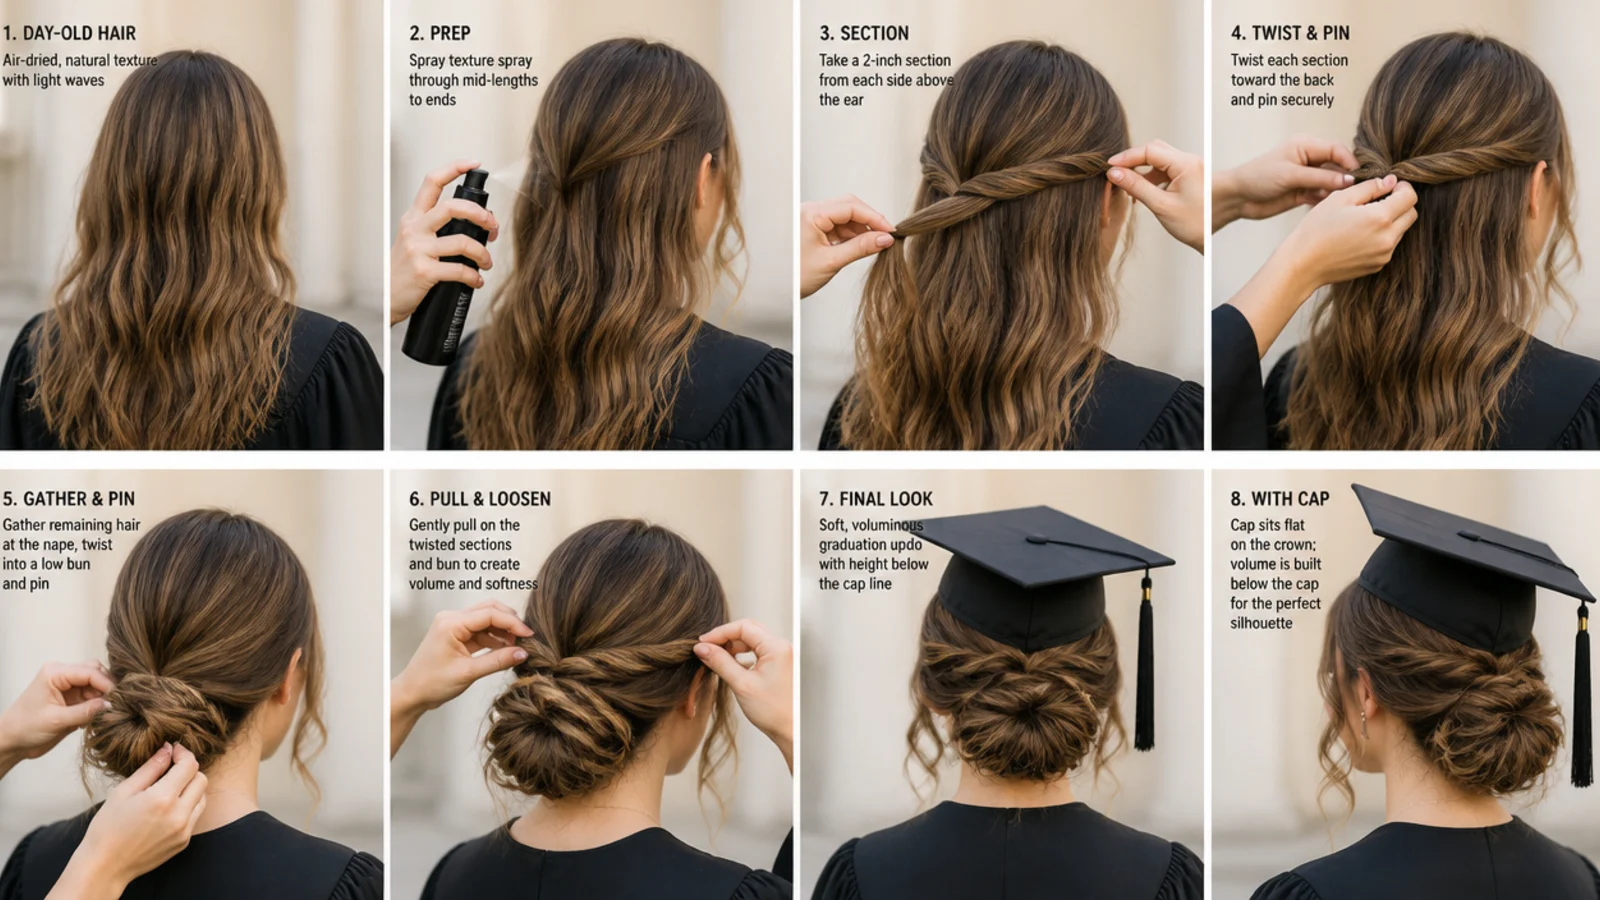
Wash and dry your hair the day before the ceremony, not the morning of. Freshly washed hair is too slippery to hold a coil and the pins slide straight out under a cap. Keep conditioner on the mid-lengths and ends only so the roots stay grippy. If your hair is very fine or very clean, mist texture spray or a light dry shampoo through the roots and mid-lengths and scrunch it in. Day-old hair with a little residual texture takes half as many pins and holds twice as long. The same prep rule applies to nearly every style on the graduation hairstyles hub.
Common mistake: Washing the morning of, which leaves hair so slick the chignon unravels during the processional.
Pro tip: Sleep on a satin pillowcase so you wake up with texture, not a crushed flat crown.
2. Measure the Cap Line Before You Style Anything
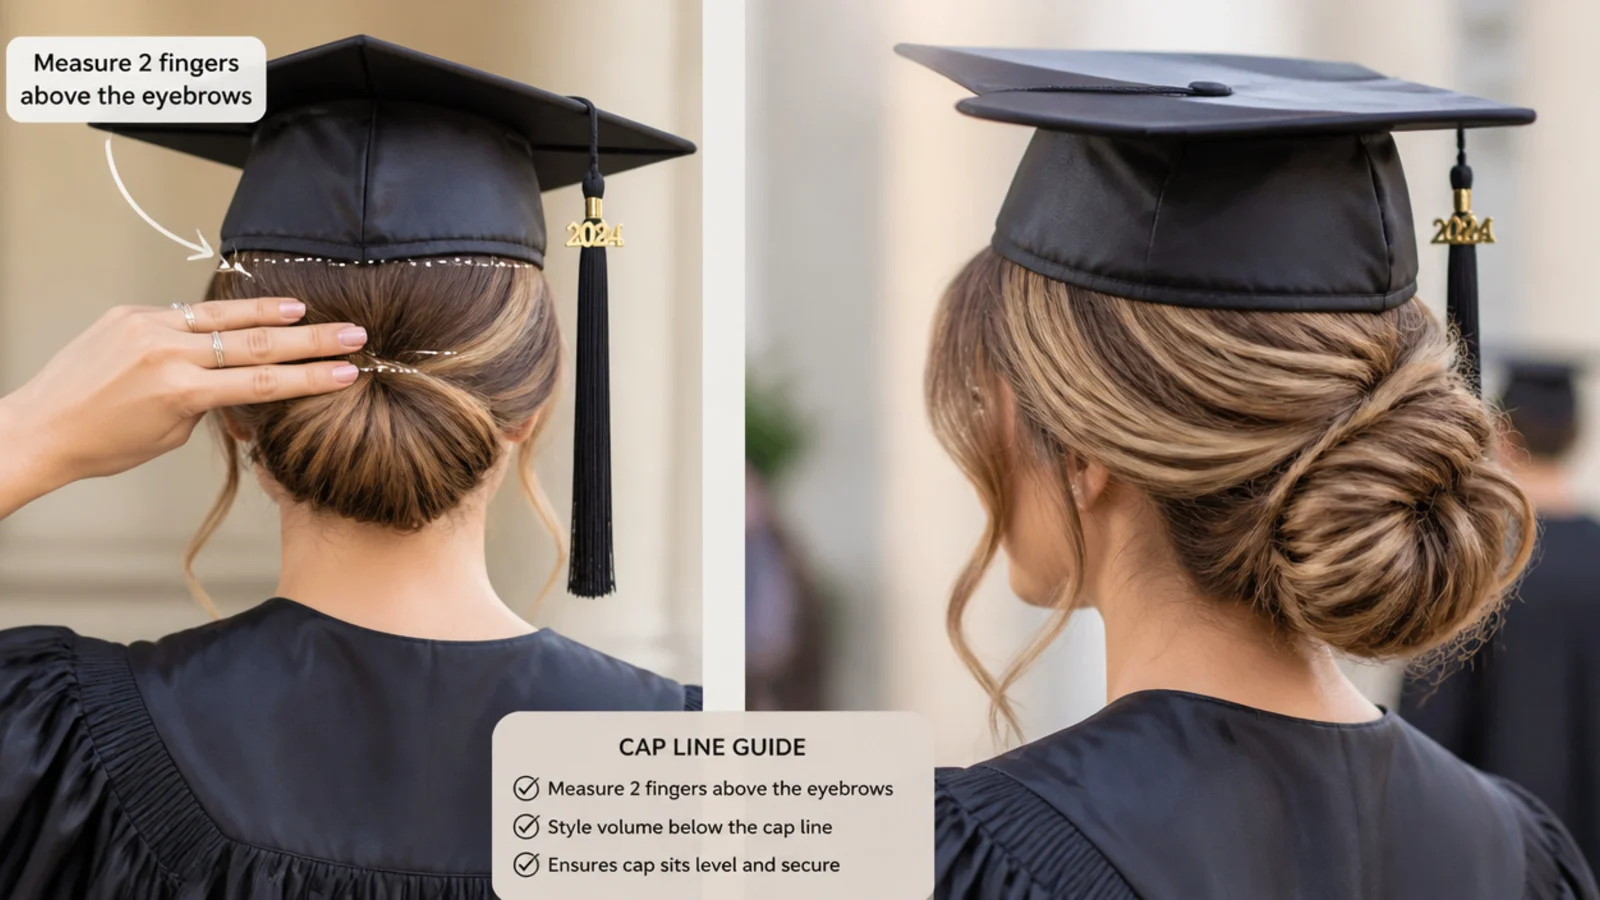
Put the mortarboard on bare hair and look in the mirror. The front edge should land about two fingers above your eyebrows and the flat board should sit level, not tipped back. Trace where the fabric band meets your head with a finger and remember that line, because it is the ceiling for your entire updo. Anything you build above it will fight the cap. Take the cap off and do a full practice run three days early if you can, since that is the only way to find out your bun sits too high while there is still time to change it.
Common mistake: Styling first and testing the cap last, when the bun is already pinned in the wrong place.
Pro tip: Photograph yourself from the side wearing the cap so you can see the true silhouette.
3. Build Volume Below the Cap Line
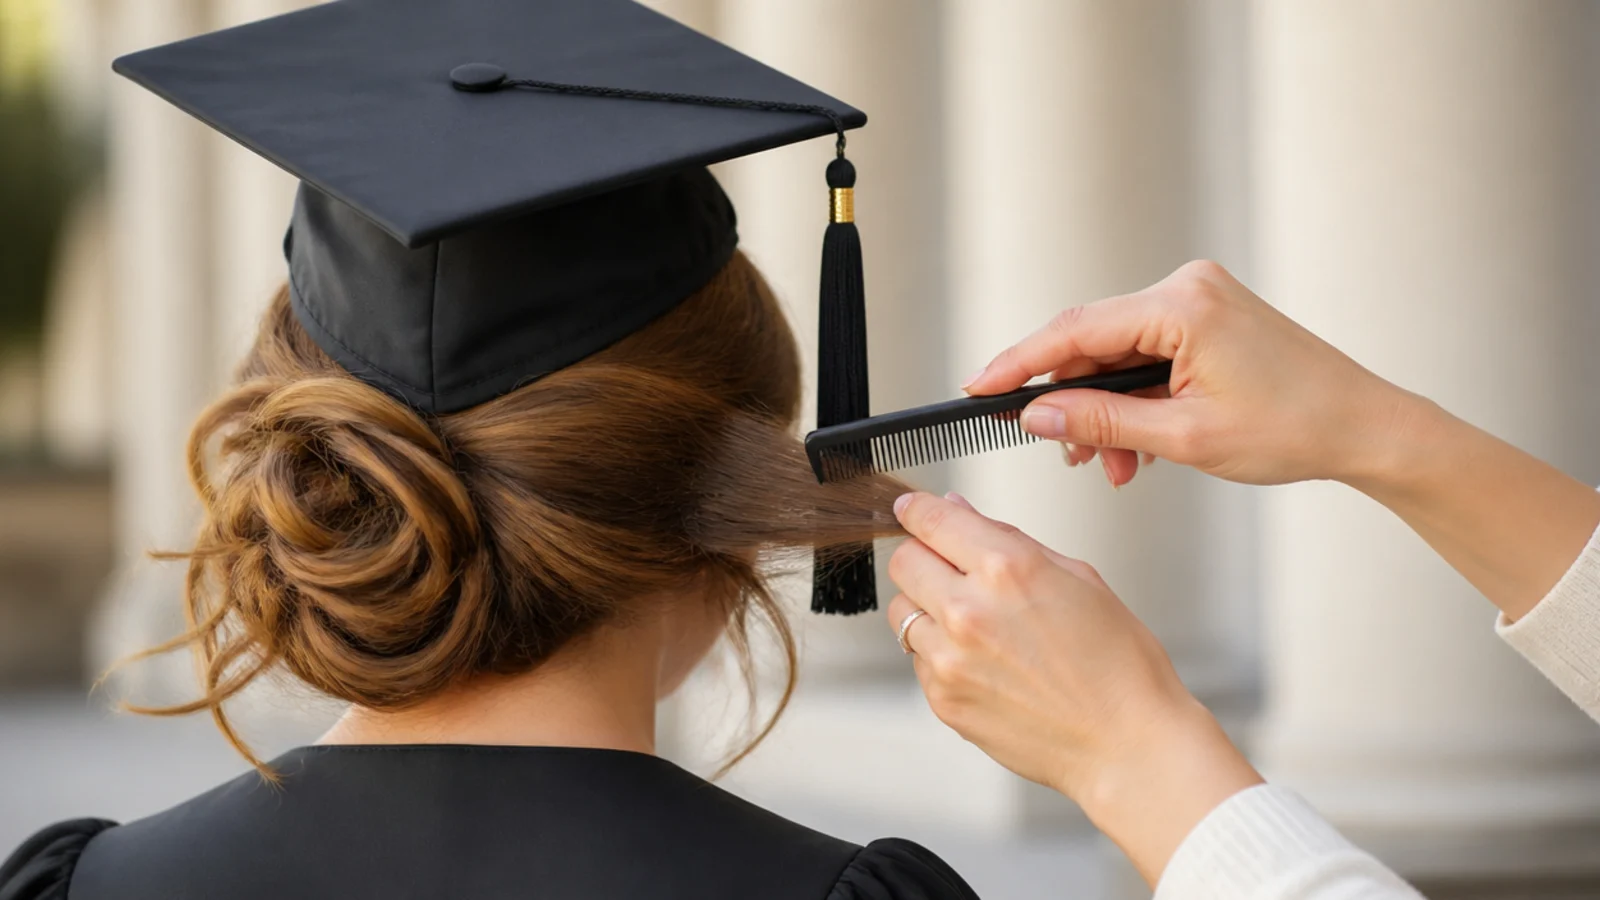
Section off the front third of your hair and clip it forward out of the way. On the back section, take horizontal one-inch slices at the occipital bone, the bump at the back of your skull, and backcomb each slice three short strokes with a tail comb. This is where all your volume goes, because the cap sits above it and cannot crush it. Then release the front section and smooth the top layer over the backcombing with a boar bristle brush, using long light strokes so you polish the surface without dragging the cushion out.
Common mistake: Teasing the crown for height, which is exactly where the cap will flatten it in ten seconds.
Pro tip: Volume at the sides and back photographs far better once the cap is on than crown height ever does.
4. Gather a Low Ponytail at the Nape
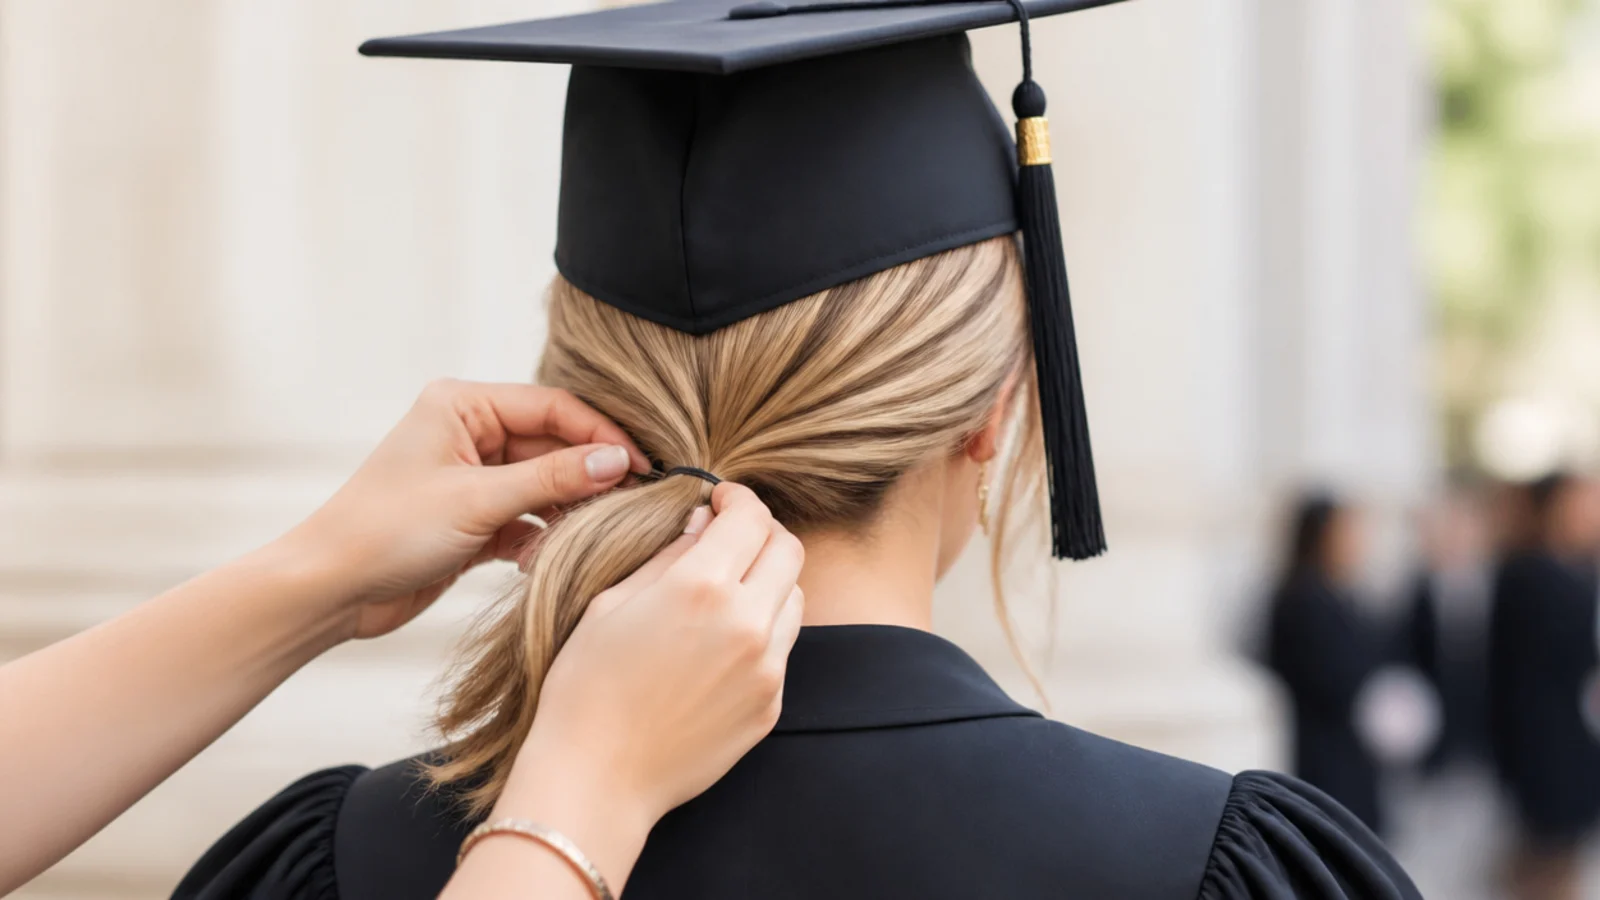
Brush everything back to the nape, keeping the hairline smooth but not tight, and gather it into a low ponytail sitting right at or just below the occipital bone. Secure with a clear elastic wrapped three times. Tilt your chin up while you gather so the ponytail lands low rather than creeping upward, which is the most common cause of a bun that ends up in the cap's way. Leave out a half-inch piece at each temple now, before the elastic goes on, so you are not yanking pieces free later.
Common mistake: Gathering with your head tipped forward, which pulls the base an inch too high.
Pro tip: Slide the elastic down a quarter inch after securing so the base sits soft, not drum-tight.
5. Twist the Ponytail Into a Rope
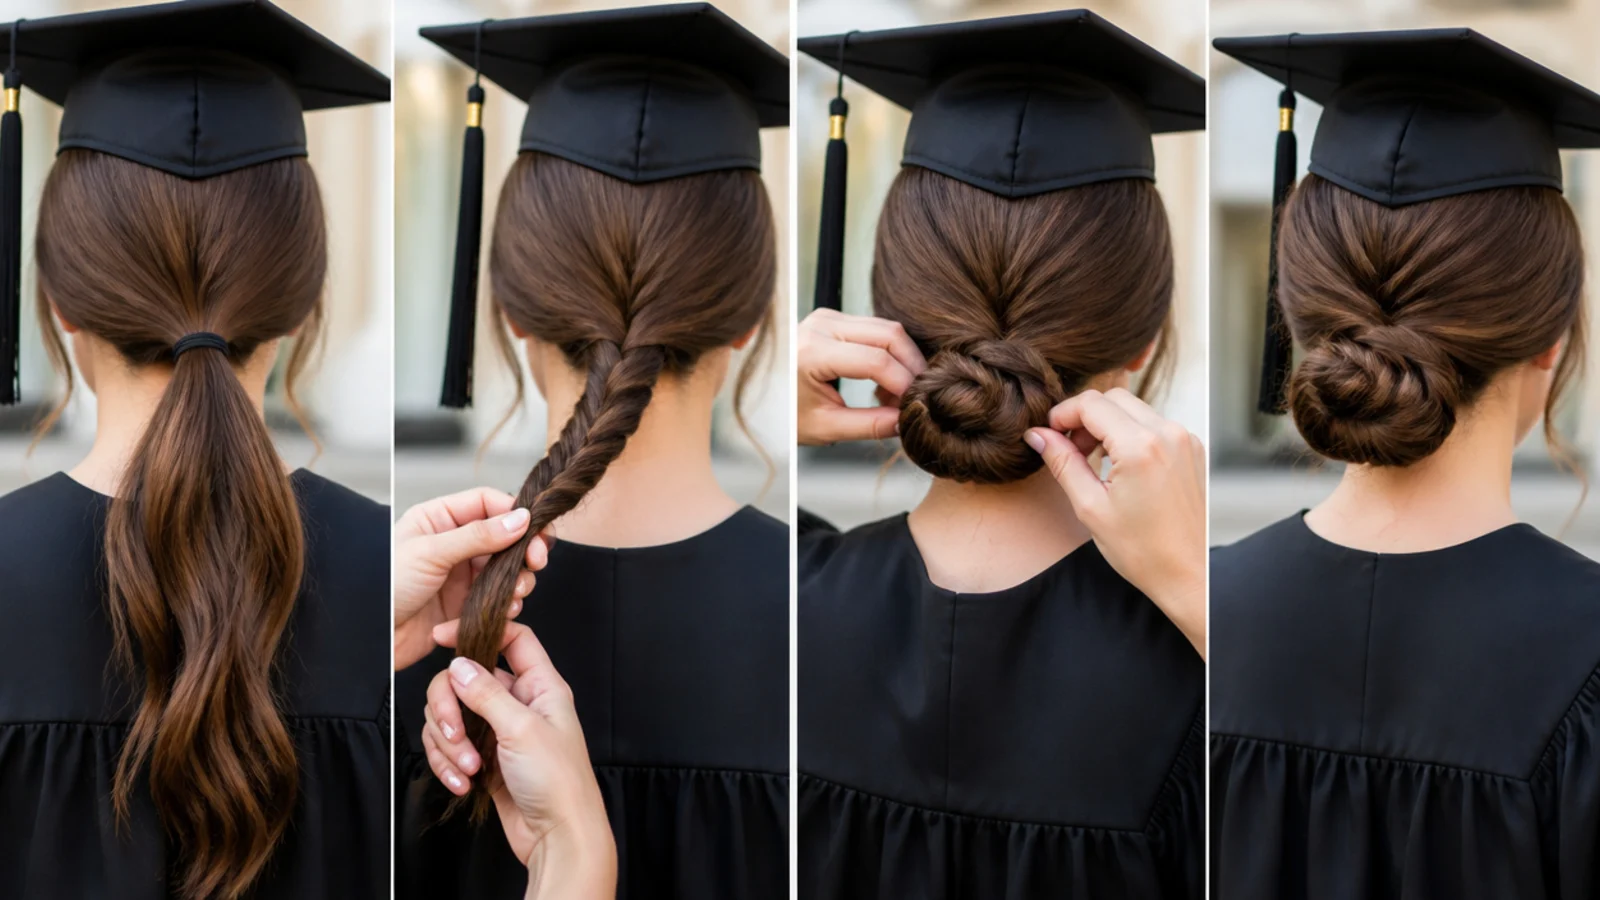
Hold the ponytail out from your head and twist the whole length in one direction until it starts to kink and want to fold on itself. That resistance is what you want, because a twisted rope holds its own shape and needs fewer pins than a loose gathered bun. Do not twist it so tight that it becomes a hard cord; stop at the point where it coils willingly but still looks soft. On thick or waist-length hair, split the ponytail in two and rope the sections around each other instead for a lighter, less top-heavy result.
Common mistake: Over-twisting into a stiff cord, which springs loose and creates lumps under the cap.
Pro tip: Mist the length with flexible-hold hairspray before twisting so the rope stays cohesive.
6. Coil the Rope Into a Low Chignon
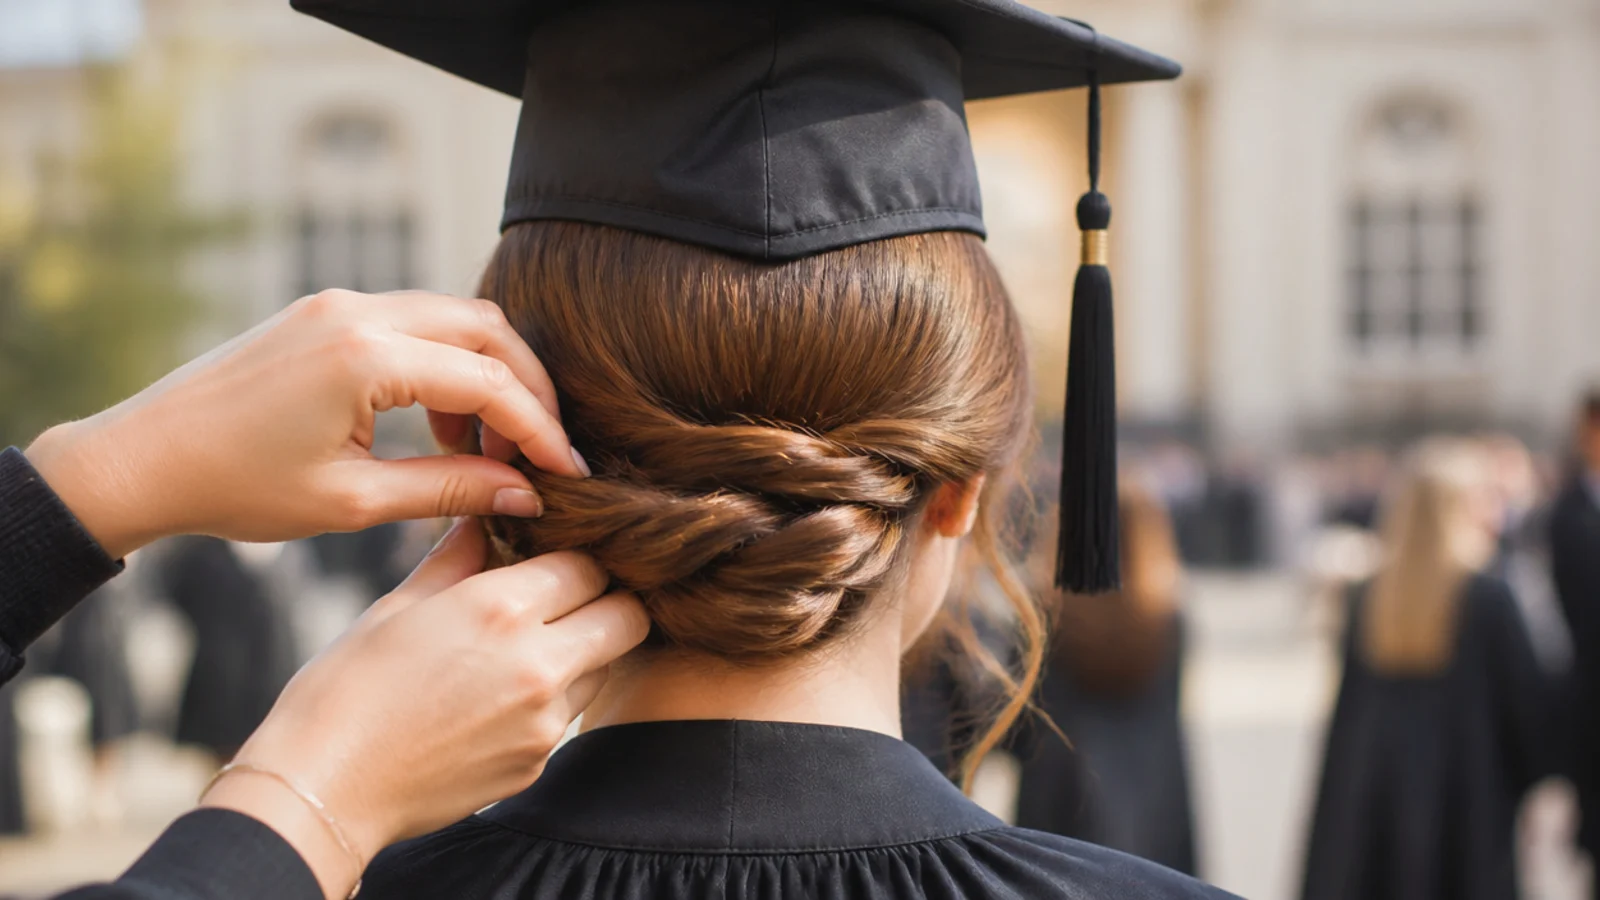
Wrap the rope around the base of the elastic in a flat spiral, keeping every pass low and pressed close to the head rather than stacking outward. You want the finished chignon to sit against the nape like a disc, not to project like a ball, because projection is what makes the cap tip forward. Tuck the ends under the coil with your thumb. Aim for a bun no more than two inches deep front to back. Flat and wide beats round and tall on every measure that matters for a ceremony.
Common mistake: Building the coil outward into a ball, which shifts the cap's balance and slides it forward.
Pro tip: Spread the coil slightly wider than it wants to be so it reads full on camera without gaining depth.
7. Anchor With Six U-Pins and Ten Bobby Pins
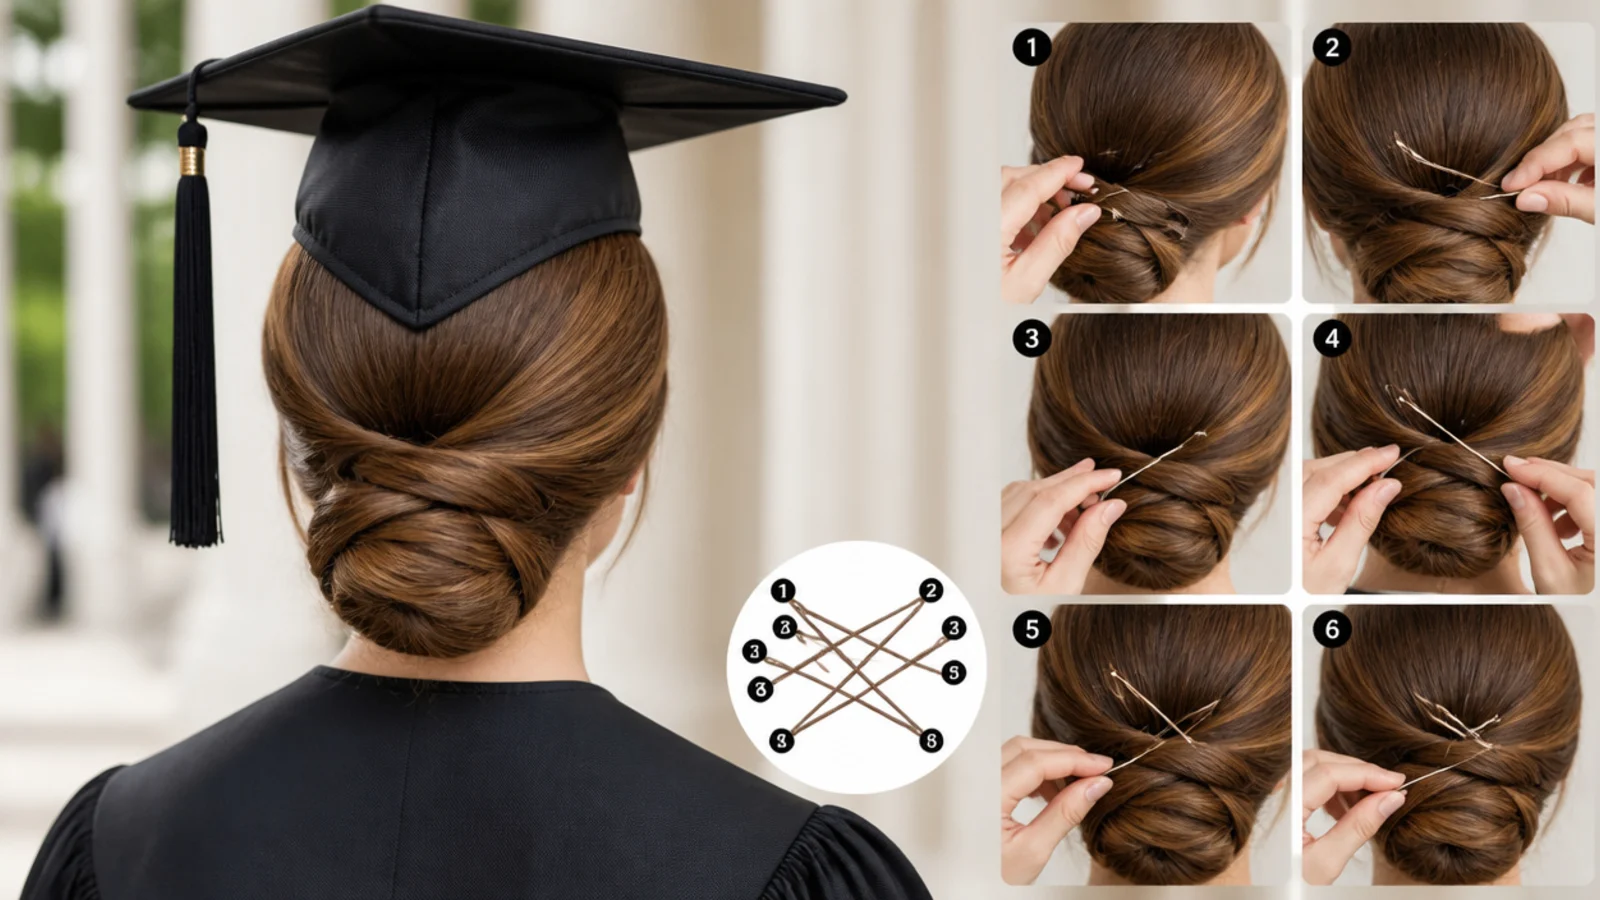
Push six U-pins into the outer edge of the coil, angling each one in toward the scalp and then rotating it so the pin catches the base and travels back out. Space them evenly around the perimeter like the numbers on a clock face. Then take ten bobby pins, wavy side down against the head, and cross them in pairs to form Xs at the five points that carry most of the tension: both sides, both under-edges and the top. Crossed pins hold roughly twice as long as parallel ones, which is the whole reason the same X trick is used to pin the cap itself.
Common mistake: Using bobby pins alone, which grip the surface but never catch the base of the coil.
Pro tip: Match pin color to your hair, and buy a fresh pack, since old pins lose their spring.
8. Set With Flexible Hold, Then Fit and Pin the Cap
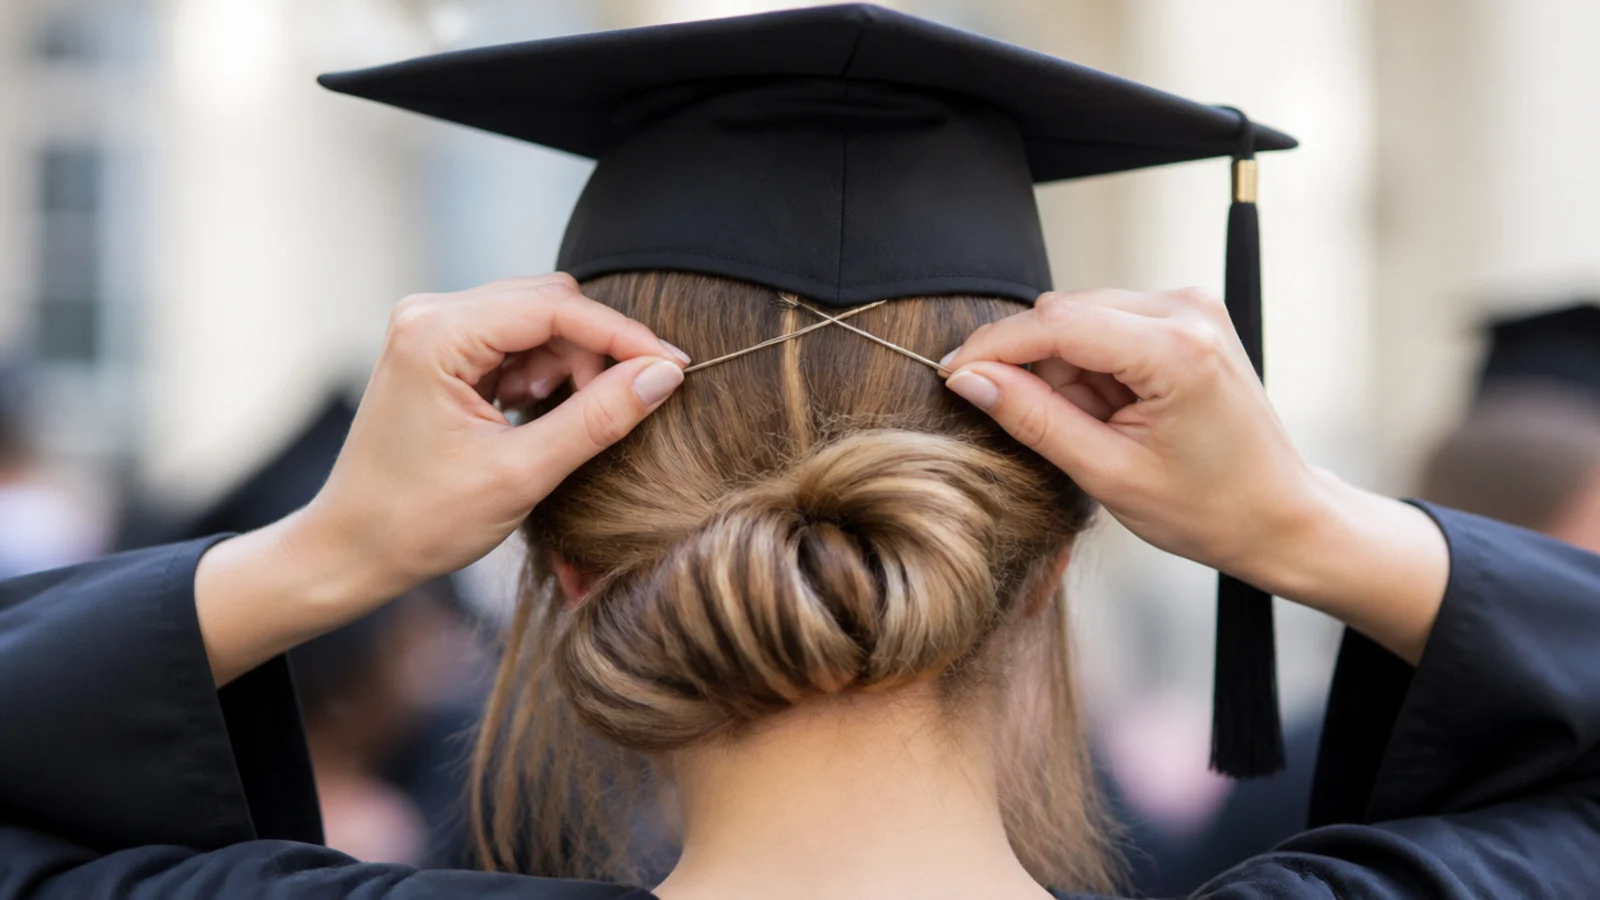
Mist flexible-hold hairspray from about ten inches away, one pass over the crown and one around the perimeter. Skip stiff freeze-hold sprays entirely, because they lock the crown into a shell that keeps the cap dent after you take the cap off. Now set the cap on so the front edge lands two fingers above your eyebrows, and slide two bobby pins through the inner fabric band and into your hair on each side, crossing each pair into an X above the ear. Four pins total makes the cap wind-proof without pulling. More on this in graduation hairstyles with a cap.
Common mistake: Pressing the cap down hard to make it feel secure, which is what creates the dent.
Pro tip: Pin the cap where the band already touches hair, never through the flat board itself.
Where the Graduation Cap Sits and Why Your Updo Must Stay Below It
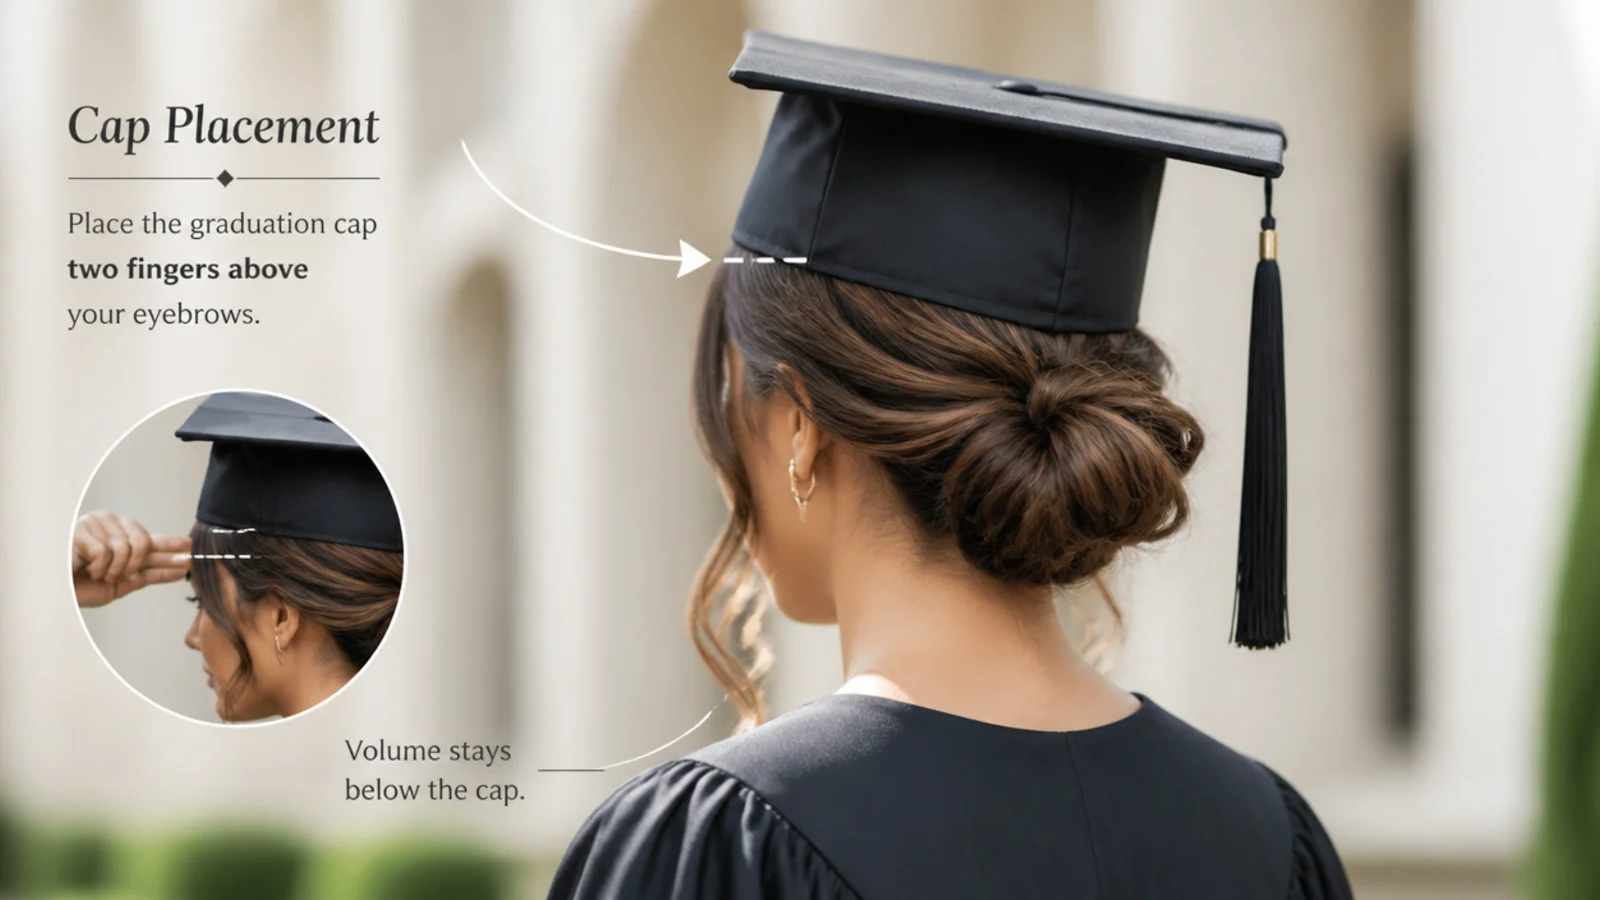
A mortarboard is not a hat that perches. The flat board sits level on the crown and the fabric band descends deep around the head, with the front edge landing about two fingers above your eyebrows. That line is the ceiling for your entire style. Anything you build above it, whether that is a topknot, a teased crown or a bun placed at the back of the head but too high, gets pushed by the board until either the cap tips forward over your face or the bun slides sideways. Below that line, on the other hand, you have complete freedom, which is why low buns, chignons, half-ups and side-swept waves are the styles that actually work. Build your volume at the sides and the back, roughly at and below the occipital bone, and it survives the whole ceremony untouched. It also photographs better, because with the cap on the camera only ever sees your silhouette from the ears down. Every style on the graduation hairstyles hub obeys this one rule.
How to Do a Graduation Updo on Short, Medium and Long Hair
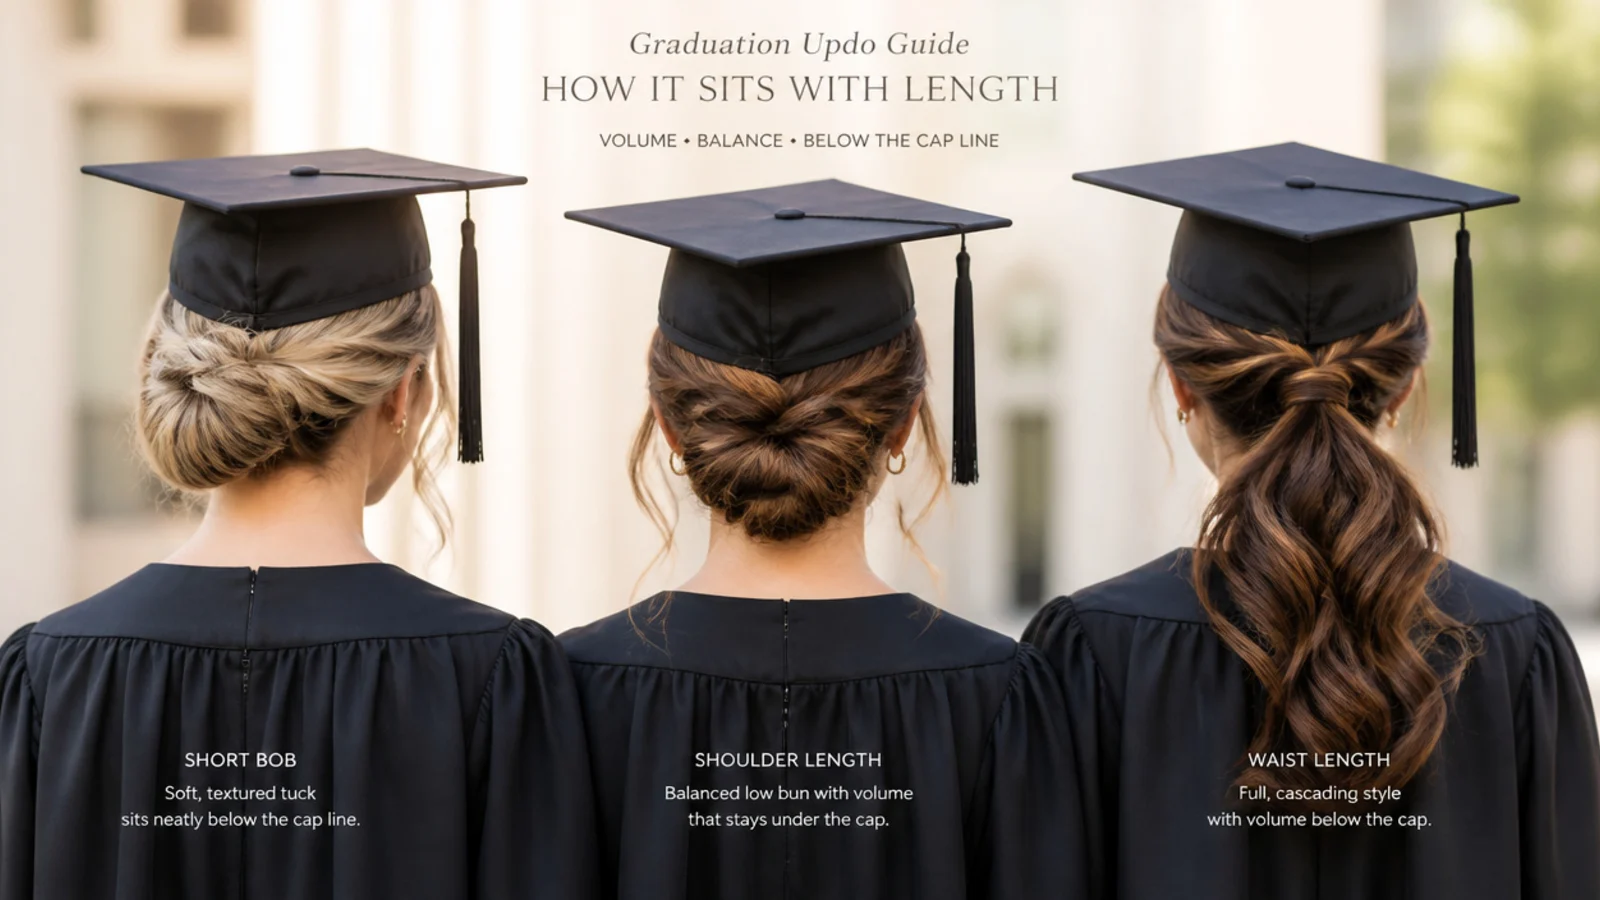
The 20 steps above assume shoulder length or longer, but the method adapts. On a chin-length bob or a pixie there is not enough length to coil, so you build a faux updo instead: pin the back sections up in overlapping horizontal rows with crossed bobby pins, and leave the last inch loose so the ends stack rather than jab. That is covered in detail in graduation hairstyles for short hair. Shoulder to bra-strap length is the sweet spot: one rope twist coils into a full chignon and needs about 25 minutes. Past bra-strap length, weight becomes the issue, since a heavy bun at the nape drags the cap backward off the crown. Split the ponytail into two ropes, wrap them around each other, and add two extra U-pins at the underside. See graduation hairstyles for long hair for the full weight-management approach. Curly and coily textures should skip the texture spray, use a moisture-based cream instead, and coil looser to preserve definition, as explained in graduation hairstyles for curly hair.
Updo vs Hair Down for Graduation Photos: Which Photographs Better
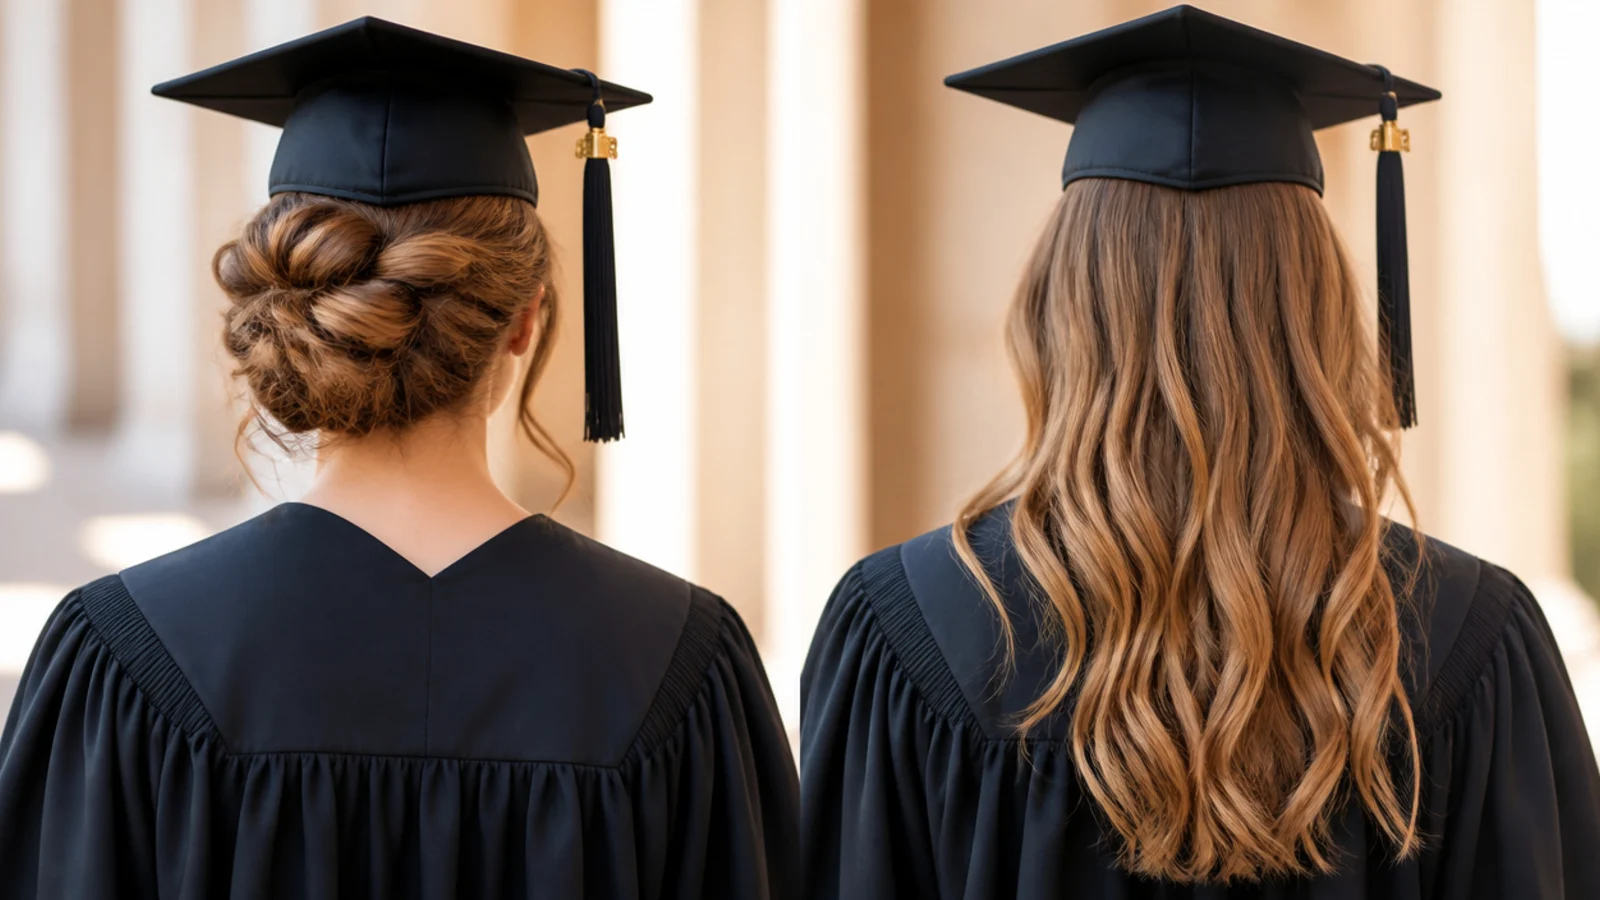
Structured styles photograph more reliably than loose ones at a graduation, and the reason is the venue rather than the hair. Ceremonies happen in gyms and auditoriums with overhead lighting or outdoors in full midday sun, and both flatten loose hair into a shapeless mass that disappears against a dark gown. An updo keeps a defined outline in every frame, from the processional shot taken from the side to the handshake photo taken from below. Down hair also has a specific cap problem: the band creases it in a hard line across the back, and that crease shows in every photo taken after the cap comes off. If you want length visible, a half-up is the honest compromise, since the top section stays controlled under the cap while the length still reads. The one case where down wins outright is long hair with genuine texture, waves or defined curls that hold their own shape under lighting. Otherwise, up. Compare all the options in 25 stunning graduation hairstyles.
How to Make a Graduation Updo Last Four Hours

Four hours is the realistic span from getting dressed to the last family photo, and three things decide whether the updo survives it. First, grip: day-old hair plus texture spray holds pins that clean hair spits out. Second, anchoring: U-pins that hook the base of the ponytail are what carry the load, while bobby pins only manage the surface, so the ratio of six U-pins to ten bobbies is not arbitrary. Third, product choice: flexible-hold hairspray in two light passes, applied 60 seconds before the cap goes on, holds without turning the crown into a shell that keeps its dent. Skip gel entirely at outdoor spring ceremonies, since humidity makes slicked styles flake and revert. The failure mode to watch for is the coil creeping down the nape, which starts around hour two on fine hair. If you feel it move, push two spare U-pins up into the underside of the coil rather than adding more surface pins. More timing-friendly options live in easy graduation hairstyles.
Cap-On to Cap-Off: Fixing the Dent Before Photos
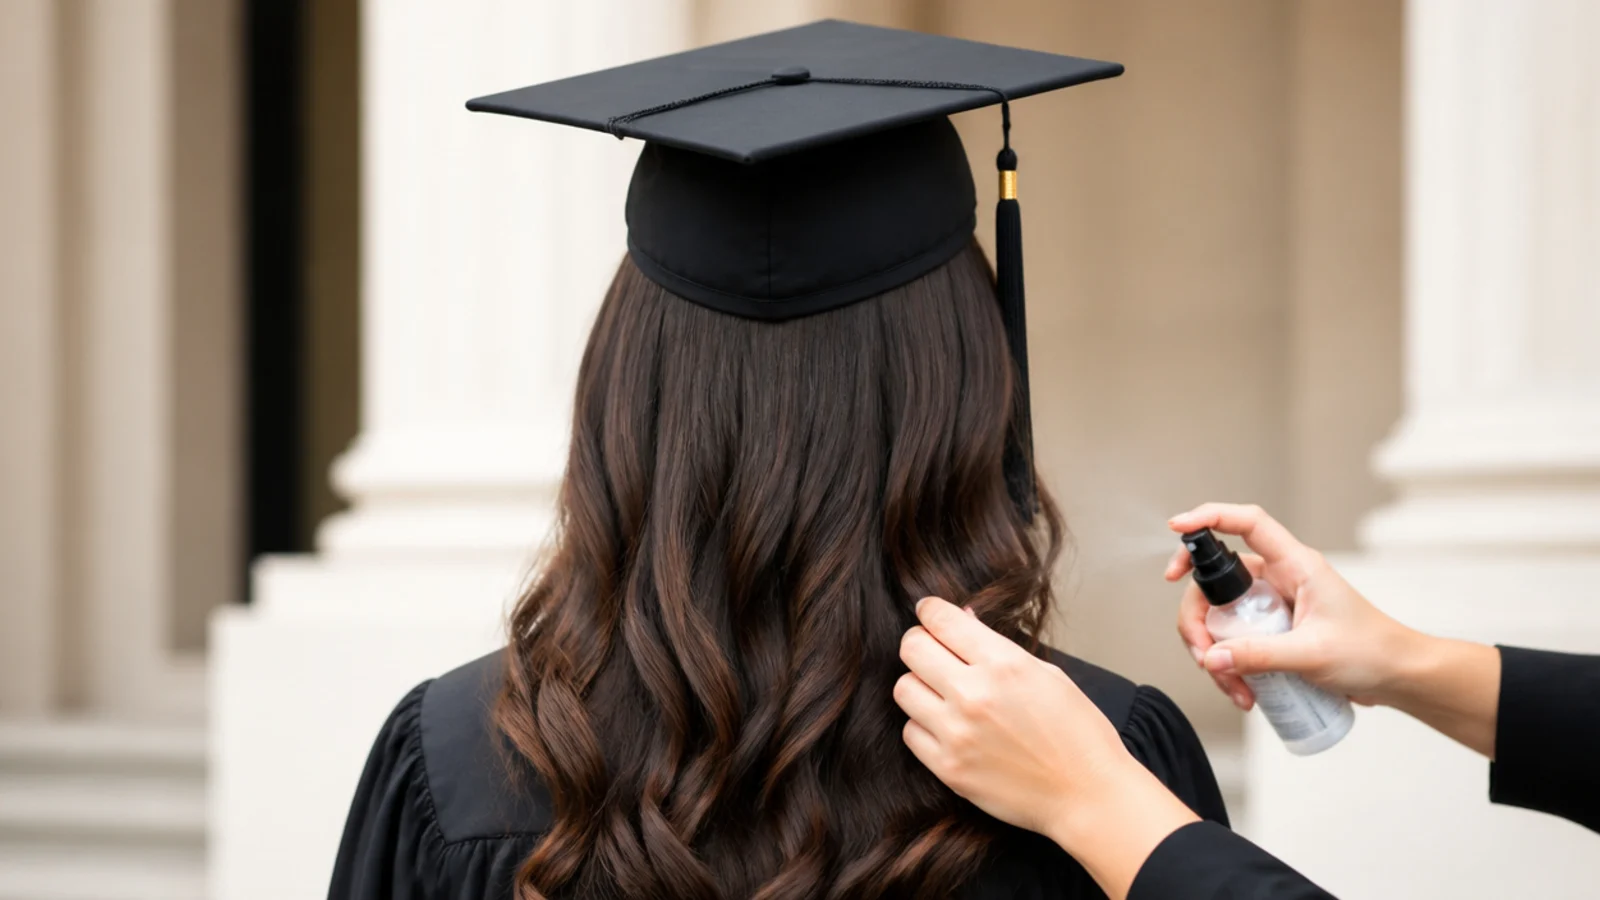
Nearly every graduate takes the cap off within minutes of the recessional, and most of the photographs that end up framed are taken in the half hour after that. So the cap-off look deserves as much planning as the cap-on one. The dent forms along the band line, roughly two fingers above the eyebrows and continuing around behind the ears, and it is worst when the hair was set with a stiff spray or when the cap was pressed down hard to feel secure. The fix takes 30 seconds: mist plain water on the dent line from a mini spray bottle, tip your head forward, shake, then finger-comb the crown up and back and let body heat do the rest. Follow with one light pass of flexible spray. Curly hair should use a pick at the roots instead of fingers, lifting rather than combing to avoid frizz. Because the volume in this method lives below the cap line, there is genuinely little to repair. The cap styling guide covers dent prevention in more depth.
Timing the Morning Of: When to Start Your Graduation Updo
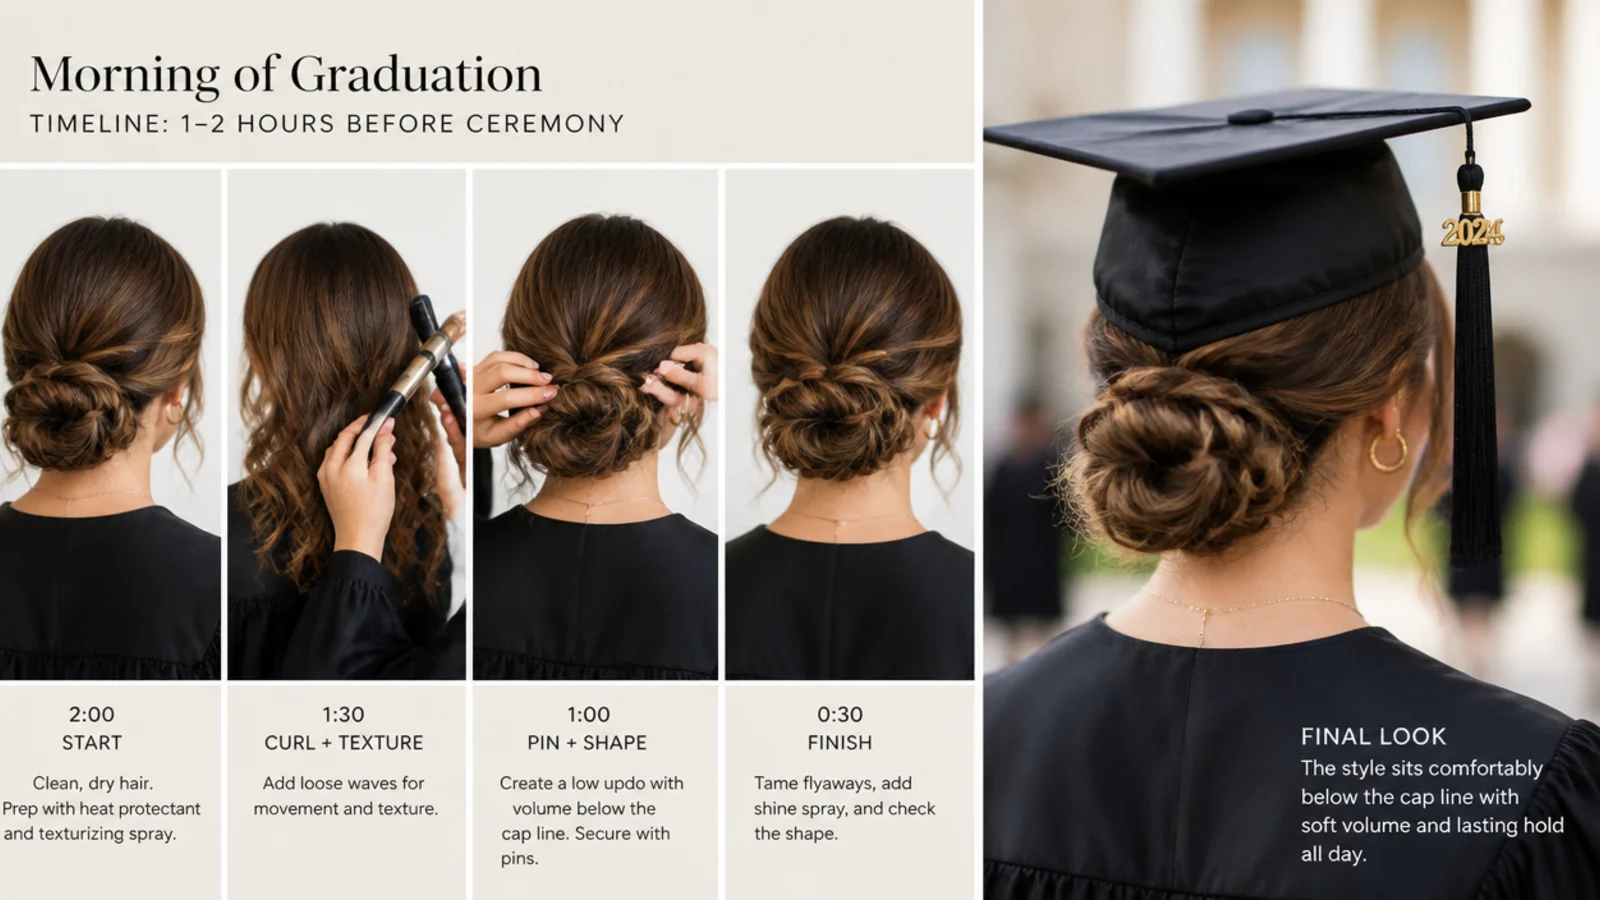
Style one to two hours before you need to leave, not the night before. A chignon slept on collapses on one side and the coil flattens where your head rested, and re-pinning a slept-in updo takes longer than doing it fresh. The one exception is braided prep: braiding damp hair overnight for heatless waves works well, because you take the braids out in the morning and style from there. Build the timeline backward from the call time on your ceremony instructions. If the gown line-up is at 9:00 am and the drive is 30 minutes, start the updo at 7:00 am, which gives 35 minutes to style, 10 minutes to fit and pin the cap, 15 minutes of slack for a pin that will not sit, and time to get dressed without rushing. Do not style before you put the gown on: pulling a zipper or a hood over a finished chignon is how it comes loose. Gown first, cap last. If that timeline feels tight, pick something faster from easy graduation hairstyles.
Frequently Asked Questions
How do you do an easy graduation updo step by step?
Start on day-old hair, measure where the cap sits about two fingers above your eyebrows, backcomb at the occipital bone for volume below that line, gather a low ponytail at the nape, twist it into a rope, coil it flat against the head, then anchor with six U-pins and ten bobby pins crossed in Xs. Set with flexible-hold hairspray and pin the cap on last.
How long does a graduation updo take to do yourself?
About 25 to 35 minutes for the updo on shoulder-length or longer hair, plus 5 minutes to fit and pin the cap. Add 10 minutes if it is your first attempt, and another 10 if you are washing that morning. Doing one full practice run three days before typically cuts the real-day time by a third, because you already know where the base sits.
What kind of updo works under a graduation cap?
Anything that sits at or below the occipital bone: a low chignon, a low twisted bun, a braided updo pinned flat, or a French twist that ends below the cap line. High topknots and teased crowns do not work, because the mortarboard sits directly on the crown and will push them out of place or refuse to seat level.
How do you wear a graduation cap with an updo?
Set the cap so the front edge lands two fingers above your eyebrows and the board sits level rather than tipped back. Then slide two bobby pins through the inner fabric band into your hair above each ear, crossing each pair into an X. Four pins total is enough for an outdoor ceremony. Pin only where the band touches hair, never through the stiff board.
Should I wear my hair up or down for graduation?
Up photographs more reliably. Structured styles keep a defined outline under gym lighting and midday sun, while down hair flattens against a dark gown and picks up a hard crease from the cap band. The exception is long hair with real texture or defined curls, which holds its own shape. A half-up is the honest middle ground if you want length visible.
How do you keep a graduation updo from falling out?
Grip, anchoring and the right spray. Style on day-old hair with texture spray so pins bite, use six U-pins that hook the base of the ponytail rather than relying on bobby pins alone, and cross bobby pins in Xs at the tension points. Two light passes of flexible-hold hairspray applied 60 seconds before the cap goes on finishes it.
How do you fix graduation cap hair dent?
Mist plain water along the dent line, tip your head forward and shake, then finger-comb the crown up and back and let body heat set it. Follow with one light pass of flexible-hold hairspray. Curly hair should lift at the roots with a pick rather than combing. Using flexible rather than freeze-hold spray in the first place is what makes the dent easy to reverse.
Can you do a graduation updo on short hair?
Yes, but you build a faux updo instead of coiling. Pin the back sections up in overlapping horizontal rows with crossed bobby pins, leaving the last inch of each section loose so the ends stack softly rather than poking out. It works from about chin length. On a pixie, focus on side volume and texture instead, since there is nothing to pin up.
When should I do my hair on graduation morning?
One to two hours before you leave. A chignon slept on collapses on one side and takes longer to repair than to redo. Build the timeline backward from your gown call time and leave 15 minutes of slack. Put the gown on before you finish the hair, because pulling fabric over a finished coil is a common way to lose pins.
Which graduation hairstyles look are you saving?
The one thing that decides whether this works is the cap line. Measure it with two fingers above your eyebrows before you touch a comb, keep every coil, twist and pin below it, and let the volume live at your temples and the back of your head where the cap cannot flatten it. Six U-pins into the coil, ten bobby pins around the perimeter and two crossed under the cap band is the full hardware list. Style one to two hours before you leave, pack a mini hairspray and six spare pins, and spend 30 seconds fluffing the sides after the cap comes off. If your hair is shorter than chin length, start with graduation hairstyles for short hair instead, or browse every option on the graduation hairstyles hub.