
Quick Comparison
| Long Invisible Layers | Short Choppy Layers | |
|---|---|---|
| Where the shortest layer starts | About 4 inches below the chin, inside the hair | At the cheekbone or temple, on the surface |
| Weight removed | Light; the perimeter stays dense | Heavy; the ends are deliberately thinned |
| Best hair density | Fine to thick; the only safe option on fine hair | Thick or coarse only |
| Best hair texture | Straight, 2A to 2C waves | 2B to 3B waves and curls that hold shape |
| Daily styling time | 0 to 5 minutes; air-dries well | 5 to 15 minutes plus texture spray or mousse |
| Trim cadence | Every 10 to 12 weeks | Every 6 to 8 weeks before it goes mushroom-shaped |
| Volume at the crown | Minimal lift; movement lives in the mid-lengths | Strong lift; the crown is the whole point |
| Grow-out behavior | Invisible; blends into long hair with no awkward stage | Obvious; the crown layers sit out for 3 to 4 months |
| Salon wording to use | Long invisible layers, blunt perimeter, nothing above the collarbone | Choppy point-cut layers starting at the cheekbone, piecey ends |
1. Long Invisible Layers on Collarbone-Length Hair

The safest layered mid length cut there is. The perimeter stays one length at the collarbone, and the layers are cut internally, starting around 4 inches below the chin, so they never break the outline. From the front the hair reads blunt and thick; in motion it swings and separates. Stylists also call these ghost layers or internal layers. Because nothing short sits on the surface, the cut grows out for four months without an awkward stage. It is the version to ask for if you have been burned by layers before.
Who it suits: First-time layers, medium to thick straight or wavy hair, and anyone who wants movement without visible steps.
Tip: Say long invisible layers, nothing shorter than four inches below my chin, keep the perimeter blunt.
2. Face-Framing Layers Starting at the Jaw

Two shorter pieces cut around the face, beginning at the jawline and angling back into the length. This is the highest-impact, lowest-cost change on this list: it opens the face and highlights the jaw without removing a single inch from the back. Starting at the jaw rather than the cheekbone is the difference between a soft frame and something that reads as grown-out bangs. The pieces should be cut with the head upright and the hair dry, so they fall where you actually part your hair. Expect to refresh them every 6 to 8 weeks.
Who it suits: Every face shape, and anyone who wants a visible change while keeping their length.
Tip: Ask for face-framing starting at the jaw, soft diagonal, cut dry so it falls with my part.
3. Curtain Bangs With Blended Mid Length Layers

Curtain bangs split at the center and sweep out to each side, with the shortest point at the cheekbone or brow and the longest blending into your face-framing layers around the jaw. The blend is what stops the bang from looking like a separate object stuck on the front of the cut. On mid length hair the proportion is close to ideal, because there is enough length behind the fringe to balance it. Full detail on this pairing lives in mid length haircut curtain bangs.
Who it suits: Round and square faces, and anyone easing into a fringe with something reversible.
Tip: Ask for curtain bangs that blend into the face-framing layer, no hard step between the two.
4. The Butterfly Cut on Mid Length Hair

The butterfly cut stacks a short, heavily layered top section that ends around the chin over a long, mostly untouched bottom section. Pinned up, the top layers look like a bob; down, you keep collarbone length. The two sections are connected but the weight difference is dramatic, which is where the volume comes from. It needs real density to work, because the illusion depends on the top layers being thick enough to hide the join. Styled with a round brush, it gives the biggest crown lift of any cut here.
Who it suits: Thick, medium to coarse hair; long faces that want width at the cheekbone.
Tip: Ask for a butterfly cut with the shortest top layer at chin length, connected not disconnected.
5. The Hush Cut on Shoulder-Length Hair

The hush cut is the quiet cousin of the butterfly. Same idea of lighter layers over kept length, but the layers are softer, fewer, and sit lower, so nothing separates into two visible tiers. Korean salons popularized it as a low-effort cut that air-dries well, and that is genuinely its selling point: it needs no round brush. It usually comes with a see-through curtain fringe. Because the layering is gentler, it also survives on fine to medium hair, where a true butterfly cut goes sparse at the ends. Overnight heatless curls sit beautifully on it.
Who it suits: Fine to medium hair, air-dryers, and anyone who wants butterfly-cut softness without the volume commitment.
Tip: Ask for a hush cut with soft connected layers, nothing above the jaw, and a see-through fringe.
6. Wolf Cut Layers on Mid Length Hair
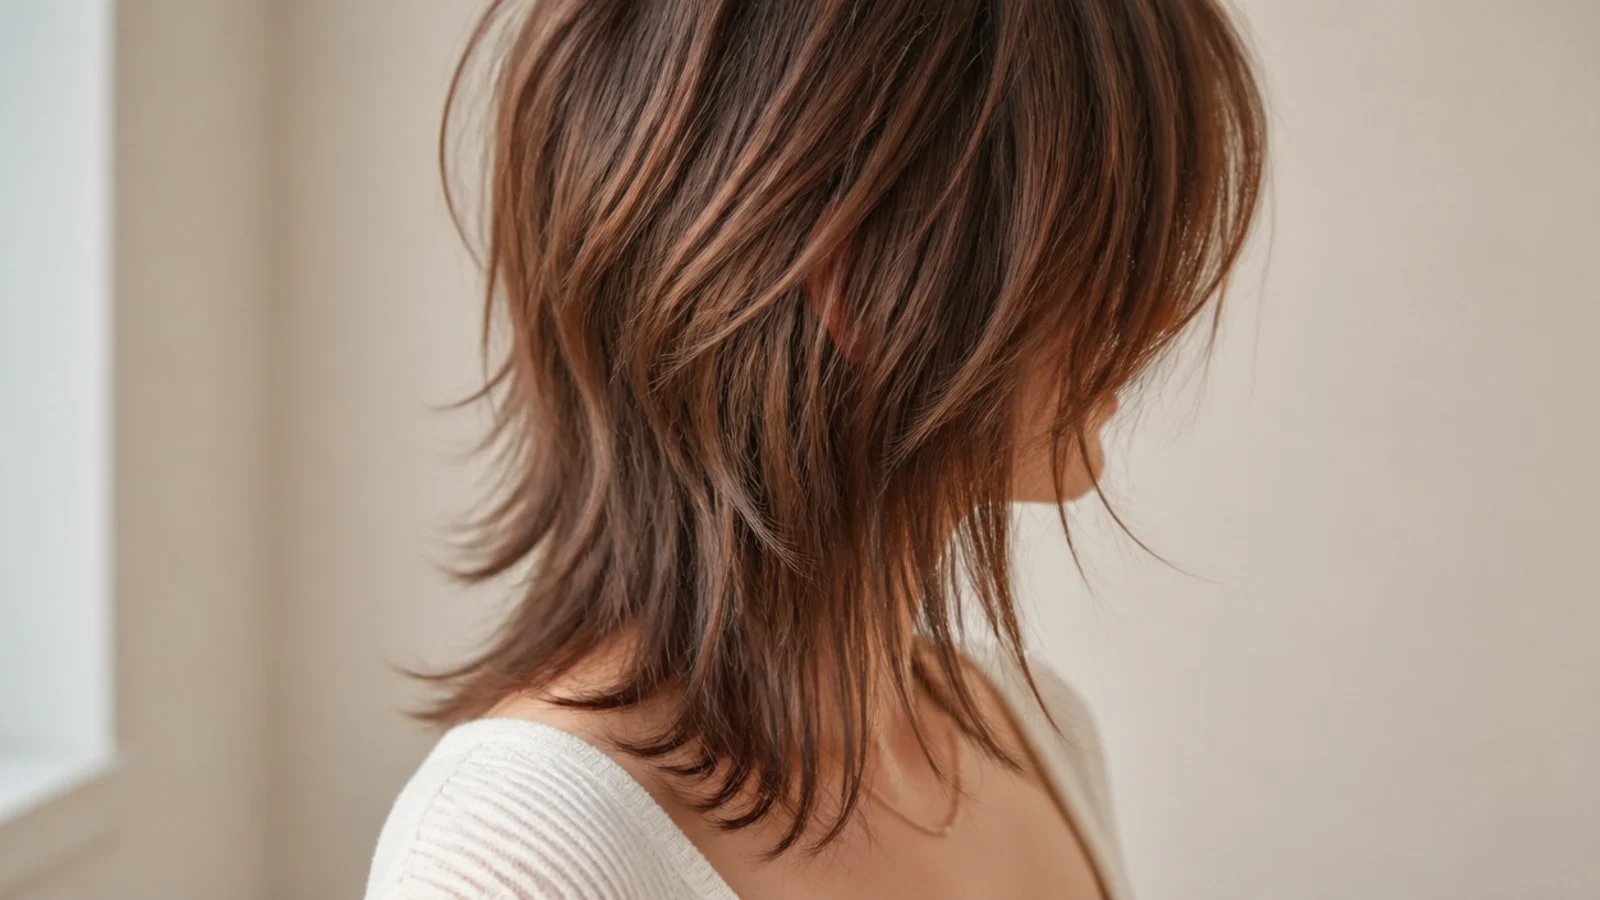
A wolf cut piles short, choppy layers into the crown and leaves the ends thin and shaggy, so the silhouette is wide on top and narrow at the bottom. It is the most aggressive cut on this list and the hardest to undo, since the crown layers can be six inches shorter than the perimeter. On mid length hair it reads as a modern mullet-shag hybrid. It is genuinely fun on thick wavy hair and genuinely risky on fine hair, where the thinned ends turn stringy within a month.
Who it suits: Thick, wavy or curly hair; people who use texture spray daily and re-cut often.
Tip: Ask for a wolf cut with the shortest crown layer no higher than my cheekbone on the first try.
7. Modern Shag Layers at Collarbone Length
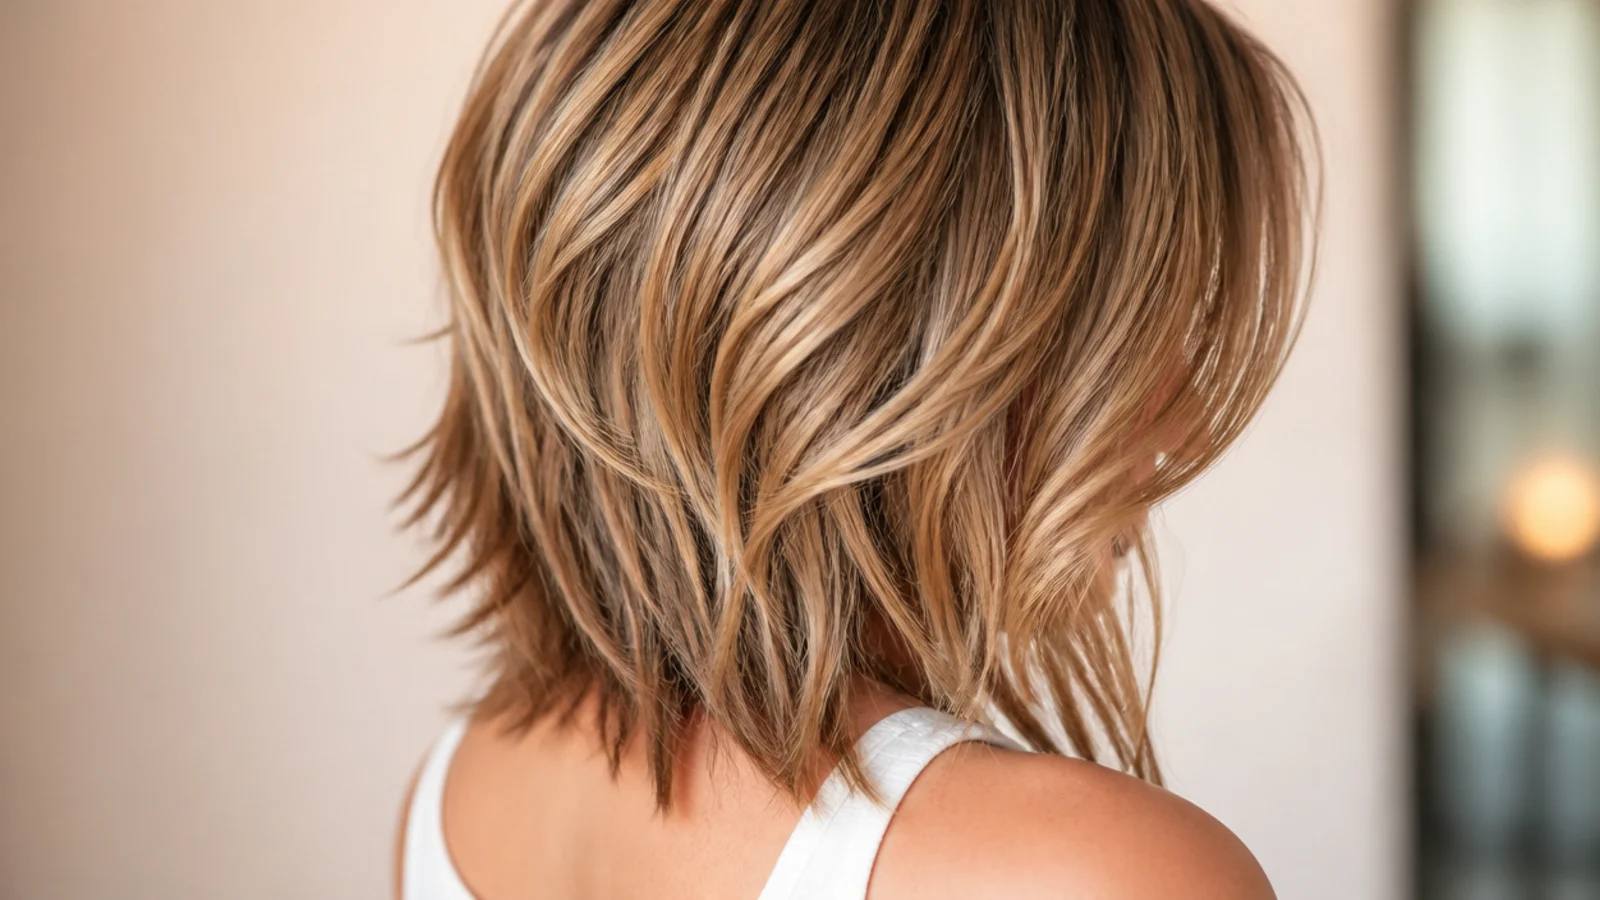
The modern shag keeps the 70s architecture, stacked layers through the crown and a fringe, but softens the disconnection so it looks lived-in rather than costume. Layers start around the cheekbone and step down in short increments all the way to the collarbone. It gives the most natural-looking volume of any cut here on wavy hair, because each layer bends into its own wave. The failure mode is real though: at week six a shag can go mushroom-shaped on top if you skip the trim. Styled loose it sits close to the looks in beach hairstyles.
Who it suits: Wavy and thick hair, 2B to 3A textures, and anyone who wants visible layers rather than invisible ones.
Tip: Ask for a soft modern shag, point-cut ends, layers starting at the cheekbone not the temple.
8. 90s Layers on Mid Length Hair
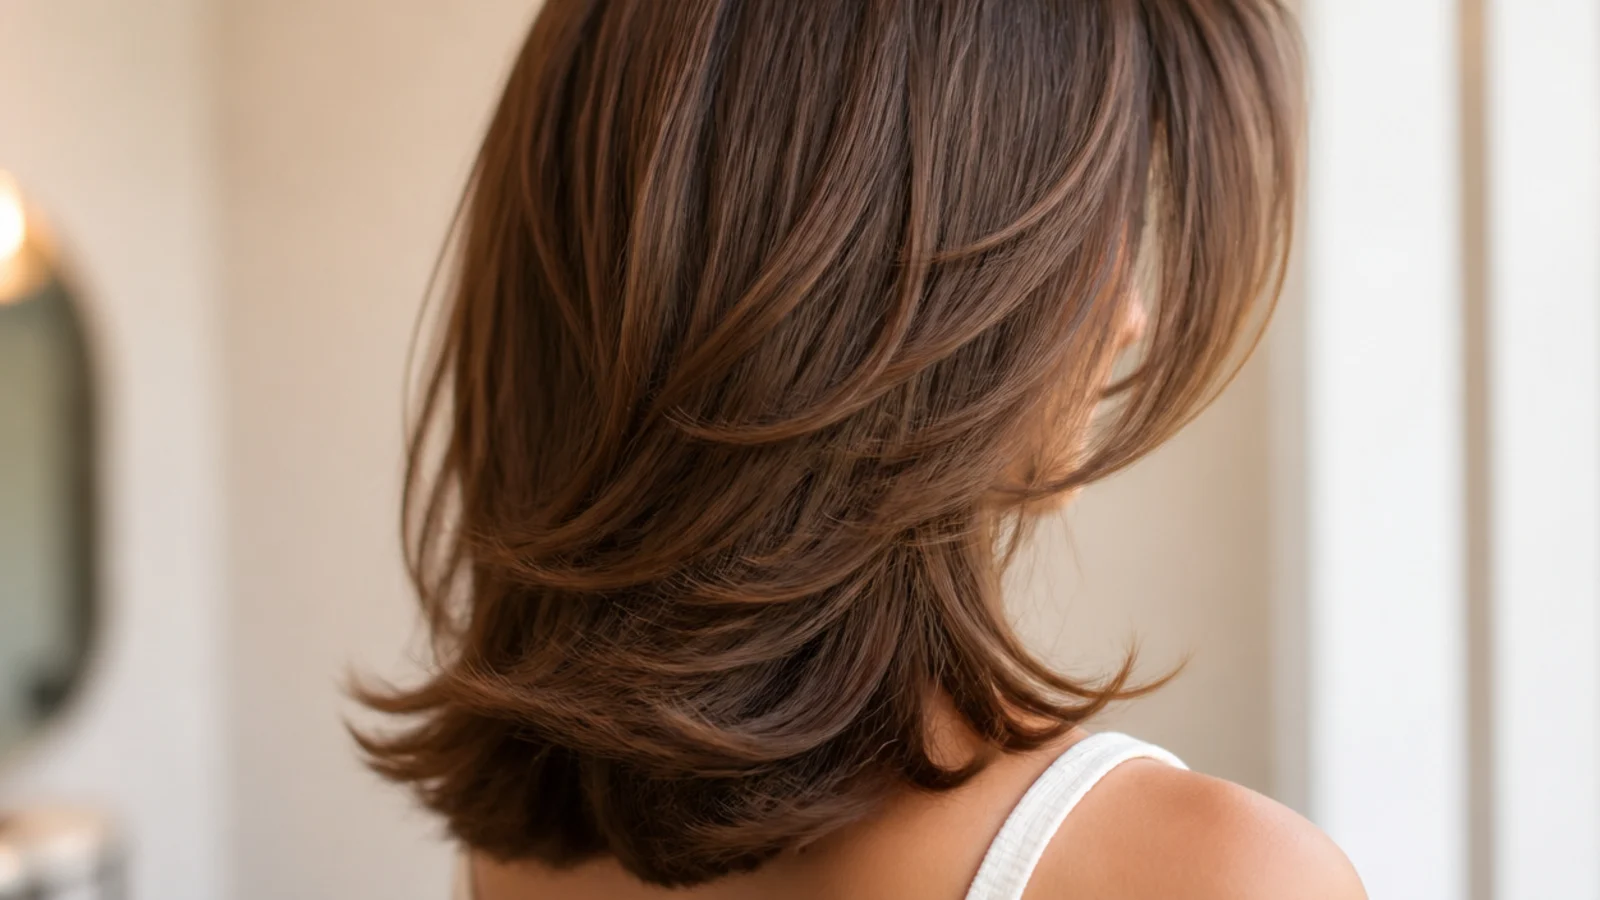
Long, uniform layers cut in wide sections and blow-dried away from the face so they flick back at the cheekbone and jaw. This is the Rachel logic updated: less stacking, more sweep. The layers are cut on a steep diagonal at the front and blend into a nearly one-length back, so the movement is concentrated where people see it. It only looks like this with heat, which is the honest catch. Air-dried, 90s layers just read as long layers. Budget 10 minutes with a round brush, or set them with the technique in old Hollywood waves.
Who it suits: Straight to loosely wavy hair, oval and heart faces, and anyone who already blow-dries.
Tip: Ask for 90s layers, steep diagonal at the front, blended into a blunt back so the length stays.
9. U-Shape Layers on Mid Length Hair

The perimeter is cut into a shallow U, longest in the center back and gradually shorter at the sides, with long layers following that same curve. The U shape reads fuller than a straight blunt line because the corners are softened, and it stops the ends from looking heavy and squared off. It is the classic Indian-salon step-cut logic done softly. On mid length hair keep the U shallow, around a 1.5 inch difference between the center and the sides, or it starts to look like a V.
Who it suits: Medium to thick straight hair, and anyone whose blunt cut feels too severe at the corners.
Tip: Ask for a soft U-shape perimeter, about an inch and a half of curve, with long layers following it.
10. V-Cut Layers on Mid Length Hair

A sharper version of the U: the back comes to a defined point in the center, and the layers taper toward it. The V exaggerates length and slims a broad back and shoulder line, which is why it suits taller frames and thick hair that wants weight removed from the sides rather than the center. The trade-off is density at the tip; on fine hair the point of the V goes wispy fast. Keep the V shallow, no more than 2 inches deeper than the sides, unless your hair is genuinely dense.
Who it suits: Thick or coarse hair, broad shoulders, and anyone wanting the illusion of extra length.
Tip: Ask for a shallow V, two inches maximum, with the layers tapering into it rather than stepping.
11. Razored Choppy Layers for Thick Mid Length Hair

A razor removes weight along the length of the strand rather than cutting straight across it, so thick hair loses bulk without losing its outline. The ends finish piecey and separated instead of blunt. This is the right tool for hair so dense that a blunt collarbone cut turns into a triangle by lunchtime. It is also the wrong tool for fine hair and for most curls, where the razor frays the cuticle and creates frizz. Ask for the razor only through the interior, not on the perimeter.
Who it suits: Very thick, straight to wavy hair that goes triangular when cut blunt.
Tip: Say razor the interior to remove bulk, but keep the perimeter shear-cut so my ends stay strong.
12. Long Layers for Fine Mid Length Hair

On fine hair the rule inverts: fewer layers, and longer ones. Two soft layers through the mid-lengths, nothing above the collarbone at the back, and a strong blunt perimeter that keeps the ends looking dense. Over-layering is the single most common mistake on fine hair, because every layer you add removes strands from the perimeter, and the perimeter is what reads as thickness. If your ends already look see-through, the answer is a trim and fewer layers, not more. Full breakdown in mid length haircut for fine hair.
Who it suits: Fine or thinning hair, and anyone whose last layered cut left the ends sparse.
Tip: Ask for two long layers only, blunt perimeter, and no thinning shears anywhere near my ends.
13. Curl-by-Curl Dry-Cut Layers on Mid Length Curly Hair
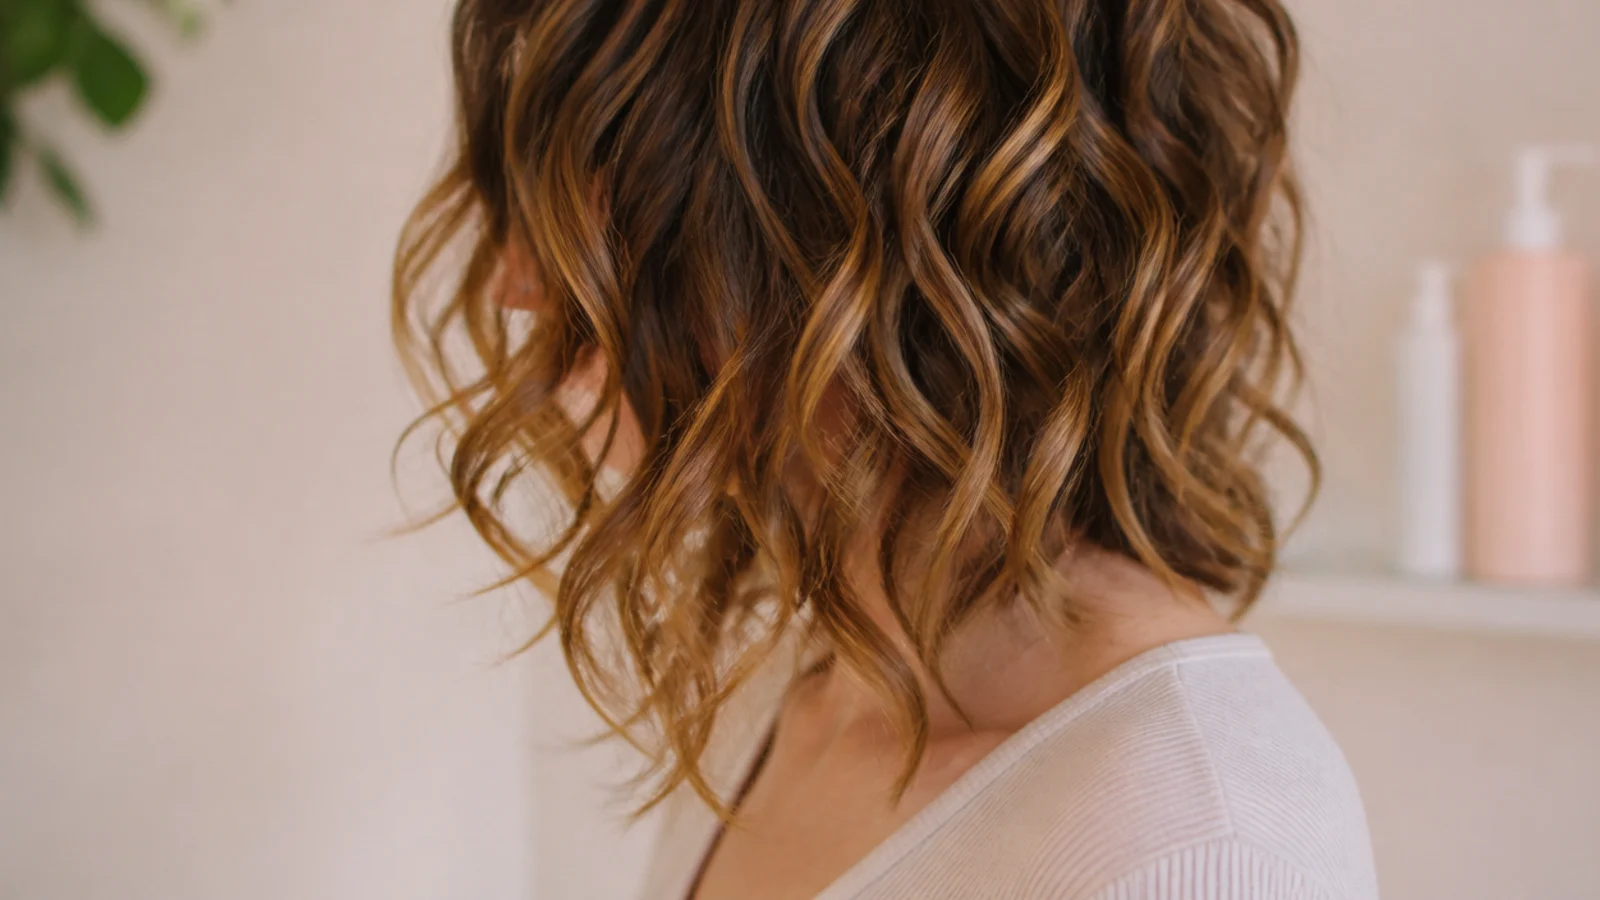
Curly hair should be cut dry, curl by curl, so the stylist can see exactly where each spiral sits once it springs up. Cut wet, a 3B curl can shrink 3 to 5 inches by the time it dries, which is how people leave the salon with a chin-length cut they asked to be collarbone. Layers on curls exist to prevent the triangle, so they are cut higher on the sides than the back. Bring your hair clean, dry and styled the way you normally wear it. More in curly mid length haircut.
Who it suits: 2C to 3C curls, and anyone who has been shocked by shrinkage after a wet cut.
Tip: Say cut it dry, curl by curl, and I want collarbone length after it springs, not before.
14. Beachy Piecey Layers for 2B Wavy Mid Length Hair
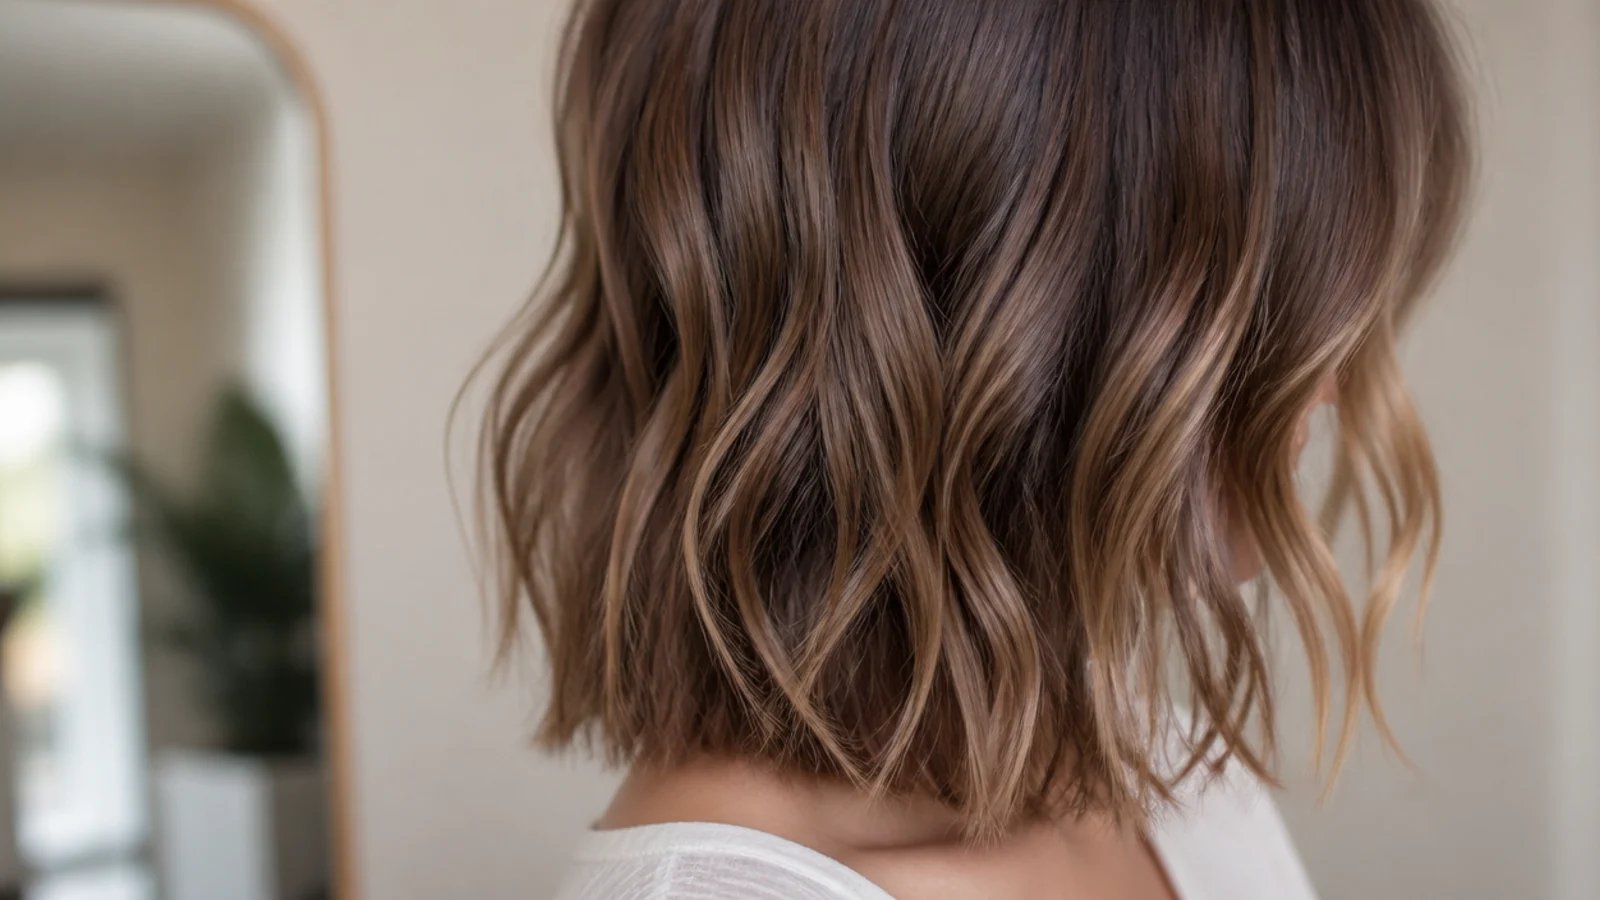
Loose 2B waves need layers that follow the bend rather than cutting across it. Point-cut layers through the mid-lengths let each wave form its own S without weight dragging it flat, and the ends stay slightly piecey so the wave pattern reads as texture rather than frizz. The key number is layer depth: on 2B hair keep the shortest layer at chin length or lower, because shorter than that and the waves stack into a pyramid. Sea salt spray on damp hair, then air dry. See more in wavy mid length haircut.
Who it suits: 2A to 2C waves that go flat at the root and wide at the ends.
Tip: Ask for point-cut layers following my wave pattern, shortest layer at chin, cut on dry hair.
15. Blunt Mid Length Cut With Hidden Interior Layers

A hard blunt line at the collarbone with all the layering buried underneath, cut into the interior so it never surfaces. From every angle the cut looks one length and expensive; underneath, the weight has been removed so the hair still moves. This is the cut most people actually want when they say they want layers but are scared of them. It costs nothing in grow-out because there is no visible step to grow past. It does need a sharp trim every 8 weeks to keep the line crisp, and it holds a style that lasts all day better than a shag does.
Who it suits: Medium to thick straight hair, and anyone chasing a glossy expensive-looking finish.
Tip: Ask for a blunt collarbone line with hidden interior layers only, nothing visible from outside.
16. Feathered Layers on Straight Mid Length Hair

Feathering means the ends are tapered so finely that each layer fades into the next with no visible line. On straight hair this is the difference between layers that look intentional and layers that look like steps, because straight hair shows every hard edge. Feathered layers sit best through the front and the last 3 inches of length. They do soften the perimeter, so they suit medium density rather than genuinely fine hair. Pair with a deep side part for the most lift. See straight mid length haircut for more shapes.
Who it suits: Straight, medium-density hair that shows hard layer lines too clearly.
Tip: Ask for feathered ends, vertical point cutting, no visible steps anywhere in the length.
17. Bottleneck Fringe With Mid Length Layers
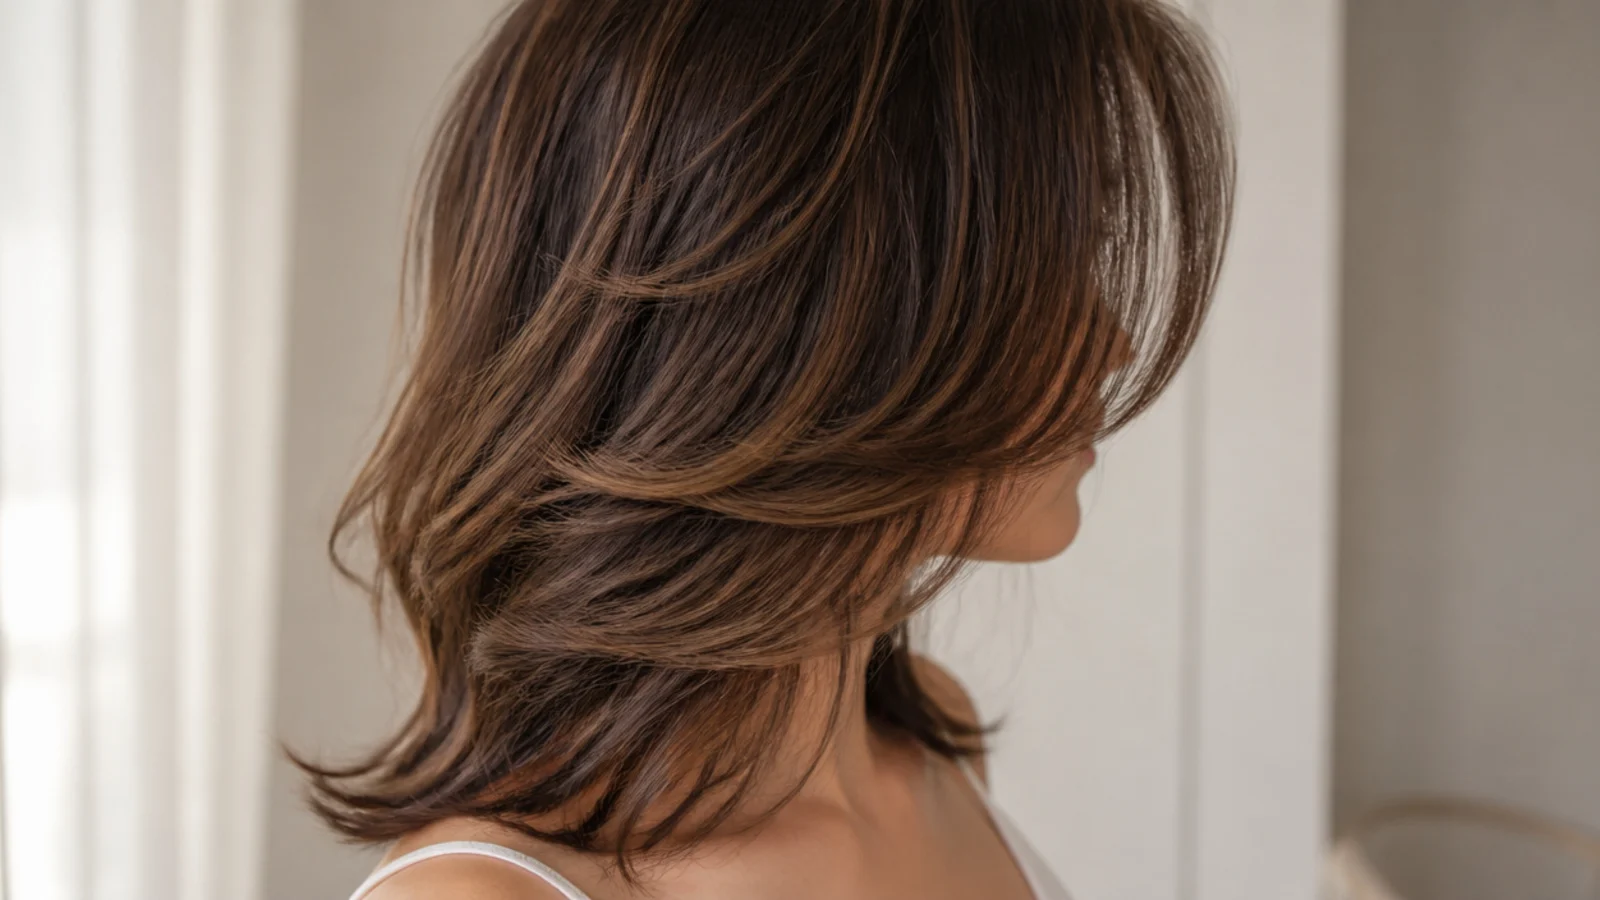
A bottleneck fringe is narrow and rounded at the center brow, then flares out sharply at the cheekbone into the face-framing layer, so the shape traces the neck of a bottle. It is the most forgiving fringe on this list because the shortest point sits at the brow rather than above it, and it grows straight into a curtain bang. On mid length hair it gives the front the interest of bangs while the layers behind stay long. Blow it forward and down with a small round brush.
Who it suits: Long, oval and square faces; fringe beginners who want an easy exit.
Tip: Ask for a bottleneck fringe, shortest point at the brow, flaring into my jaw-length face frame.
18. Money-Piece Layers on Mid Length Hair

The cut and the color doing one job. The two face-framing layers are lightened two to three levels brighter than the rest, so the layer you already cut at the jaw reads as a deliberate design line instead of a stray piece. It is the cheapest way to make an otherwise simple layered mid length cut look styled, and it grows out softly because the brightness sits at the front where regrowth is easy to refresh. Shade guidance in money piece hair colors.
Who it suits: Anyone with jaw-start face framing who wants the layers to actually show up in photos.
Tip: Ask for the money piece to start exactly where the face-framing layer starts, not higher.
19. Mid Length Layered Lob With Flipped Ends
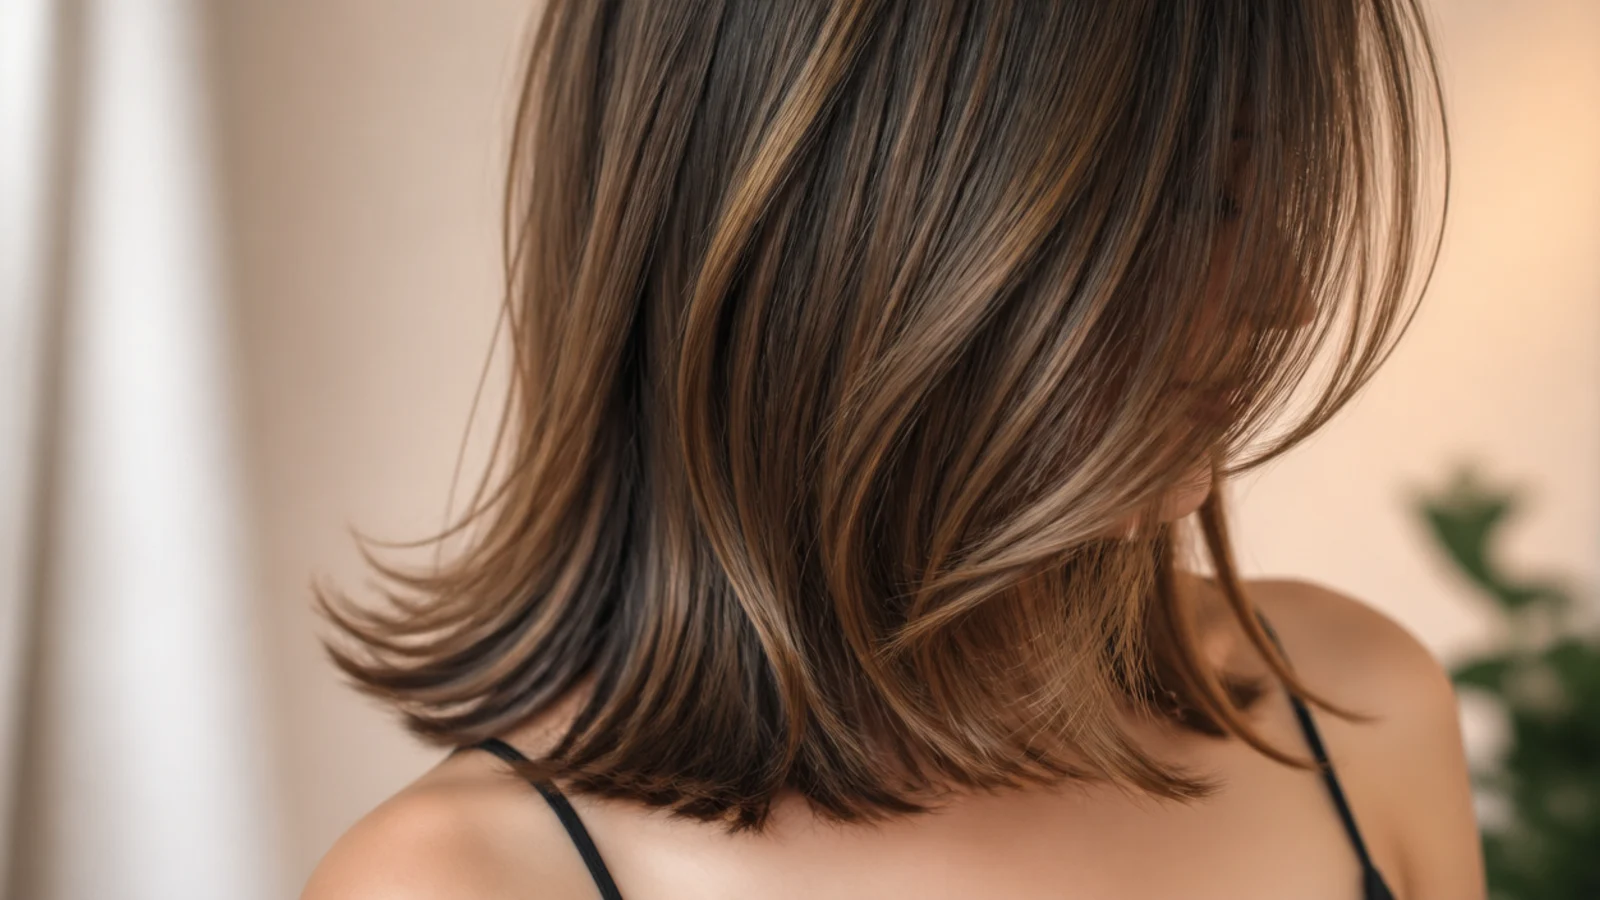
A lob cut just at the shoulder, with light internal layers and the last inch flipped outward with a flat iron or a large round brush. The flip is what keeps a shoulder-length cut from doing the thing shoulder-length cuts do, which is fold under and sit on the trapezius in a triangle. Two minutes of styling changes the whole silhouette. If you like the shape but want it shorter, the shapes in modern bob haircuts are the next step down.
Who it suits: Straight and lightly wavy hair sitting right at shoulder length that keeps kicking out anyway.
Tip: Ask for a shoulder-grazing lob with light internal layers, cut to flip out rather than under.
20. Low-Maintenance Grown-Out Layers for Mid Length Hair

Layers cut deliberately soft and long so that at week twelve they still look like a haircut rather than a problem. That means nothing shorter than four inches below the chin, a blunt-ish perimeter, and no thinning shears. This is the cut for people who genuinely go five or six months between appointments. It also happens to be the shape most flattering under air-drying, since there are no short pieces to stick out. Real-world grow-out notes are in hair trends I tried.
Who it suits: Infrequent salon-goers, growing-out phases, and anyone between a shag and long hair.
Tip: Say cut it so it still looks good in four months, long soft layers, no thinning shears.
What Counts as Mid Length: Collarbone to Just Below the Shoulder
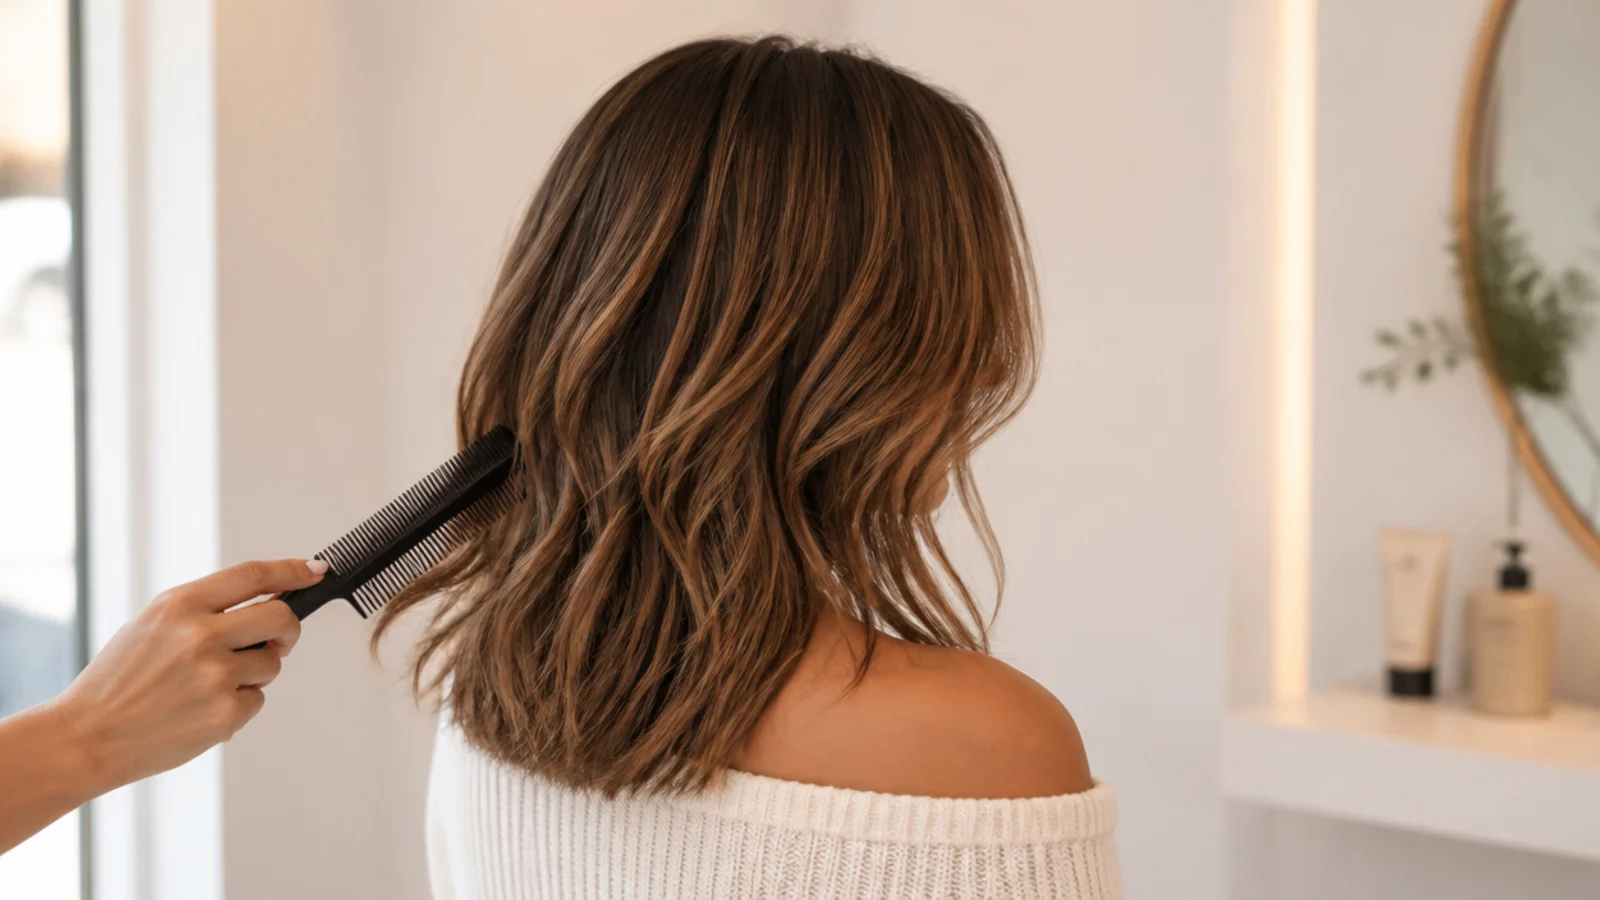
Mid length is a landmark, not a measurement. It runs from the collarbone at the short end to about an inch below the shoulder at the long end, and naming the landmark is what keeps you from ending up with something you did not ask for. On a 5 foot 2 frame that band is roughly 12 to 15 inches from the root; on a 5 foot 9 frame it is closer to 14 to 17 inches, which is why inches alone are a bad instruction and collarbone is a good one. Anything above the collarbone is a lob and starts behaving like a bob; anything past the armpit is long hair and loses the swing that makes this length worth cutting. The awkward zone is exactly at the shoulder, where the ends hit fabric and fold outward or under at random. If you land there, either go half an inch above the collarbone or an inch below the shoulder, or cut the ends to flip out on purpose. Mid length is also the shortest length that still holds every ponytail style worth wearing, which is part of why people stop here. The full length map is in the mid length haircut guide.
Hush Cut vs Butterfly Cut vs Wolf Cut vs Shag: What Actually Differs
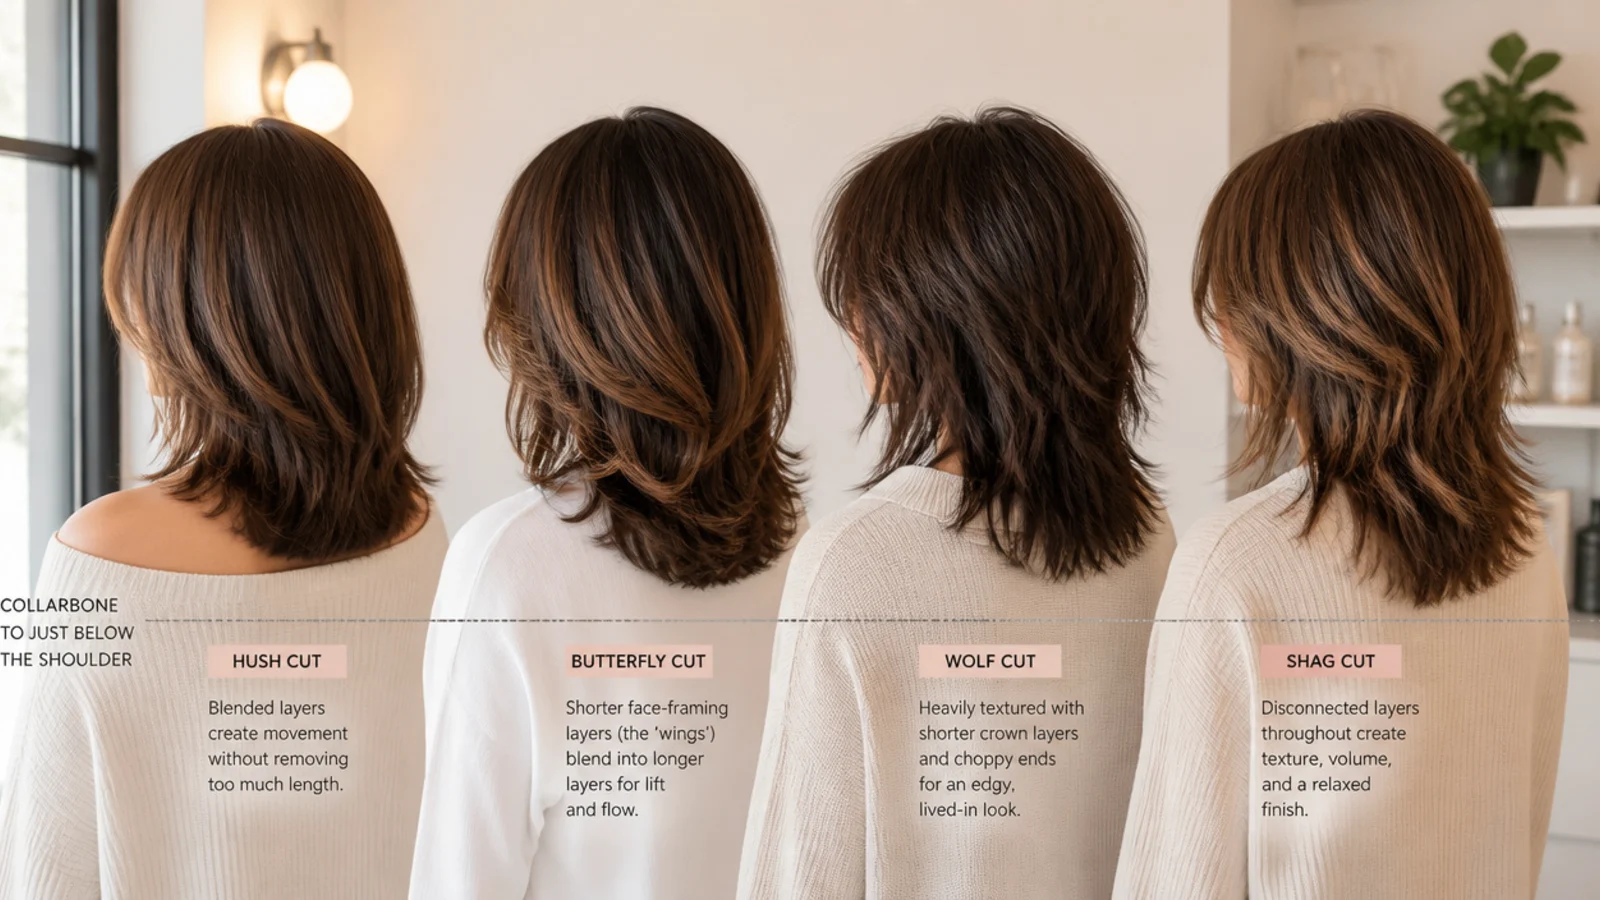
These four names get pinned to the same photo on different sites, which is useless when you are trying to ask for one. Three things actually separate them: where the shortest layer starts, how much weight is removed from the ends, and whether the layers are connected or disconnected. The hush cut is the softest: shortest layer around the jaw, connected, very little weight removed, designed to air-dry. The butterfly cut moves the shortest layer up to the chin and creates a deliberate weight gap between a short top section and a long bottom one, so it looks like a bob over long hair. The shag stacks layers in short steps all the way from the cheekbone down and point-cuts the ends, which is why it reads textured rather than smooth. The wolf cut is the shag pushed further: crown layers as short as the temple, ends thinned aggressively, often partly disconnected. In order of commitment, that is hush, butterfly, shag, wolf.
Mid Length Layers by Face Shape: Round, Square, Heart, Oval and Long
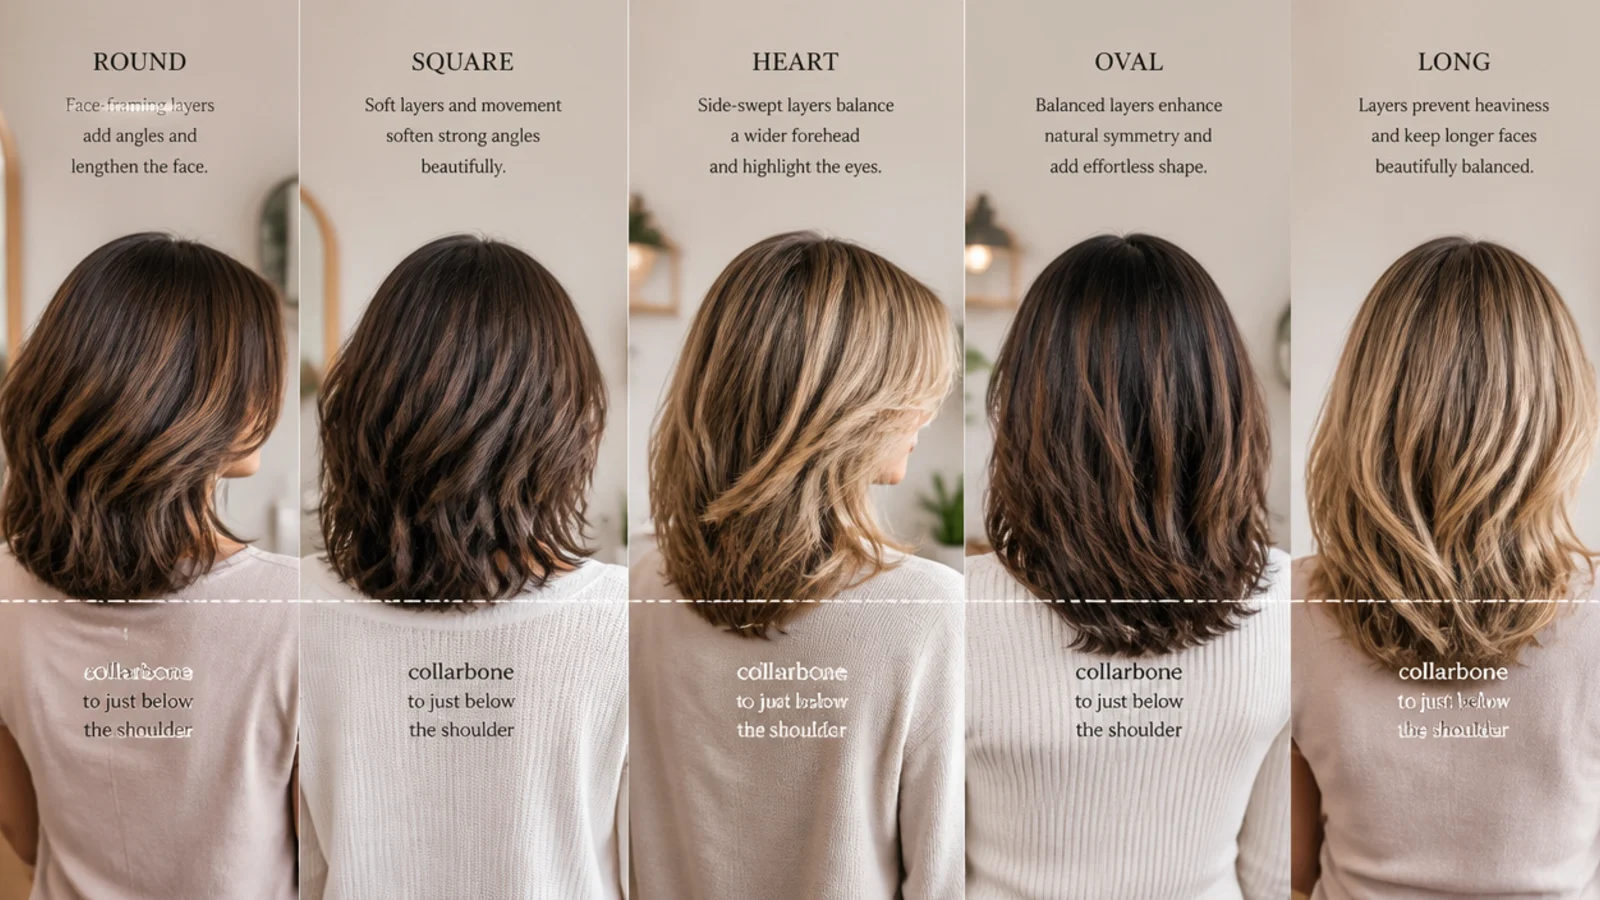
Layers change your face by adding width where they start and length where they end, so the start point is the lever. Round faces want the shortest face-framing layer at the jaw or below, never at the cheekbone, because width at the cheek is exactly what you do not need; a center part and a shallow V-shaped perimeter add vertical line. Square faces want soft curved face-framing that lands right on the jaw corner to blur it, plus curtain bangs to soften a strong forehead. Heart faces are balanced by layers that fill out below the chin, so keep the top smooth and the volume low. Oval faces can start layers anywhere, which is why almost every reference photo is on an oval face. Long faces want horizontal interest at the cheekbone: a butterfly cut, a bottleneck fringe, or curtain bangs, and they should avoid a deep V that drags the eye further down. If you are unsure, jaw-start face framing on a collarbone cut is the option that flatters the widest range.
Layers for Fine vs Thick vs Curly Mid Length Hair
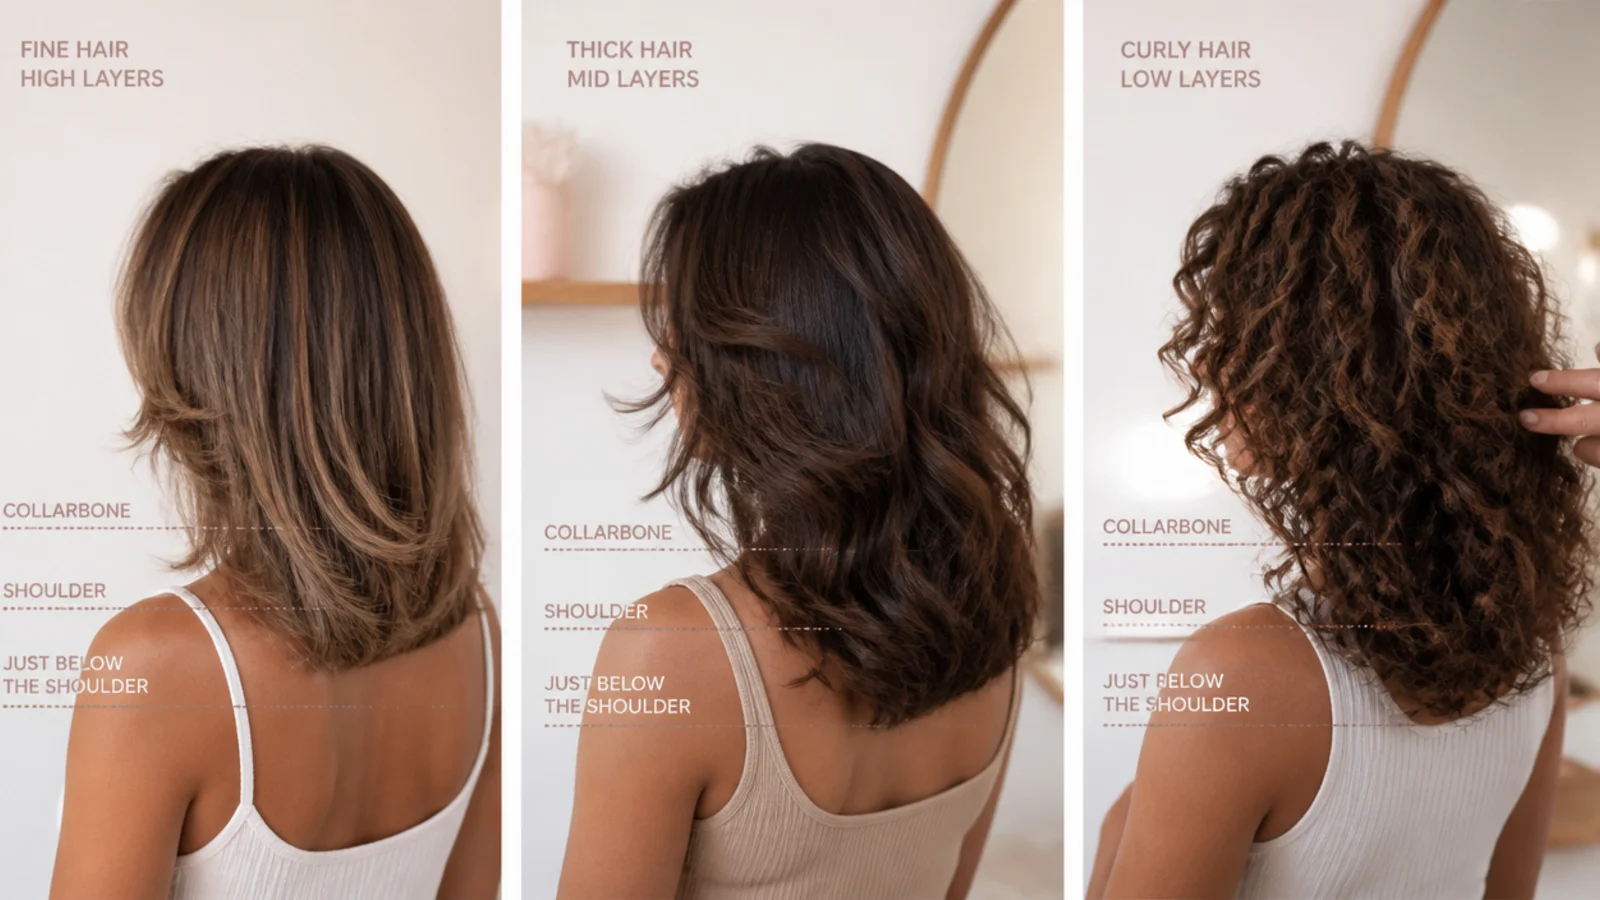
The same layered haircut behaves in three completely different ways depending on what it is cut into. Fine hair needs fewer and longer layers, because the perimeter is what reads as thickness and every layer steals strands from it; two soft layers and a blunt line will look fuller than eight layers every time, and thinning shears should stay in the drawer. Thick hair has the opposite problem, which is bulk collecting at the mid-lengths and forming a triangle, so it wants weight removed from the interior, ideally with point cutting or a razor used only inside the shape. Curly hair should be cut dry, curl by curl, since a curl that measures at the collarbone wet can sit at the chin dry, and the layers exist mainly to stop the pyramid by taking width out of the sides. Styling follows the same logic: fine hair wants mousse at the root, thick hair wants cream through the ends, curls want gel and no brushing. The type-by-type guide is your hairstyle for your hair type, and fine-hair specifics are in mid length haircut for fine hair.
How to Ask Your Stylist for Mid Length Layers

Photos beat adjectives, but the photo still needs a sentence attached. Start with the landmark, not a number: collarbone length, or an inch below the shoulder. Then name the layer type and its start point, which is the part people leave out. The safest all-purpose script is: collarbone length, long invisible layers, face-framing starting at the jaw. If you want texture instead, swap in choppy point-cut layers starting at the cheekbone, piecey ends. Say what you do not want as clearly as what you do, because that is where cuts go wrong: no thinning shears, no layers above my chin, keep the perimeter blunt. Ask for the face-framing pieces to be cut dry with your head upright and your normal part in, since wet hair cut with the head tilted falls somewhere else entirely. Finally, ask two questions before the first section is clipped: how will this look at week ten, and how much daily styling does it need. A stylist who answers both honestly is the one to rebook.
Common Mistakes With Mid Length Layers, and How to Grow Them Out
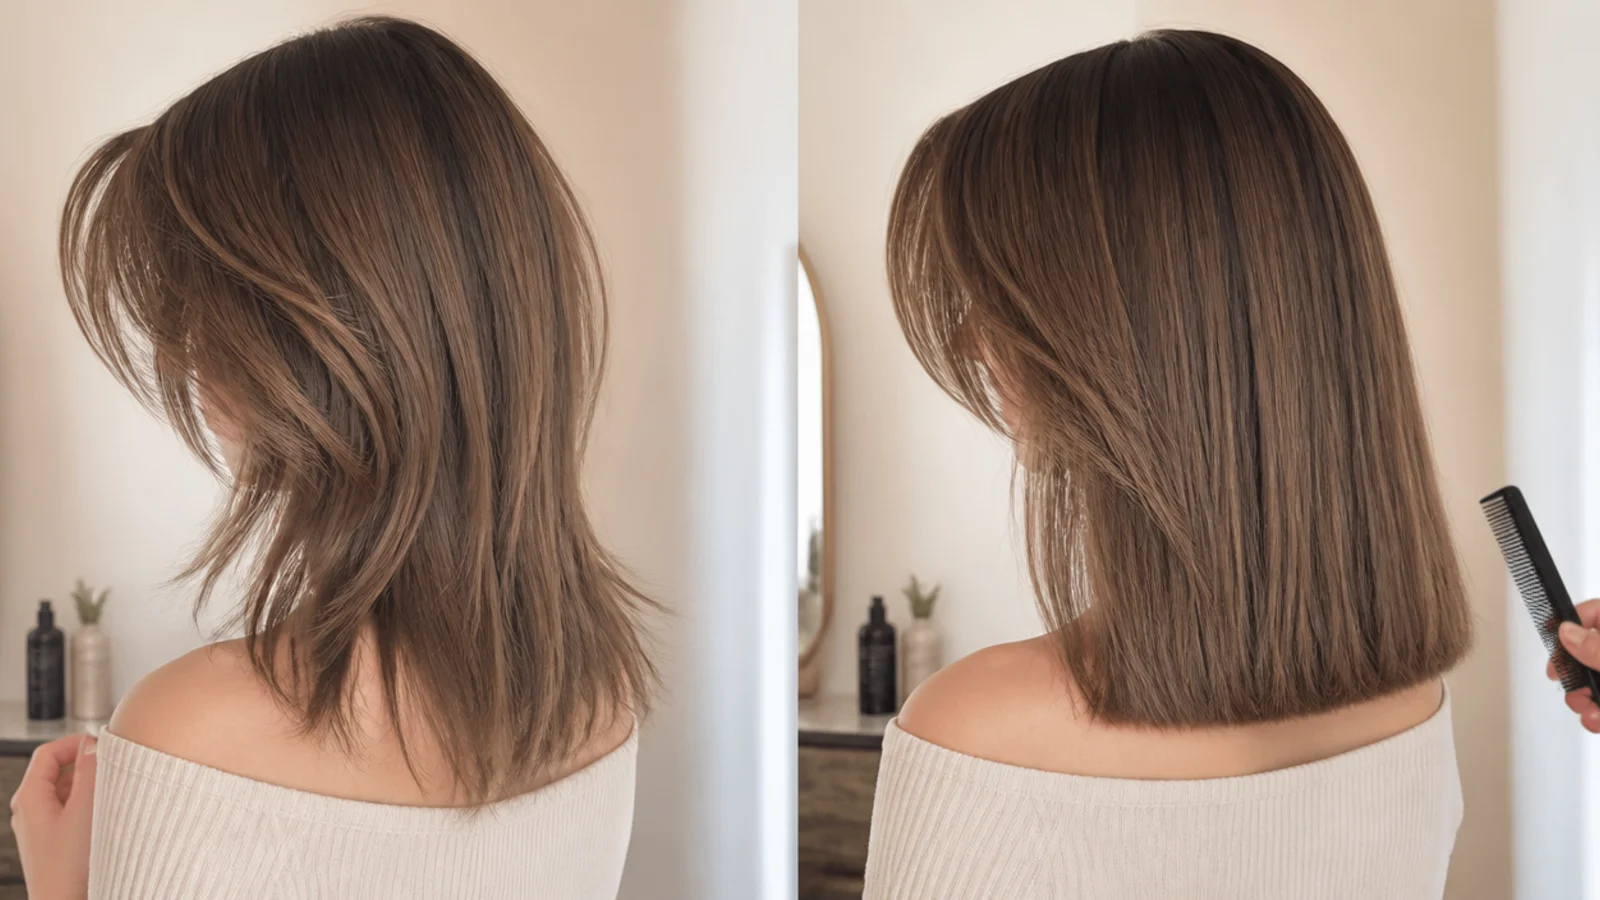
Four mistakes account for almost every layered-cut regret. The first is over-layering fine hair, which hollows out the perimeter until the ends look see-through; the fix is a blunt trim and a moratorium on new layers for two cuts. The second is layers cut too short at the crown, which produces the mushroom shape at week six; ask for the shortest crown layer to sit no higher than your cheekbone the first time. The third is cutting curls wet and losing 3 to 5 inches to shrinkage. The fourth is skipping the trim, since layered ends fan and split faster than blunt ones, and every 8 to 12 weeks is the real cadence. Growing layers out is mostly a matter of letting the shortest pieces catch up while trimming only the perimeter, roughly half an inch every 12 weeks, which takes about 9 to 12 months for a shag and 3 to 4 months for long invisible layers. In the meantime, half-up styles and the easy everyday hairstyles hide the in-between stage better than anything a flat iron can do.
Frequently Asked Questions
What are the best layers for mid length hair?
Long invisible layers with face-framing starting at the jaw suit the widest range of hair types and face shapes. They remove weight from inside the hair so the perimeter stays dense, add movement through the mid-lengths, and grow out with no awkward stage. Choppy or crown-heavy layers look better in photos but need thick hair and a trim every 6 to 8 weeks.
Where should layers start on mid length hair?
For a soft result, the shortest layer at the back should sit no higher than about 4 inches below your chin, and the face-framing pieces should start at the jaw. Starting layers at the cheekbone or temple creates a shag or wolf cut instead, which adds crown volume but reads much more dramatic and needs more frequent trims.
Do layers make mid length hair look thinner or thicker?
It depends on how many you take. A few long layers make thick hair look lighter and more movable, which reads as healthier. Too many layers on fine hair make it look thinner, because each layer removes strands from the perimeter, and the perimeter is what your eye reads as density. Fine hair does better with two long layers and a blunt line.
How often should you trim layered mid length hair?
Every 8 to 12 weeks for the overall shape. Layered ends fan out and split faster than blunt ones because there is more exposed end per inch of hair. Face-framing pieces and any fringe need attention sooner, around every 6 to 8 weeks, since a half inch of growth there is far more visible than the same growth at the back.
What is the difference between face-framing layers and curtain bangs?
Face-framing layers start at or below the chin or jaw and blend into your length, so they never sit on your forehead. Curtain bangs start at the brow or cheekbone, part in the center, and sweep to each side. A money piece is neither one; it is a color technique that brightens whichever front pieces you already have.
Should curly mid length hair be cut wet or dry?
Dry, and ideally curl by curl. Wet curls hang straight and can shrink 3 to 5 inches as they dry, so a cut measured wet at the collarbone can end up at the chin. A dry cut lets the stylist see where each curl actually sits and place layers to prevent the triangle shape at the sides.
Which mid length layered haircut is the lowest maintenance?
Long invisible layers on a blunt collarbone perimeter. There are no short surface pieces to stick out, it air-dries without a round brush, and it stays wearable for three to four months between appointments. A hush cut is a close second. The wolf cut and the shag are the highest maintenance on both trims and daily styling.
How long does it take to grow out mid length layers?
Hair grows roughly half an inch a month, so short crown layers from a shag or wolf cut take about 9 to 12 months to blend back into one length. Long invisible layers disappear in 3 to 4 months. Trim only the perimeter while you grow, and let the shorter pieces catch up rather than chasing them with more cutting.
Which mid length haircut look are you saving?
If you take one thing from these 20 layered mid length haircuts, make it this: the length is the easy part, and the layer start point is the decision that changes your face. Long invisible layers beginning below the chin are the low-risk entry, a jaw-start face frame is the single most flattering addition for almost every face shape, and choppy cheekbone layers are a commitment you should only make with thick or wavy hair and a texture spray habit. Book a trim at 8 to 12 weeks before the ends fan out, screenshot the two or three cuts you keep coming back to, and browse the rest of the mid length haircut hub if you are still deciding on length.