
Quick Comparison
| Blunt One-Length Straight Mid Length Cut | Layered Straight Mid Length Cut | |
|---|---|---|
| How thick the ends look | Maximum; every strand reaches the bottom line | Lighter and tapered; can go see-through on fine hair |
| Best hair density | Fine to medium type 1 hair | Medium to thick type 1B and 1C hair |
| Daily styling time | 0 to 5 minutes; air dries into shape | 10 to 15 minutes; wants a round brush to blend the layers |
| How it looks on day three | Still holds the line; oil at the roots is the only tell | Layers separate and can read stringy without texture spray |
| Volume at the crown | Low; volume has to come from the part or a root spray | Higher; short interior pieces lift the top section |
| Trim cadence | Every 10 to 12 weeks; the line softens slowly | Every 8 weeks; layer ends taper and lose their shape faster |
| Grow-out behavior | Grows out evenly and stays wearable for months | Layers drop unevenly; the shortest pieces get awkward first |
| Risk if the stylist overshoots | Low; the mistake is length, which is recoverable | High; over-layering takes months to grow back in |
| Best for | Fine hair, low-effort routines, an expensive polished finish | Thick heavy hair, visible movement, more shape around the face |
1. Blunt Collarbone Cut With No Layers

One length, cut flat across at the collarbone, with zero interior layers and no thinning shears anywhere near it. On straight hair this is the single most expensive-looking cut you can buy, because all the density collects at the bottom line and the ends read thick instead of feathered. It is also the lowest-effort option: it air dries into shape and needs no round brush. The trade-off is bulk on very thick hair, which is why entry 12 exists.
Who it suits: Fine to medium density type 1 hair that looks sparse when layered.
Tip: Say 'blunt, one length, no thinning shears, cut wet and dry-check the line' so nobody texturizes the ends.
2. Sleek A-Line Lob Angled Toward the Chin

The back sits at the nape or just below, and the perimeter angles forward so the front pieces land an inch or two longer, around the collarbone. That forward slope is what pulls the eye down the jaw and keeps a lob from looking boxy from the side. It is the classic salon lob and it survives a bad blow-dry better than a layered cut, because the shape lives in the perimeter. Straight hair holds the angle sharply, which is the whole appeal.
Who it suits: Round and square face shapes wanting length through the jaw.
Tip: Ask for a 1 to 2 inch difference front to back, not more, or the front reads like an outgrown bob.
3. Straight Mid Length Cut With Long Invisible Layers
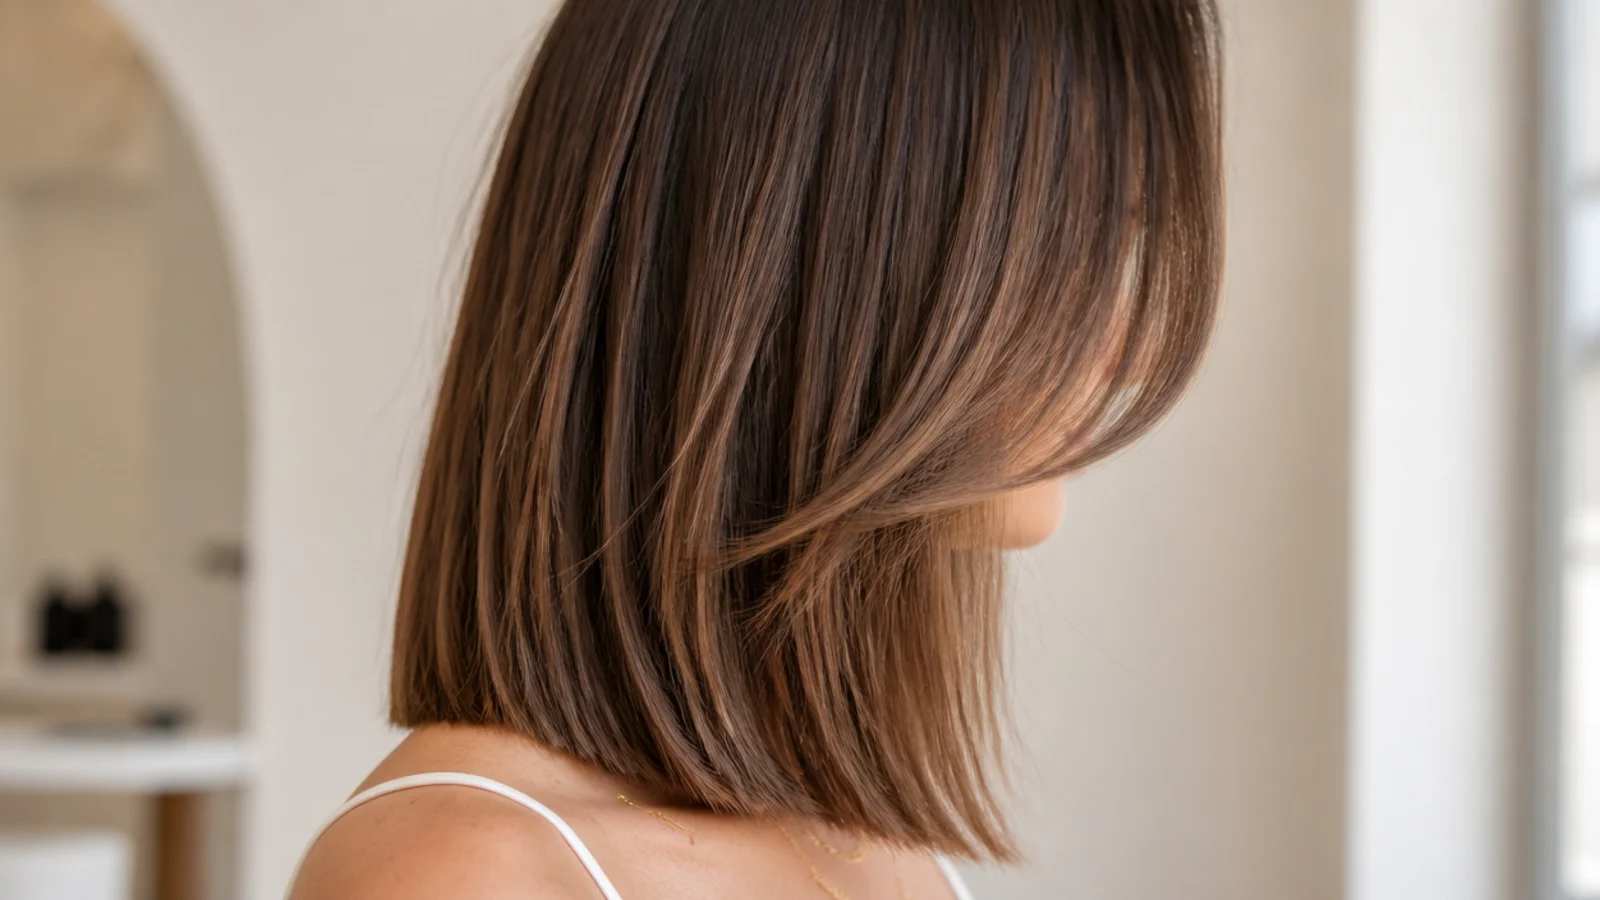
Layers cut so long and so softly blended that you cannot see where any of them start. The shortest interior piece still reaches below the collarbone, so the outline stays solid while the weight through the mid-shaft comes down. This is the compromise cut for people who want movement without visible steps, and on straight hair it is the safest layered option there is. It is often sold as ghost layers or hidden layers. The perimeter looks blunt from a distance.
Who it suits: Medium to thick straight hair that feels heavy but photographs flat when layered hard.
Tip: Use the exact phrase 'long invisible layers, nothing shorter than my collarbone' at the consultation.
4. Classic U-Cut on Straight Hair
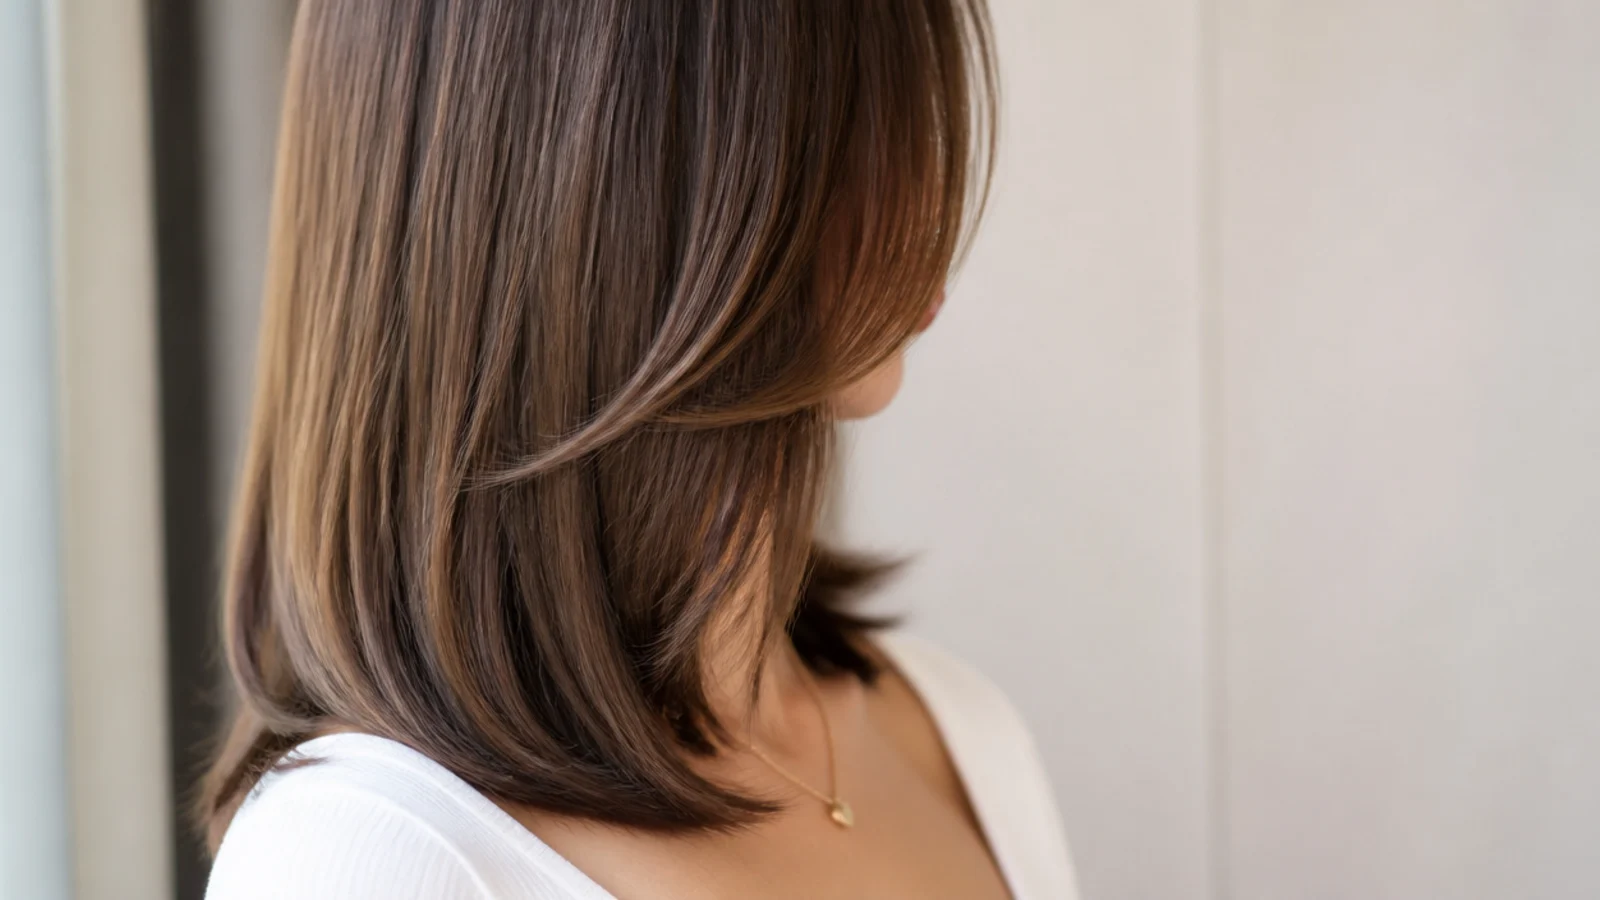
The perimeter is cut in a shallow U, so the back center is the longest point and the sides curve gently up toward the face. It looks softer than a blunt line from the back and it is the traditional grow-out shape, because a U keeps looking intentional as it lengthens. On straight hair the curve reads clearly, which a wavy texture would blur. Depth of the U is the variable: shallow reads polished, deep reads bohemian and starts drifting toward a V.
Who it suits: Anyone growing hair out who still wants a defined shape at every stage.
Tip: Ask for a shallow U with about 1.5 inches between the shortest and longest point.
5. Soft V-Cut for Straight Mid Length Hair

Same idea as the U but with a point rather than a curve at the center back, so the silhouette narrows and reads longer than it measures. On straight hair the V is visible in every ponytail and every mirror shot, so it is the one perimeter shape people either love or immediately grow out. It removes bulk at the sides without any interior layering, which makes it useful on thick hair that goes triangular. Keep the point subtle at mid length.
Who it suits: Thick straight hair that widens at the ends and needs the corners softened.
Tip: A 2 inch V is dramatic at mid length; ask for 1 inch if this is your first one.
6. Straight Mid Length Haircut With Curtain Bangs

A center-parted fringe cut shortest at the inner corner of the eyebrow and blending out to the cheekbone, worn over a collarbone-length cut. It is the highest-impact change you can make without losing an inch of length, and on straight hair the two curtain panels fall exactly where they are cut, so the result matches the photo more reliably than it does on wavy hair. Expect a 90 second round-brush pass most mornings to set the bend outward.
Who it suits: Long, oval and heart-shaped faces; anyone easing into bangs for the first time.
Tip: See mid length haircut curtain bangs for growing them out.
7. Butterfly Cut on Straight Hair
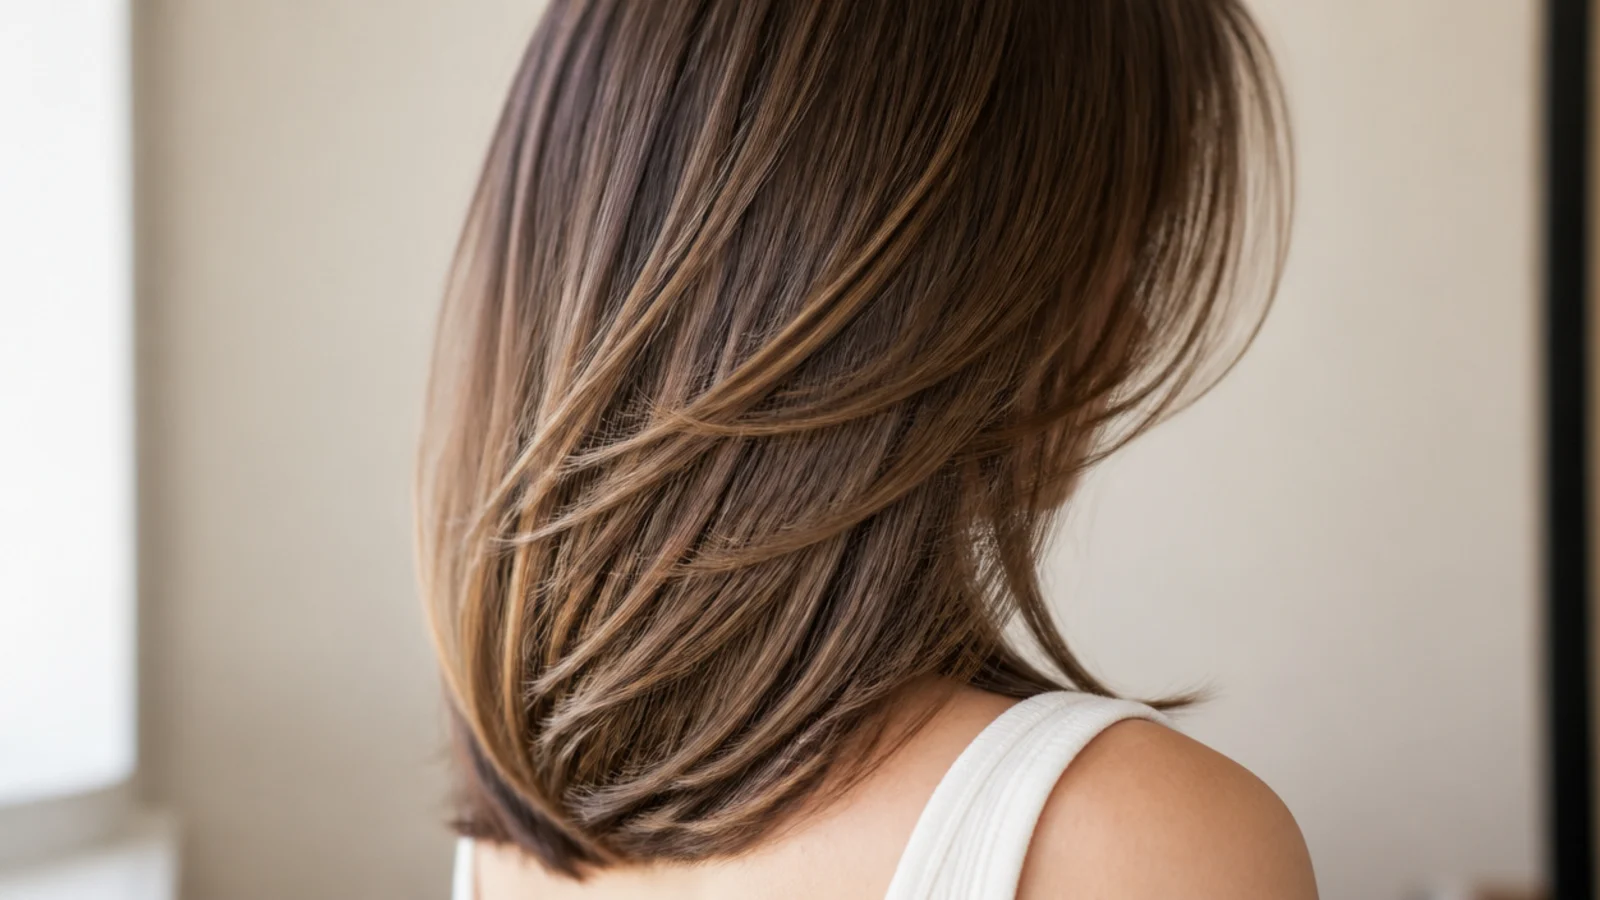
Two distinct layer families: a short shelf around the chin and cheekbone that mimics a shoulder-length cut, and a long undisturbed length at the collarbone or below. The gap between them is what creates the illusion of volume on top and length underneath. On straight hair the two tiers show plainly, so it needs curling or at least a bent blow-dry to blend, and it is the highest-styling-effort cut in this list at roughly 15 minutes a day.
Who it suits: Medium to thick straight hair with the patience for daily heat styling.
Tip: Ask for the top tier to sit at the jaw, not the lip, so the shelf does not look like a mullet growing out.
8. Blunt Cut With Hidden Layers Underneath

The visible outline stays blunt at the collarbone while weight is removed from the underneath section only, so the top layer lies flat over a lighter interior. This is how stylists make very thick straight hair sit down without ruining the blunt line. Nothing is visible from the outside, which is the point. Done badly it is just internal thinning and the ends go stringy, so it has to be cut in sections, not attacked with texturizing shears.
Who it suits: Thick, coarse type 1C hair that puffs at the sides in a one-length cut.
Tip: Say 'remove weight from the underneath only, keep my outline blunt' and specifically decline point-cutting the perimeter.
9. Face-Framing Layers Starting at the Jaw

Two front sections cut on a soft diagonal, shortest at the jawline and blending down into the collarbone length behind them. Starting at the jaw rather than the cheekbone is the whole difference between framing that opens the face and framing that reads as a grown-out fringe you have to style. On straight hair a jaw start falls cleanly against the face with no product. It also grows out gracefully, which cheekbone-start layers do not.
Who it suits: Every face shape; the single safest layer to add to a one-length cut.
Tip: Ask for 'face-framing starting at the jaw, blended, no visible step' and hold your jaw with a finger to show the point.
10. Deep Side Part Lob for Flat Straight Hair
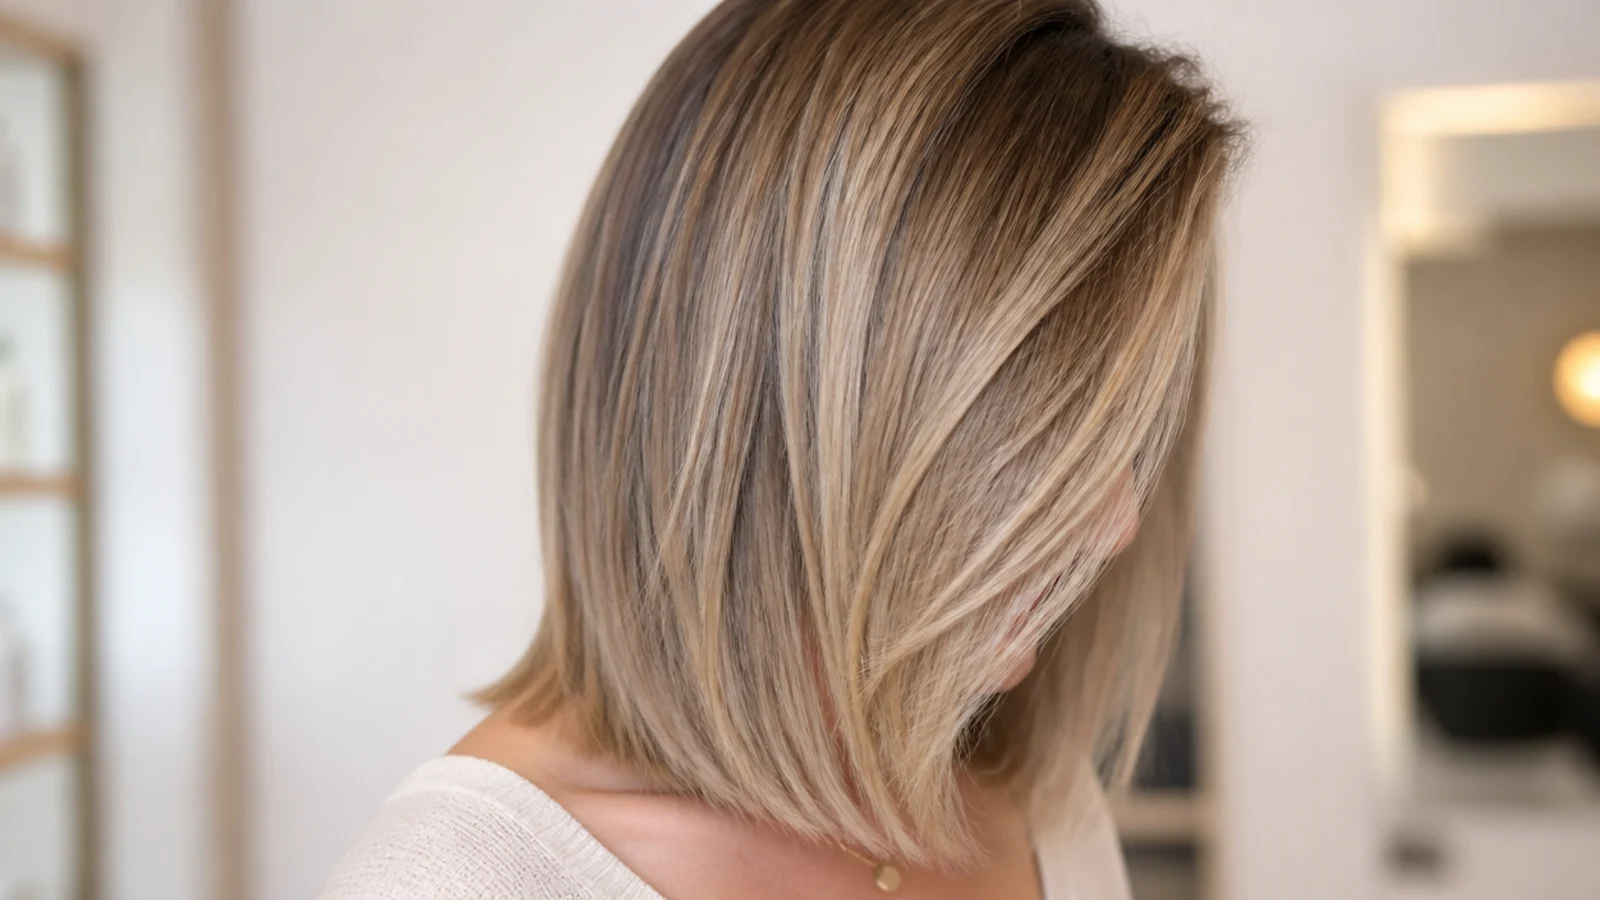
The cut is a plain collarbone lob; the volume comes from moving the part two to three inches off center, so the hair on the heavy side is forced up and over against its natural fall. That gives real root lift on straight hair without a single layer, which matters because layers are the usual and often wrong answer for flatness. It costs nothing, reverses in a second, and is the trick to try before you commit to any layered shape.
Who it suits: Fine straight hair that goes flat at the crown by lunchtime.
Tip: Set the new part on damp hair and blast the roots against the direction for 20 seconds to lock the lift.
11. Straight Mid Length Cut With a Money Piece
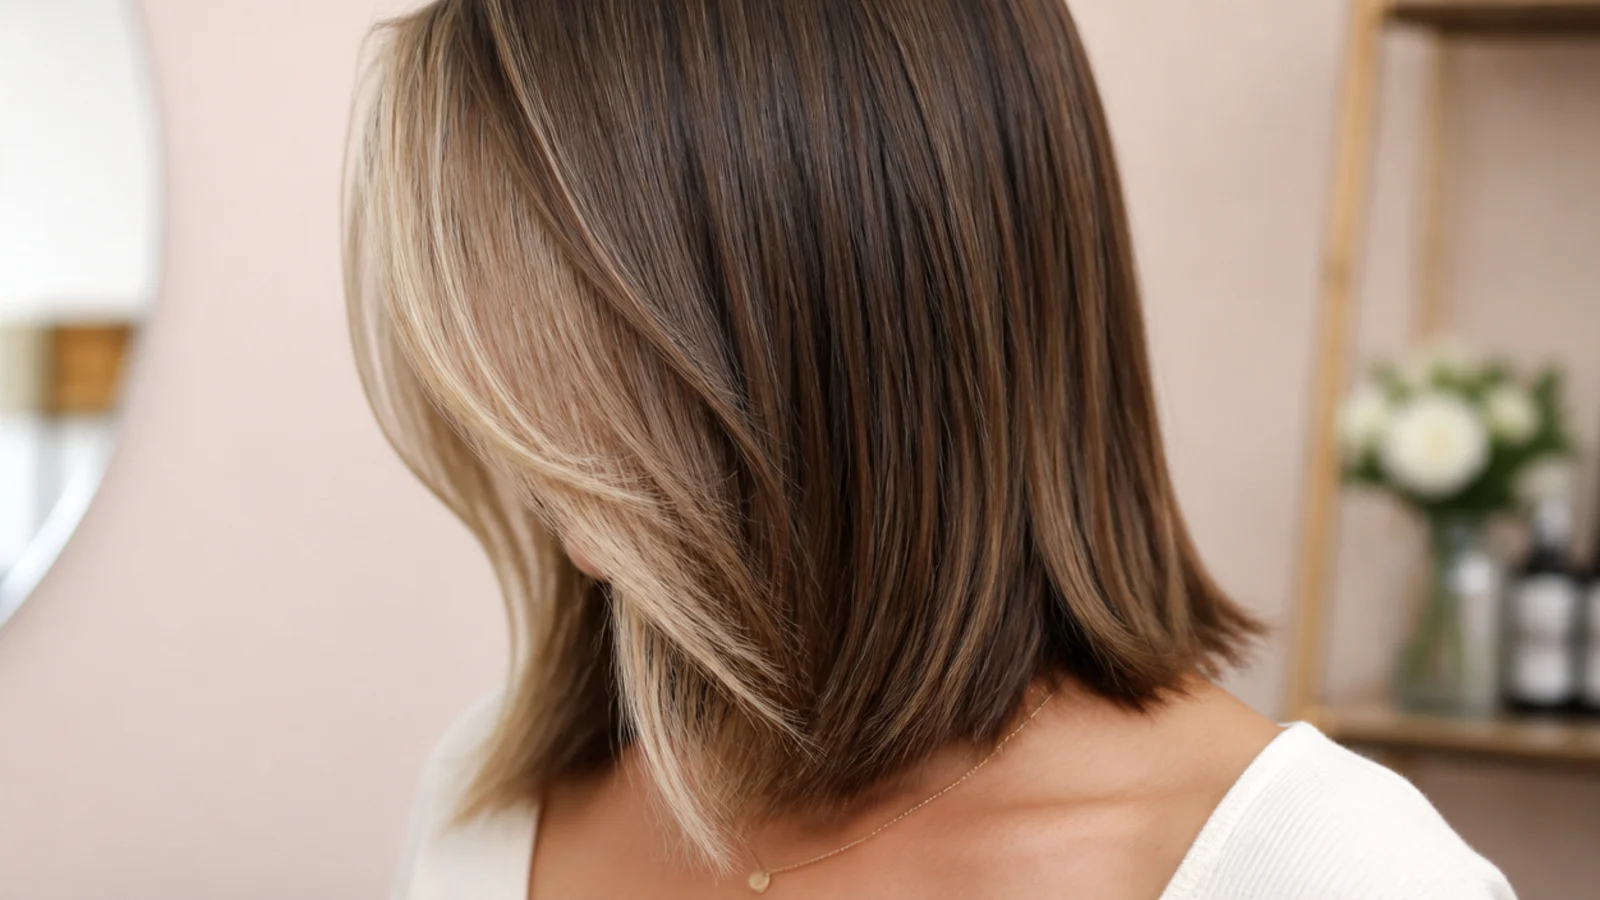
The cut stays a simple collarbone blunt or soft U; the change is two lightened panels at the front hairline, usually two to three shades brighter than the base. On straight hair the brightness lands in an unbroken vertical line, which is exactly why it works here better than on curls, where it scatters. It is the cheapest way to make a plain cut look designed, at roughly 90 to 180 dollars for a partial.
Who it suits: Anyone who likes their cut but wants the face to look brighter without a restyle.
Tip: Read money piece hair before booking so you can name the placement you want.
12. Feathered Layers on Thick Straight Hair
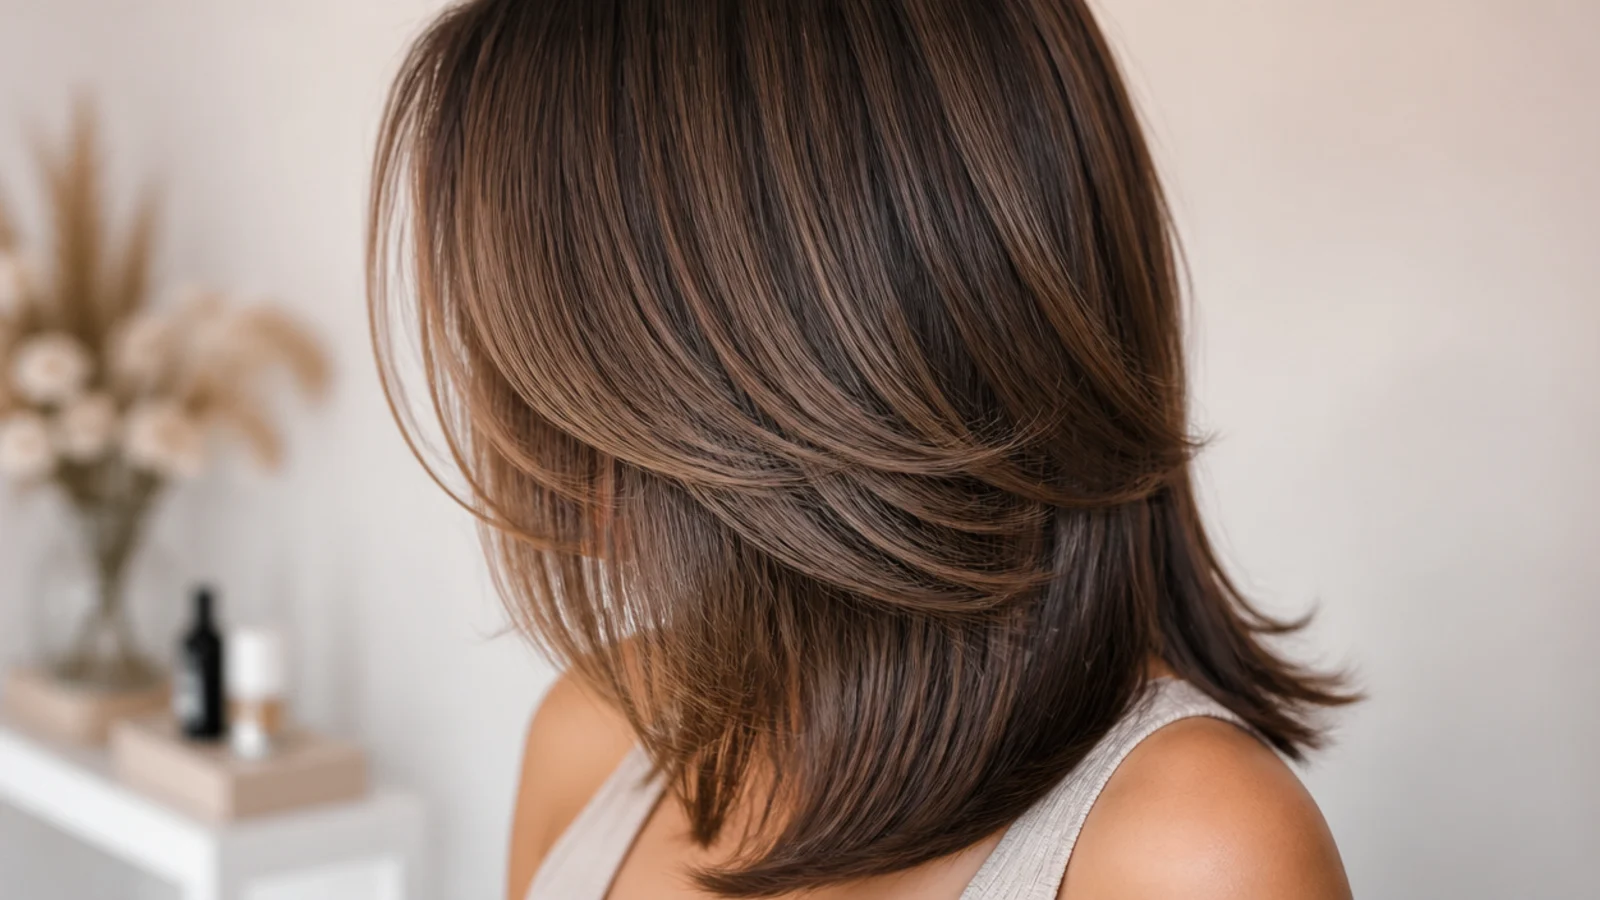
Layers cut with the shears angled into the hair rather than straight across, so each edge tapers instead of stopping abruptly. On thick straight hair a hard layer edge shows as a visible shelf in daylight; feathering blurs it. The classic version has the shortest feather at the cheekbone and everything else falling to the collarbone. It removes real bulk, so it is a bad choice on fine hair, where the same technique leaves the ends see-through.
Who it suits: Dense, heavy type 1B and 1C hair that feels hot and sits like a helmet.
Tip: Ask for feathered, not razored; a razor on straight hair frays the ends and shows within three washes.
13. Straight Mid Length Haircut for Fine Hair, One Length at the Collarbone

Cut in a single line at the collarbone with no interior layers and no texturizing at all, so every strand reaches the bottom and the perimeter reads as thick as your hair can possibly look. This is the honest answer for fine hair, and it contradicts most of the internet, which pushes layers universally. Layers on fine straight hair remove the few strands that were making the ends look full. Collarbone is the ceiling: past the shoulder, fine hair tapers visibly.
Who it suits: Fine, low-density straight hair with see-through ends.
Tip: See mid length haircut fine hair for the fine versus thin distinction.
14. Blunt Fringe With Collarbone Length Straight Hair
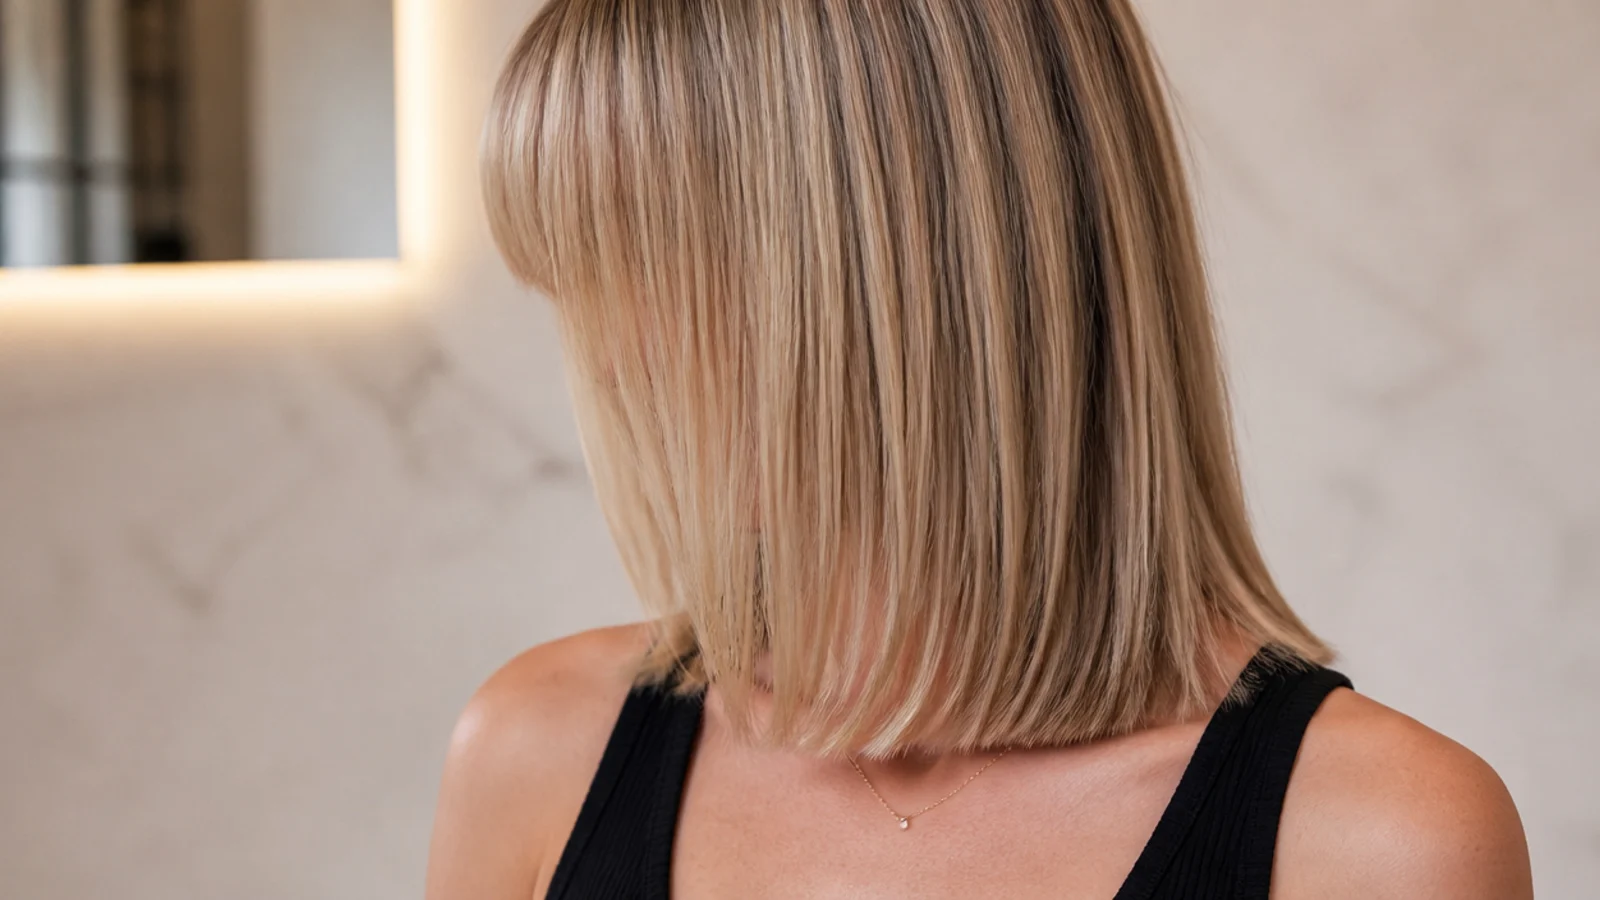
A full fringe cut flat at or just below the eyebrow, over an otherwise untouched collarbone length. Straight hair is the only texture where a blunt fringe behaves without daily work, because the hair falls where it is cut instead of springing. The commitment is real: a blunt fringe needs a trim every three to four weeks and it exposes cowlicks immediately. Check your hairline at the part before you agree to it.
Who it suits: Oval and long faces with a straight, cowlick-free front hairline.
Tip: Ask for it cut a quarter inch below your target so the first dry-check does not overshoot.
15. Straight Mid Length Shag for Day-Three Hair

Choppy, disconnected layers through the crown over collarbone-length ends, cut so the shape looks better with a day of oil in it than it does fresh from the shower. That is its real value on straight hair: most cuts here collapse by day three, and a shag improves. The cost is product dependency, since a shag on fine straight hair needs texture spray to hold its separation. On thick straight hair it works with nothing at all.
Who it suits: Medium to thick straight hair that gets washed twice a week.
Tip: Ask for the crown layers to start at the top of the ear, and bring a photo, because shag definitions vary by stylist.
16. Flipped Ends Lob With a 90s Blowout
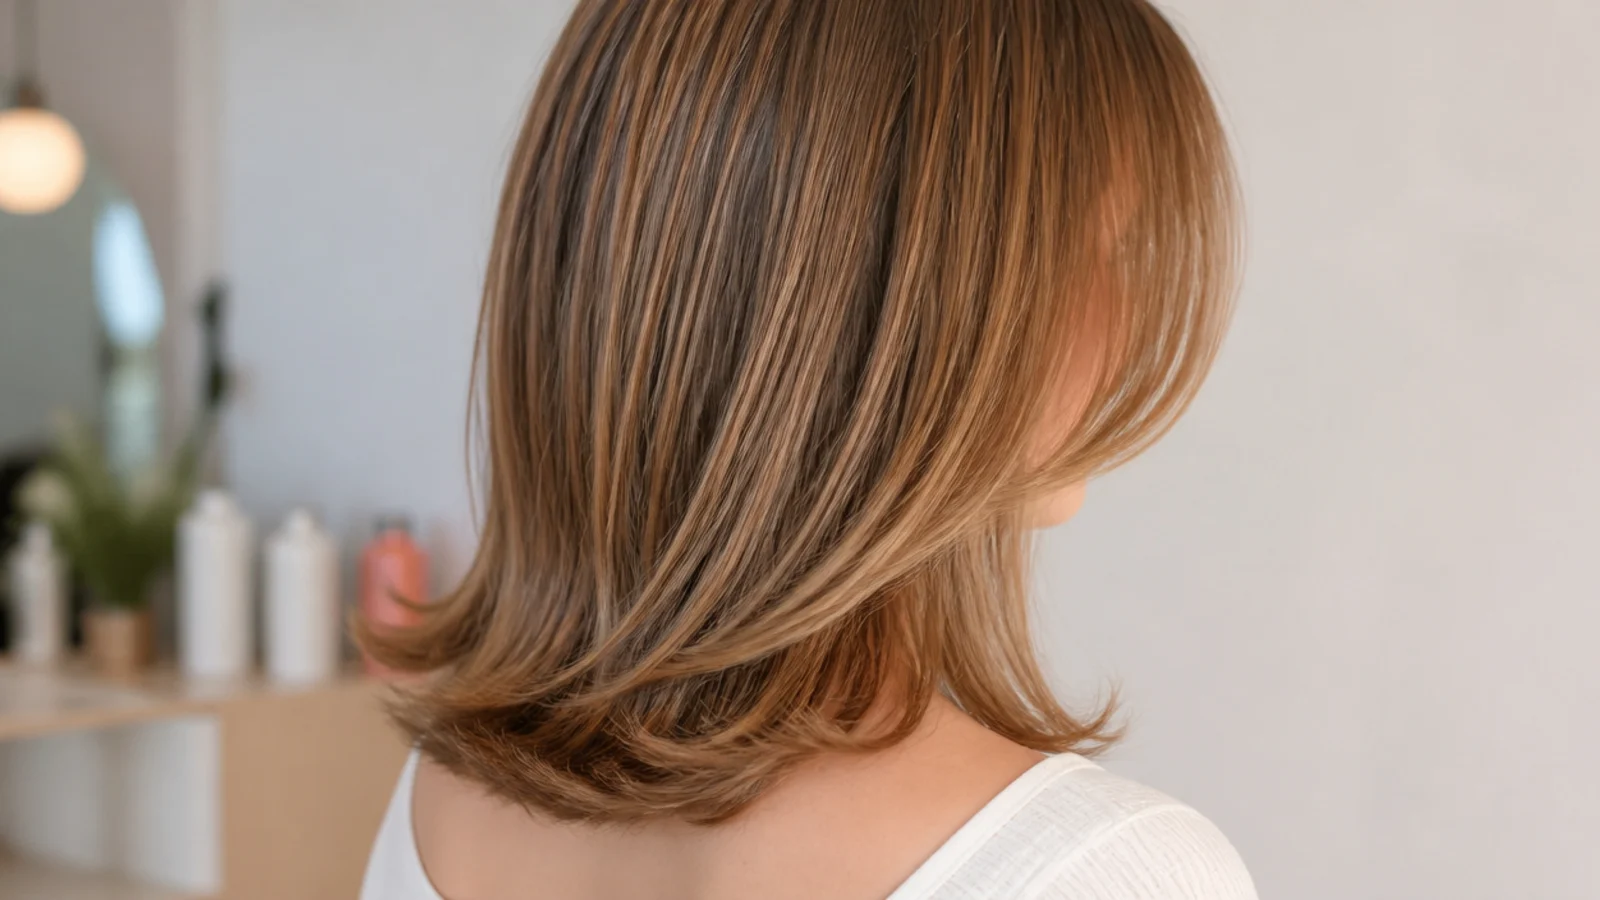
A blunt or softly layered lob at the collarbone, styled with the last two inches bent outward on a large round brush or a flat iron. Straight hair takes the flip cleanly and holds it for a day, which wavy hair will not do. The cut itself needs to be blunt-ish for the flick to read as a line rather than a frizz, so ask for minimal texturizing. Budget eight minutes with a 2 inch round brush.
Who it suits: Anyone with a heart-shaped or narrow jaw wanting width at the bottom.
Tip: Flip on cool hair after the brush pass; heat alone without a cool-down drops the bend in an hour.
17. Straight Mid Length Cut With Wispy Side-Swept Bangs

A thin, softly point-cut fringe pulled from a deep side part and swept across the forehead, sitting between the brow and the top of the cheekbone. It is the most reversible fringe on this list, because there is so little hair in it that you can tuck it behind an ear within six weeks. On straight hair the wispiness has to be built in with point cutting or the panel reads as a heavy slab. Ask for it cut dry.
Who it suits: Round and square faces; anyone who wants a fringe they can undo.
Tip: Take no more than a 1 inch triangle from the hairline back, or it stops being wispy.
18. Chin-Start Layers on a Round Face

Face-framing that begins at the chin instead of the jaw or cheekbone, cut into a length that runs an inch or two below the shoulder. The lower start point keeps a vertical line running past the widest part of a round face, which is what makes the face read longer. Cheekbone-start layers do the opposite: they add width exactly where a round face does not need it. On straight hair the effect is immediate and unforgiving in either direction.
Who it suits: Round faces and anyone with fullness through the cheeks.
Tip: Keep the overall length below the shoulder too; a chin-length perimeter widens a round face.
19. Below-the-Shoulder Straight Cut With a Squared Perimeter
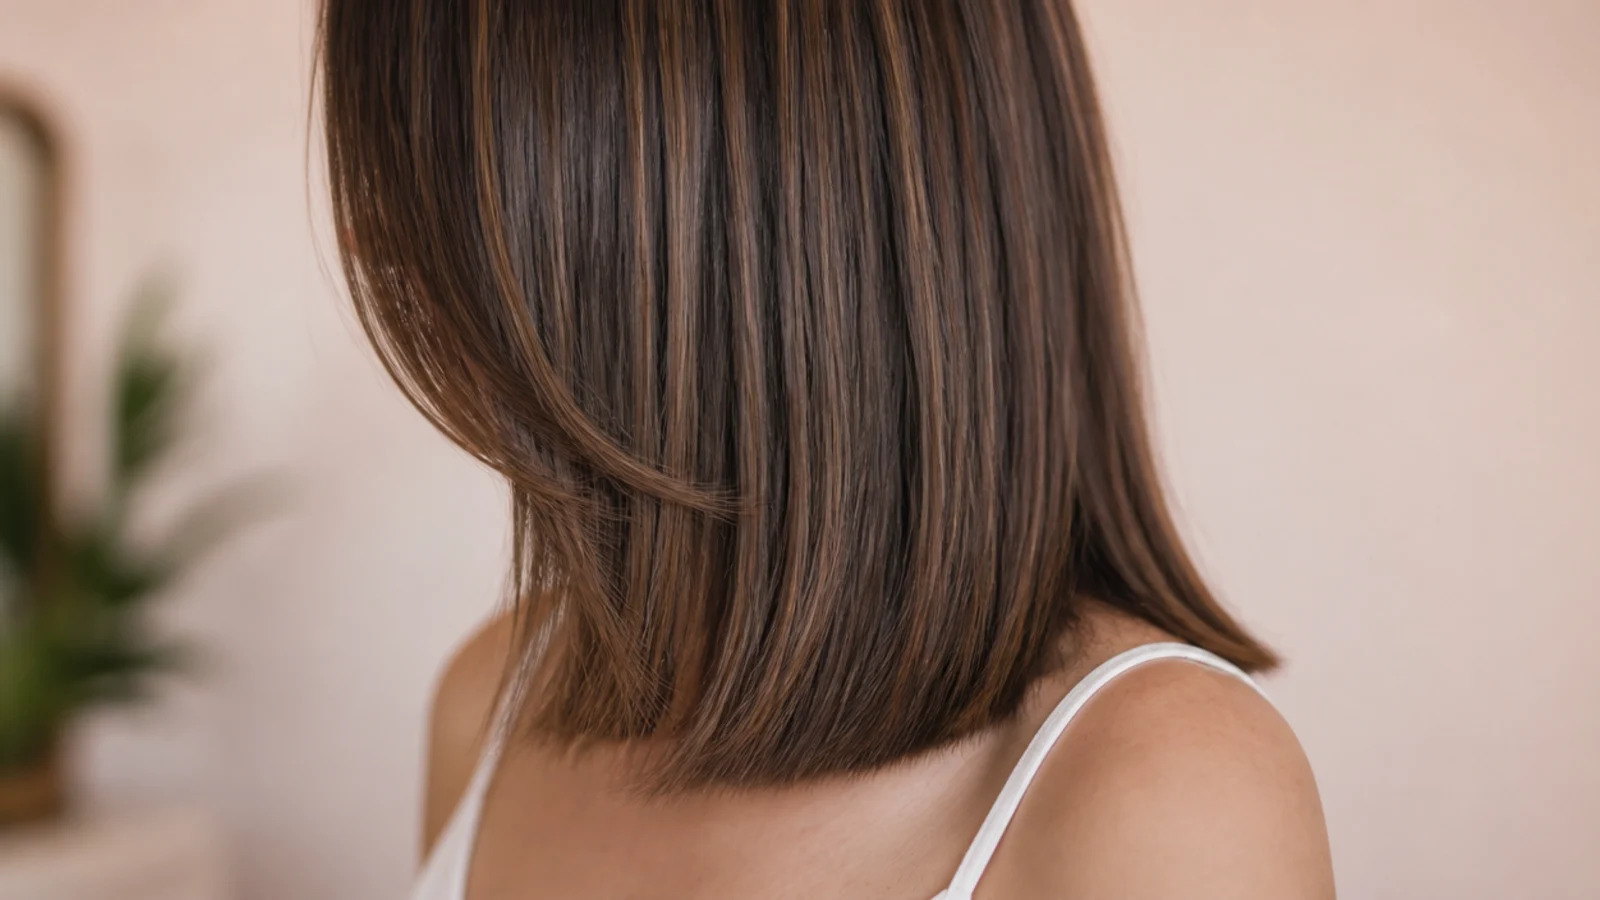
The longest length in this list, sitting one to two inches below the shoulder, cut square across with the corners deliberately left in rather than rounded off. Those corners are what stop long-ish straight hair from tapering into a point, and they are the first thing a rushed stylist removes. This is the cut for people who want mid length without feeling short, and it is also the easiest stage to keep growing from.
Who it suits: Tall frames and anyone who finds collarbone length too much of a change.
Tip: Say 'keep my corners, square the perimeter, take half an inch only' at every trim.
20. Low-Maintenance Straight Lob for Air Drying

A collarbone lob cut wet and then dry-checked, with almost no layering and no texturizing, designed to be washed and left alone. Straight hair air dries in roughly 45 to 90 minutes and lands almost exactly where it was cut, which is the one texture advantage type 1 has. Add a pea of lightweight serum through the last three inches while damp and nothing else. It is the lowest-cost cut here in both time and product.
Who it suits: Anyone whose real morning routine is under five minutes.
Tip: Ask for a dry-check at the end; wet hair on a straight head sits a quarter inch longer than dry.
What Counts as a Straight Mid Length Haircut

Mid length is a landmark, not a vibe. The ends fall between your collarbone and roughly two inches below the shoulder, which is why the same cut measures 12 inches on one person and 16 on another. Name the landmark at the chair and you will get what you asked for; say "medium" and you are trusting someone else's mental picture. Two practical notes for straight hair specifically. First, wet hair hangs about a quarter to half an inch longer than dry on type 1, so any cut done entirely wet lands short, and a dry-check at the end is not a luxury. Second, the shoulder is a hinge point: hair cut exactly at the shoulder line pushes outward against the shoulder and flicks, so either stop at the collarbone or clear the shoulder by an inch or more. The awkward inch in between is the most common reason people say their mid length cut "does not sit right." If you are still deciding between this and staying long, the mid length haircut hub lays out the trade-off, and the mid-length-versus-long comparison is the honest one to read before you book.
Straight Mid Length Haircuts by Face Shape
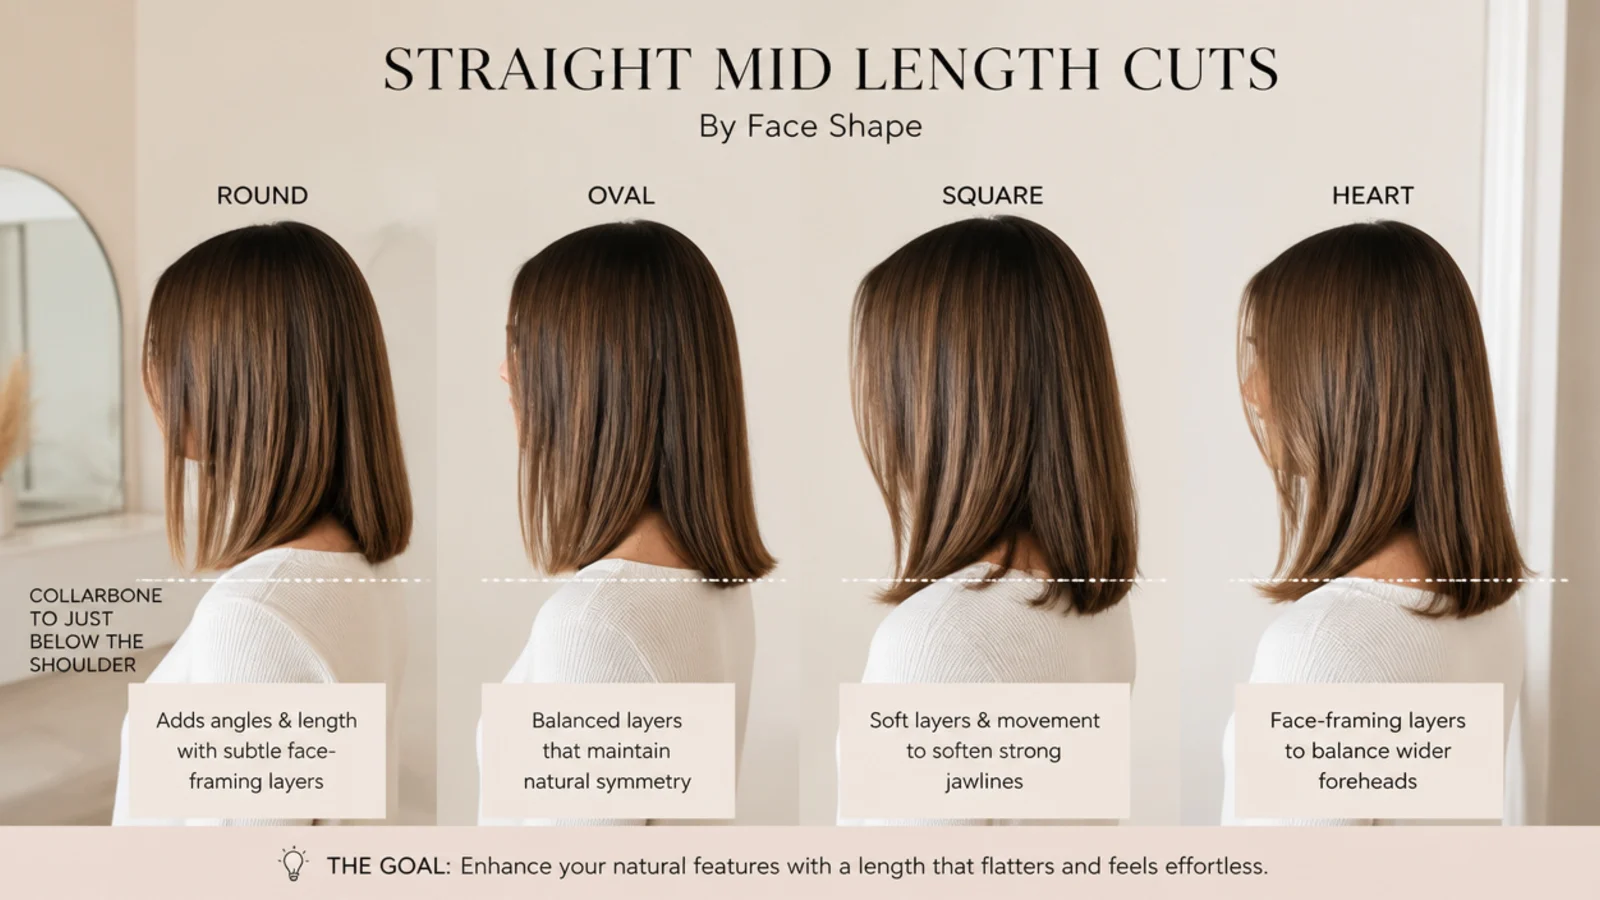
Face shape decides where the shortest piece near your face sits, not how long the whole cut is. On a round face, keep the perimeter below the shoulder and start any face-framing at the chin, so a vertical line runs past the widest point instead of stopping at it. On a square or strong-jawed face, an A-line lob angled forward softens the corner, and face-framing that starts at the jaw sits right along the line you want to blur. Heart-shaped faces carry width at the temples and narrowness at the chin, so weight belongs low: a blunt collarbone line or flipped ends add the bottom width that balances the forehead, and curtain bangs cover the widest part of the brow. Oval faces can take any of the 20 cuts above, which is genuinely true rather than a compliment. Long faces should avoid a center part with poker-straight length falling flat on both sides, since that reads as two vertical lines; a fringe or a deep side part interrupts it. Match the photo to your density as well as your face, because a cut that suits your shape but not your hair will still disappoint.
Layers, Face-Framing and How to Ask Your Stylist
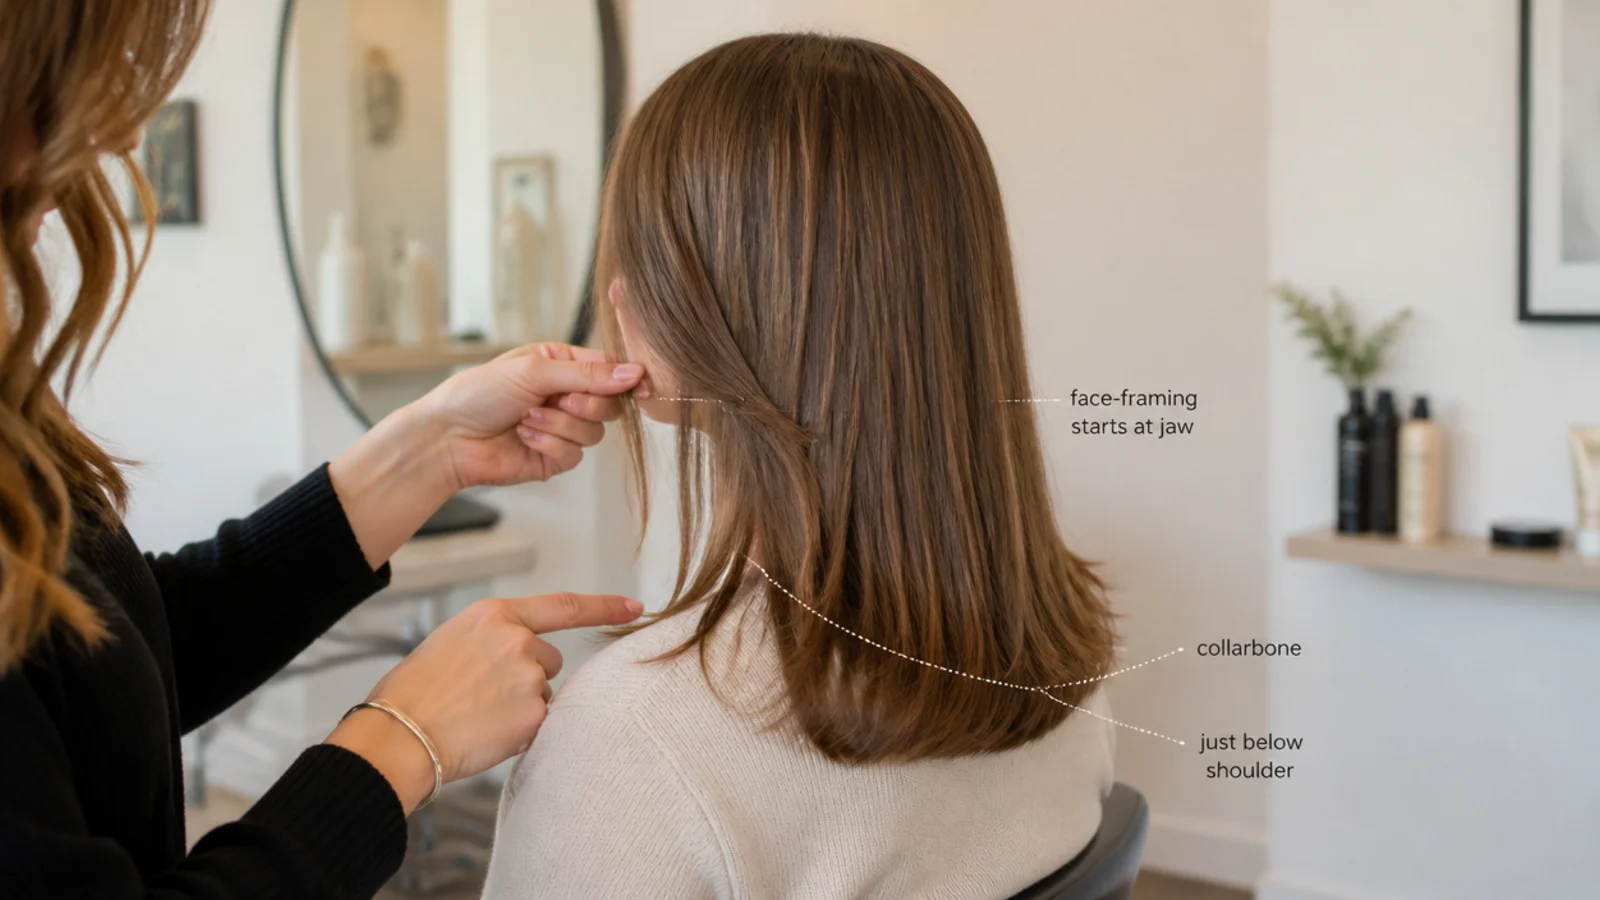
Bring wording, not adjectives. The sentence that gets you a good straight mid length cut is: "collarbone length, long invisible layers, face-framing starting at the jaw." Every part of that is a measurable instruction. Collarbone length names the landmark. Long invisible layers tells the stylist that no interior piece should be short enough to see. Face-framing starting at the jaw sets the exact point, which is the single decision that determines whether the framing opens your face or reads as grown-out bangs. Three more phrases worth having ready. "No thinning shears on my perimeter" protects a blunt line, which is the whole shape on straight hair. "Please dry-check before the final pass" catches the wet-to-dry length difference. "Remove weight from underneath, keep the outline blunt" is the fix for thick hair that puffs. Understand also that face-framing layers, curtain bangs and a money piece are three different things people constantly conflate: framing is length cut on a diagonal, curtain bangs are a fringe with a center split, and a money piece is color. You can have all three or none. For the layered versions in depth, read mid length haircut layers.
Fine vs Thick Straight Hair: The Cut Has to Change
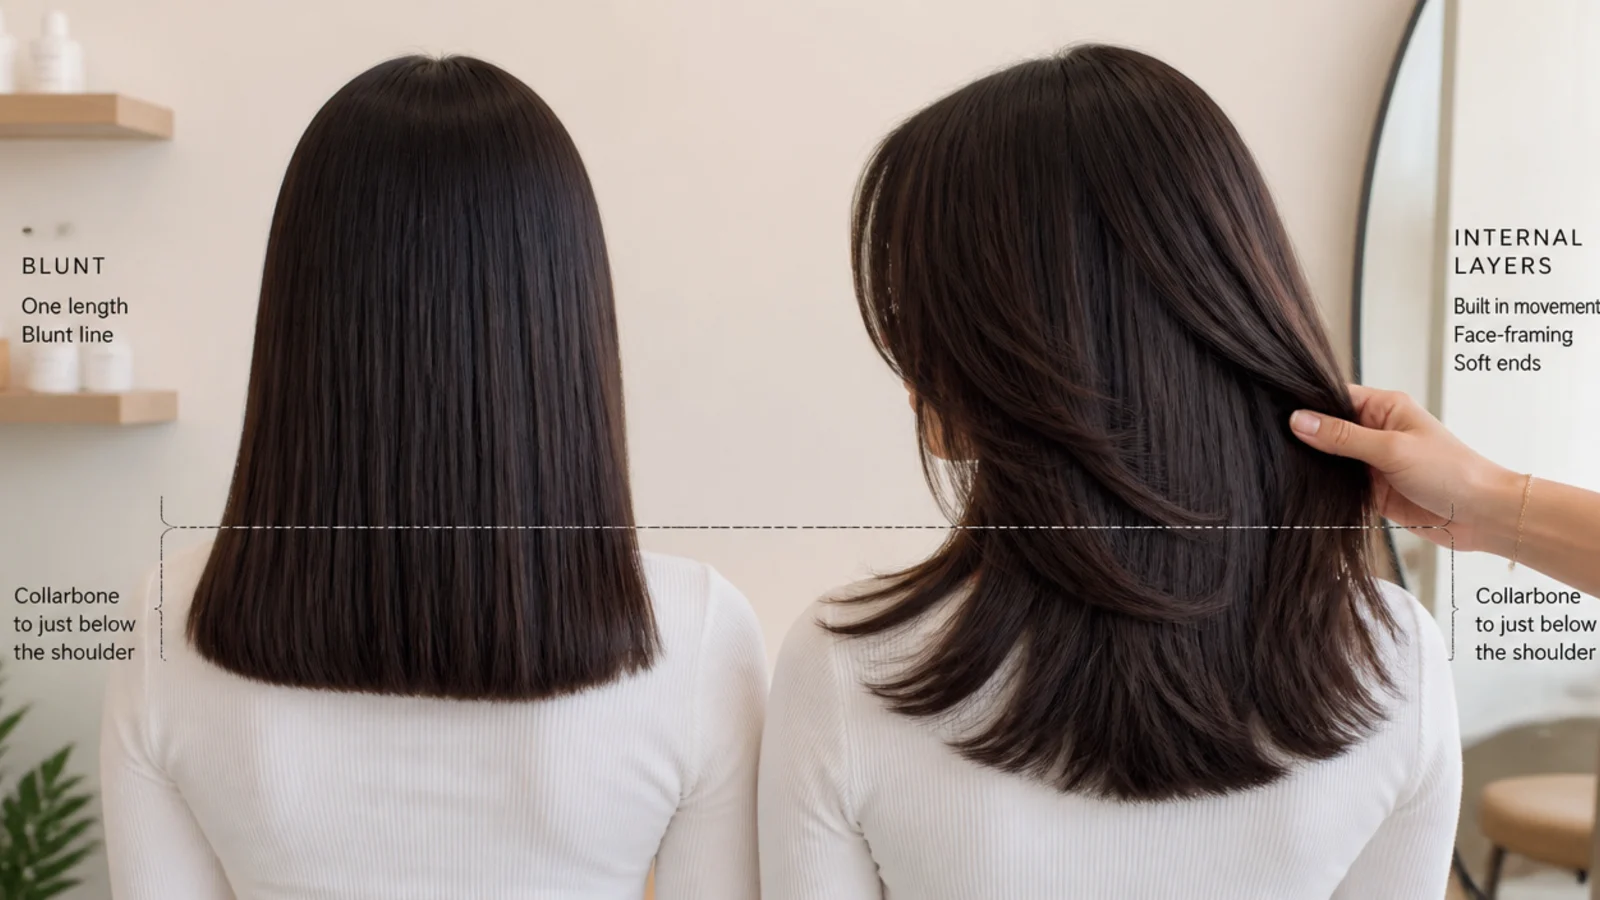
The most common bad advice in this category is that layers add volume. On fine straight hair they do the opposite: layering removes strands from the bottom line, so the ends that already looked sparse look sparser, and the shortest layers stick out of the ponytail forever. Fine hair wants fewer, longer layers or none at all, a collarbone perimeter rather than a below-shoulder one, and volume created by a deep side part or a root spray rather than by scissors. Thick straight hair has the opposite problem: left one length it builds a wedge that widens at the ends and sits like a helmet. It needs weight taken from the interior and from underneath, with the outline kept clean, plus feathered rather than razored edges, since a razor frays type 1 ends within a few washes. Curly and wavy hair is a different conversation again, because it has to be cut dry or curl by curl so the length lands where you want once it springs up. See mid length haircut fine hair, or, if your hair is not actually straight, wavy mid length haircut and curly mid length haircut.
Day-to-Day Styling and Cuts That Look Good on Day-Three Hair
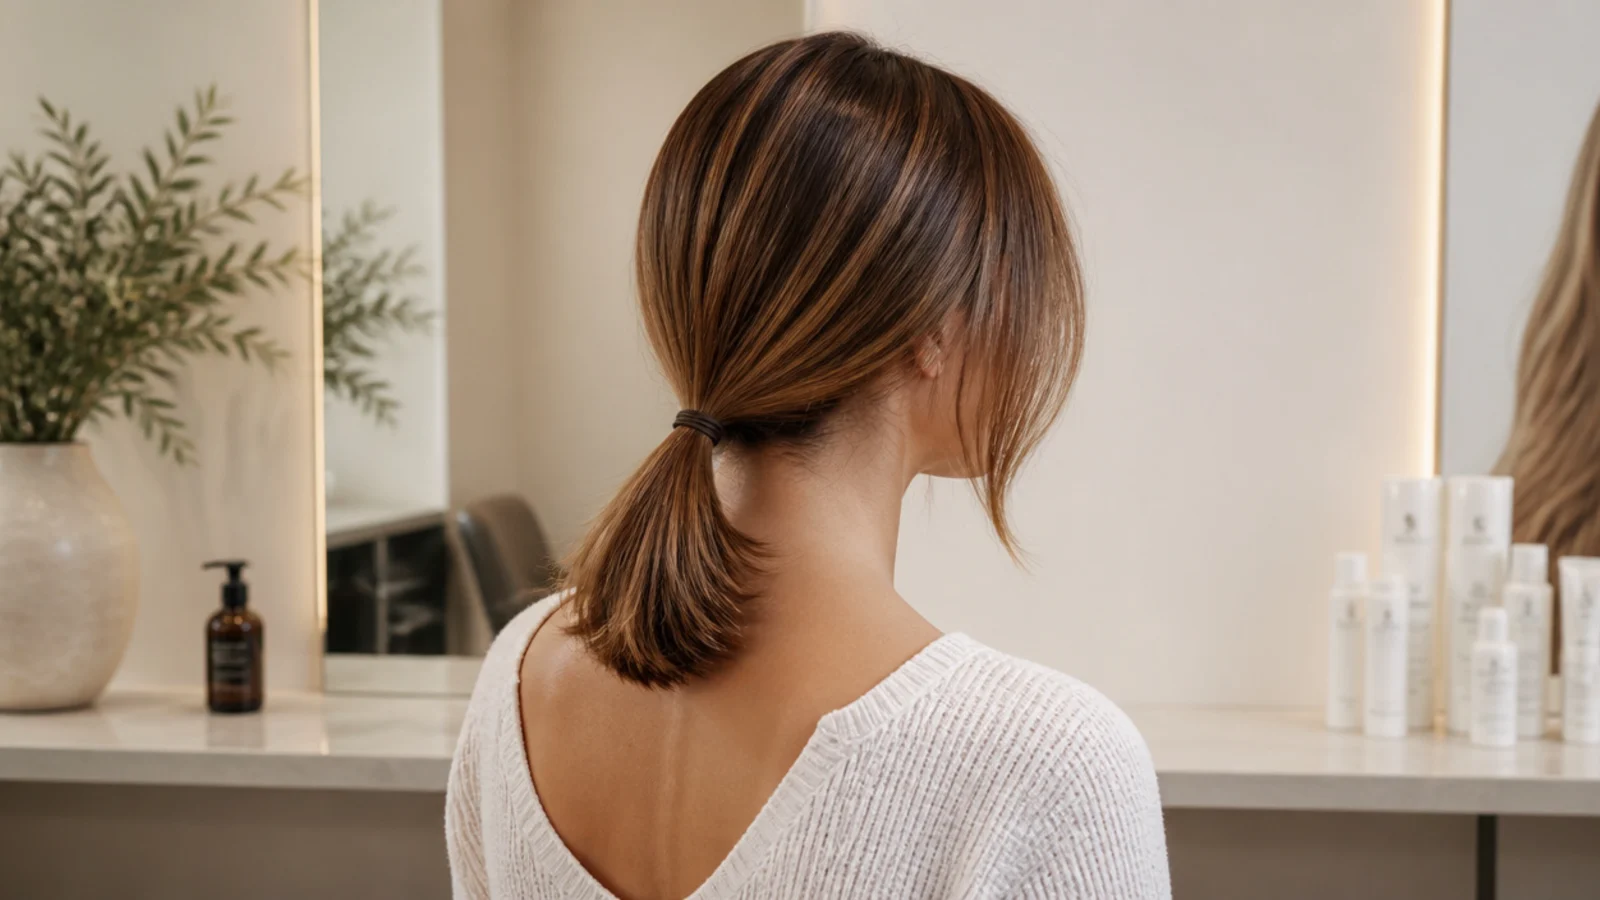
Straight hair does not hold a shape, it holds a line. A blowout on type 1 drops within a few hours in any humidity, which is why the cuts that win here are the ones that look intentional with no styling at all. Realistically: a blunt collarbone cut needs 0 to 5 minutes and a pea of serum on the ends. An A-line lob or a flipped-ends lob needs about 8 minutes with a 2 inch round brush. A butterfly cut or a shag needs 12 to 15 and some texture spray. Choose according to your actual mornings, not your aspirational ones. On day three, the useful moves are a dry shampoo pass at the part only, a deep side part to reset the roots, and a low ponytail or a tucked half-up rather than a restyle. Mid length is the length where a claw clip finally works, which is its quiet advantage over a bob. For styles that hold, see cute hairstyles that last all day and 5 minute everyday hairstyle; for heat-free bend, look at heatless curl tools compared.
Growing Into or Out of a Straight Mid Length Cut
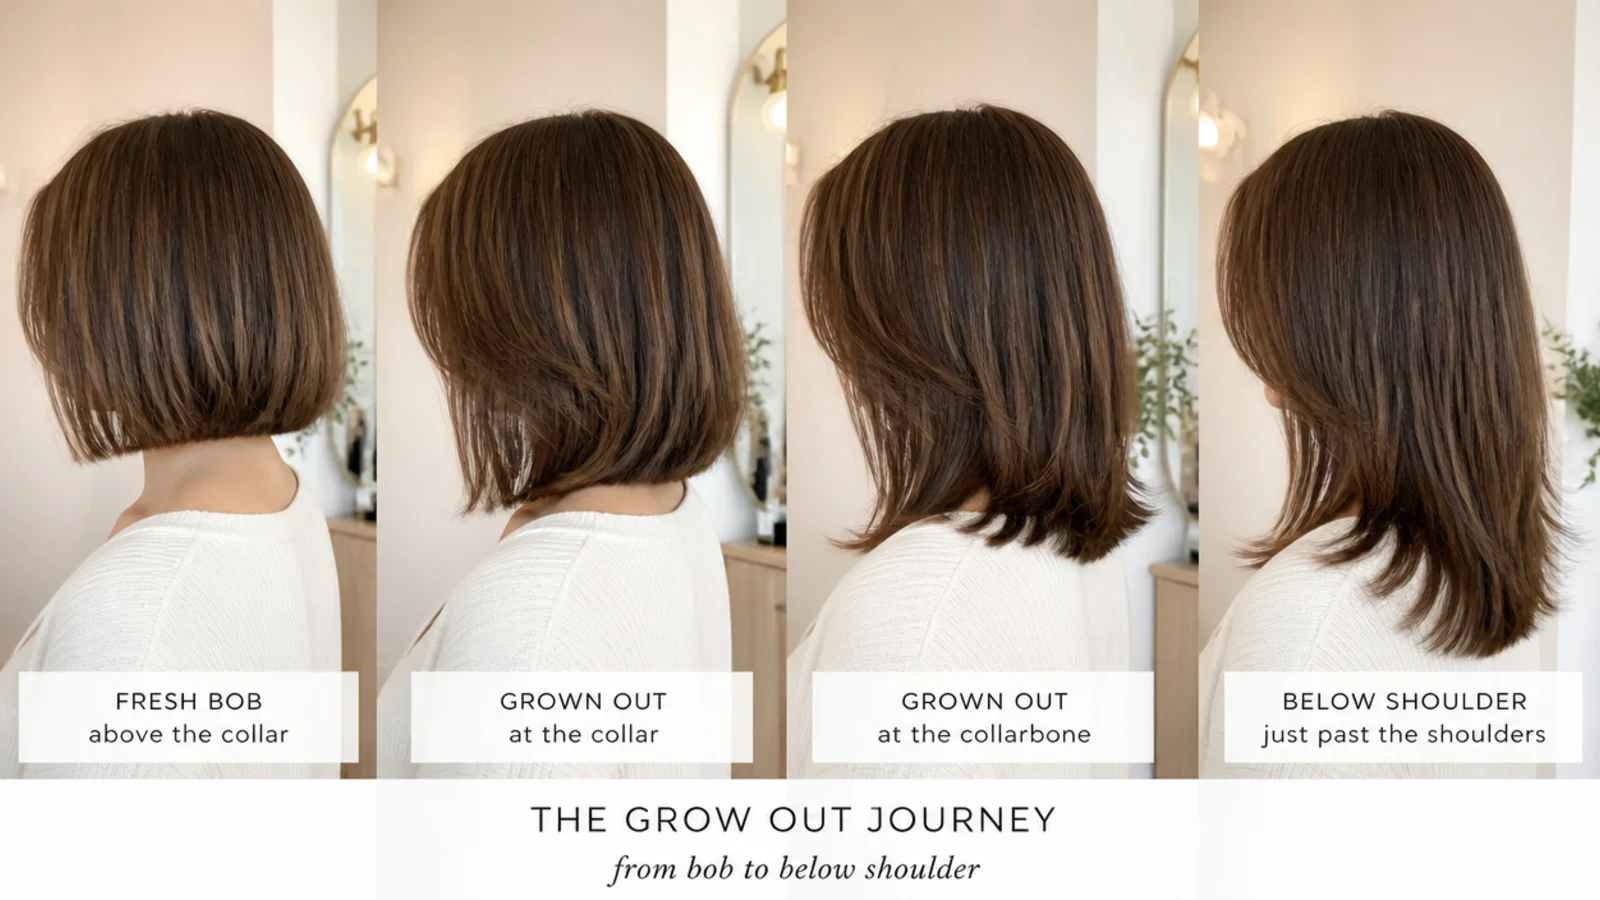
Hair grows roughly half an inch a month, so a bob at the chin takes about eight to ten months to reach the collarbone, and a collarbone cut reaches the middle of the back in roughly 12 to 18 months. That number is the honest answer to the fear behind this whole search, which is what happens if you hate it. The grow-out is easier from a blunt or U-shaped perimeter than from a heavily layered one, because a solid line just gets longer while layers drop unevenly and the shortest pieces reach the awkward stage first. Trim every 8 to 12 weeks while growing, taking a quarter to half an inch, and say "keep my corners" so the perimeter does not round away into a taper. Going the other direction, from long to mid length, do it in two appointments rather than one if you are nervous: cut to below the shoulder first, live with it for a cycle, then take it to the collarbone. If you decide to keep going shorter, bob haircuts is the next stop, and hairstyle for your hair type helps sanity-check the decision against your texture.
Frequently Asked Questions
What is the difference between a lob and a mid length cut?
A lob is a specific shape, a long bob, that sits between the chin and the collarbone and usually carries a defined perimeter. Mid length is a length range, collarbone to about two inches below the shoulder, and it covers many shapes including lobs, U-cuts, shags and butterfly cuts. Every lob at collarbone length is a mid length cut, but plenty of mid length cuts are longer than any lob.
What is the best medium length haircut for low-maintenance styling?
A blunt one-length cut at the collarbone with no interior layers and no texturizing. On straight hair it air dries into the shape it was cut in, needs nothing but a little serum on the ends, and still looks deliberate on day three. It also holds its line for 10 to 12 weeks between trims, where layered shapes start looking soft at eight.
How do I add volume to my straight hair without layers?
Move the part. Shifting it two to three inches off center forces the hair up and across its natural fall and gives real root lift with no cutting at all. Beyond that, blast the roots with cool air against the direction of growth for 20 seconds, use a mousse or root spray at the scalp rather than a conditioning cream, and keep the perimeter blunt so the ends look dense.
Which medium length cuts grow out the best?
Blunt one-length cuts and shallow U-cuts, because a solid perimeter simply gets longer and stays wearable for months. A-line lobs are next, since the angle softens gradually. Heavily layered shapes and butterfly cuts grow out worst, because the shortest interior pieces hit an awkward in-between length while the rest keeps going, which usually forces a shaping appointment.
How often should I trim my medium length straight hair?
Every 8 to 12 weeks. Layered cuts sit at the eight week end because layer ends taper and lose definition quickly; blunt cuts can stretch to 12. Take a quarter to half an inch each time. If you are actively growing your hair, trim on the longer cadence but do not skip it entirely, since split ends travel up the shaft and eventually cost you more length than the trims would have.
Do layers suit fine straight hair?
Sparingly, or not at all. Layering removes strands from the bottom line, so fine hair that already had see-through ends looks thinner rather than fuller. If you want some movement, ask for two or three long invisible layers with nothing shorter than the collarbone, plus face-framing at the jaw, and refuse thinning shears entirely. A blunt collarbone line is the most reliable answer.
Where should face-framing layers start on a mid length cut?
At the jaw for most people, because that is low enough to blend into the length and high enough to open the face. Chin-start suits round faces, since it keeps a vertical line past the widest point. Cheekbone-start is the most dramatic and the fastest to get awkward as it grows, since it behaves like a grown-out fringe that needs styling every day.
What are the trendiest medium length straight haircuts right now?
The blunt collarbone cut with no visible layers is the dominant look, followed by the A-line lob and the butterfly cut. Curtain bangs remain the most requested add-on because they change the face without costing length. The consistent thread is a clean, solid perimeter: heavily thinned and razored ends read dated on straight hair, and stylists are cutting far less texture into type 1 than they were a few years ago.
Can straight mid length hair hold a curl?
It can hold a bend but rarely a tight curl for long. Type 1 hair has few natural hydrogen bonds pulling it into shape, so anything you set drops as soon as humidity gets to it. Use a heat protectant, curl in 1 inch sections at around 350 degrees, and let each section cool fully in your hand before releasing it, then finish with a flexible-hold spray rather than a stiff one.
Which mid length haircut look are you saving?
If you take one thing from these 20 straight mid length haircut ideas, make it this: on straight hair the perimeter does the work. Pick your bottom line first, at the collarbone or an inch or two below the shoulder, then decide how much weight comes out above it, and let face-framing start at the jaw so the shape opens your face without shortening your length. Fine hair wants fewer, longer layers than the internet tells you. Thick hair wants weight removed from the interior, not the surface. Book a trim every 8 to 12 weeks, save the photos that match your density and not just your face, and browse the rest of the mid length haircut hub or start with mid length haircut layers.