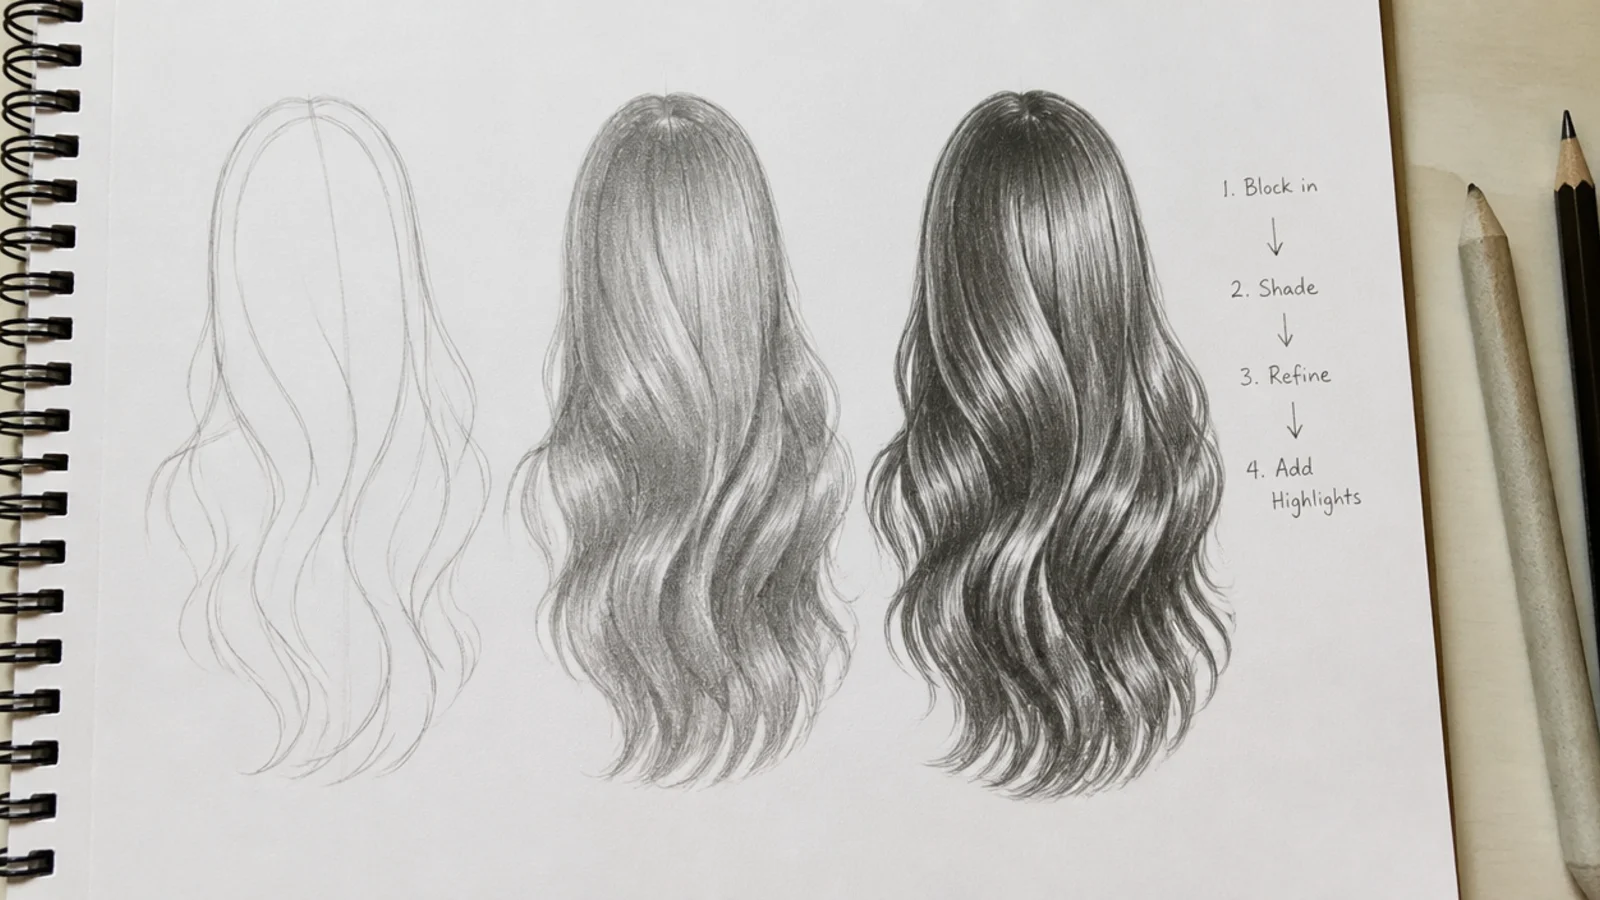
Quick Comparison
| Pencil on Paper | Digital Sketching on a Tablet | |
|---|---|---|
| Startup cost | Under 25 dollars for five graphite grades, paper and a kneaded eraser | 150 to 400 dollars for an entry tablet, plus software |
| Highlights | Reserved as untouched white paper or lifted with a kneaded eraser | Painted back in on a layer at any point, fully reversible |
| Value range | 2H to 6B gives roughly nine usable steps of gray | Unlimited, but easy to flatten by working only mid tones |
| Fixing mistakes | Erasing damages the paper surface after two or three passes | Undo is free, which can slow down decision-making |
| Flow lines | Whole-arm strokes come naturally and stay long | Stroke stabilizer needed until wrist habits are retrained |
| Texture work | Paper tooth adds grain that reads as hair automatically | Needs a textured brush or the strokes look plastic |
| Best for beginners | Yes, forces you to plan values before committing | Fine, but layers let you avoid learning silhouette discipline |
| Time per sketch | 10 to 30 minutes for the tutorials above | Similar, though color and highlights add 5 to 10 minutes |
| Best use case | Sketchbook practice, portrait study, learning value | Character design, colored hair, revisions and client work |
1. Draw the Skull and Mark the Hairline Before Any Hair
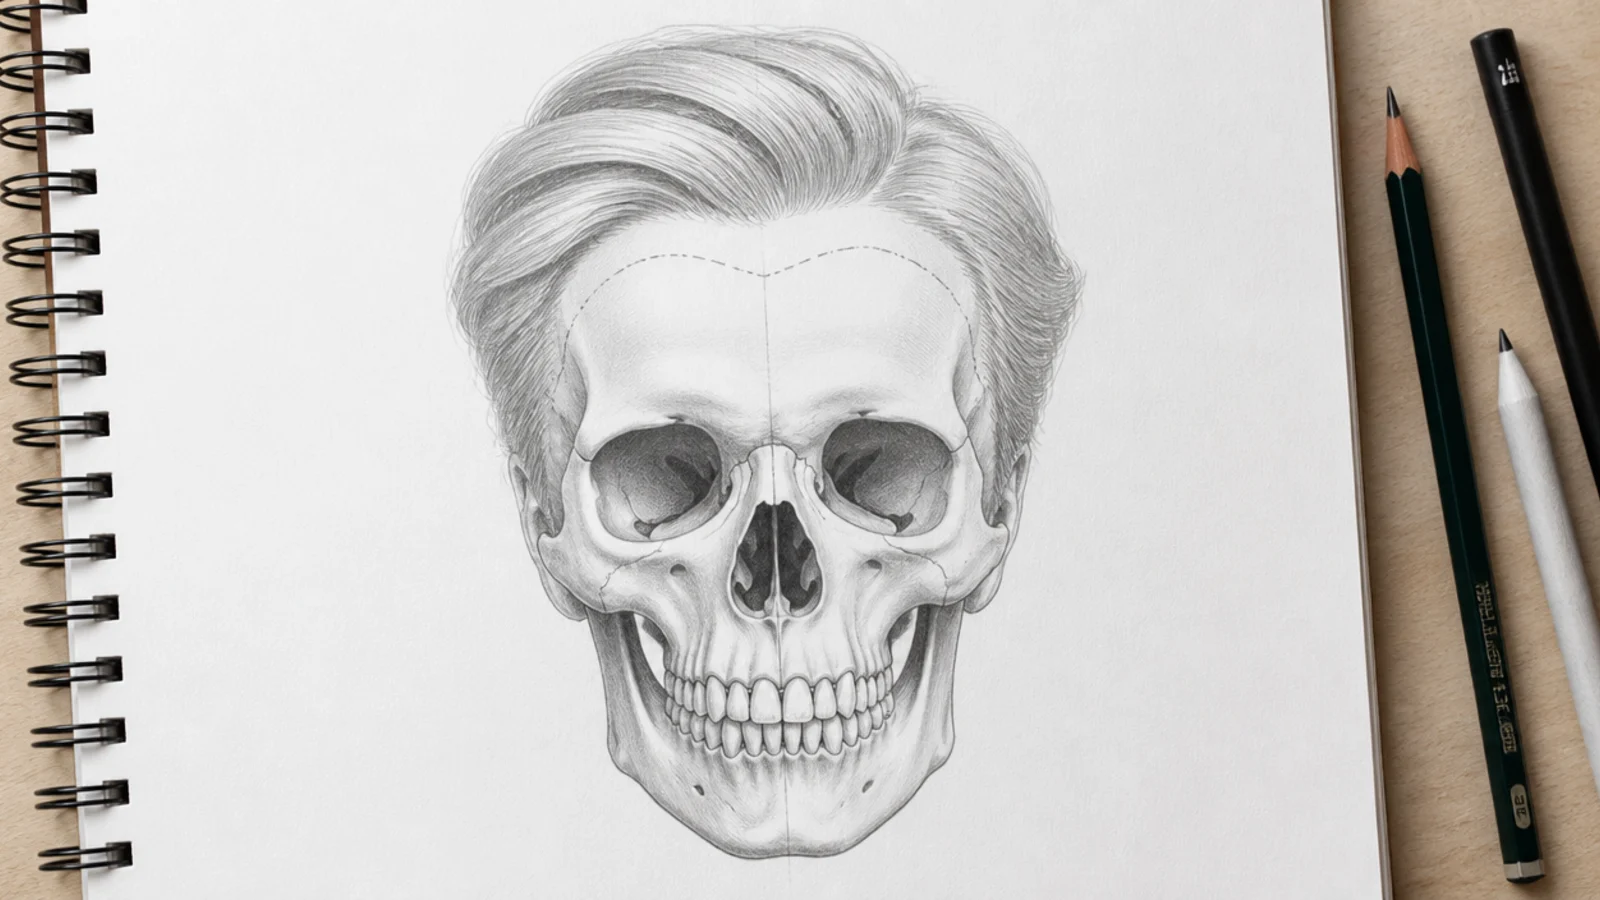
Start with the head itself in 2H, including the full curve of the cranium, because beginners flatten the top of the skull and then have no room left for hair volume. Mark the hairline about one third of the way down the forehead, and draw it as a soft irregular line with small breaks at the temples, never as a hard clean arc. Add a second faint line at the crown, roughly two thirds back on the top of the skull, since that is the point every section of hair grows out from. Nothing here should be dark enough to survive into the finished sketch.
Common mistake: Drawing the hairline as a smooth even curve, which instantly reads as a wig line rather than a hairline.
Pro tip: Keep the skull line visible under the hair so you can check volume clearance later.
2. Block the Hair Silhouette as One Solid Shape
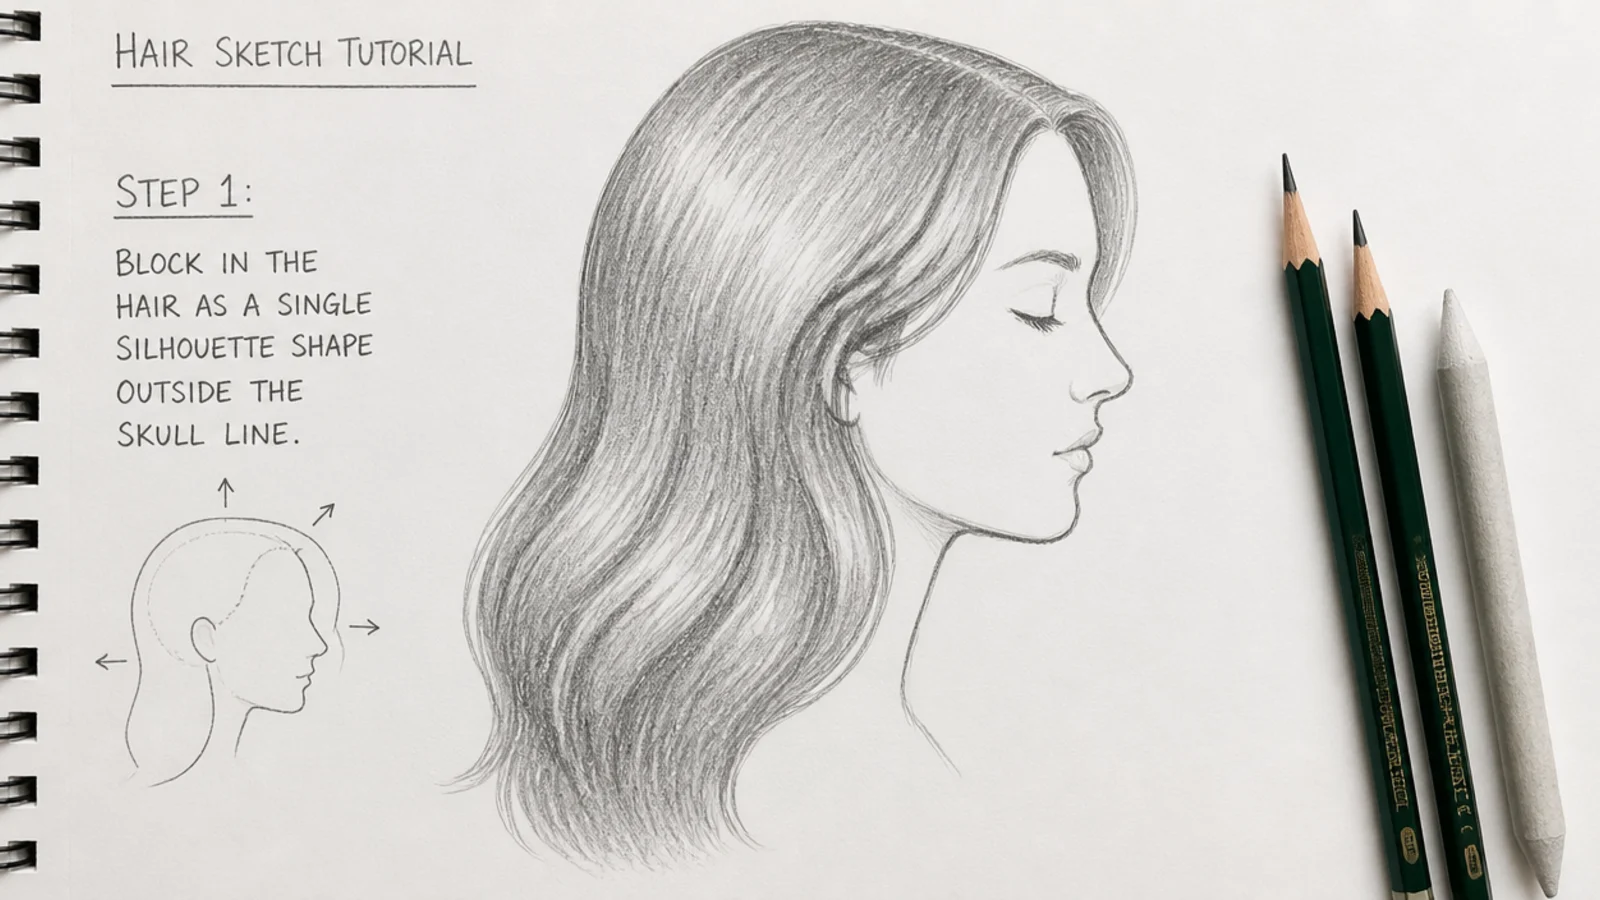
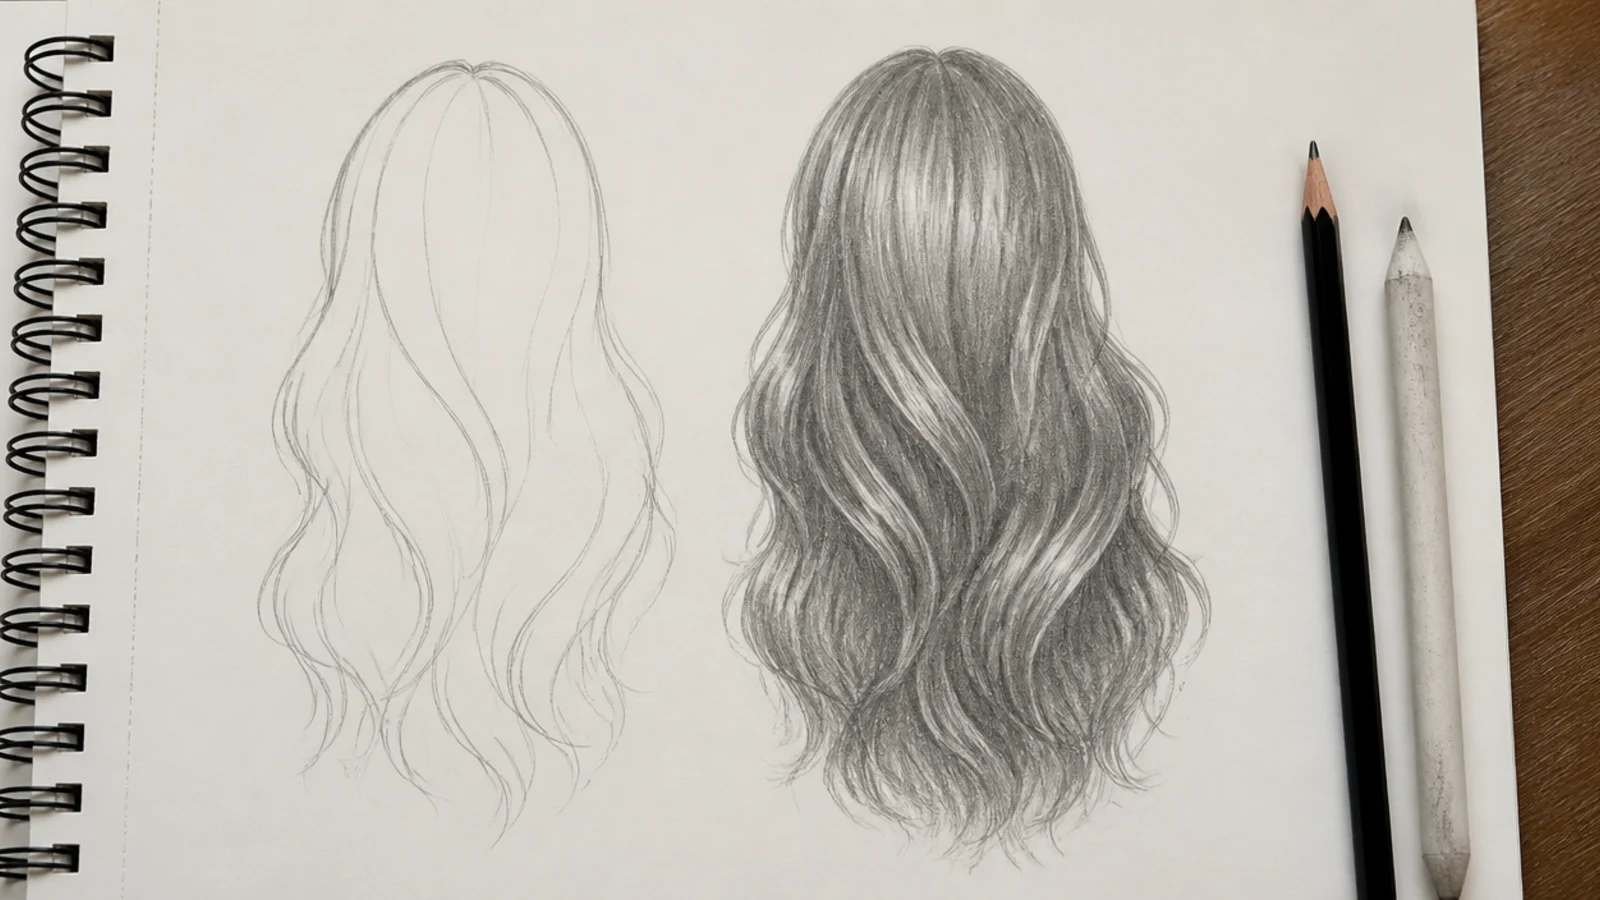
Draw the entire hairstyle as one closed shape sitting about 5mm outside the skull line at the crown, more for thick or curly hair. Hair has thickness, so a silhouette drawn flush against the skull always looks painted on. Judge this shape alone: fill it in mentally as a black shadow and ask whether it still reads as a bob, a ponytail or an afro. This is the single highest-leverage moment in any hair sketch and the step beginners skip fastest.
Common mistake: Drawing individual strands at this stage, which locks in a shape you have not actually decided on yet.
Pro tip: Squint at the silhouette; if it stays readable while blurred, the shape is working.
3. Find the Crown and Draw Five or Six Flow Lines
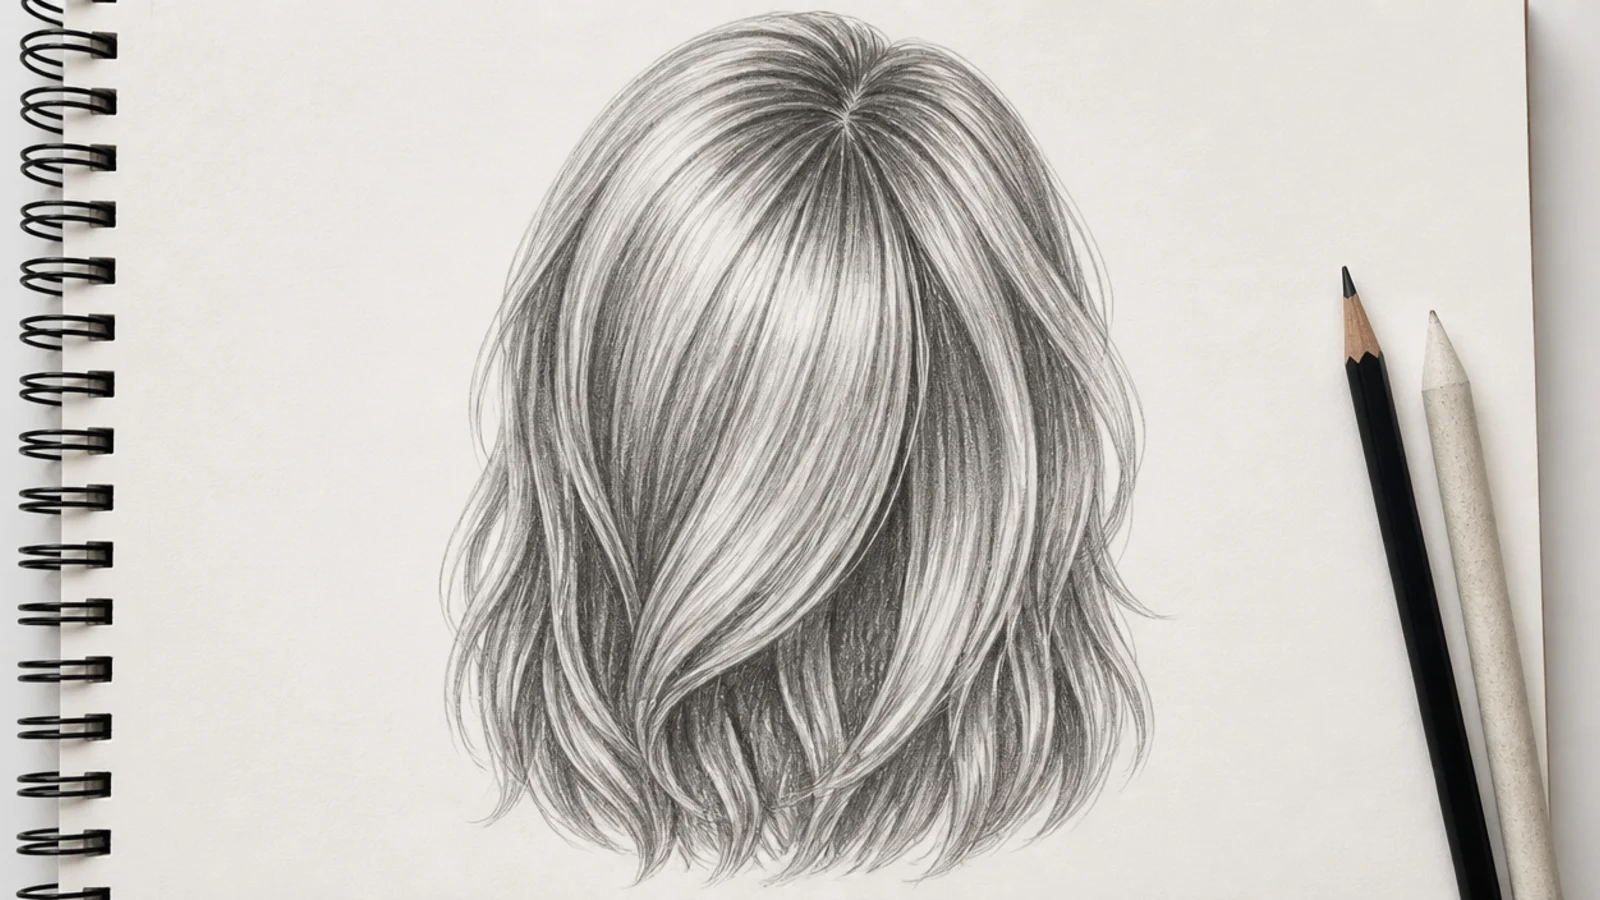
From the crown point you marked, run five or six long 2H lines out through the mass to the ends of the hair. These are direction lines, not hairs. Every one should fan slightly, because hair radiates from the crown and only looks natural when the lines diverge. Parallel lines are what makes drawn hair look like corduroy. If the style has a part, the lines on each side of it should sweep away from the part in opposite directions.
Common mistake: Running the flow lines straight down the page instead of following the curve of the skull first.
Pro tip: Draw flow lines with your whole arm, not your wrist, so they stay long and confident.
4. Divide the Mass Into Three or Four Sections
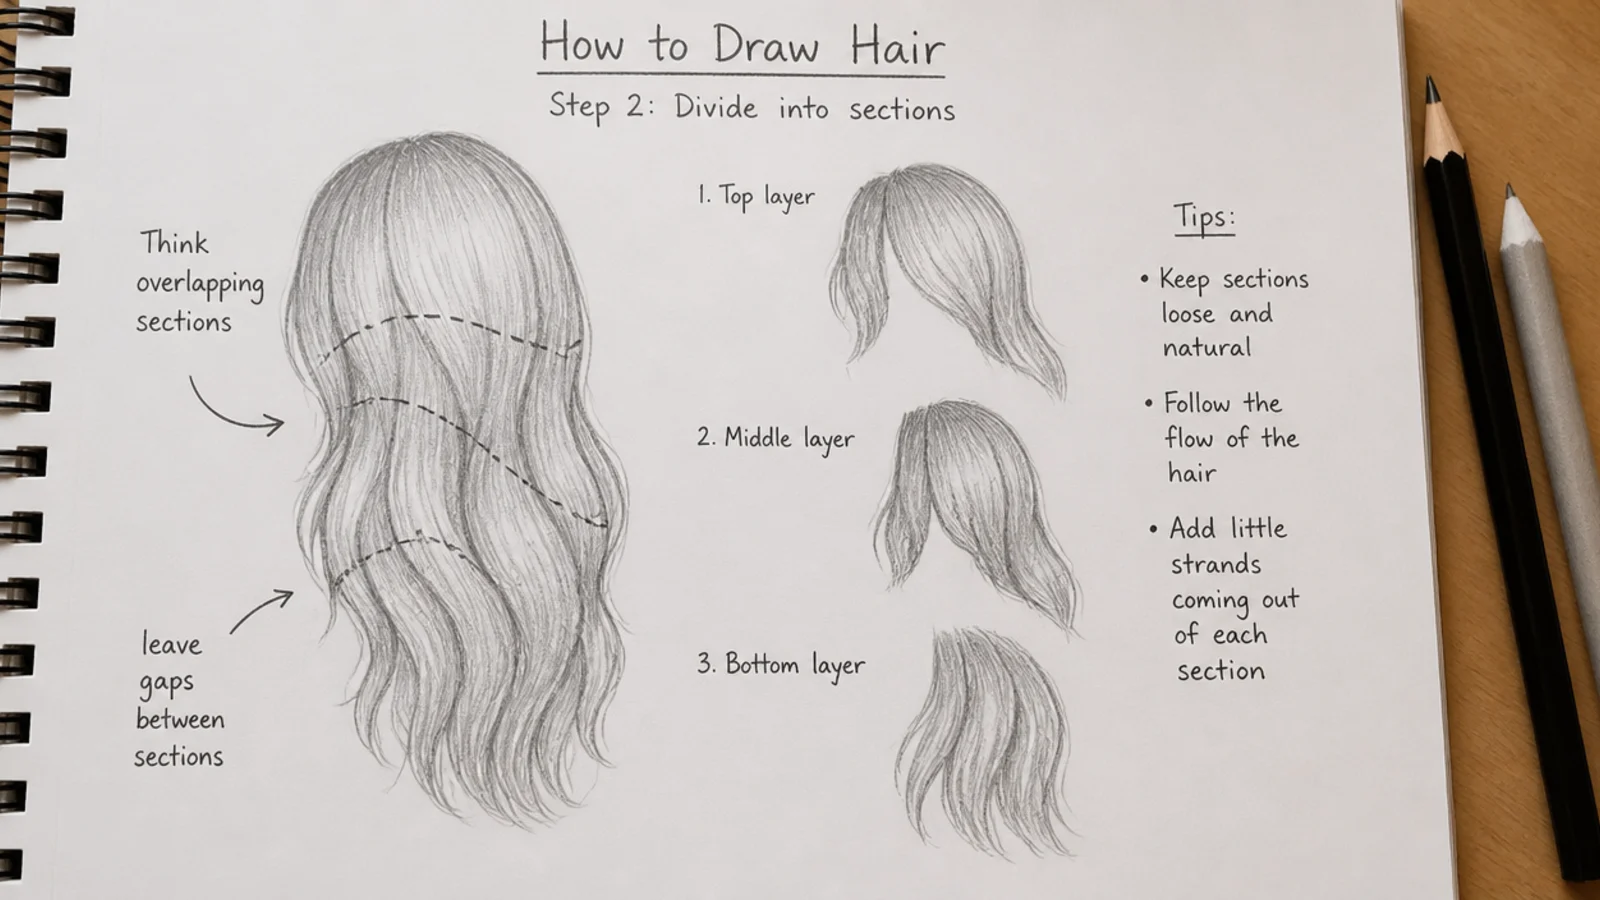
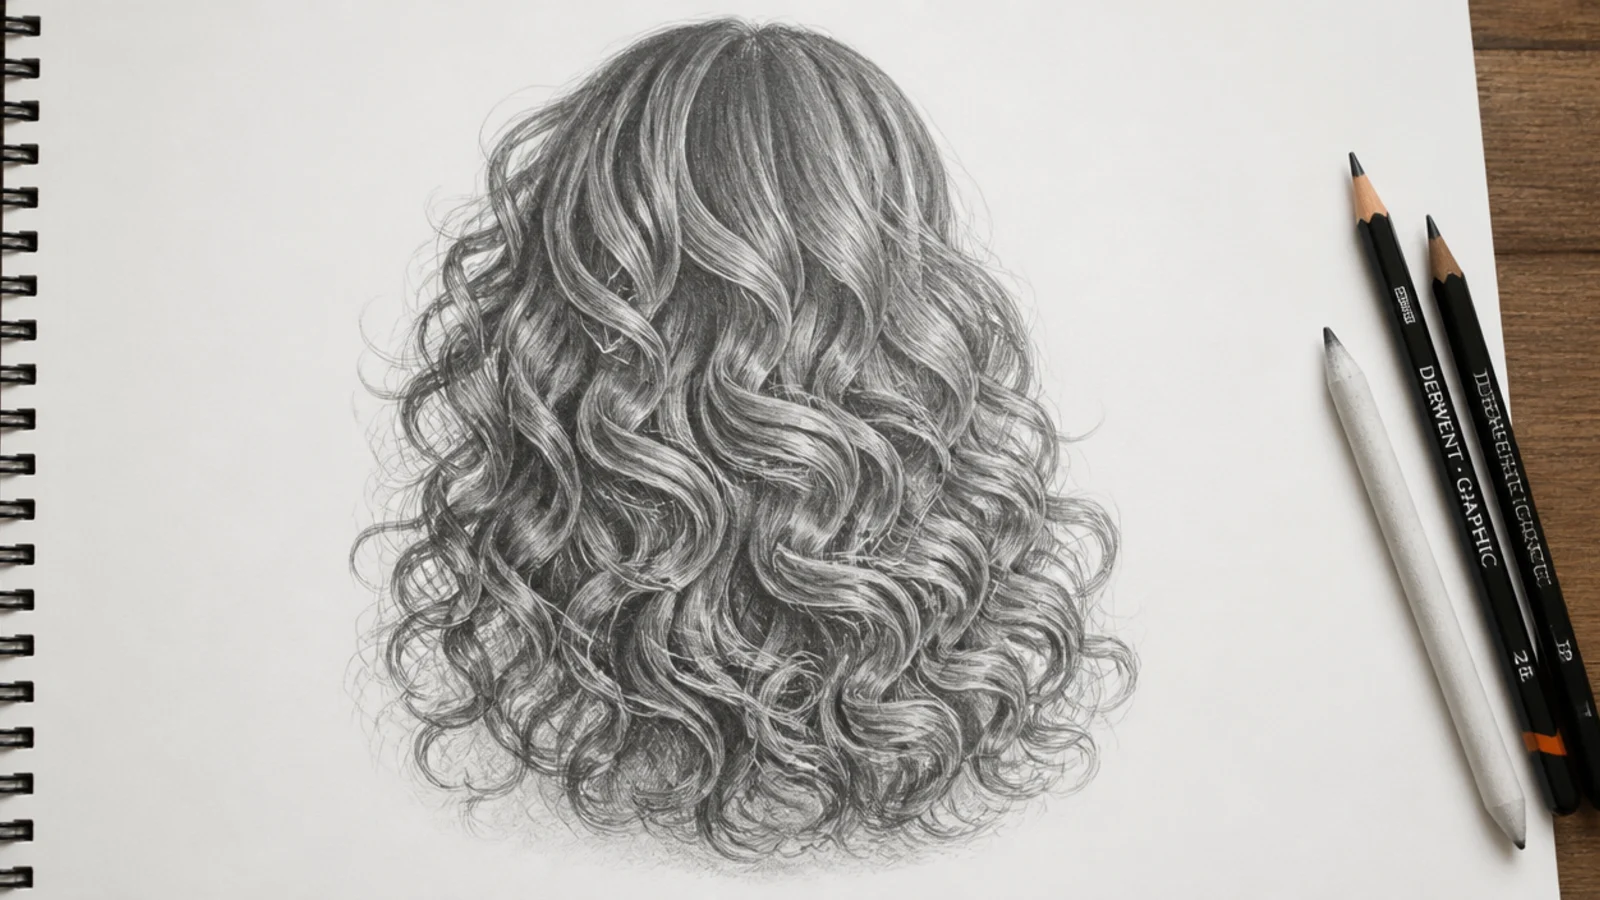
Real hair separates into clumps, so split the mass into three or four ribbon-shaped sections that overlap each other. Vary their widths deliberately: one broad section, one narrow, one in between reads far more natural than three equal bands. Let the sections cross in front of one another so some ends disappear behind others, which is what creates depth before you have shaded anything. This sectioning is also what makes curly hair sketches work, since curls are just heavily twisted sections.
Common mistake: Making every section the same width, which produces a striped, wig-like surface.
Pro tip: The gaps between sections become your darkest values later, so plan them now.
5. Lay the Mid Tones With 2B and 4B Along the Flow
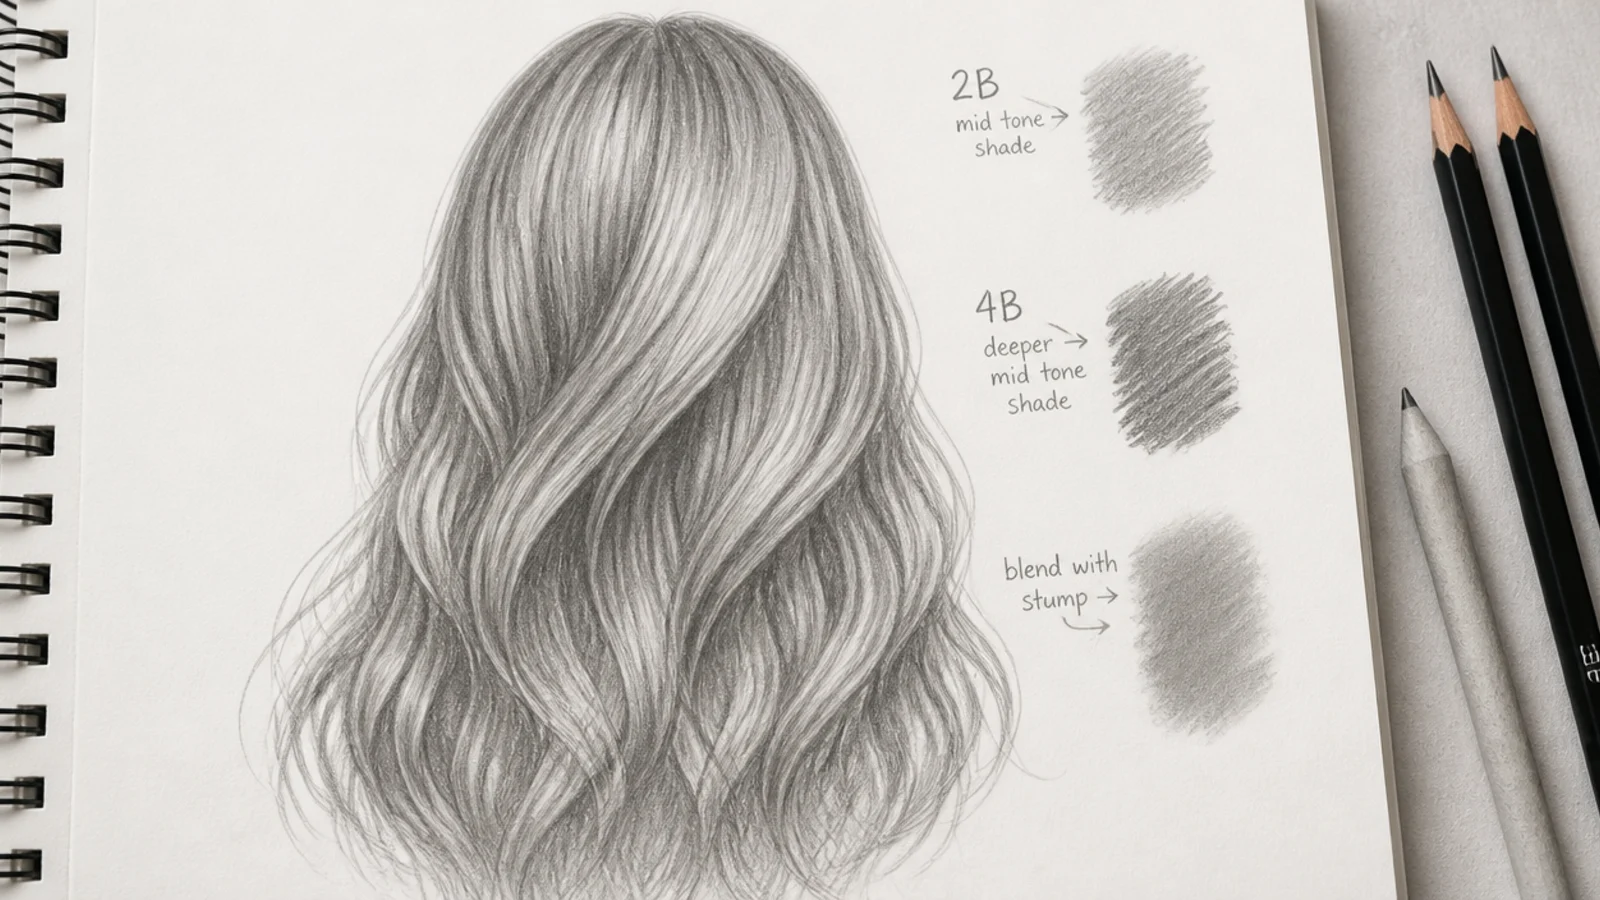
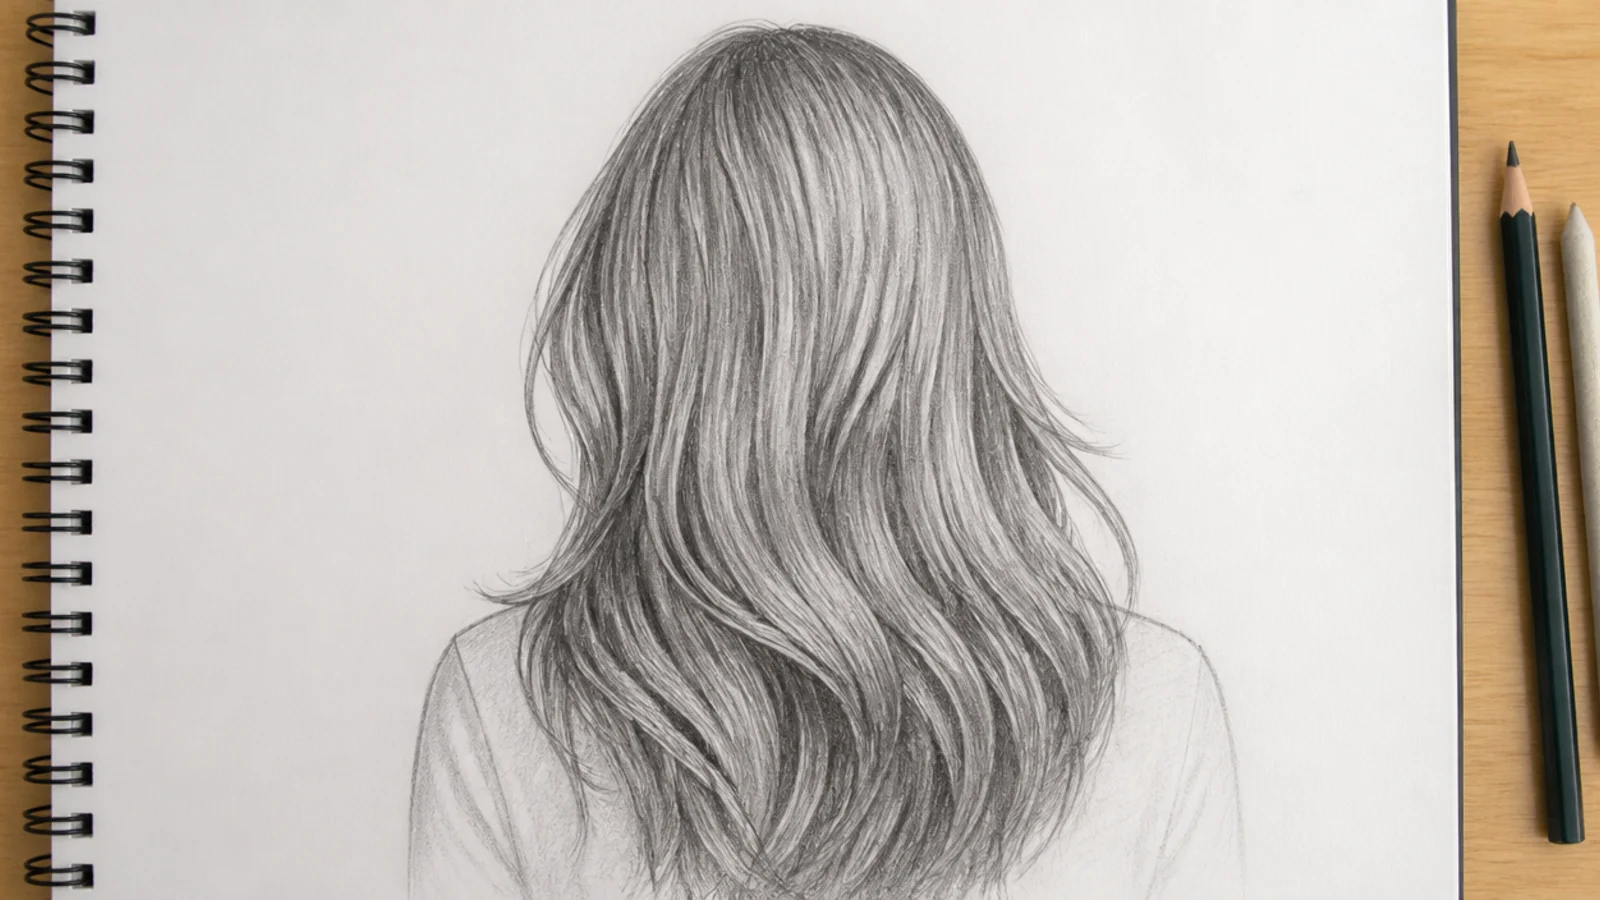
Switch to 2B and stroke along the flow lines, never across them, with light pressure and long strokes that lift at the end so they taper. Cover everything except the band where the light hits, usually a curved strip near the crown. Then repeat with 4B in the recesses: under the part, inside the curve of every wave, and where hair tucks behind the ear or the shoulder. Work light to dark throughout, because graphite is easy to add and hard to remove.
Common mistake: Shading with short scratchy strokes, which reads as texture noise rather than direction.
Pro tip: Rotate the paper so every stroke pulls toward your hand instead of pushing away.
6. Push the Dark Cores to 6B and Protect the Highlights
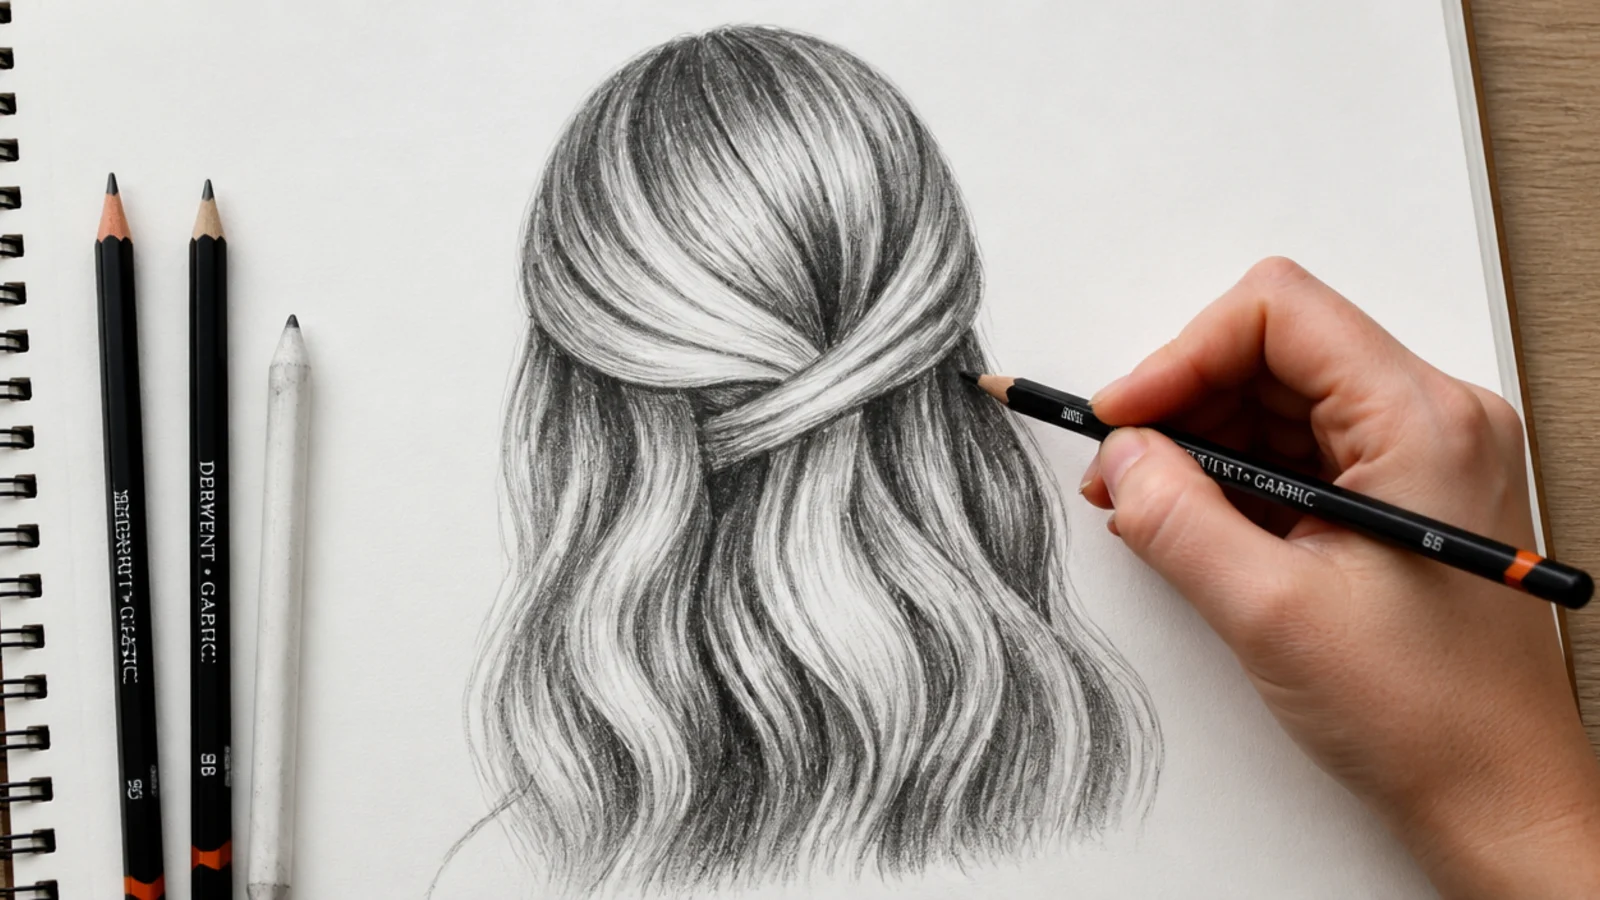
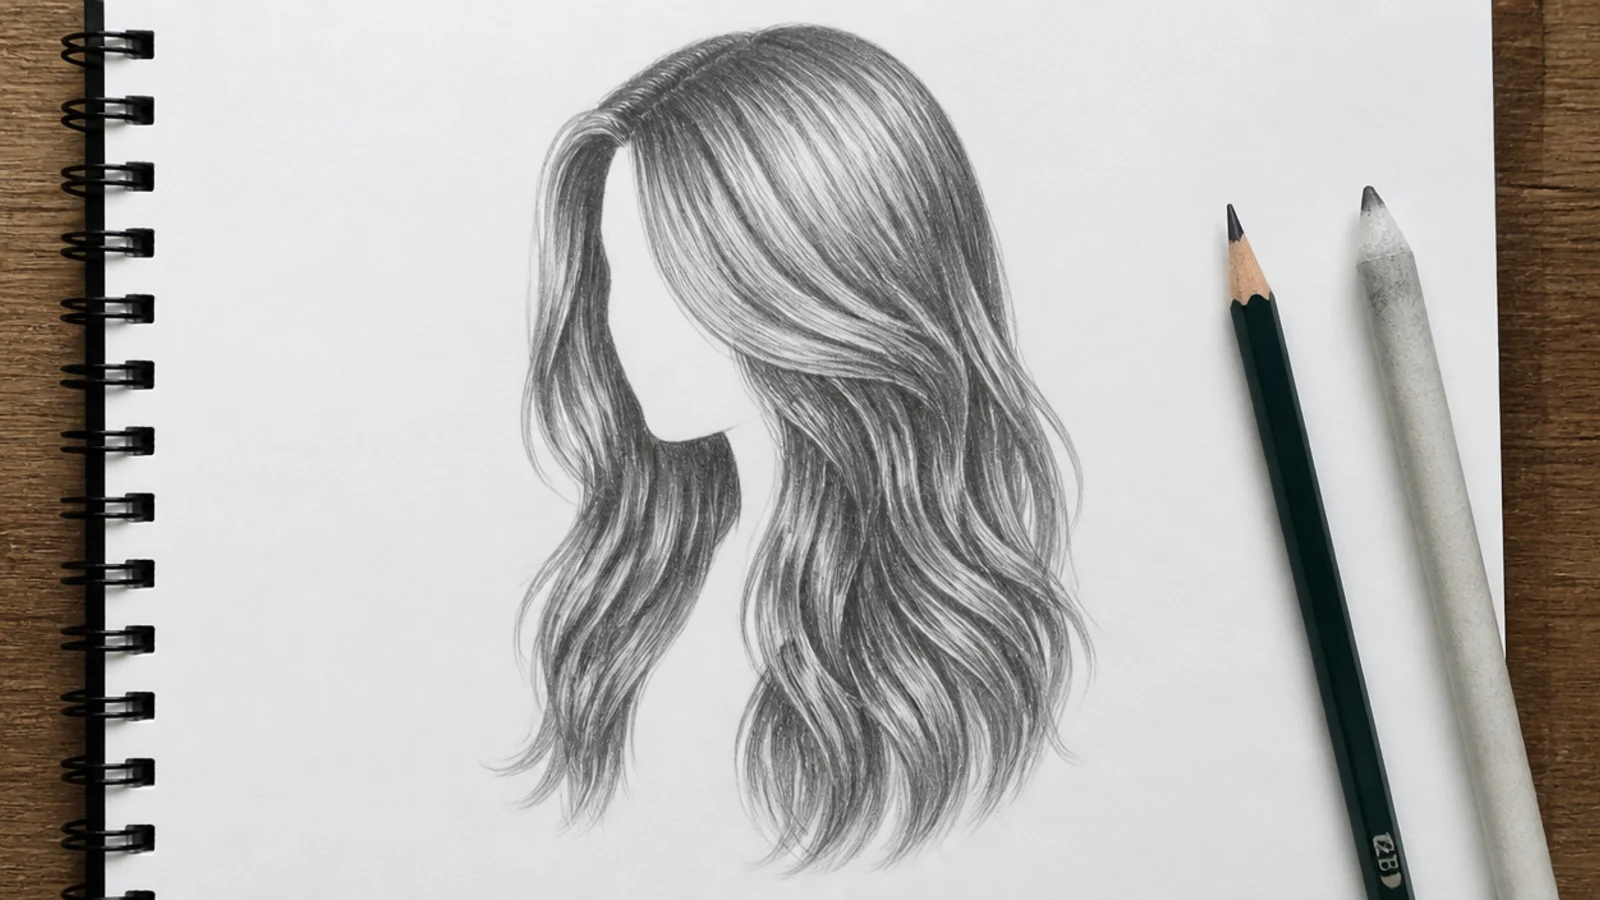
Take 6B into the deepest gaps only: the crevices between overlapping sections, the underside of the mass, and the roots at the part. These near-black cores are what make the untouched paper read as shine. Do not shade the highlight band at all, and if you have already dirtied it, press a kneaded eraser into a wedge and lift the graphite back out in strokes that follow the flow. One clear light band beats five scattered ones.
Common mistake: Spreading dark value evenly across the whole mass, which flattens the hair into a gray helmet.
Pro tip: Blonde and gray hair invert this: keep 6B for the roots only and let 2B carry the mass.
7. Add Grouped Strands and Edge Flicks Last
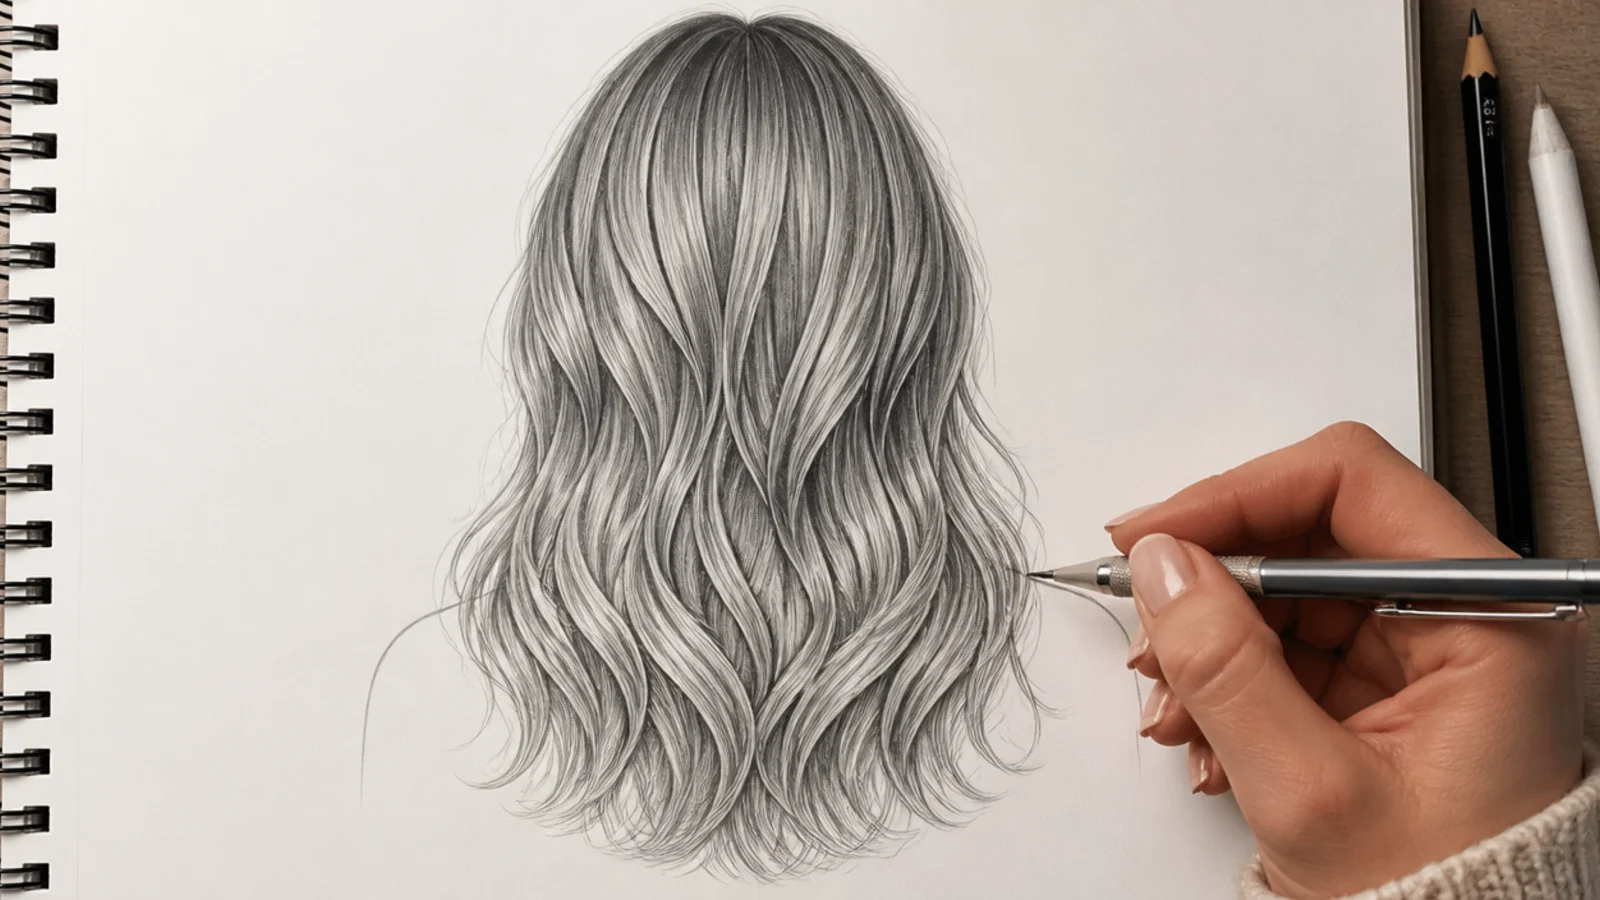
Only now do you draw anything that looks like a hair, and even then draw groups, not singles. Use a sharp HB or a 0.5mm mechanical pencil to lay maybe fifteen to twenty strands total across the whole head, concentrated at the borders between light and dark. Break the outer edge of the silhouette with short flicks that follow the flow, especially at the ends. Those flicks are the difference between hair and a helmet.
Common mistake: Outlining every strand you can see in your reference, which kills the mass you spent six steps building.
Pro tip: Add two or three stray hairs that escape the silhouette entirely; it reads instantly as real.
8. Check Against a Reference and Fix the Flat Spots
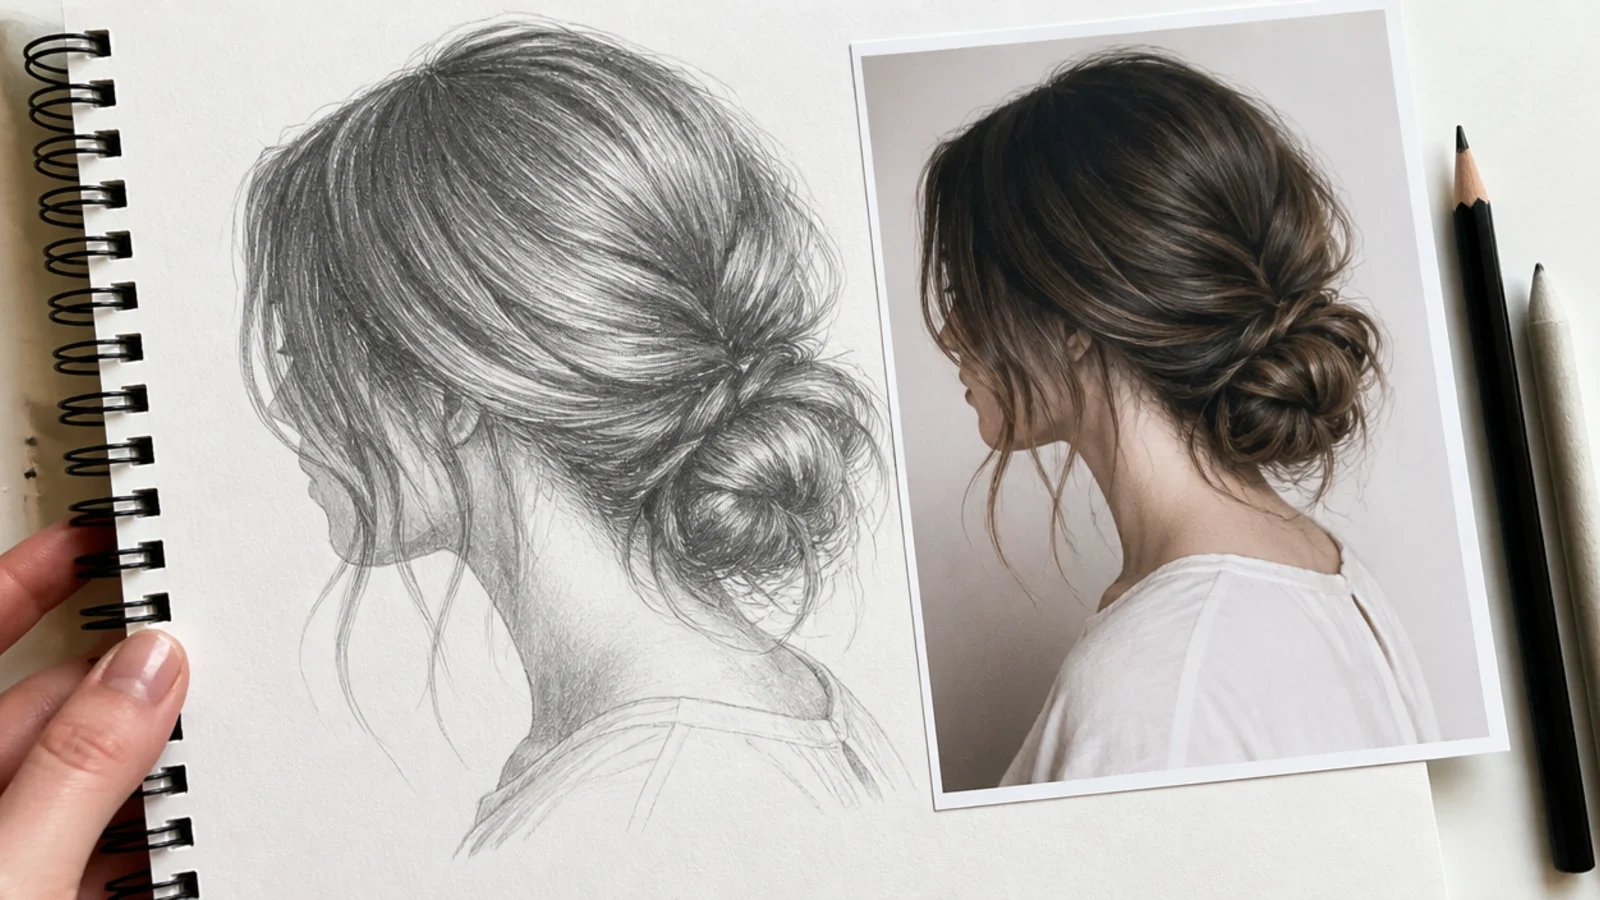
Hold the sketch up to a mirror or photograph it and flip the image, which exposes asymmetry your eye has stopped seeing. Then check three things: is there a true near-black anywhere, is there untouched white paper anywhere, and does the silhouette still clear the skull line at the crown. If any answer is no, that is your fix. Reference a real photo for the shape but never trace the strands, a habit covered in the reference section below and in hair sketch ideas.
Common mistake: Judging the drawing only at arm's length, where a missing value range is invisible.
Pro tip: Photograph in grayscale; color vision hides value errors that a gray photo shows immediately.
How to Start a Hair Sketch: Shape Before Strands
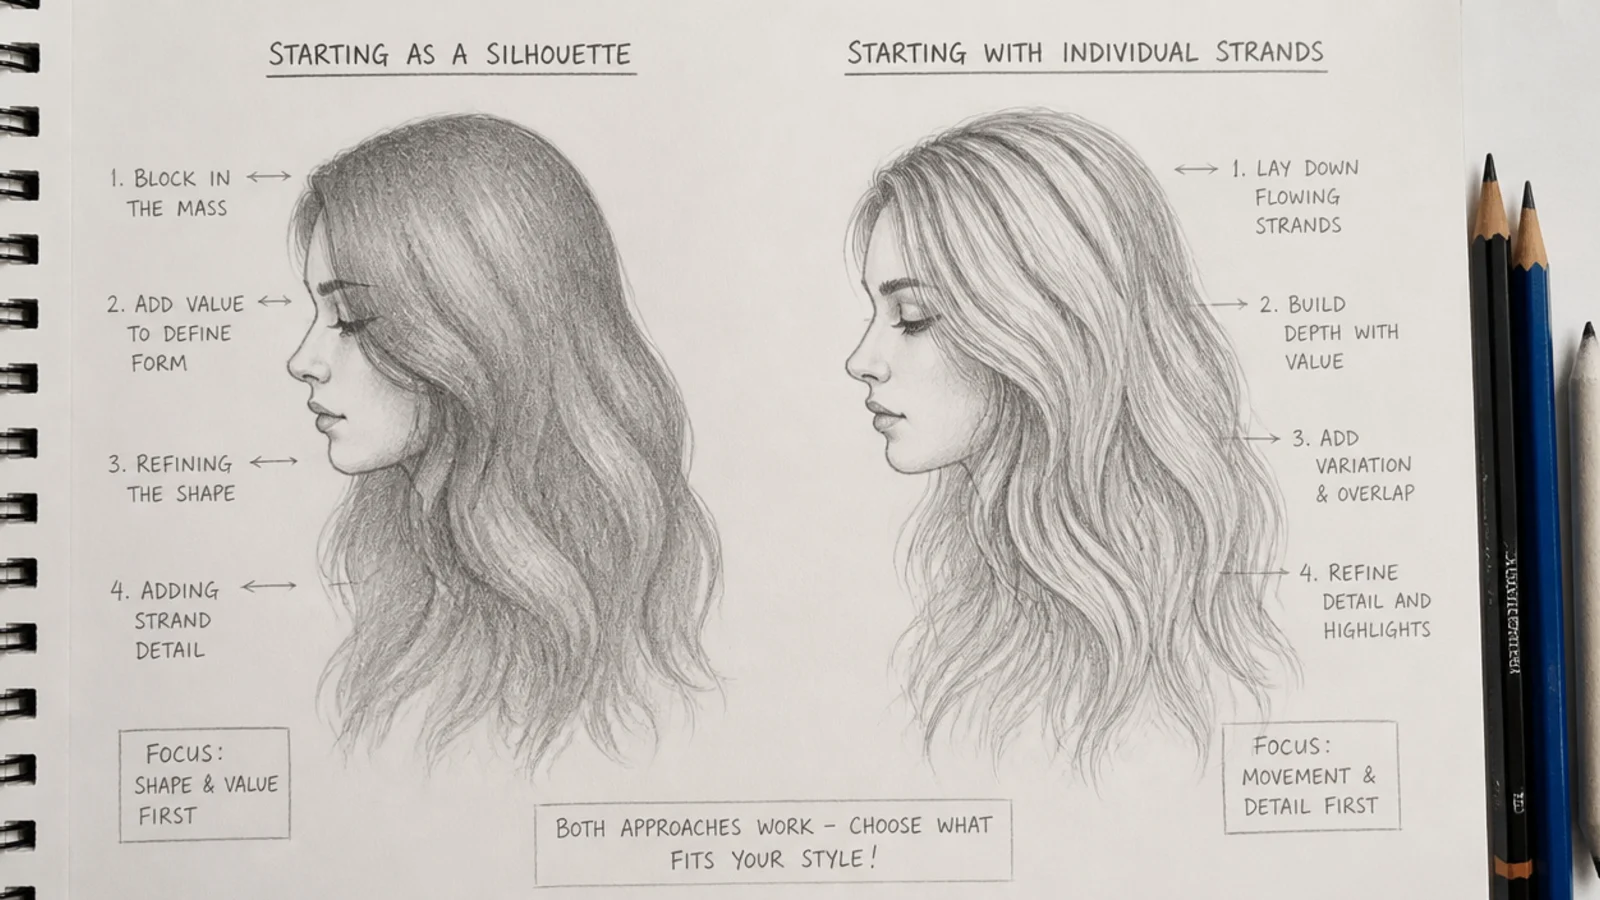
The number one beginner mistake is drawing individual strands too early, and it is worth understanding why it fails rather than just being told not to. A strand drawn before the mass exists has no correct destination, so you end up correcting each one against the last and the shape drifts. Blocking the silhouette first gives every later mark a target. Practically, that means three passes before any hair appears: the skull with its full cranial curve, an irregular hairline about a third down the forehead, and the crown point roughly two thirds back on the top of the head. Then one closed shape for the entire hairstyle, sitting 5mm off the skull for straight hair and up to 4 inches off it for an afro. Test that shape by squinting until it blurs. If a blurred bob still reads as a bob, you are clear to proceed; if it reads as an oval blob, fix it now, because no strand work rescues a bad silhouette. Every tutorial in the list above starts this way, and so does every idea on the hair sketch board.
Shading Hair for Volume and Depth
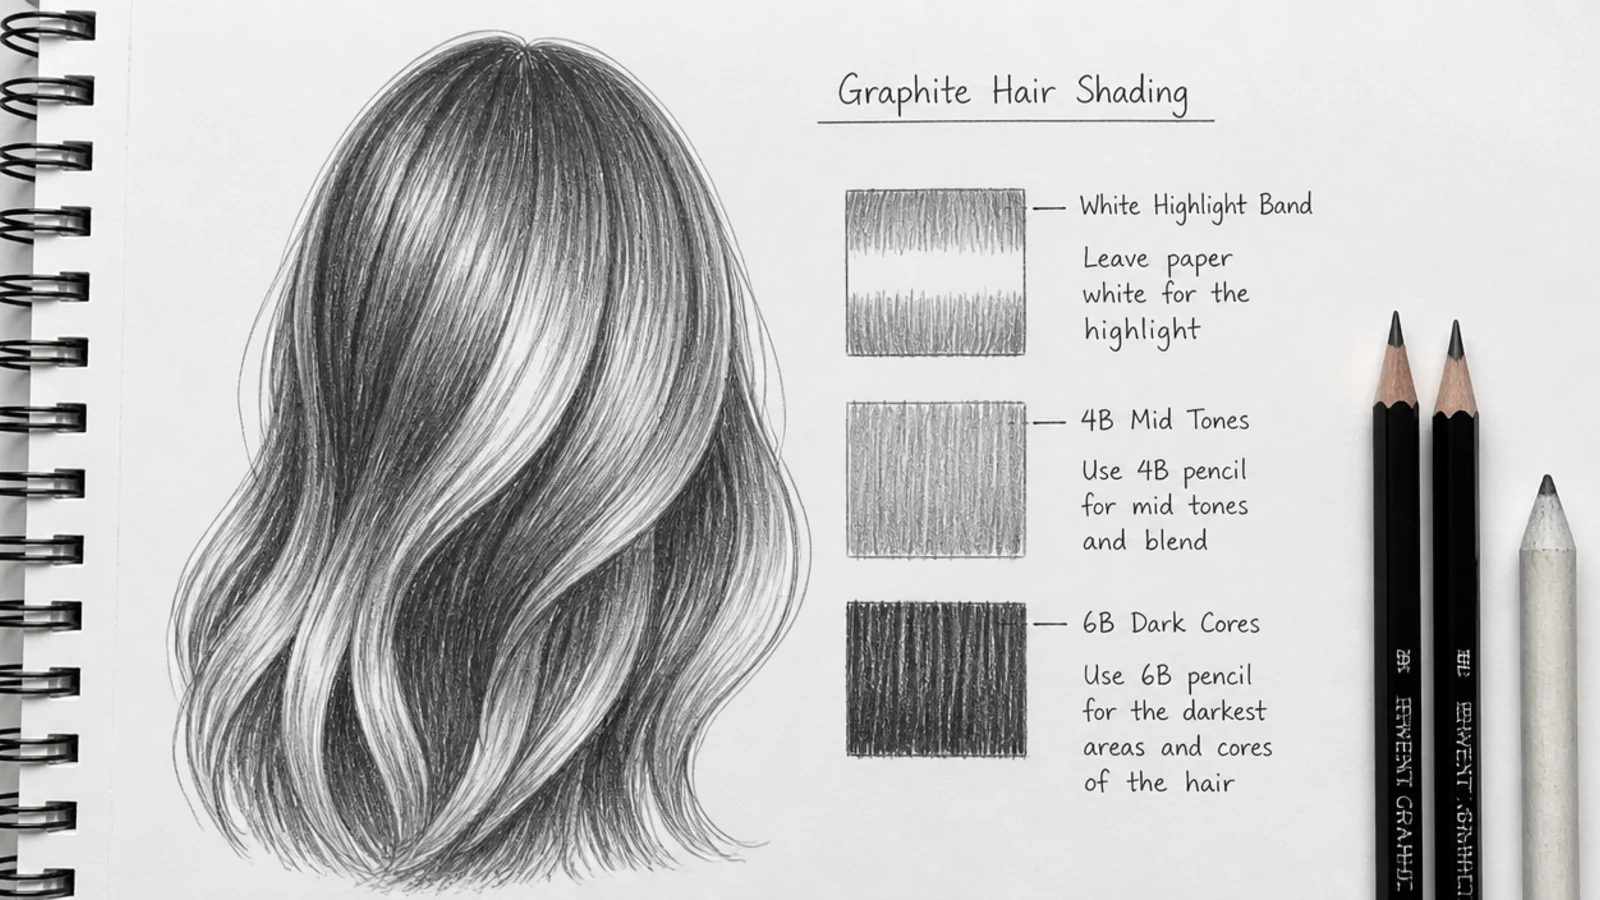
Volume comes from value range, not from strand count. Hair reads as a rounded 3D mass when it carries three distinct zones: untouched white paper where the light band sits, a 2B to 4B mid tone across most of the surface, and near-black 6B cores in the gaps between sections. Beginners typically produce only the middle zone, which is exactly why the result looks like a flat gray helmet. Identify your light source before a single shading stroke, then place one clear highlight band, usually a curved strip near the crown following the skull's roundness. Work light to dark always, since graphite adds easily and subtracts badly. Every stroke follows the flow direction, never crosses it, and lifts at the end so it tapers rather than stopping bluntly. If you have muddied a highlight, pinch a kneaded eraser into a wedge and lift the graphite out in strokes that follow the same flow. One decisive light band beats five timid ones, which is the same principle behind the shading in the curly hair sketch lessons.
Drawing Straight vs Wavy vs Curly vs Coily Hair
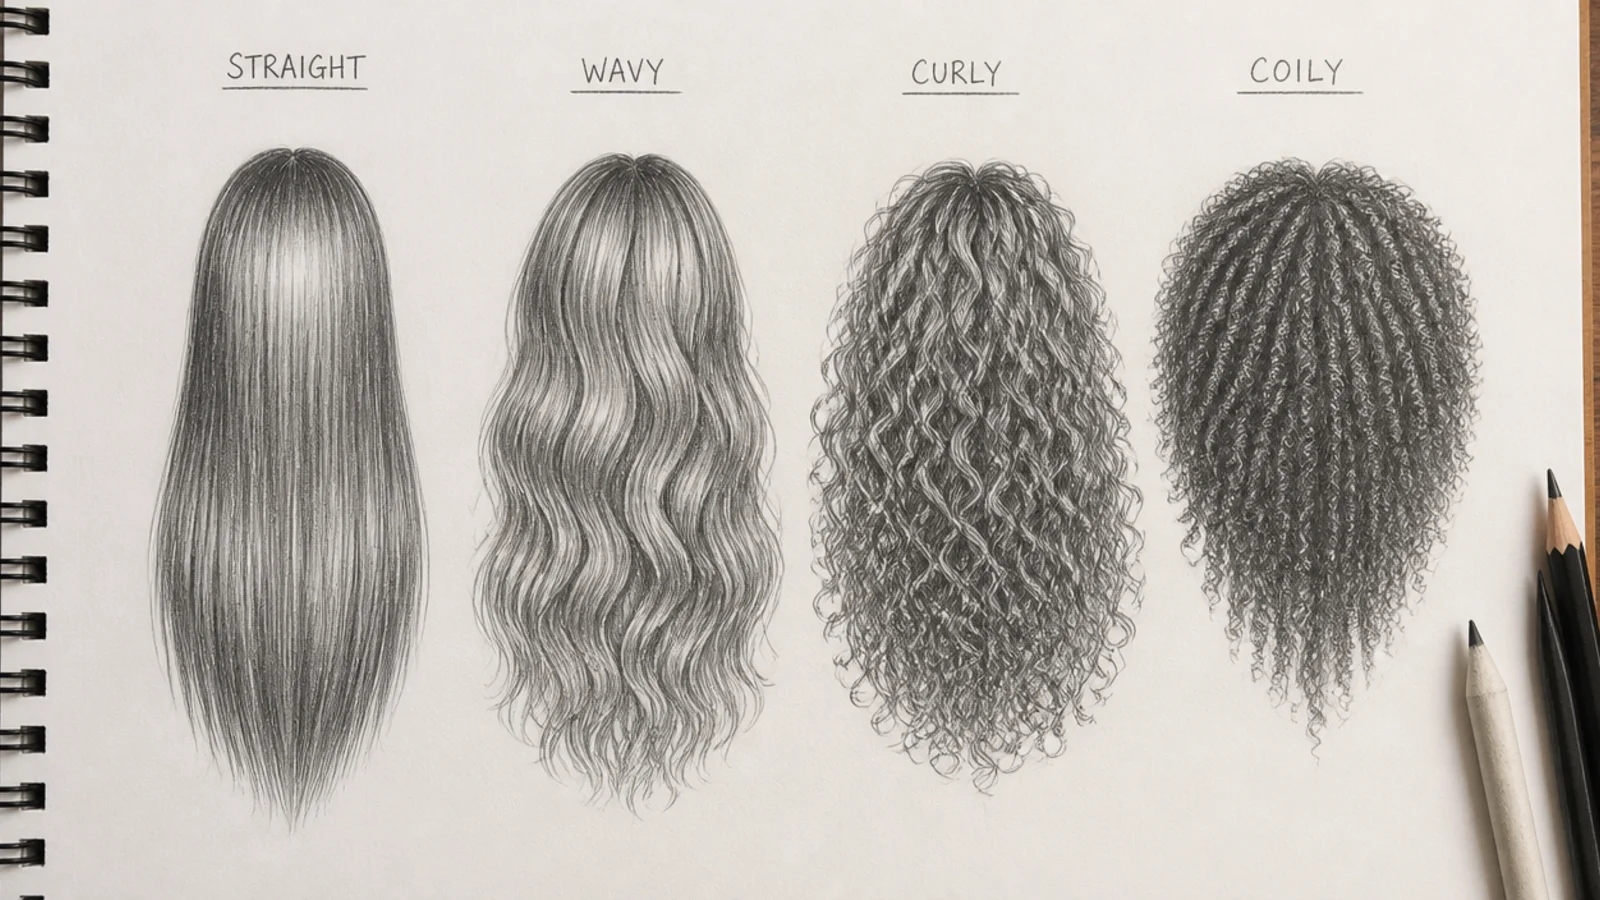
The four textures are one technique with different guideline geometry. Straight hair uses a long gentle bow, so the section still curves out past the jaw before falling back in. Wavy hair is that same line pushed into repeating S curves, roughly three per 6 inches of length, with 4B shading inside each curve and white paper on the outside. Curly hair abandons lines entirely for the ribbon: a band twisting through space so you see its face, then its edge, then its back, with light and shadow landing on opposite sides of every twist. Coily hair, 4A through 4C, is built from clusters of tiny C shapes with no hard outer outline, the edge deliberately dissolving into the page. Curl diameter is the variable that separates them: 1.5 inch spirals for loose curls, 0.5 inch for tight ones, and a dense mass of sub-quarter-inch coils for 4C. Mix diameters within a single head, because uniform curls look synthetic. Practice all four in the hair sketch ideas set.
Pencils, Paper and Blending Tools for Hair Sketching
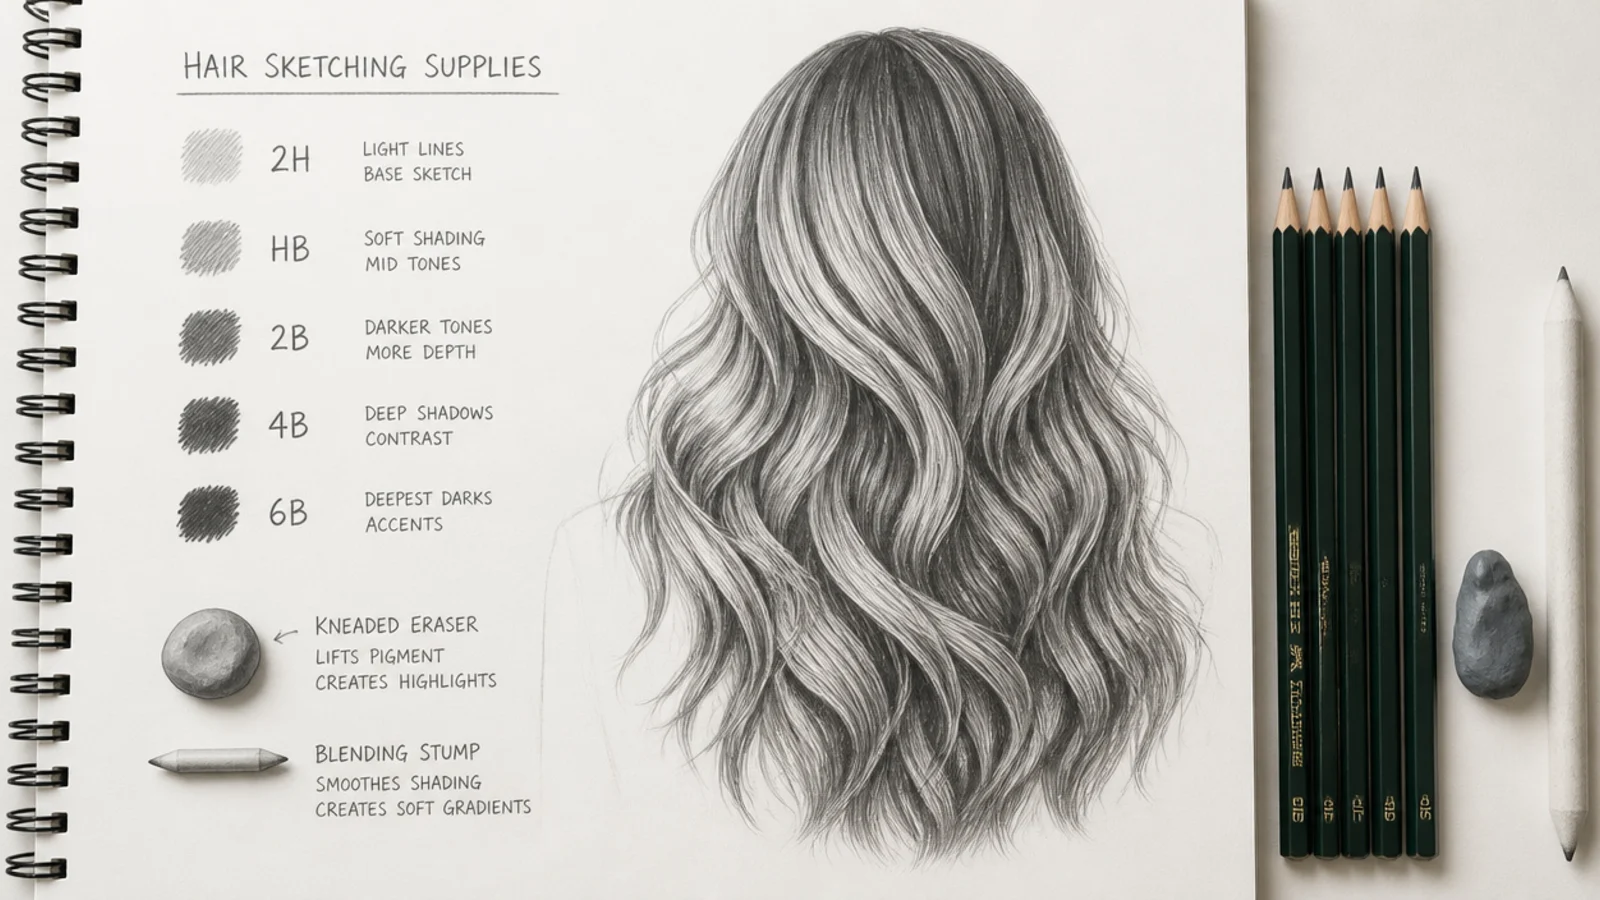
Five pencils cover everything. 2H lays guides light enough to vanish under shading, HB handles line cleanup and light strokes, 2B carries the general mid tone, 4B builds the shadow recesses, and 6B digs the darkest cores between sections. Map the grade to the hair, not just the step: dark brown and black hair lean on 4B and 6B for most of the mass, while blonde and gray hair keep 6B for the roots and part only and let large areas stay white. Paper matters more than beginners expect. Smooth cartridge paper at 90 to 120gsm takes fine strand work cleanly, while heavily toothed paper breaks strokes into dots and fights long flowing lines. A kneaded eraser is the essential tool, since it lifts highlights out rather than scrubbing them, and a blending stump softens transitions when used sparingly. Skip blending for texture work; over-blended hair loses its direction and turns to smoke. A 0.5mm mechanical pencil handles the final stray strands, and it is the only tool that works at the small scales covered in tutorial 15.
Common Hair Sketch Mistakes and How to Fix Them
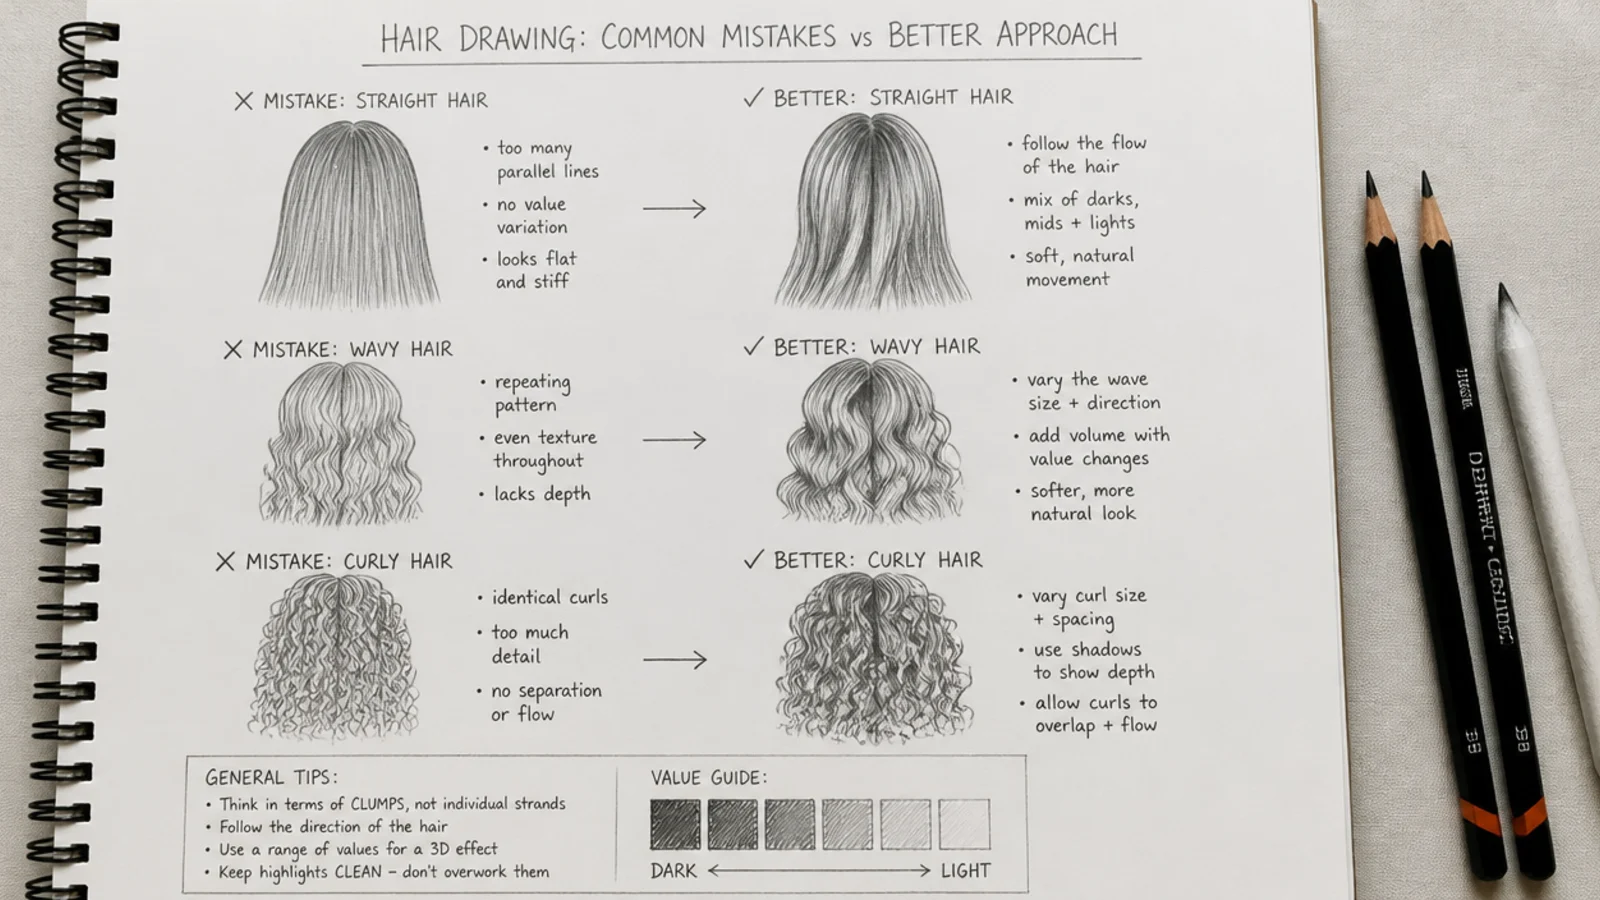
Six failures account for nearly every disappointing hair sketch. Flat helmet hair means you shaded one even mid tone, so push 6B into the section gaps and lift a highlight band back out. Spaghetti hair means you outlined individual strands instead of grouping them, so rebuild the mass and add fewer than twenty strand marks total. Corduroy hair means your flow lines ran parallel, so fan them from the crown instead. A wig line means your hairline was a clean even arc, so break it with irregular dips at the temples. Hair glued to the skull means you drew the silhouette flush against the head instead of 5mm or more outside it. A flat-topped cut-out silhouette means you never broke the ends, so add short flicks following the flow, which is the single fastest fix on this list. When something looks wrong and you cannot name it, photograph the drawing in grayscale and flip it horizontally; both errors of value and errors of symmetry surface immediately. More worked corrections appear across the hair sketch board.
Using References Without Copying Them
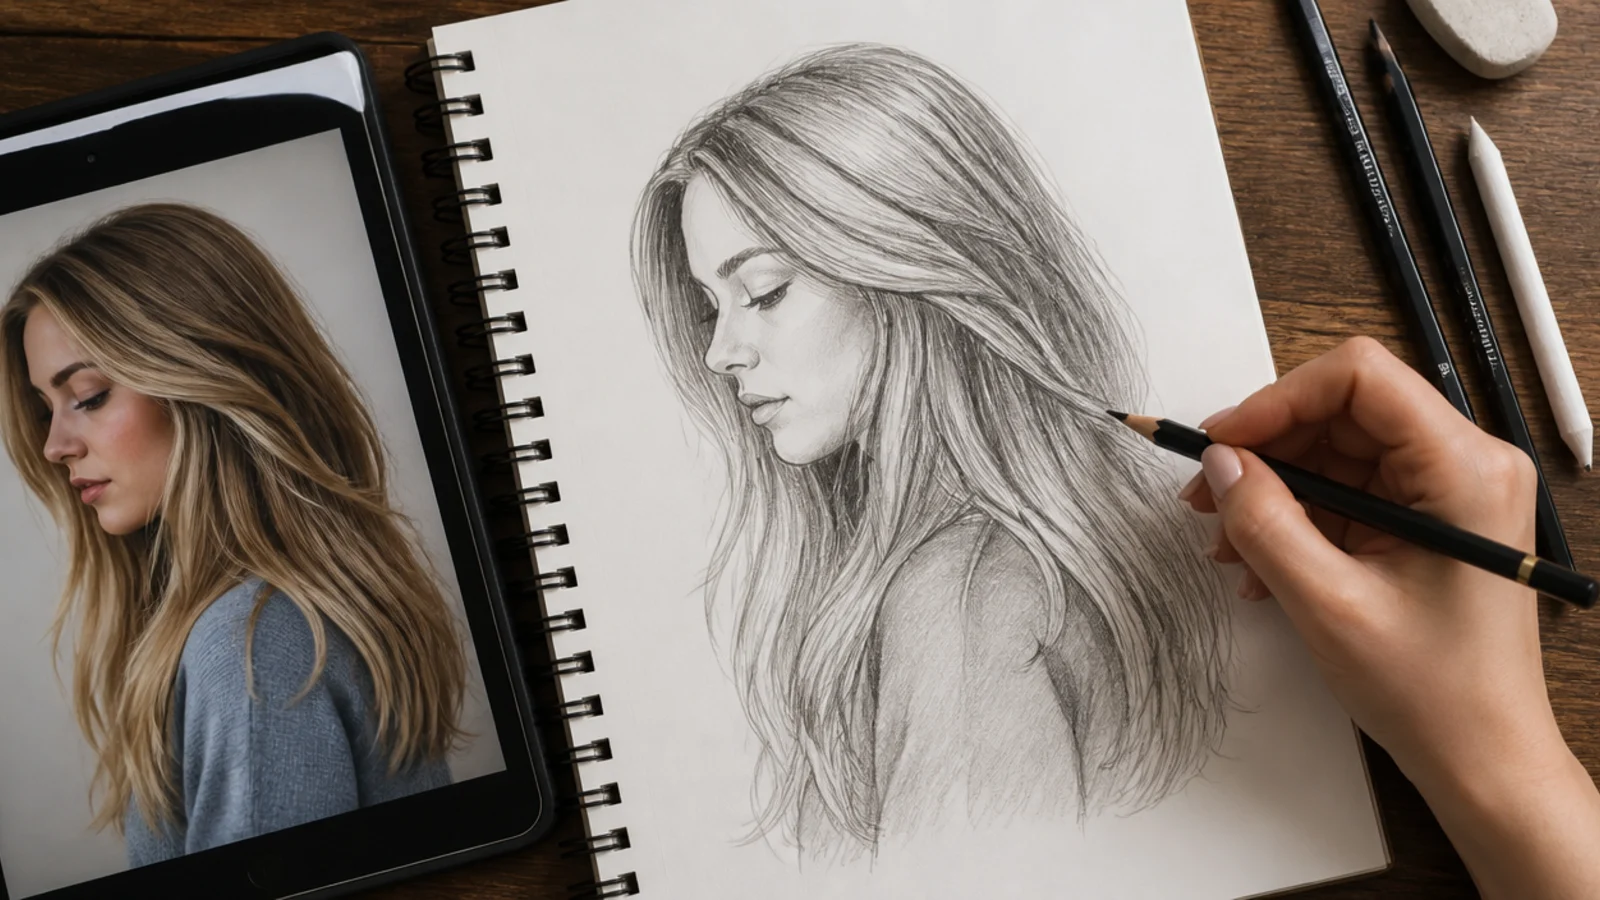
References are how you learn hair, but copying line for line teaches nothing that transfers. Use a photo for three things only: the silhouette shape, where the sections divide, and where the darkest gaps fall. Then close the reference and draw the rest from those decisions. A useful drill is the 30-second silhouette: look at a photo, fill in the hair shape as a solid black shape from memory, and compare. Do that ten times and your shapes improve more than from ten finished renders. Multi-angle reference sheets are worth hunting down, since the same hairstyle from front, side, back and three-quarter views teaches volume in a way one photo cannot. On rights, treat any photo you did not take as reference for shape and light, not as something to reproduce and sell; drawing an original figure informed by a photo is a different act from tracing one. Photo sets like mermaid braids or a boy's hair sketch study give you the section logic quickly, and the long hair sketch lessons cover flow at length.
Frequently Asked Questions
How do you draw hair for beginners step by step?
Draw the skull and an irregular hairline first, then block the whole hairstyle as one silhouette sitting about 5mm outside the skull. Run five or six flow lines out from the crown, divide the mass into three or four overlapping sections, shade mid tones with 2B and 4B along the flow, push 6B into the gaps, and add grouped strands last.
What pencils do you use for drawing hair?
Five grades cover everything: 2H for erasable guide lines, HB for cleanup and light strokes, 2B for the general mid tone, 4B for shadow recesses, and 6B for the darkest cores between sections. Dark hair leans on 4B and 6B across most of the mass, while blonde and gray hair keep 6B for roots only and leave large areas as white paper.
Why does my drawn hair look flat?
Almost always because you shaded one even mid tone across the whole mass. Hair reads as three-dimensional only when it carries three zones: untouched white paper at the highlight band, a 2B to 4B mid tone across the surface, and near-black 6B cores in the gaps between sections. Push those darks in and lift a clear highlight band back out with a kneaded eraser.
Should I draw the head before adding hair?
Yes, always, including the full curve of the cranium. Beginners flatten the top of the skull and then have no room left for hair volume, which is why the hair ends up looking painted on. Draw the skull in 2H, mark the hairline about a third of the way down the forehead, and keep the skull line faintly visible so you can check your volume clearance later.
How do you make hair look realistic in a drawing?
Group strands instead of drawing single hairs, follow the flow from the crown outward, and commit to a full value range with a genuine near-black and genuine white paper. Break the outer edge of the silhouette with short flicks so it stops looking like a cut-out, and let two or three stray hairs escape the mass entirely. Realism comes from mass and value, not from strand count.
How do you shade curly hair with a pencil?
Treat each curl as a ribbon twisting through space rather than an outlined coil. As the ribbon turns you see its face, then its edge, then its back, so light lands on one side of every twist and shadow on the exact opposite side. Use 2B on the lit side and 6B in the shadow, and vary curl diameter across the head so the texture does not look synthetic.
How long does a hair sketch take for a beginner?
Ten to thirty minutes per sketch in the tutorials above. Straight hair and short side views run around 10 to 12 minutes, wavy and braided styles around 15 to 20, and curly, coily and loc studies closer to 25. Working one tutorial a day gets you through all 15 in about three weeks, which is enough repetition to change your default habits.
How do I stop my hair drawing from looking like a helmet?
Break the outer edge. A helmet look comes from a closed, unbroken silhouette with a flat bottom, so add short flicks at the ends that follow the flow direction, and let a few strands escape past the outline. Then check that your silhouette actually sits 5mm or more off the skull at the crown, because hair drawn flush against the head always reads as molded plastic.
Is it better to learn hair drawing on paper or digitally?
Paper first, for most beginners. Working in graphite forces you to plan values before committing, since you cannot undo, and reserving white paper for highlights teaches highlight placement faster than painting them back on a layer. Once silhouette and value habits are solid, digital is excellent for colored hair, character design and revisions.
How do you use a hair reference without copying it?
Take three things from a photo and nothing else: the silhouette shape, where the sections divide, and where the darkest gaps fall. Then close the reference and draw from those decisions. A good drill is the 30-second silhouette, where you fill in the hair shape as a solid black form from memory and compare afterward. Multi-angle sheets teach volume better than any single photo.
Which hair sketch look are you saving?
If you only take one habit from these 15 tutorials, take the pause after step two: look at your blocked silhouette and ask whether it already reads as that hairstyle from across the room. If it does not, no amount of strand detail will save it, and if it does, the rest is just value. Work the tutorials in order rather than jumping to the curly and coily lessons, because ribbon logic only makes sense once you can see flow on straight hair. Fifteen sketches at 10 to 30 minutes each is roughly three weeks of daily practice, and that is genuinely enough to change your hair drawing. Then keep going with the hair sketch board and the easy hair sketch ideas list.