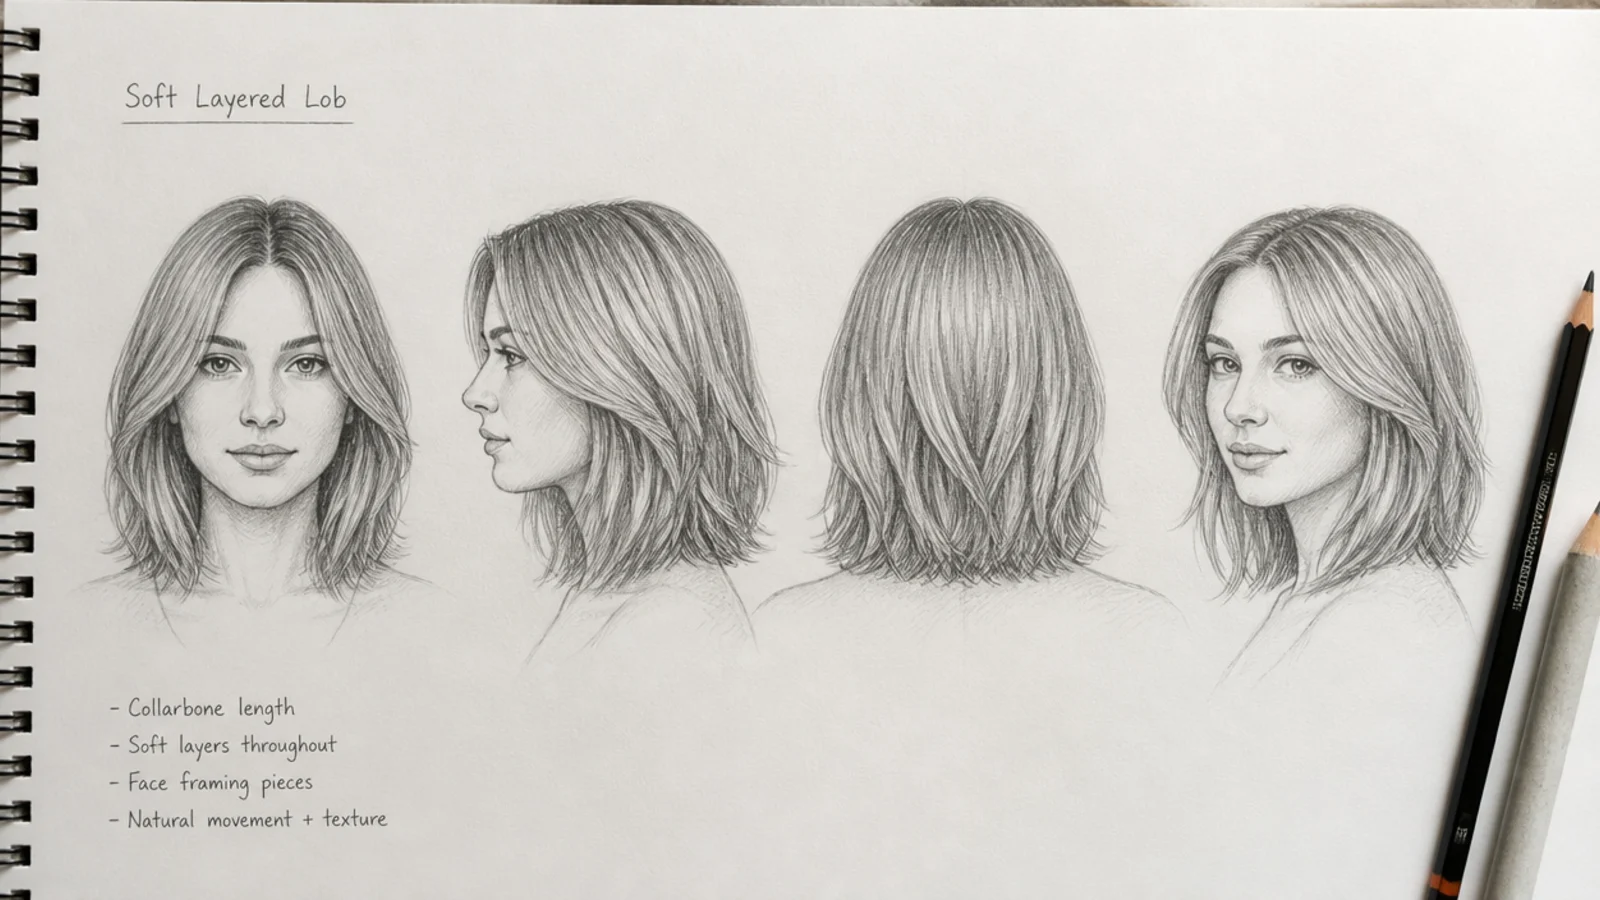
Quick Comparison
| Photo Reference of Real Hair | Drawn Sketch Reference Sheet | |
|---|---|---|
| What it shows best | True value pattern, real strand behavior, believable irregularity | Structure already simplified: silhouette, flow lines, crown position |
| How hard it is to read | Overwhelming; thousands of strands with no hierarchy to guide you | Pre-digested; someone already decided what to keep and what to drop |
| Risk of copying | High, because tracing a photo feels productive and teaches almost nothing | Lower, since you are copying a method rather than a specific image |
| Textured and coily hair | Excellent, if you can find photos with good directional lighting | Rare; most published sketch references skip 4C, locs and twists entirely |
| Multi-angle coverage | Almost never; one pose per photo unless you build a turnaround | Easy to build yourself, four angles on one page in about 35 minutes |
| Usage rights | Check the license; a photo you did not shoot may limit commercial art | Fully yours if you drew the sheet, which removes the question entirely |
| Cost | Free on stock and reference sites, or a small fee for curated packs | Roughly 15 to 30 dollars once for pencils, paper and a kneaded eraser |
| What it trains | Observation and value judgment, slowly but permanently | Simplification and speed, plus repeatable habits you can recall |
| Best use | Studying a texture you have never drawn before, in detail | Daily working reference propped beside the page while you sketch |
1. Three-Quarter Head with a Marked Crown Swirl
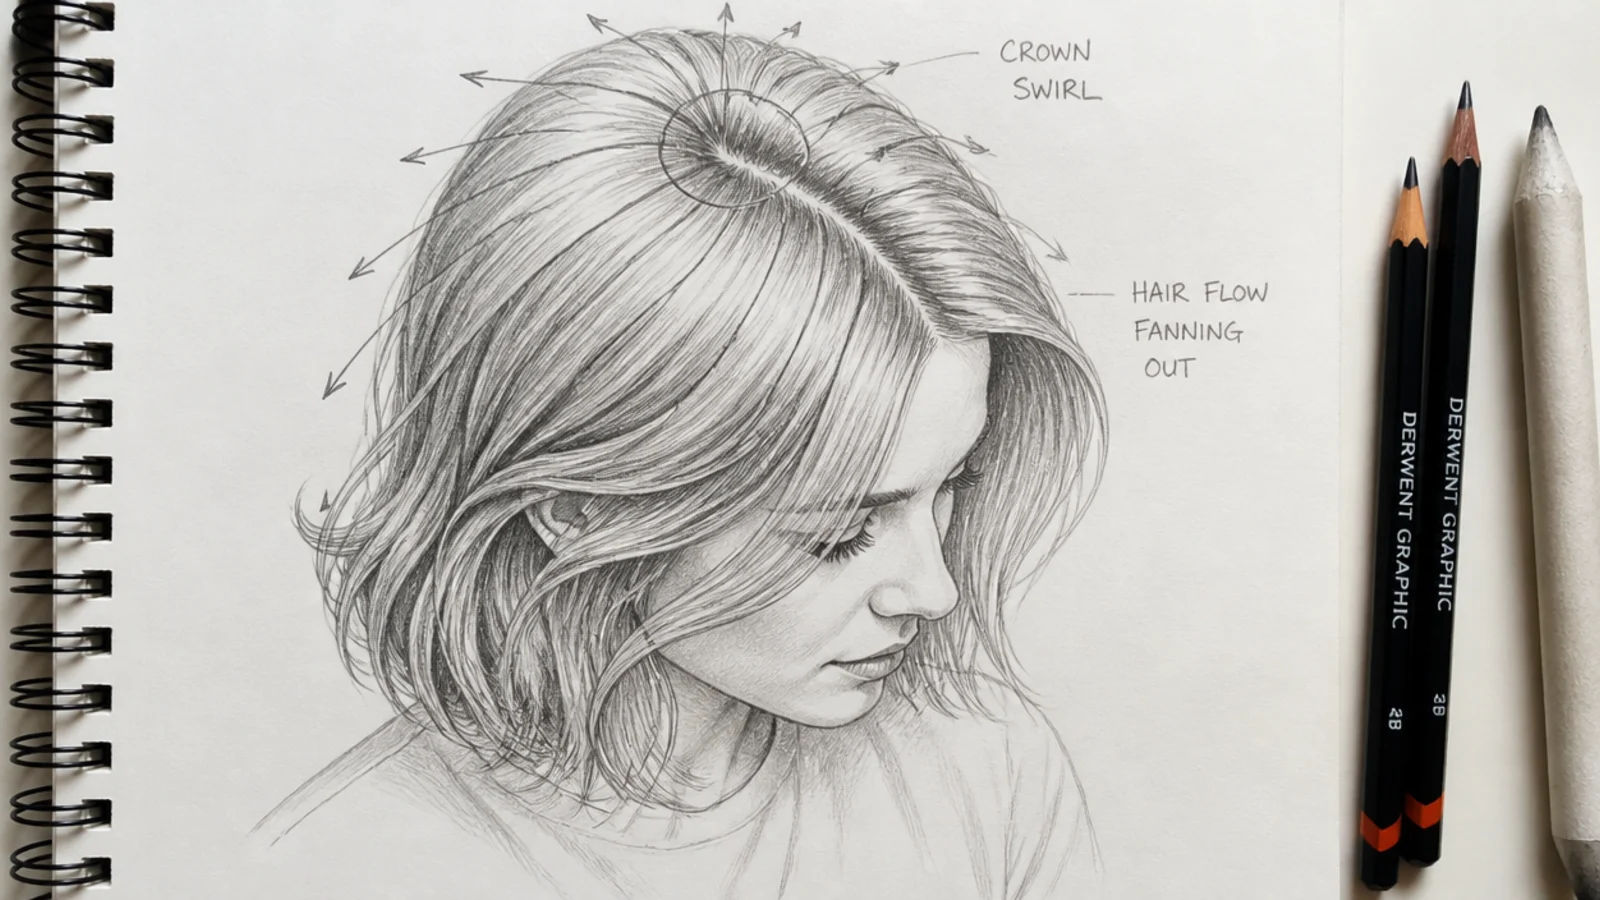
The single sheet I reuse most. A bald three-quarter skull in 2H with the crown swirl marked as a small spiral about two thirds back on the top plane, then eight flow lines fanning out from it to the hairline, nape and ears. Nothing else. It took 12 minutes to draw and it fixed a habit I had for two years of running hair in parallel lines down the page. Hair grows in sections out of that swirl, so every stroke should originate there. The same principle drives every hair sketch exercise I do.
Who it suits: Anyone whose drawn hair reads as a wig glued on rather than growing out of a head.
Tip: Draw the swirl before the hairline. If you place the hairline first, the swirl drifts too far forward.
2. Long Straight Hair from Front, Side, Back and Three-Quarter
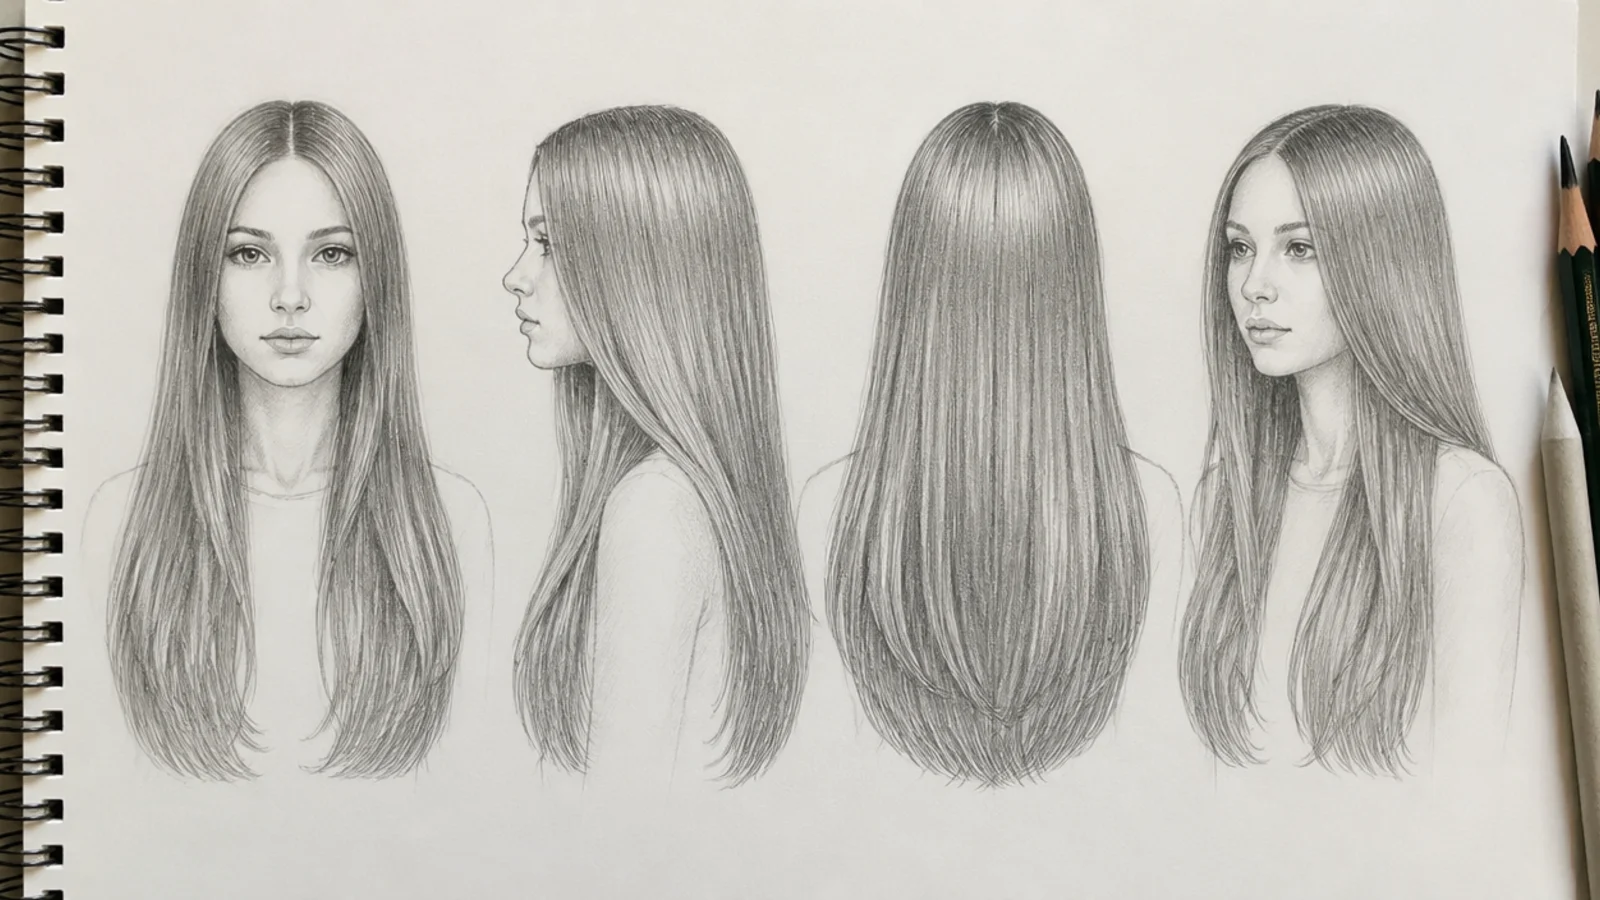
Four small heads on one page, same hairstyle, same light source, roughly 60mm tall each. This is the sheet almost nobody online offers, and it is worth more than fifty single images. Drawing the same mass four times is what taught me that the silhouette gets narrower from the side than I expect and that the back view has the widest mass of all. Took me about 35 minutes. I redraw it whenever I start a new character so the hair stays consistent between panels. Long styles get their own treatment in long hair sketch.
Who it suits: Character artists who need the same hairstyle to survive a turnaround.
Tip: Keep the light coming from one fixed direction across all four or the sheet teaches you nothing about form.
3. Loose Wavy Hair Drawn as Ribbon S-Curves
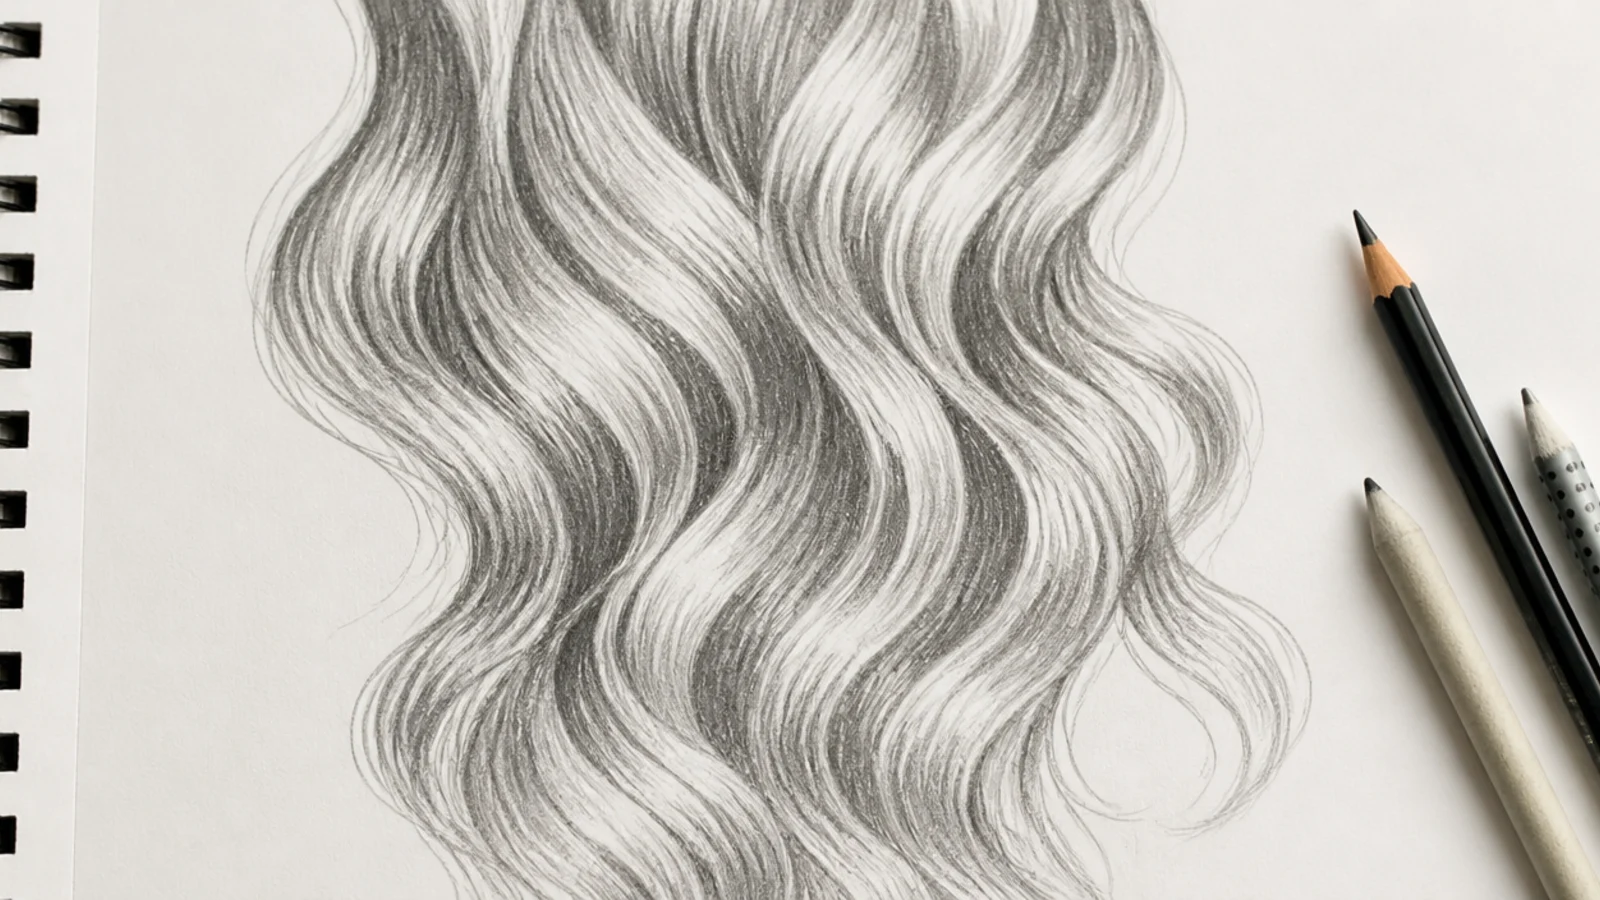
Six vertical strand groups, each pushed into the same lazy S rhythm, with 4B shading on the inside of every curve and bare paper on the outside. I made this after a failed portrait where the waves came out as random frizz. The fix was rhythm: same wave size, same interval, widening slightly toward the ends. Fifteen minutes. It is now the first thing I look at before any wavy commission, and it is the sheet that connects straight and curly logic. Rhythm is the whole lesson of hair sketch ideas number two as well.
Who it suits: Anyone whose waves look like noise instead of a repeating pattern.
Tip: Draw the straight version in 2H first, then bend it. Freehanded waves drift out of rhythm by the third curve.
4. Type 3B Curls Grouped into Ribbon Clusters
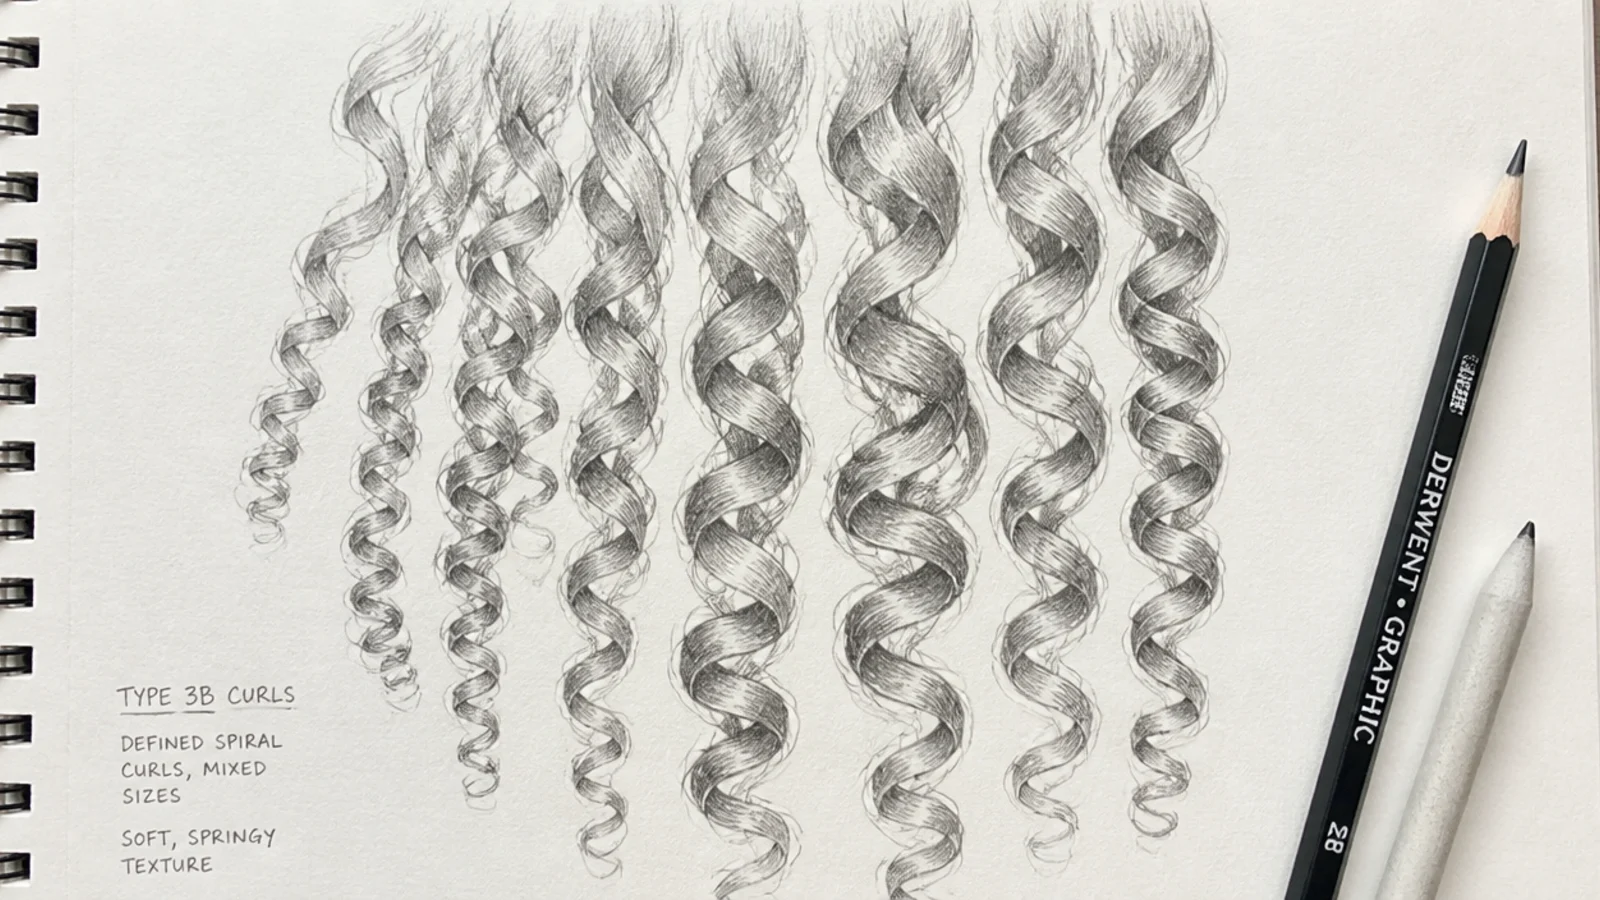
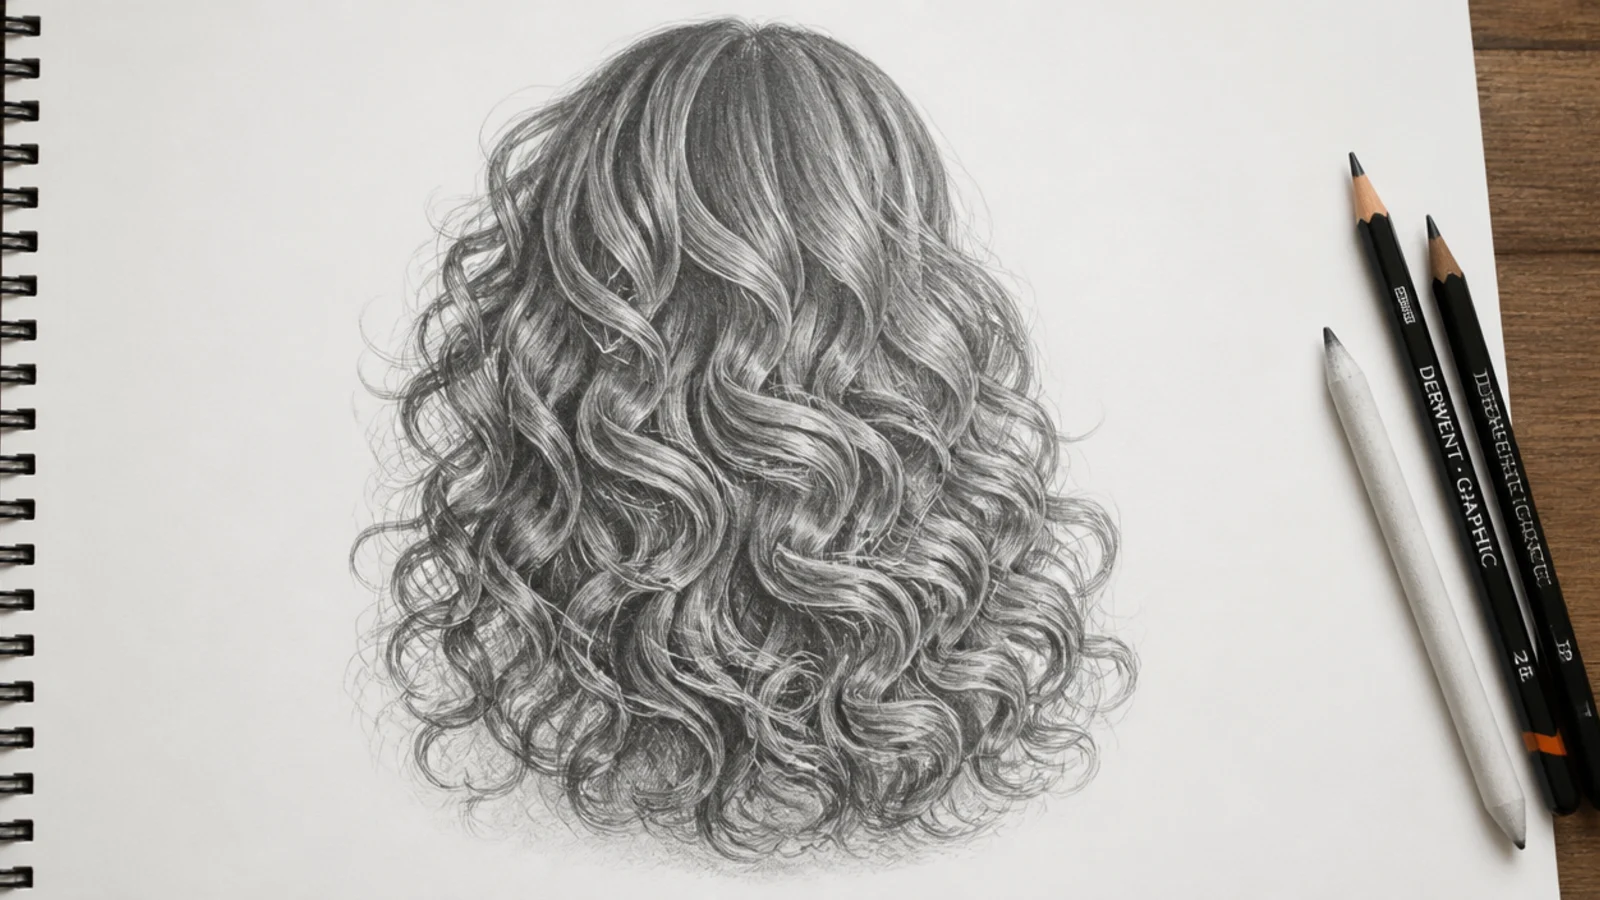
Eight curls at roughly 20mm width, each drawn as a twisting ribbon rather than an outlined coil, grouped into three clusters so the gaps between clusters carry the darkest value. The rule I extracted and now use everywhere: a ribbon has a lit face and a shadowed face on opposite sides, so 6B goes where it turns away and the paper stays white where it turns toward. Outlining coils is what made my early curls look like telephone cord. More on this at curly hair sketch.
Who it suits: Beginners whose curls read as springs, and anyone shading curls flat.
Tip: Break the outline where the light hits. A continuous hard outline kills the three-dimensional read instantly.
5. 4C Coily Hair with a Tapered Hairline
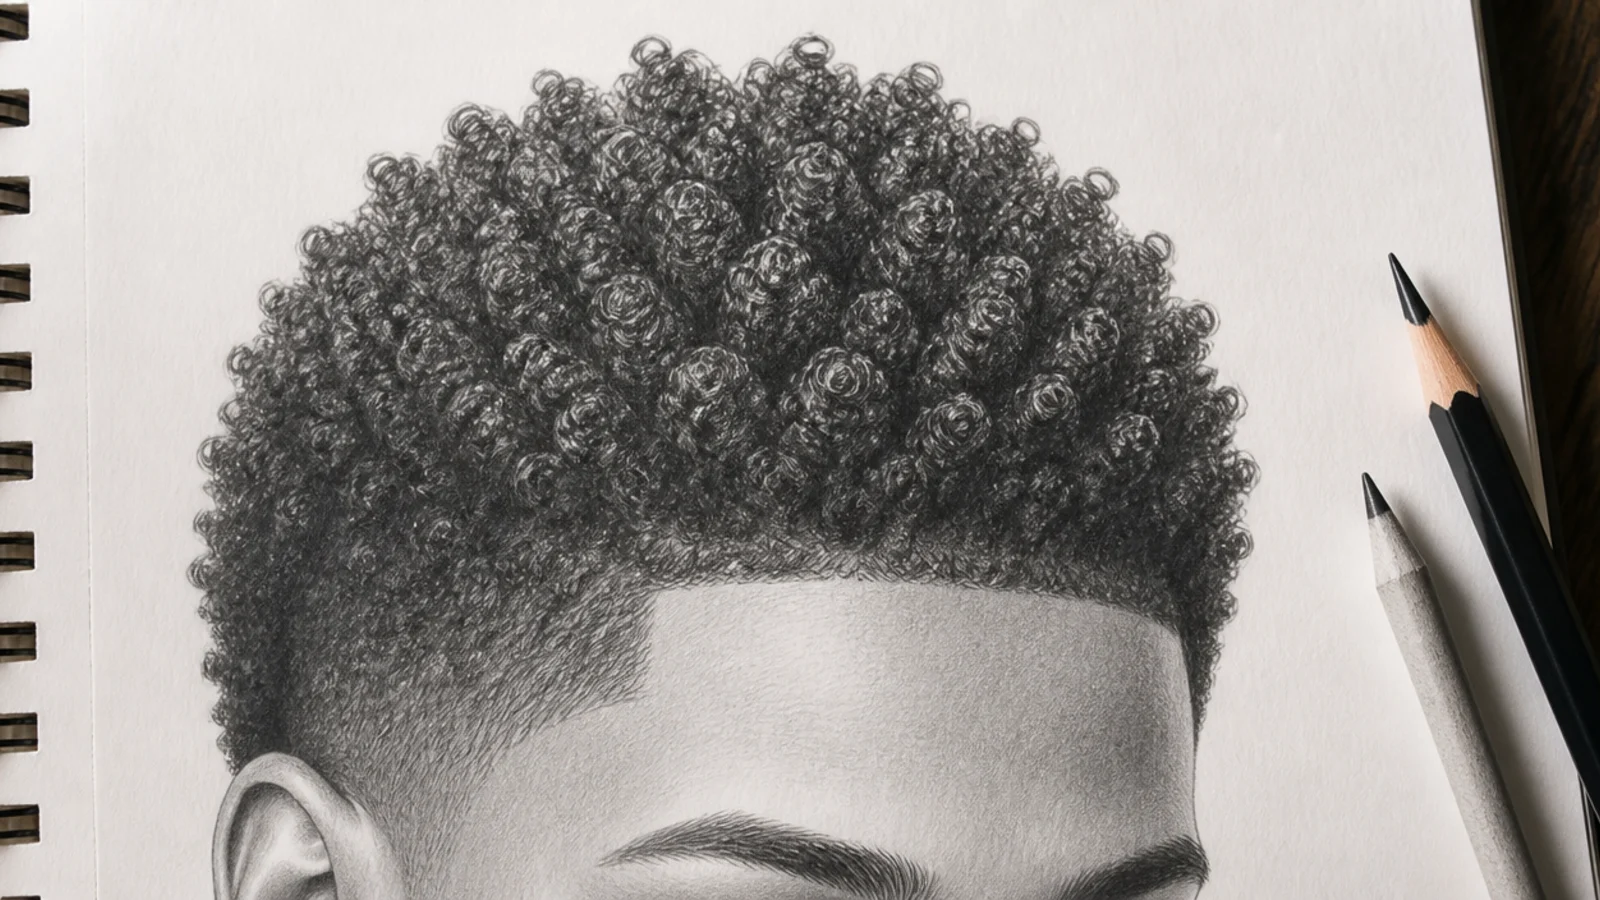
The reference I could not find anywhere, so I built it. A shell of coily texture only 10 to 20mm deep following the skull closely, built from clusters of small overlapping 2B circles with 6B pushed into the gaps between clusters. The hairline does the heavy lifting here: crisp and defined at the temples, fading out at the sideburn and nape. Textured hair is the biggest hole in every hair sketch reference library I have used, and this sheet closed it for me. Pair it with the coil work in curly hair sketch.
Who it suits: Character artists drawing Black hair, which almost no drawing reference sheet covers properly.
Tip: Draw the dark gaps between coil clusters, not the coils. The texture appears on its own once the negative space is right.
6. Shoulder-Length Locs Drawn as Cylinders
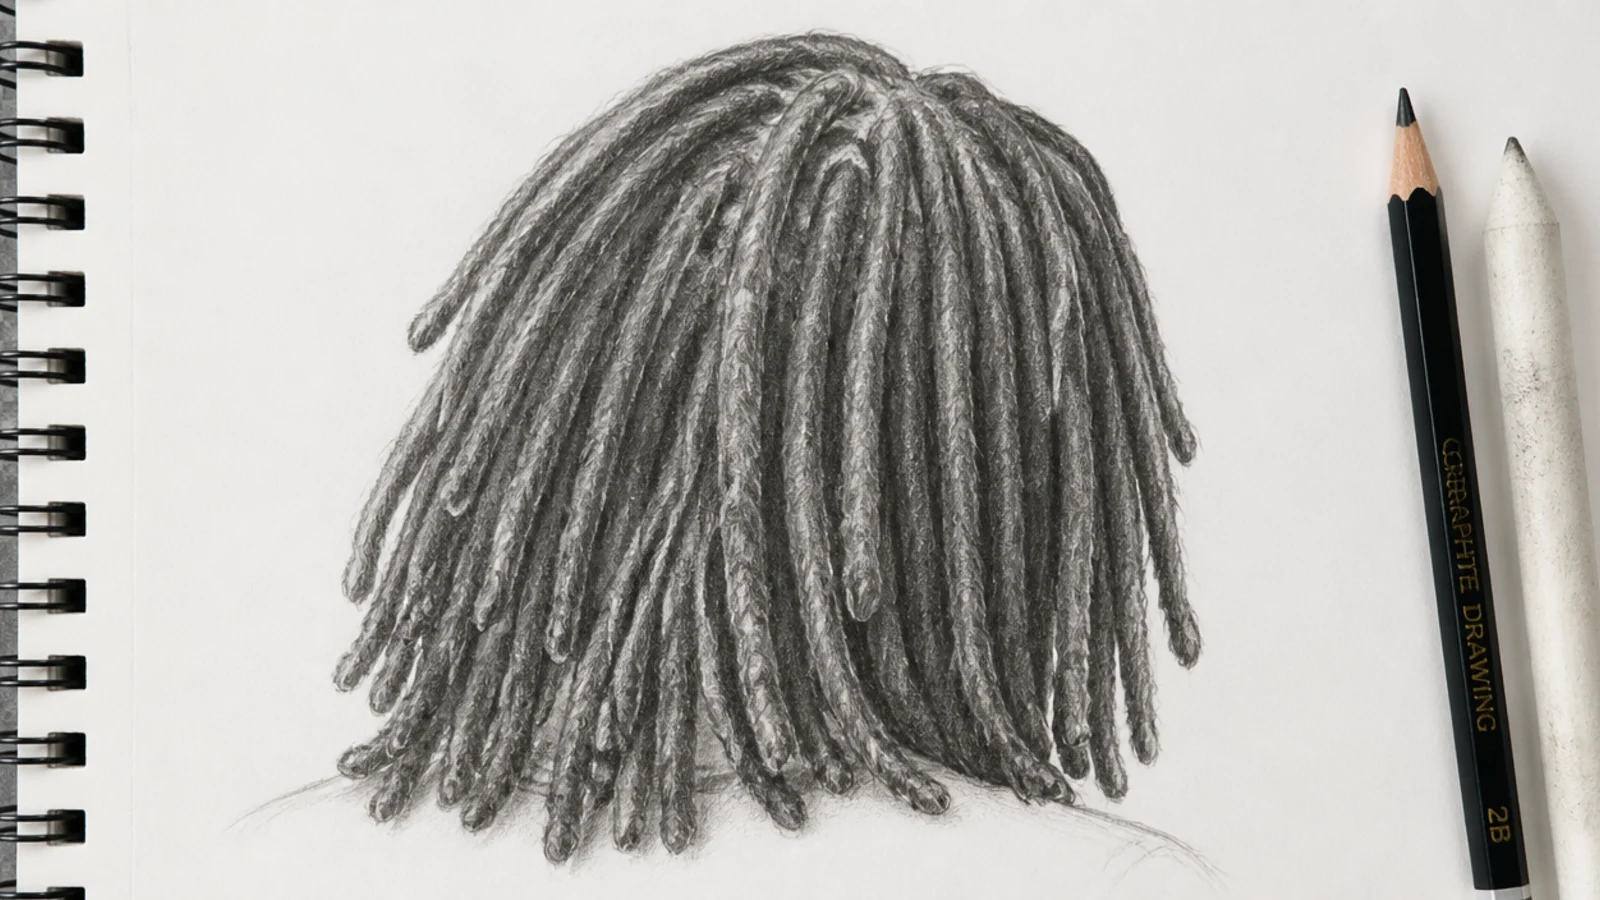
Eighteen slightly uneven tubes hanging from a visible parting grid on the scalp, a few crossing in front of others. Locs are the easiest textured style to draw because a loc is a cylinder and cylinders have obvious light and shade: a 2B side, a white core highlight, a 6B contact shadow where one loc overlaps another. Twenty minutes. I keep this sheet because the parting grid on the scalp is the part I always forget and it is the detail that sells the style. The hair sketch tutorial covers parting grids in more depth.
Who it suits: Artists who struggle with mass texture but can already shade a simple cylinder.
Tip: Roughen each tube with short cross strokes or the locs read as smooth wire rather than hair.
7. Three-Strand Braid Teardrop Breakdown
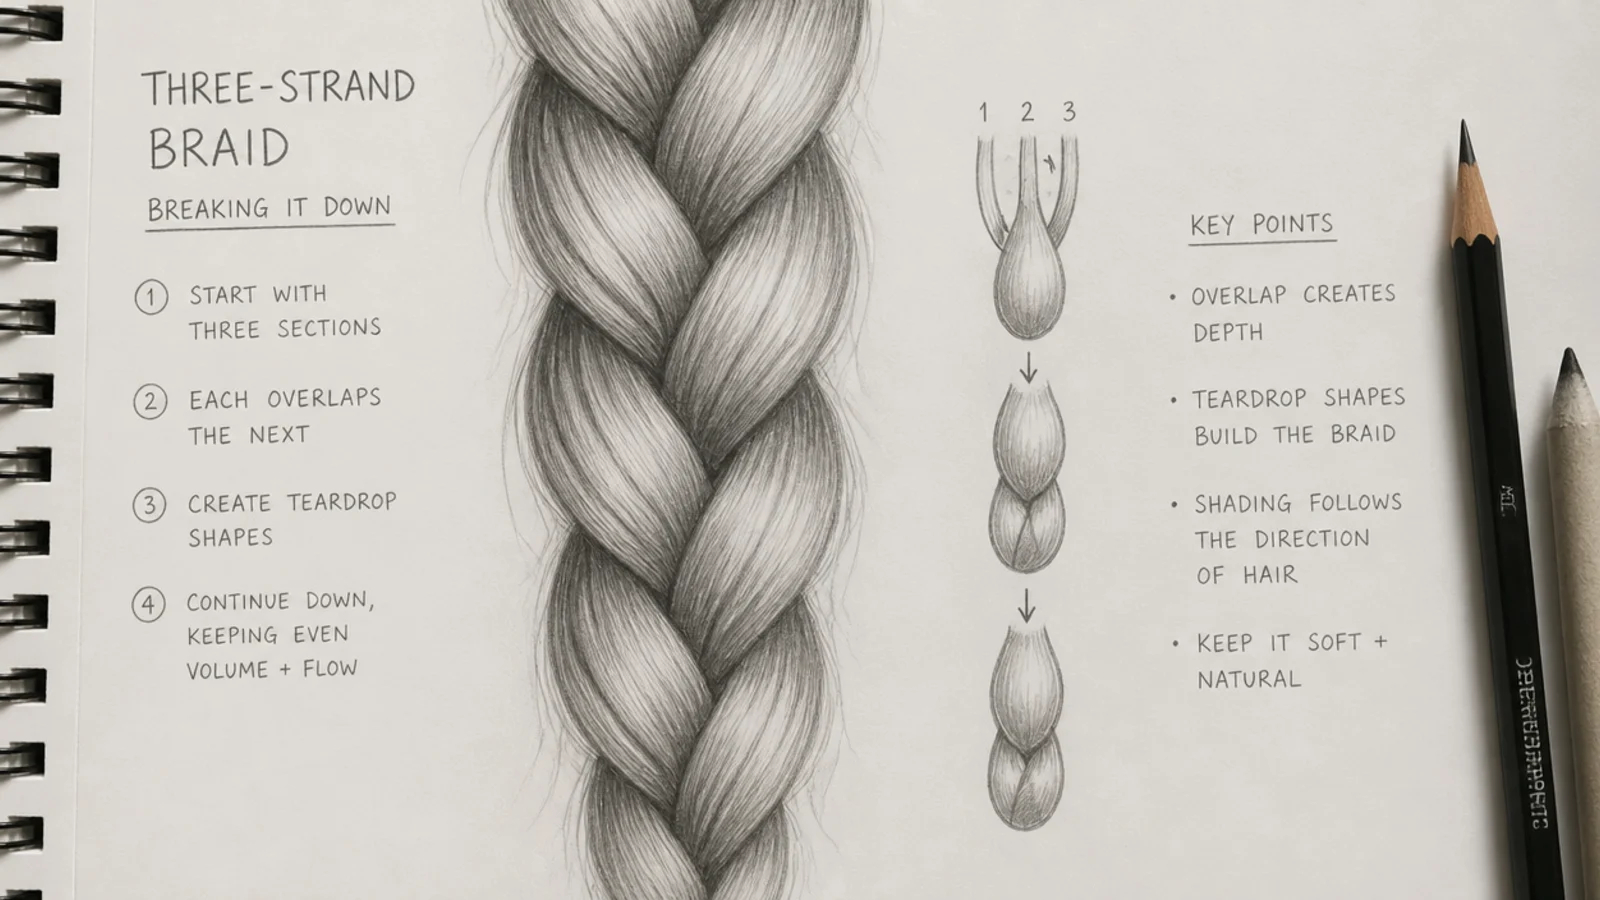
A braid drawn twice side by side: once as the naive attempt where I tried to follow three strands with my eye, and once as a column of overlapping teardrops alternating left, right, left down a central curve. The second one works and took half the time. Each teardrop tucks under the one above it and gets a 4B shadow at the tuck point. The failed version stays on the sheet on purpose, because seeing the wrong intermediate stage is what stops me repeating it. There are more braid subjects in hair sketch ideas.
Who it suits: Anyone attempting their first braid, and it is the best braid to start with.
Tip: Shrink each teardrop slightly toward the tip. Equal-sized teardrops all the way down read as rope, not hair.
8. High Ponytail Under Tension, Back View
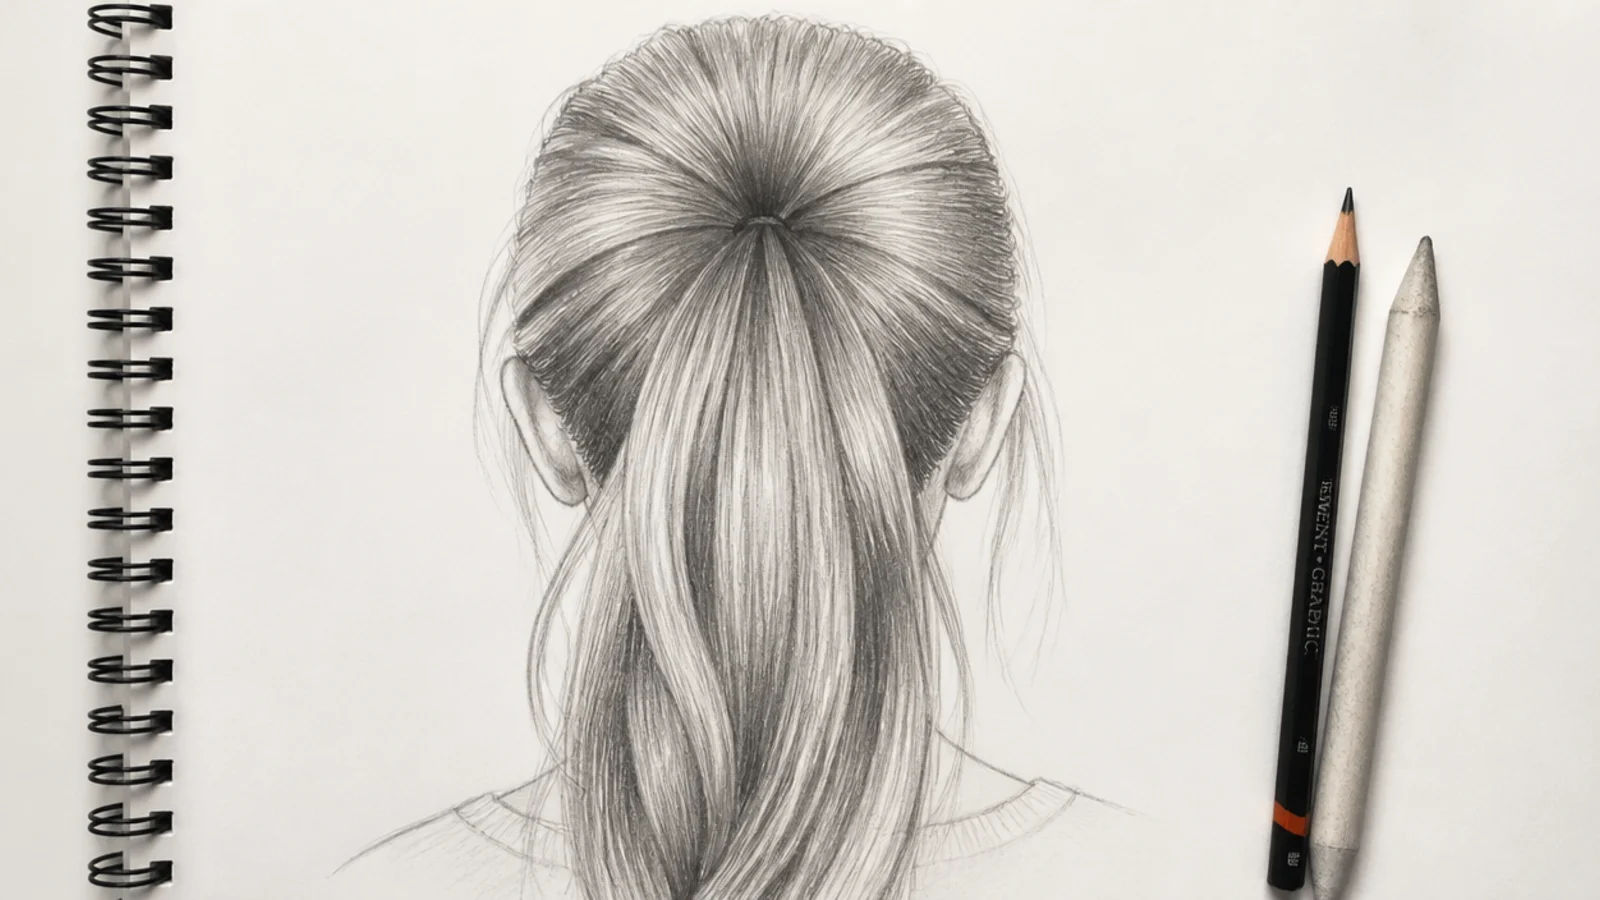
The back of the skull as an egg, the crown swirl marked, then every flow line converging on a single gathering point above and behind it, with the tail spreading again into a tapered cone below the tie. Because there is no face to get wrong, this is the purest direction exercise I own. The value note I keep returning to: the darkest 6B core sits immediately above the tie where the hair compresses, not in the tail. Twelve minutes and it fixes front views too. Back views barely appear in any hair sketch guide I have read.
Who it suits: Anyone who has only ever drawn hair from the front and guesses at the back.
Tip: Draw the tie last. Drawing it first makes every flow line aim at the tie rather than at the compression point above it.
9. Male Hairline vs Female Hairline on the Same Skull
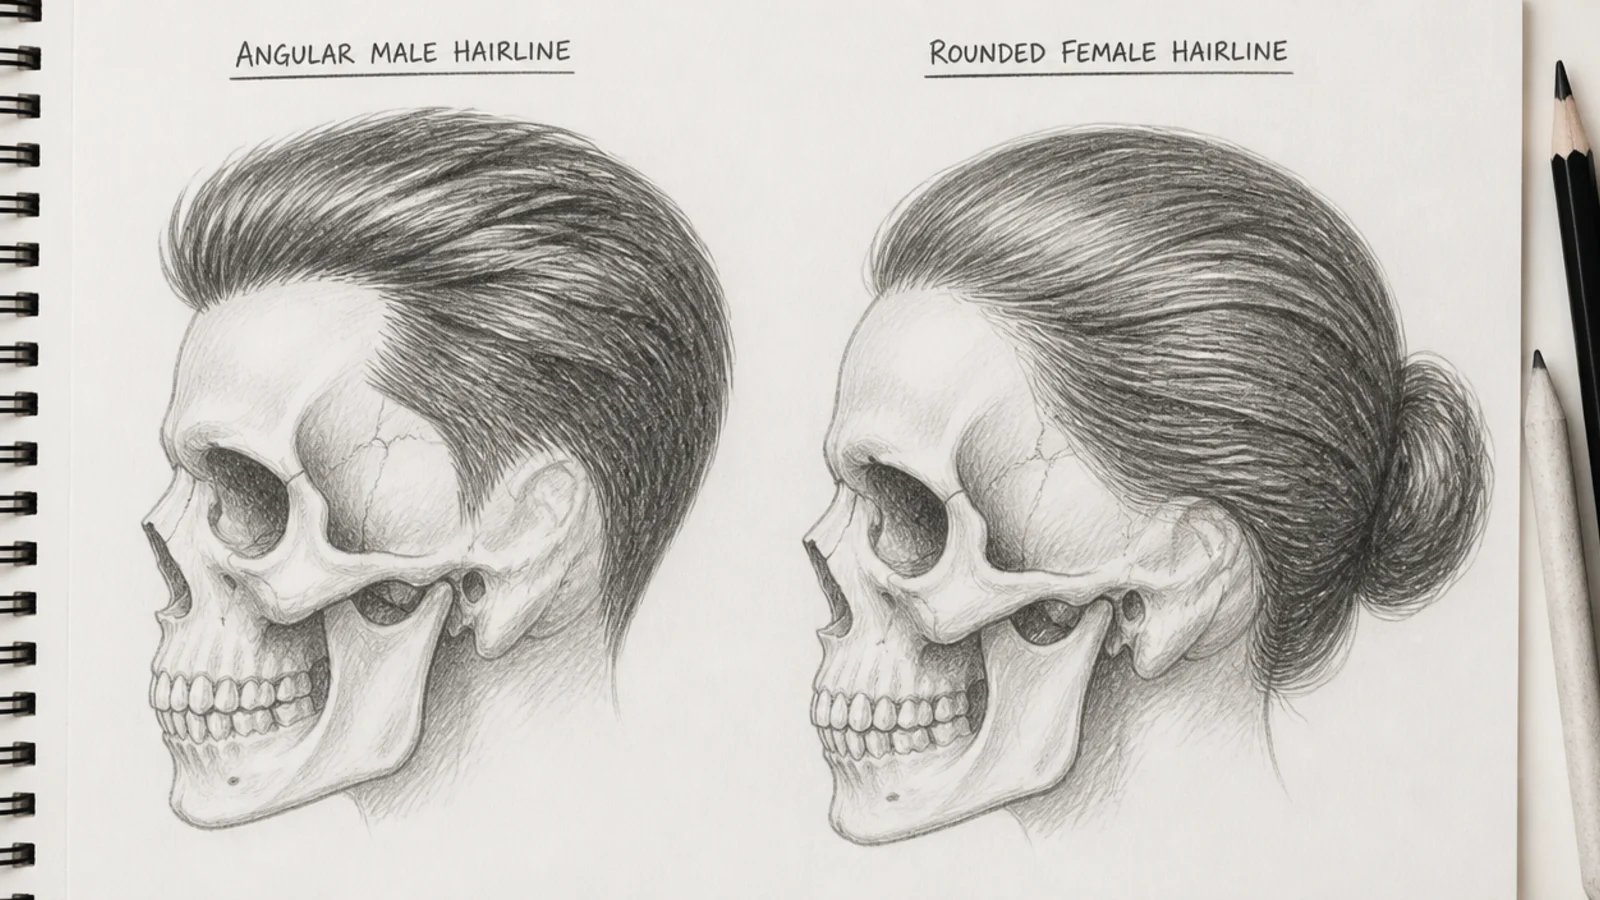
Two identical skulls at the same angle, one given a higher, more angular hairline with an M shape and slight temple recession, one given a lower, rounded, unbroken hairline. Same head, same light, only the hairline changes. I built this because every search for the topic returned hair transplant clinic pages, not drawing references. It is the fastest way to shift a character read without touching the jaw, and it takes 15 minutes. See boy hair sketch for styles built on it.
Who it suits: Character artists whose faces all read the same regardless of intended gender.
Tip: Keep both hairlines slightly irregular. A hard clean arc across the forehead reads as a swim cap on either version.
10. Buzz Cut and Fade Value Sheet
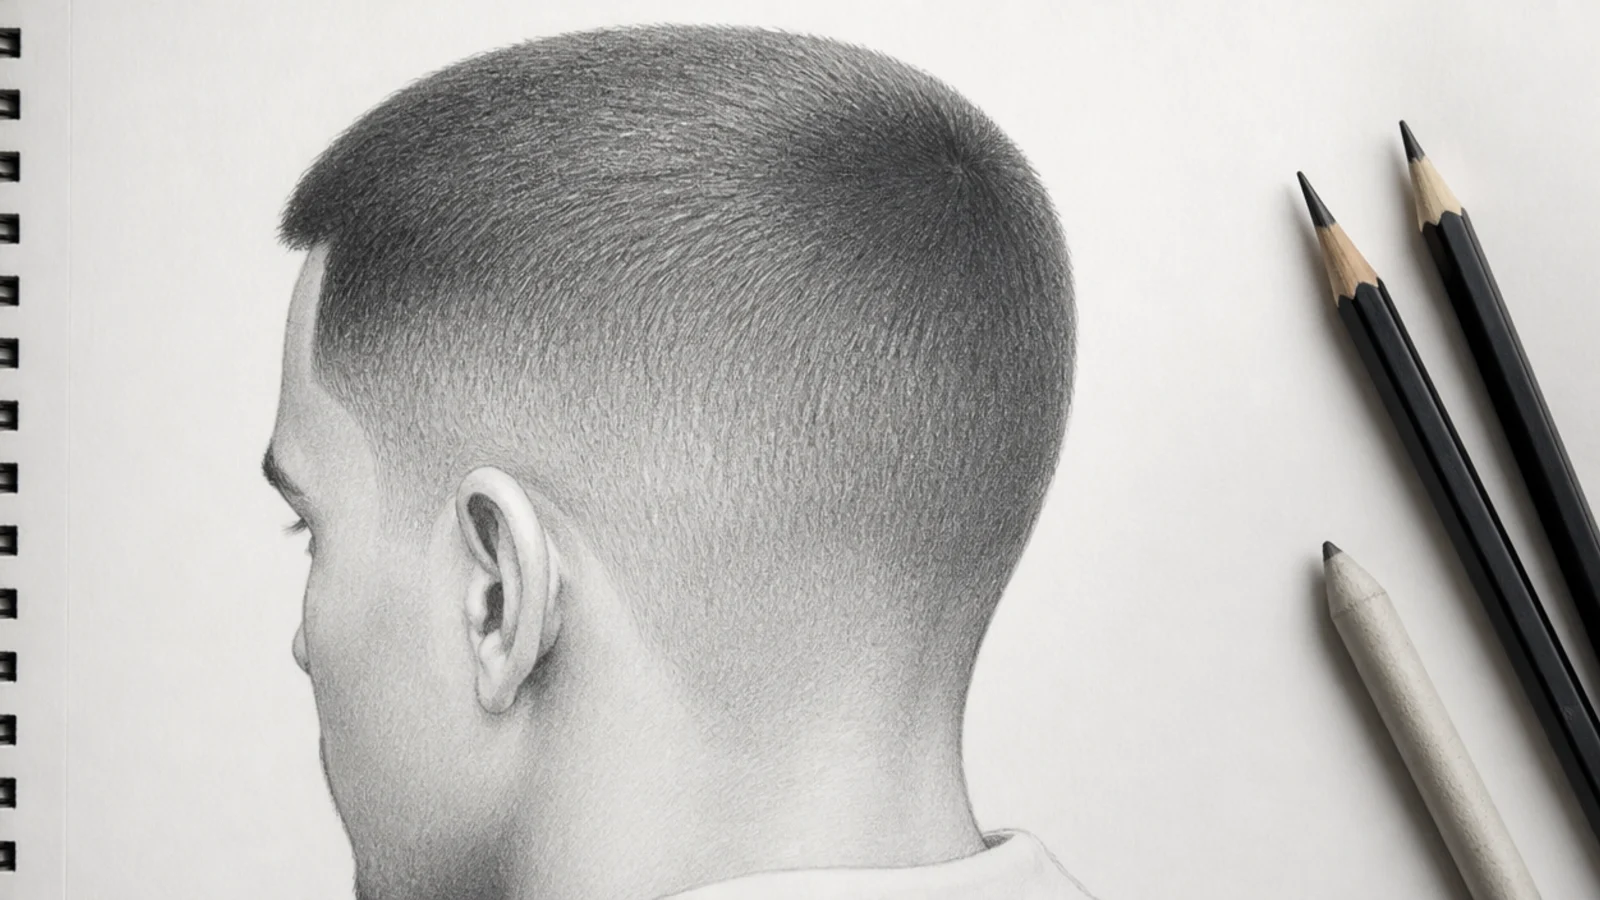
No strands at all, just value. An even 2B tone following the skull, darker where the head turns away from the light, almost white on the top plane, with the fade at the ears rendered as a gradient rather than an edge. The hairline and the taper are the only drawn lines on the whole sheet. Ten minutes. It is brutal because it exposes every skull error you have been hiding under hair, which is exactly why I keep it in the front of the folder. Short cuts get more attention in boy hair sketch.
Who it suits: Anyone whose heads look wrong the moment the hair comes off.
Tip: Stipple with a slightly blunt 2B rather than drawing lines. Any line longer than 2mm reads as long hair.
11. Curtain Bangs Over a Forehead, Front and Three-Quarter
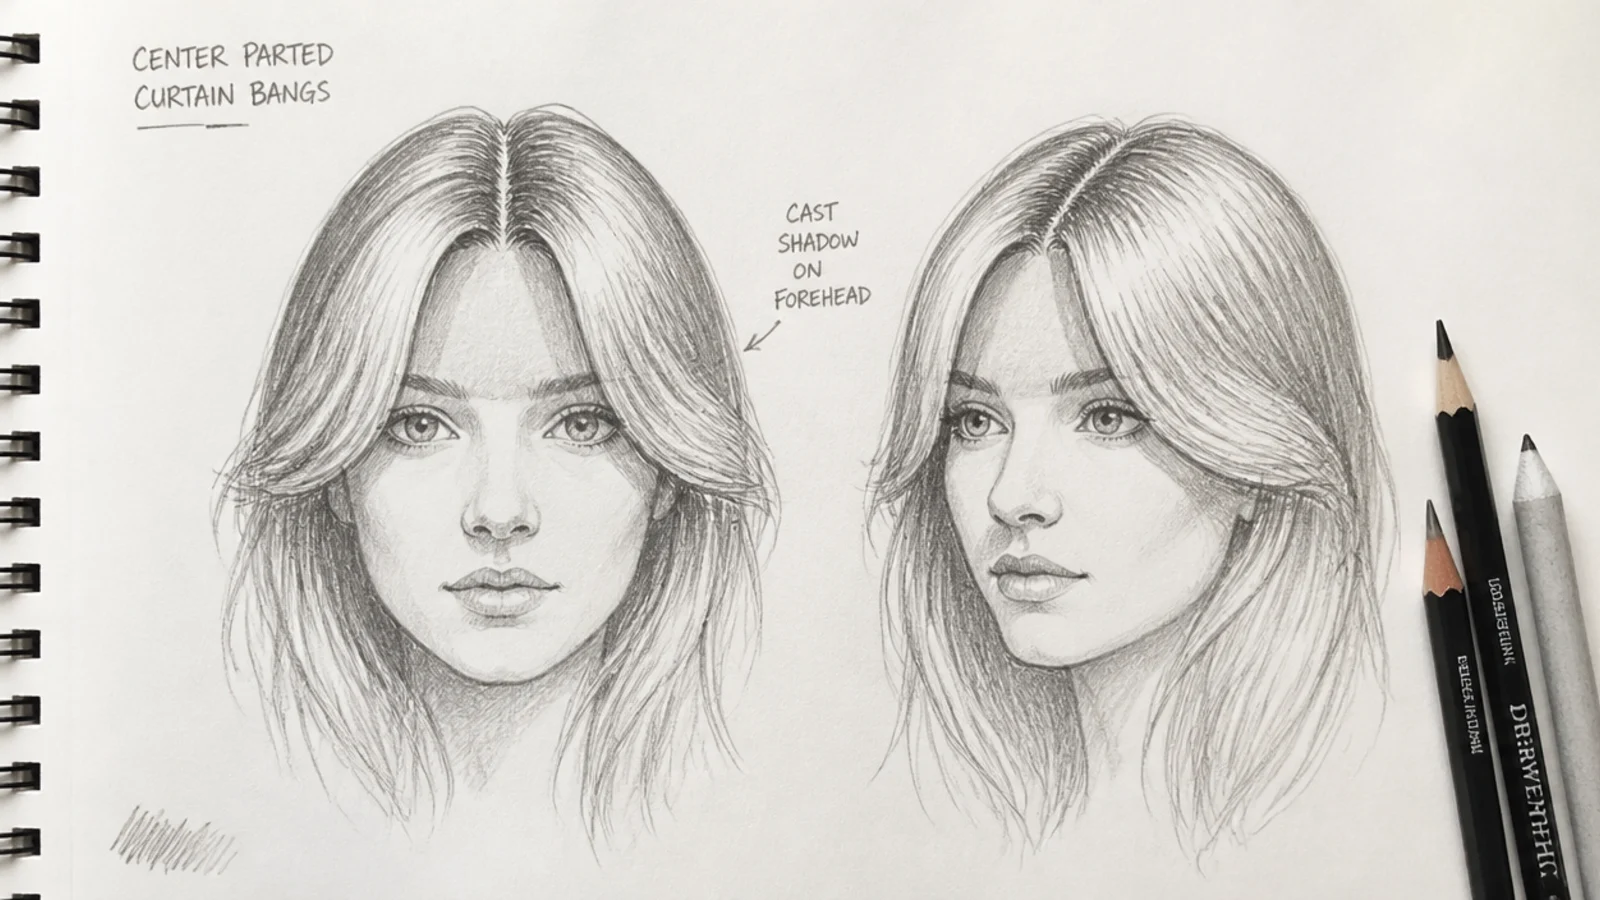
Two mirrored curves starting at a center part, sweeping over the brow and ending level with the cheekbone, shorter in the middle and longer at the outside. The detail I always forget and keep this sheet for: the 2B cast shadow directly under the fringe on the forehead. Without it the bangs sit on the face instead of in front of it. I drew the full forehead and hairline first on both angles, then laid the bangs over the top, which is the only order that works. I use the same layering order throughout the hair sketch tutorial stages.
Who it suits: Portrait sketchers, since bangs change a face more than any other hair detail.
Tip: Draw the forehead completely, then cover it. Starting with the fringe leaves it floating with no anchor.
12. Value Scale Sheet: 2H to 6B on One Hair Mass
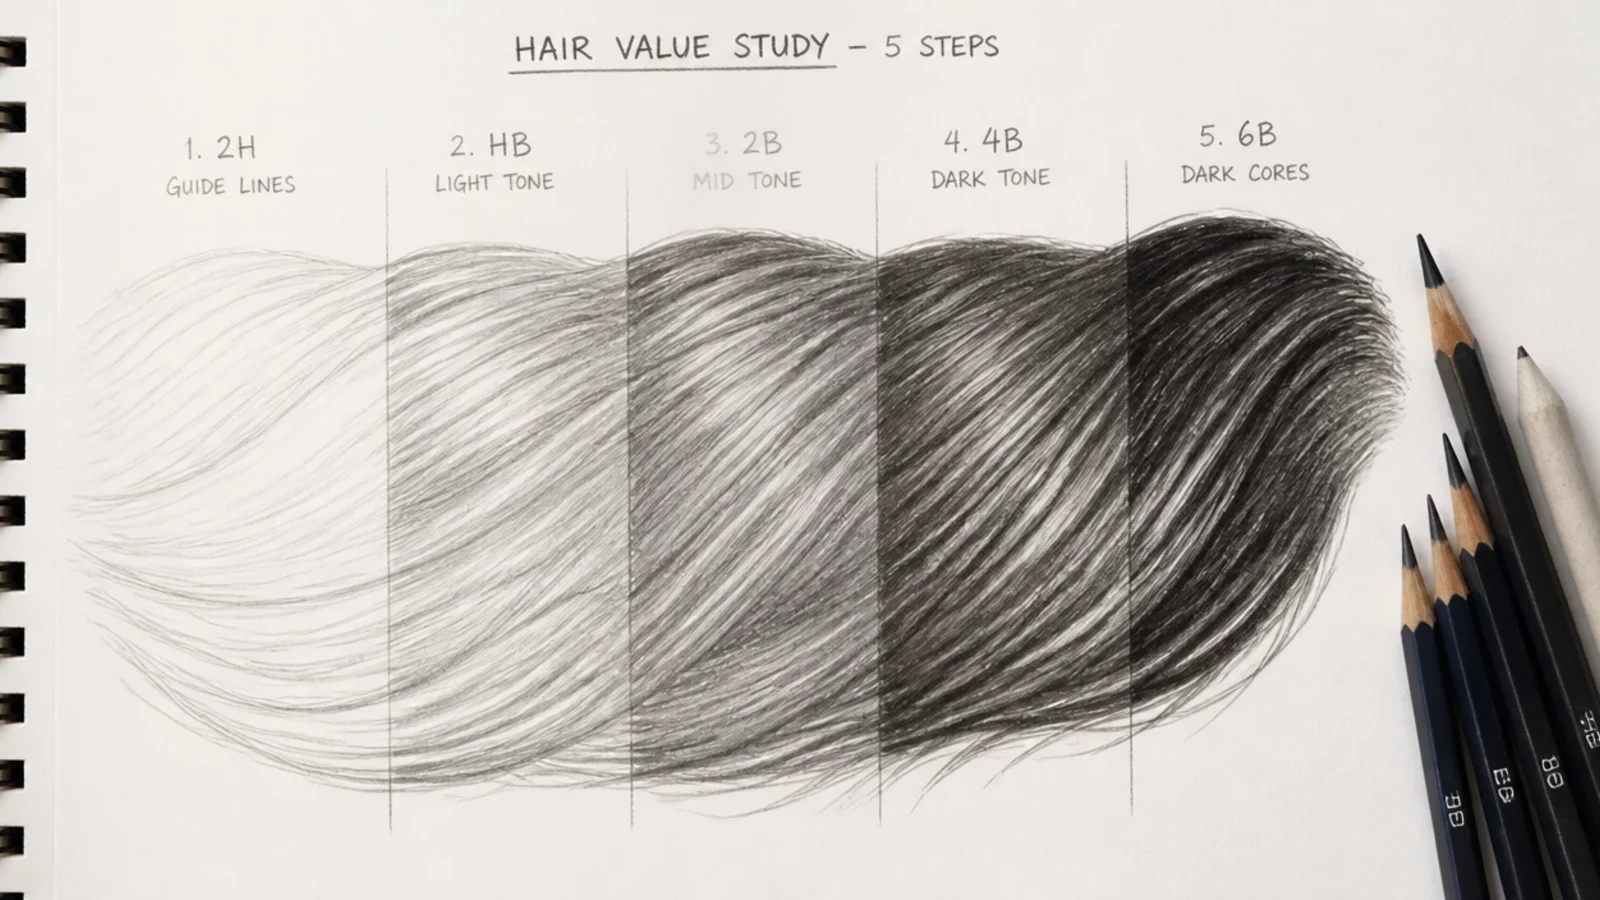
One shoulder-length mass, five labeled bands: 2H for the guide lines that get erased, HB for line work, 2B for the overall mid tone, 4B for deepened cores, 6B for the darkest points under the top layer. I made it because I kept reaching for 4B when I needed 6B and my hair stayed a timid mid gray. It costs about eight dollars in pencils to build and it is the highest-return sheet on this list. Flat hair is a value problem, never a detail problem, which is the first thing I say in hair sketch ideas.
Who it suits: Anyone told their hair sketches look flat but who cannot see why.
Tip: Put a 6B core within 3mm of bare white paper somewhere on every drawing. That single contrast creates the volume.
13. Anime Hair Highlight Band Reference
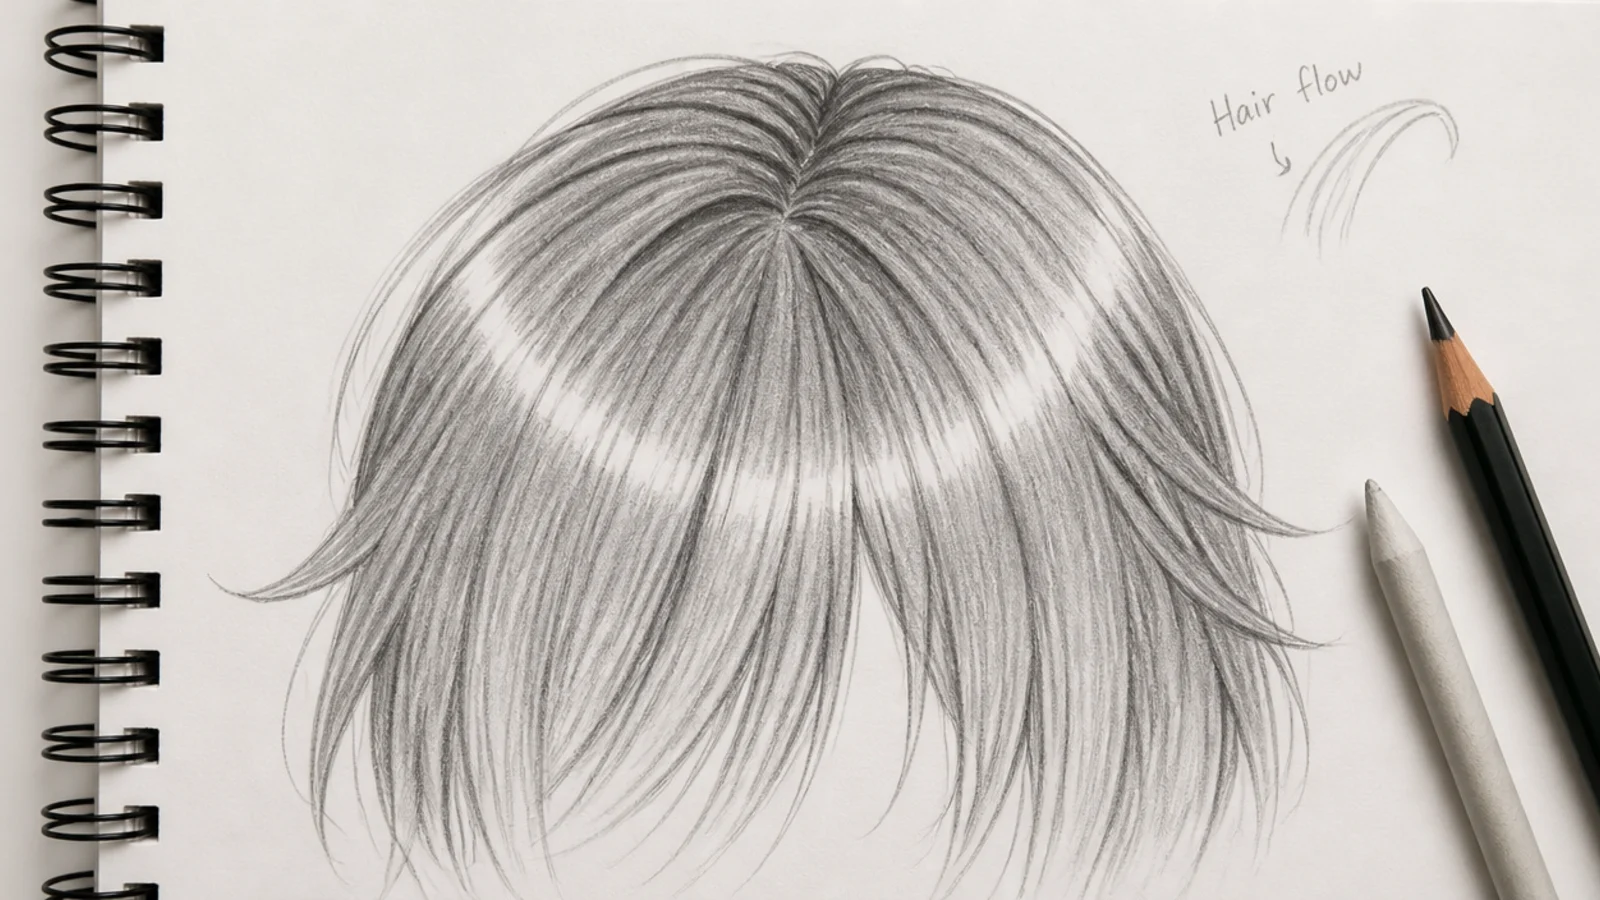
Four anime-style heads showing the same three-value formula at different angles: one curved highlight band wrapping the skull about two thirds up, a flat mid tone, a dark base near the roots and under the fringe. The lesson I extracted is that the band follows the curve of the skull, not the outline of the hair, which is why my earlier attempts looked like a stripe painted on. Long fluid strokes only, no short scratchy marks, and S curves even on straight hair. It also transfers straight back to pencil work on the hair sketch board.
Who it suits: Anyone moving between stylized and realistic work, or drawing digitally for the first time.
Tip: Bend the highlight band with the skull. A straight band across a rounded head instantly flattens the whole drawing.
14. Wind-Blown Hair in Motion, Flow-Line Sheet
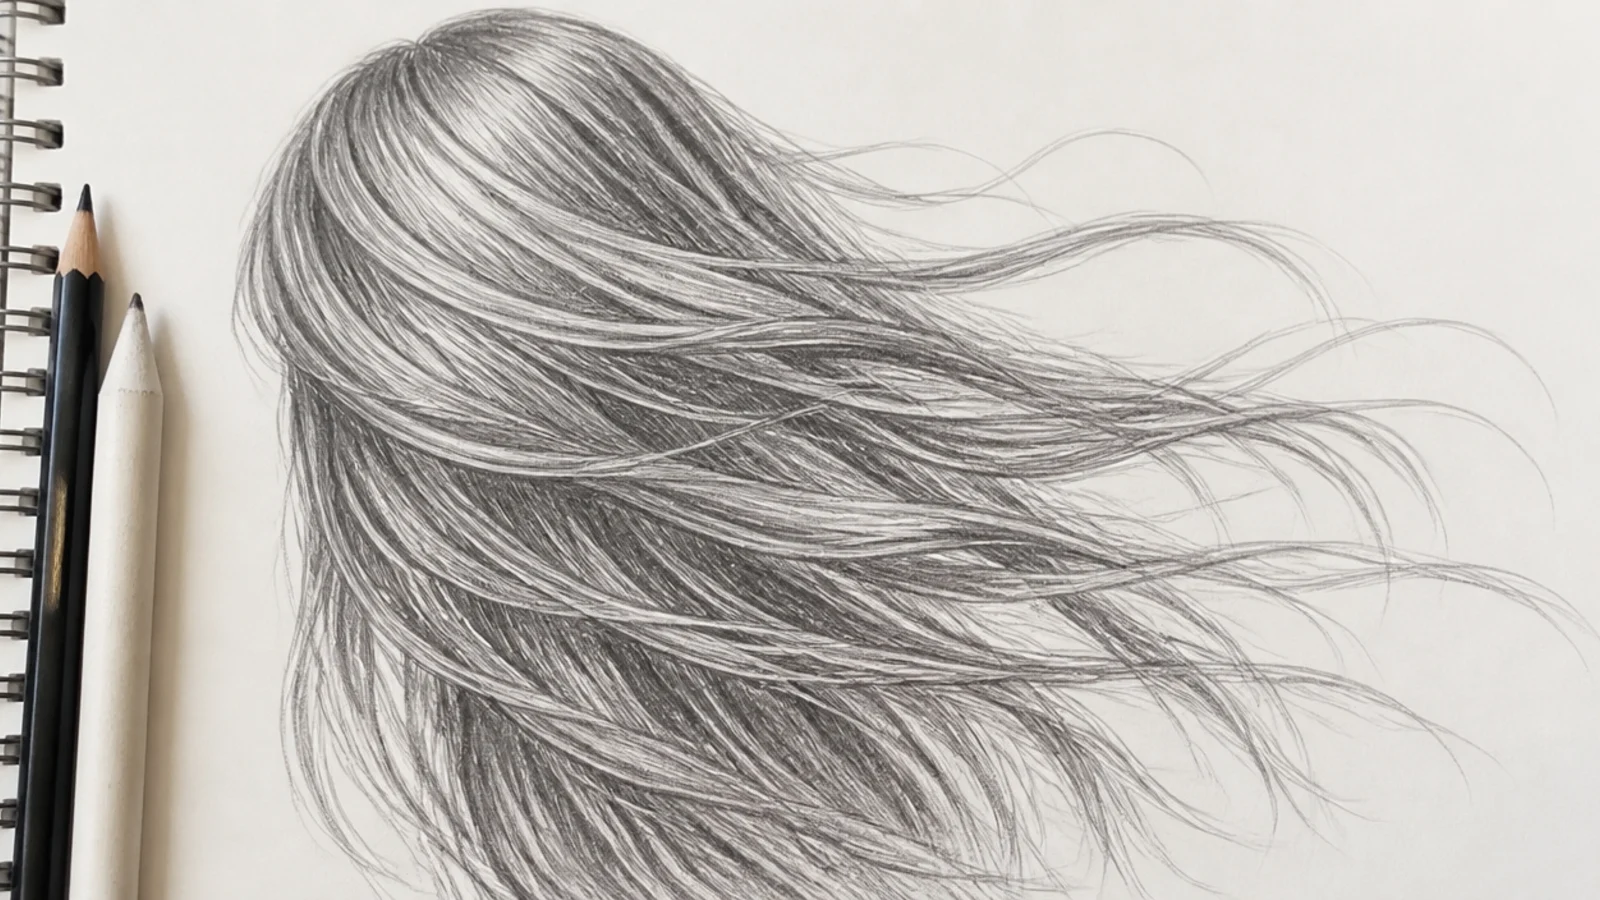
Long hair pulled sideways by a single wind direction, with five master flow lines drawn in 2H before anything else and the strand groups hung off them. The rule that made it work: the mass separates into fewer, longer groups in motion, not more. Early versions had thirty strands going thirty ways and read as an explosion. I also let two groups break away entirely and cross in front of the face, which is what sells movement. Around 25 minutes. Related work at long hair sketch.
Who it suits: Illustrators drawing action poses, and anyone whose hair looks static in a dynamic scene.
Tip: Keep the roots tight to the scalp. Wind lifts the lengths first, and lifting from the roots reads as electrocution. Every long style in long hair sketch uses the same master flow lines.
15. Small-Scale Hair on 2cm Head Thumbnails
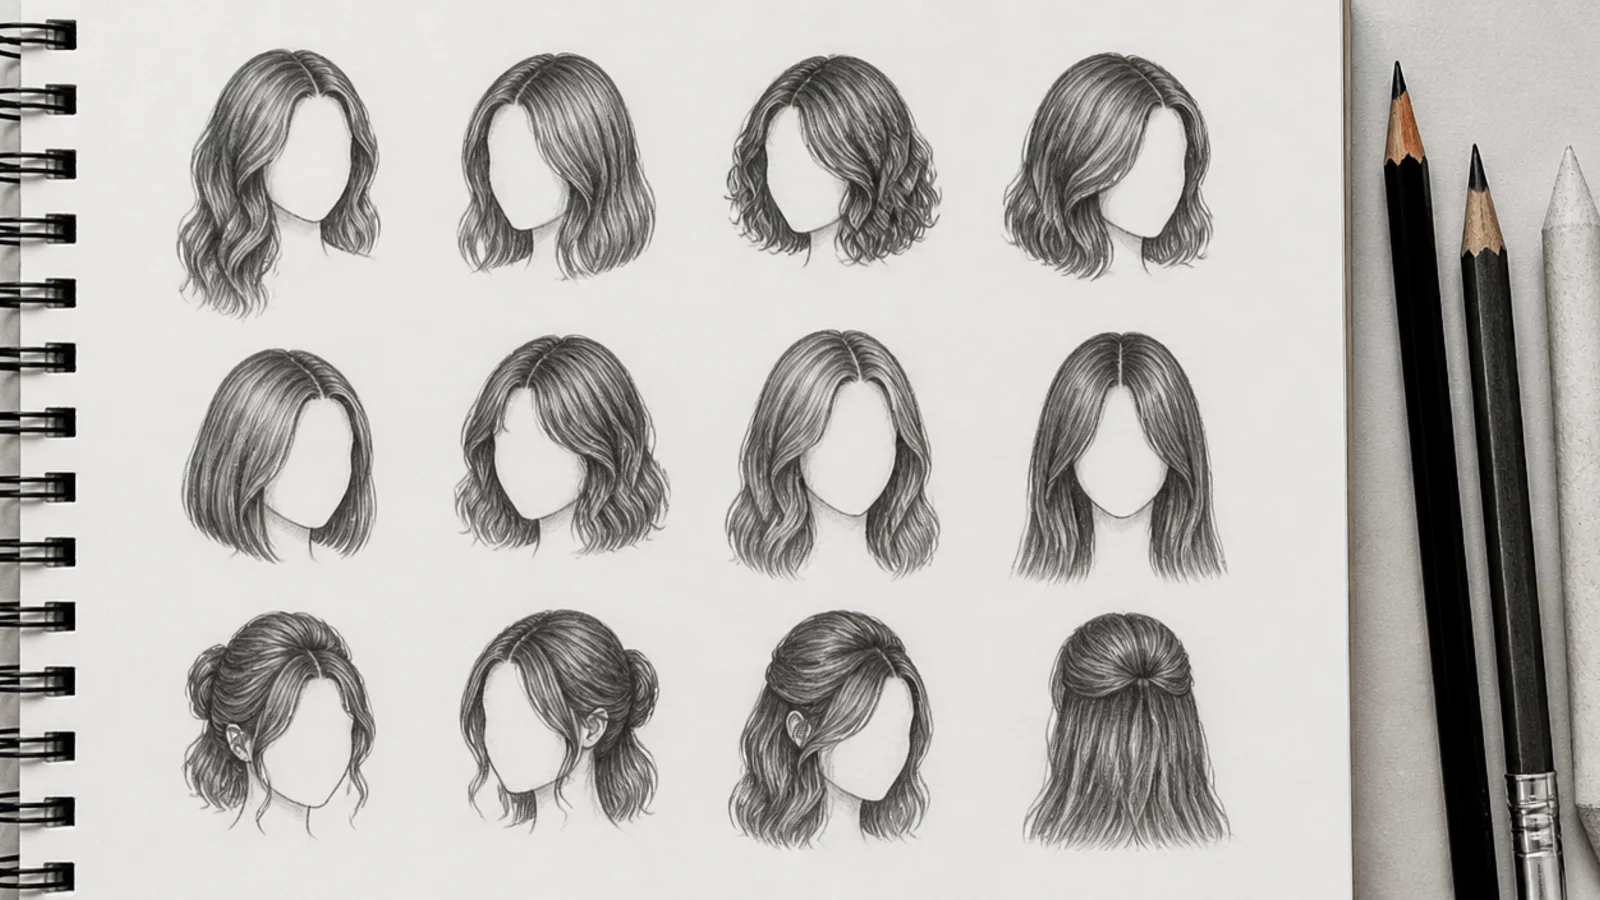
Twelve heads about 2cm tall, each a different hairstyle, rendered with zero strands. At that scale hair is silhouette plus two values and nothing else, and trying to draw texture just makes a gray smudge. This is the sheet I use most in real sketchbook work, because most figures I draw are small. It took 20 minutes for all twelve. Nobody publishes references at this scale, which is strange, because it is the size people actually draw at.
Who it suits: Sketchbook practicers and comic artists drawing full figures rather than portraits.
Tip: If the hairstyle is not recognizable in pure silhouette at 2cm, no amount of detail at that size will save it. Silhouette practice from hair sketch is the fastest way to test that.
How I Use a Hair Sketch Reference Without Copying It
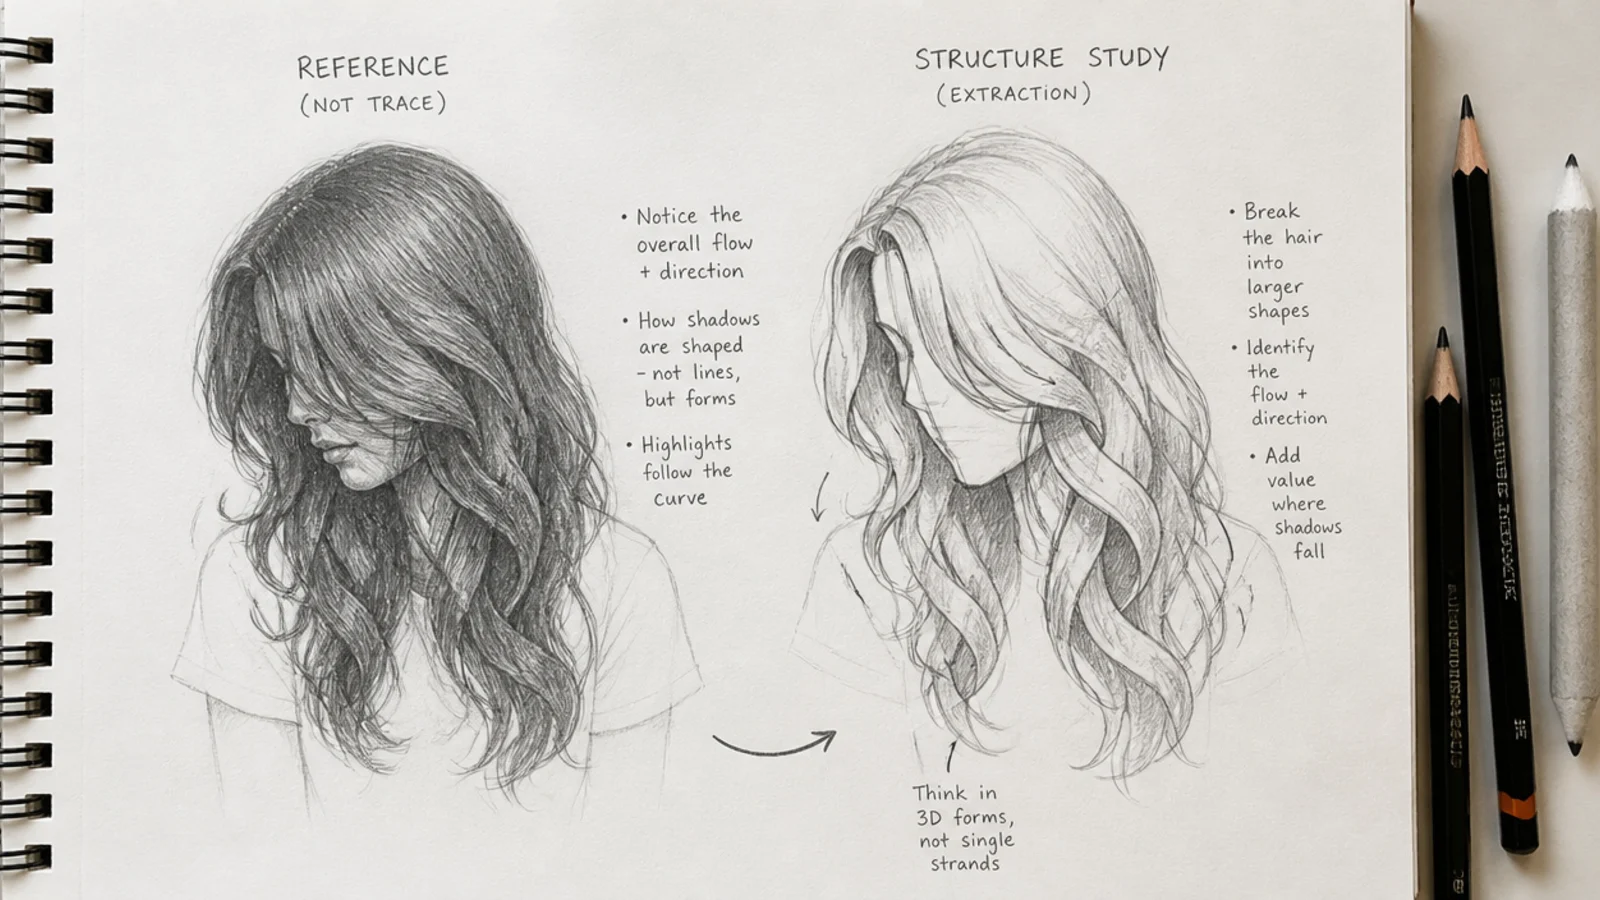
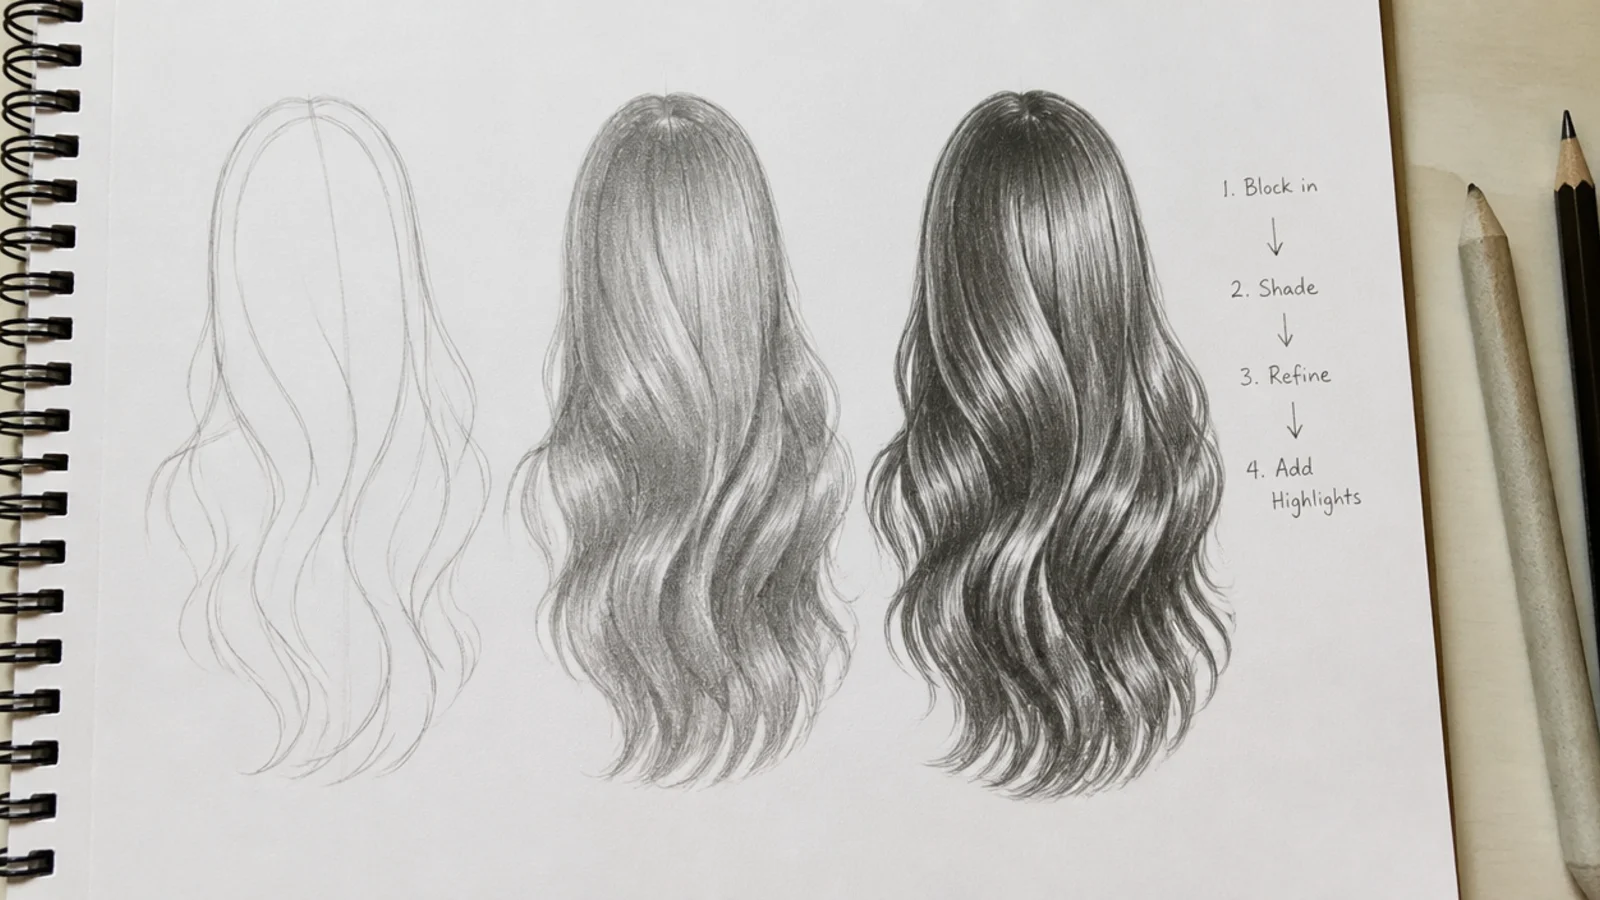
For a long time I used references badly. I would put the image next to the page and try to match it stroke for stroke, and the result was always stiff, because I was copying a finished surface instead of understanding a structure. What works is asking a reference exactly four questions and then putting it away. Where does the crown swirl sit on this head. How far outside the skull does the mass travel at its widest point, in millimeters. Where does the part run and which direction does each section leave it. Where is the darkest value, and is it under the top layer, behind the ears, at the nape or below a tie. I write those four answers in the margin, block the silhouette from the answers, and only glance back at the reference during the final texture pass. The drawing comes out looking like mine because every decorative choice, the stray strands, the flick of the ends, the highlight width, was invented rather than transcribed. Tracing feels productive and teaches nothing, which is the most expensive lesson in this article. If you want the underlying process broken into numbered stages, the hair sketch tutorial walks it through step by step.
Shape Before Strands: What Every Good Hair Reference Shows First
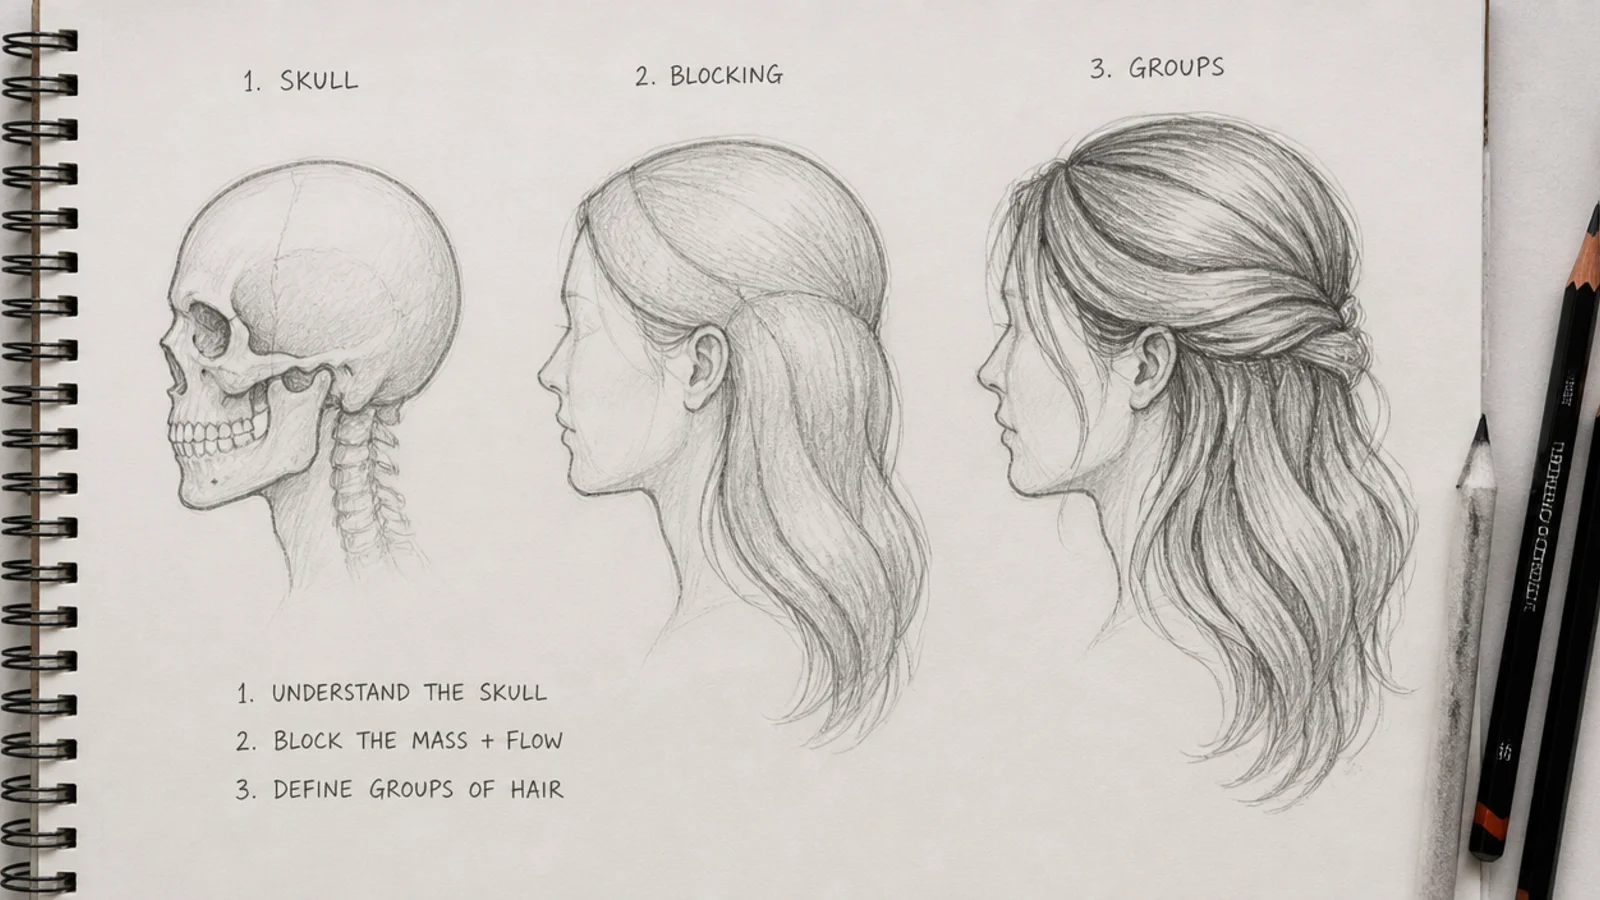
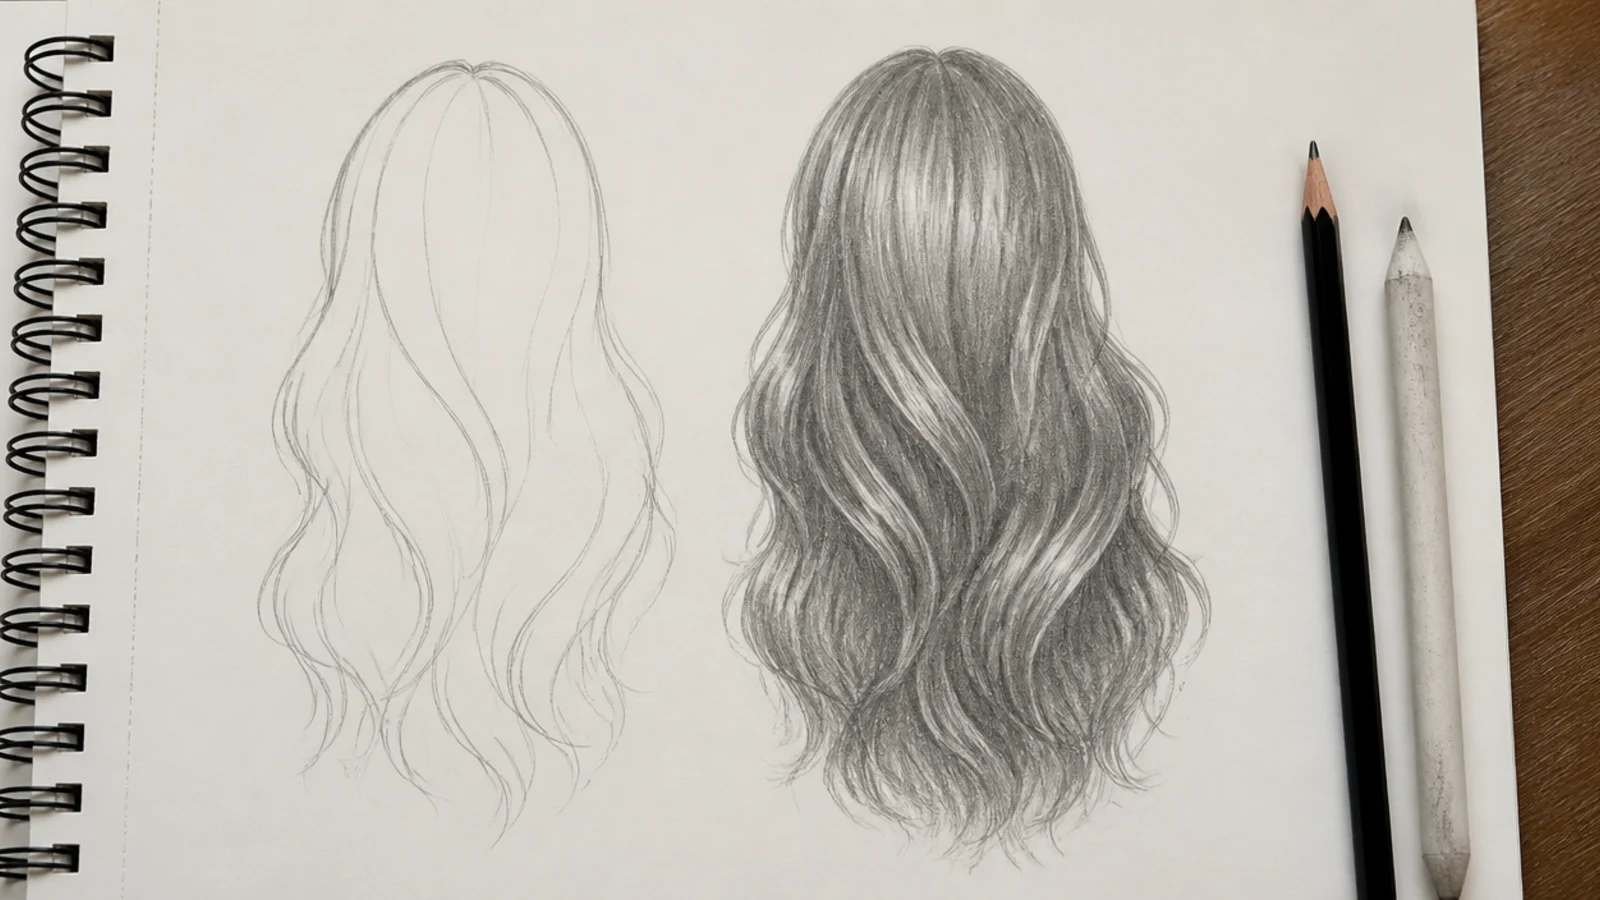
The number one beginner mistake is drawing individual strands before the hair mass exists, and no reference on earth fixes it for you. A useful reference sheet shows the mass first. I build every one of mine in four stages and I recommend judging any reference you save by whether you can see those stages in it. First the skull, including the cranium above the hairline that beginners flatten, since hair needs somewhere to sit. Second the hairline, drawn as an irregular soft line about a third of the way down the forehead, never a hard clean curve. Third the whole hair mass blocked in 2H as one shape sitting 5 to 15mm outside the skull depending on volume. Fourth, and only fourth, that mass broken into four to seven strand groups. Direction is the other half: hair grows in sections out of the crown swirl, so every line fans from that point rather than running parallel down the page, and parallel lines are precisely why drawn hair reads as a wig. Short flicks at the ends stop the silhouette looking like a molded helmet. Everything on the reference sheets above assumes this order, and the hair sketch ideas list gives you subjects to drill it on.
Shading Hair for Volume: Where the 6B Dark Cores Go
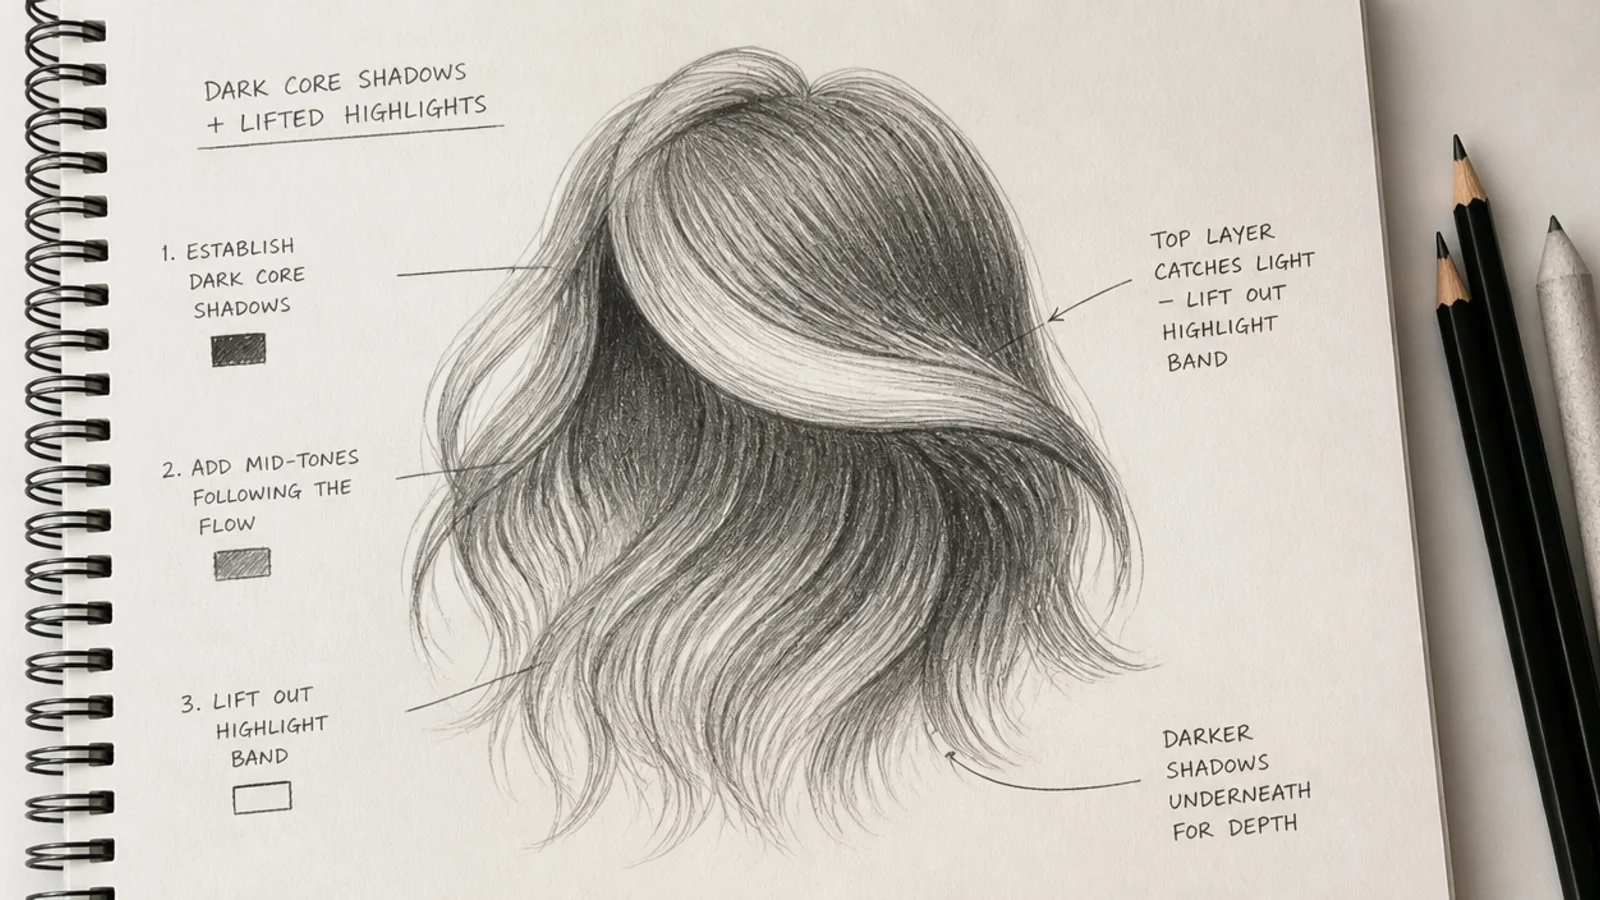
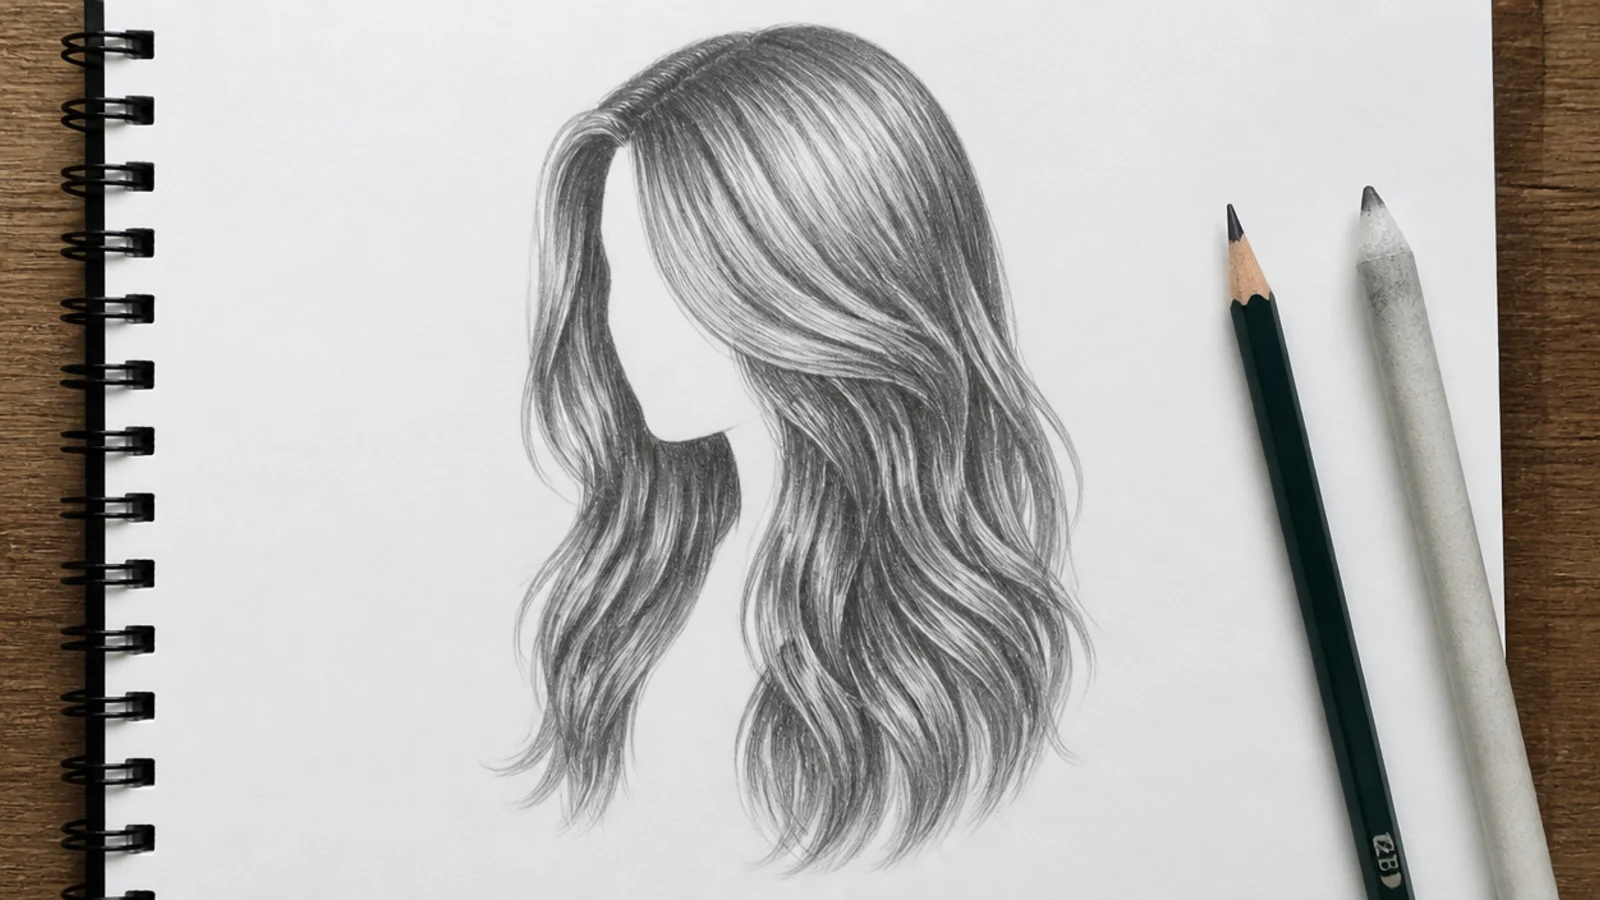
Flat hair is a value problem, not a detail problem, and it is the failure I see most in work sent to me. Decide the light source before a single shadow goes down, then put the darkest values where hair is physically deepest rather than where it looks busy: underneath the top layer, behind the ears, at the nape, inside every overlap, and immediately below any tie or knot. Those dark cores are what push the top layer forward and create the illusion of thickness. I build in three passes. An even 2B mid tone across the whole mass, cores deepened to 4B and then 6B, then the highlight left or lifted last. A highlight is not a white line scribbled on top, it is a band that wraps the curve of the skull about two thirds of the way up, and the cleanest way to get it is to leave the paper white from the start or press a kneaded eraser into the graphite and pull the tone back out. Keep the range wide. Timid mid gray from root to tip is exactly what reads as flat, and a 6B core sitting 3mm from bare paper is what makes hair look like it has depth.
One Reference Per Texture: Straight, Wavy, Curly and Coily
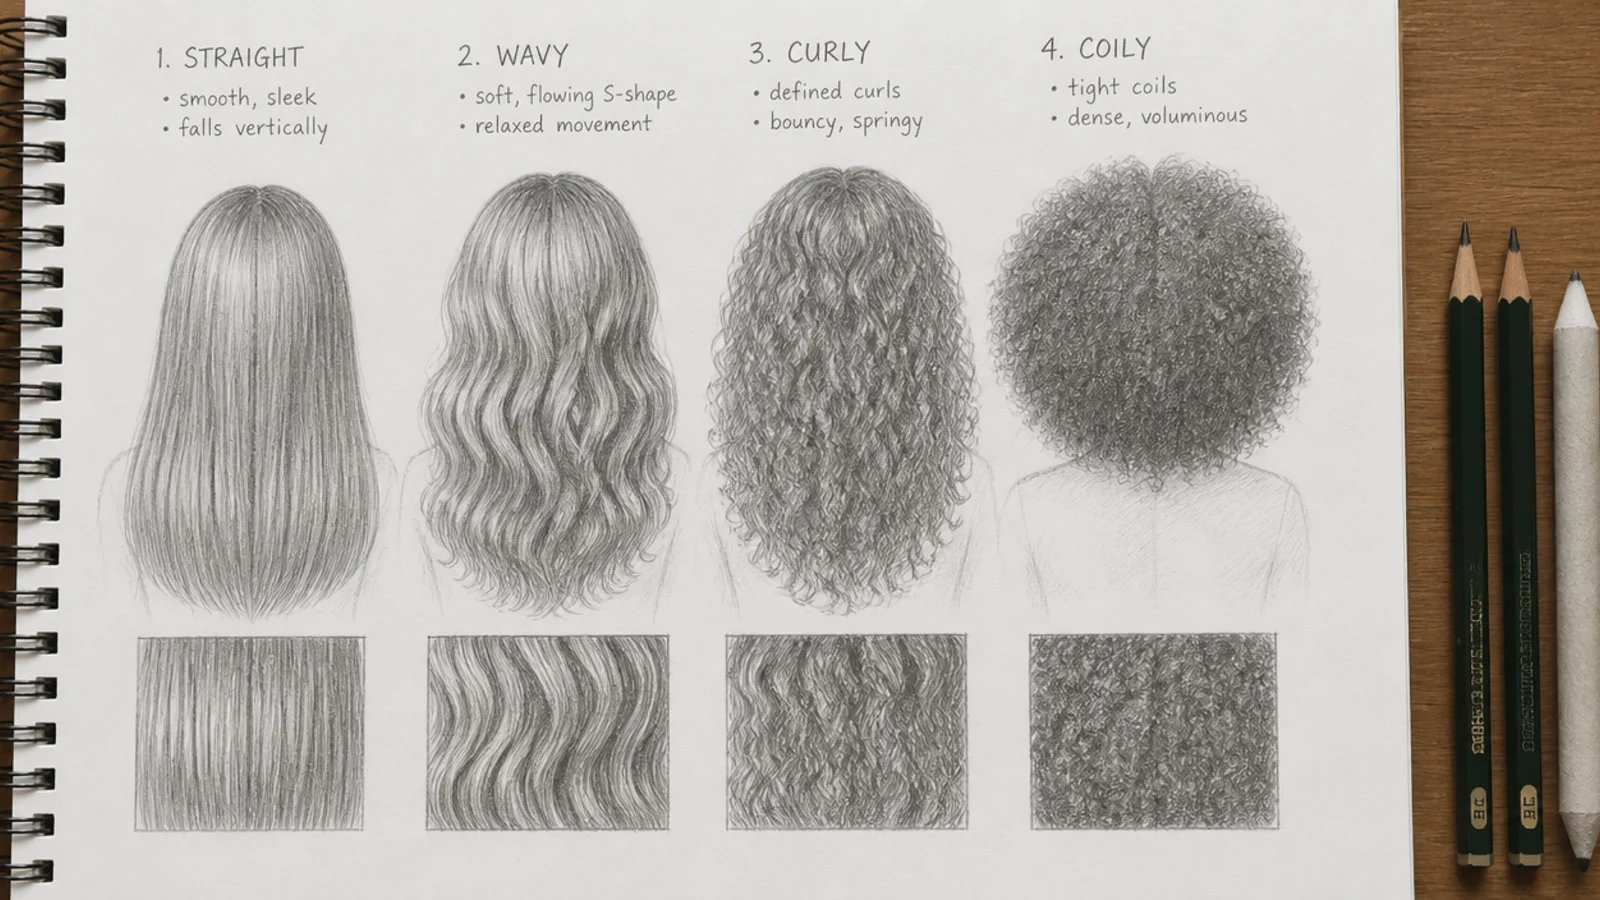
Each texture needs a different drawing unit, and using the wrong one is why a curly sketch ends up looking like noodles. Straight hair is built from long tapered strokes running the full length of the mass, with calm wide shapes and shine sitting in one broad band. Wavy hair is that same stroke with a repeating S pushed into it, shaded on the inside of every curve, left white on the outside, the wave loosening toward the ends. Curly hair is not drawn as coils at all: each curl is a ribbon that twists, showing a lit face and a shadowed face on opposite sides, with the darkest value where the ribbon turns away. Coily hair is drawn almost entirely as clustered value, tiny overlapping loops with 6B pushed into the gaps between clusters, sitting in a shell only 10 to 20mm deep against the skull. That is why I keep a separate reference sheet for each rather than one general hair sheet: a general sheet teaches you one unit and you then misapply it to three textures. Sheets 2 through 6 on this list are the four textures plus locs, and they are the ones I redraw most often. For curls specifically, curly hair sketch goes further than I can here, and long hair sketch handles length and motion.
Pencils, Paper and Blending Tools I Actually Use
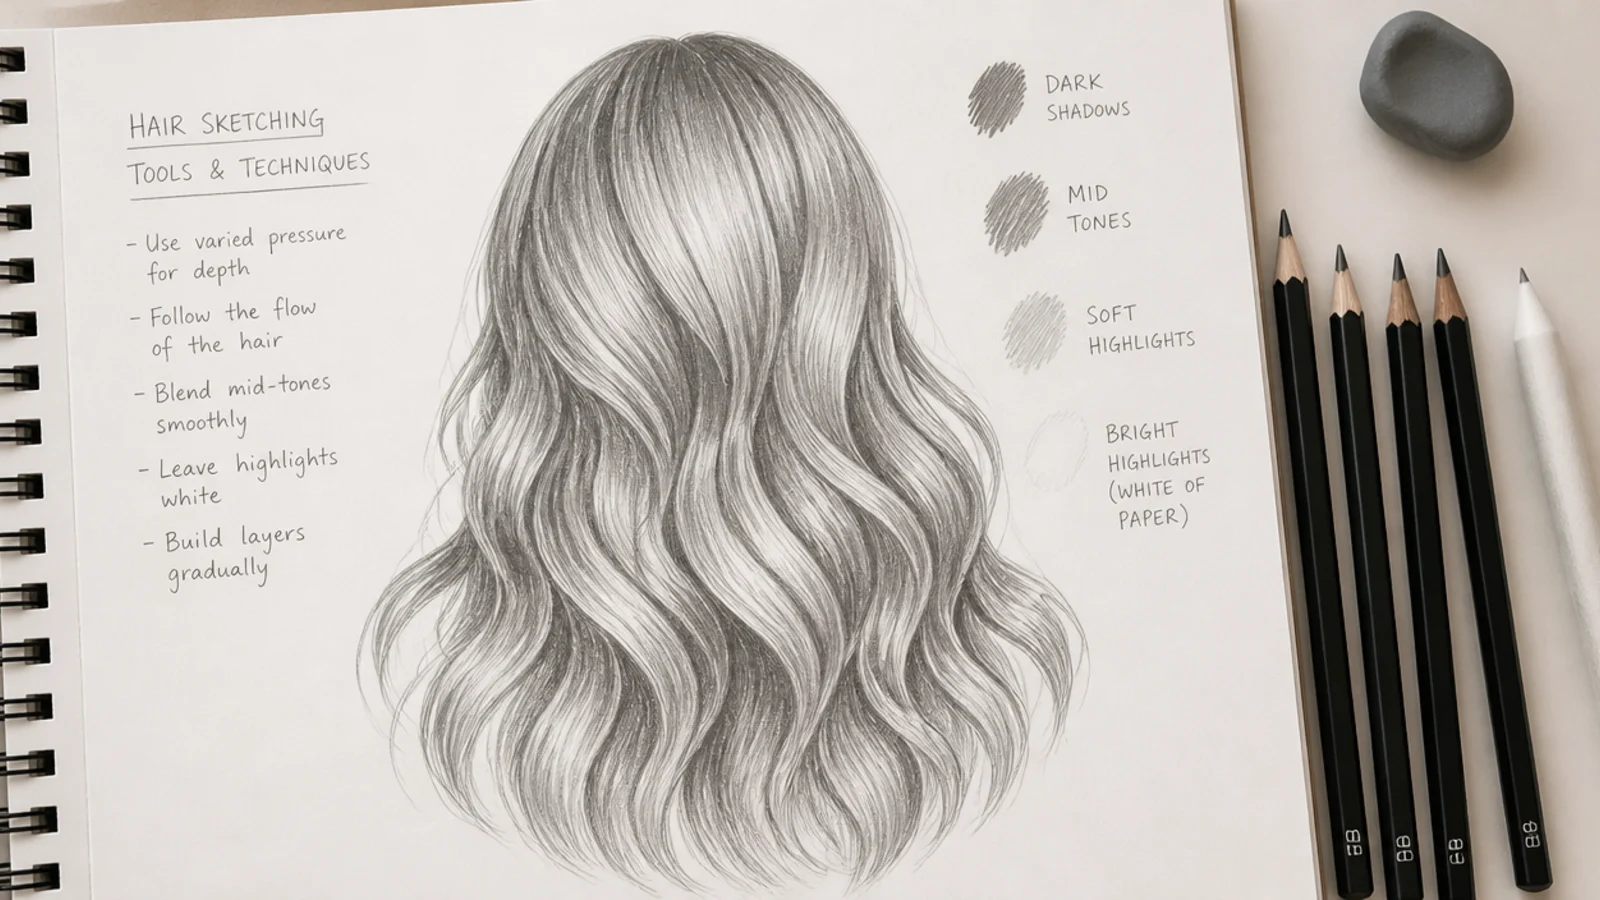
Five graphite grades cover every sheet on this page. 2H for guide lines that need to disappear, HB for committed line work, 2B for the overall mid tone, 4B for deepened cores, 6B for the darkest points. The whole set runs about 15 to 30 dollars with paper and it is the only purchase this hobby genuinely requires. Paper matters more than people expect: smooth 90 to 120gsm cartridge takes a 6B without the tooth breaking up your dark cores into speckle, while cheap 70gsm printer paper pills under a kneaded eraser and ruins any highlight you try to lift. A kneaded eraser is non-negotiable because lifting is how highlights get made; a hard vinyl eraser is for clean edges only. The blending stump is the tool I warn people about, because smudging every value together is the fastest way to turn hair into fog. I use it on maybe one drawing in five, and only in the deepest cores. One more thing that costs nothing: a fixative or even a spare sheet under your drawing hand, since graphite smears and a smeared highlight cannot be recovered. The same kit runs every exercise in the hair sketch tutorial.
Reference Licensing and the Mistakes That Cost Me Time
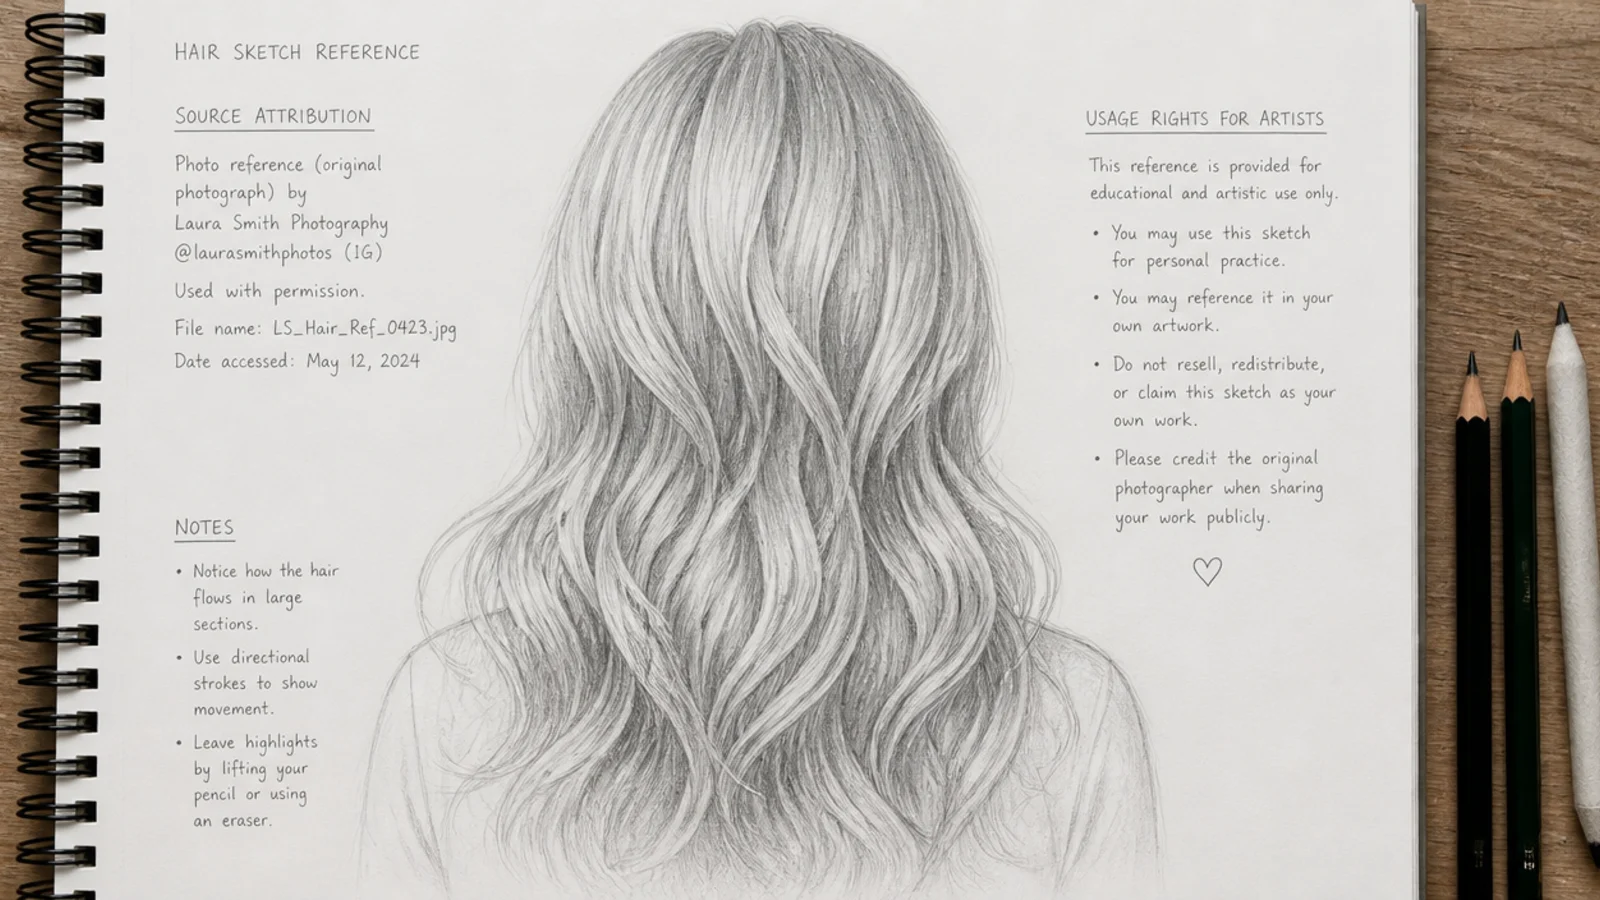
Two questions come up constantly and almost no reference site answers either. First, is it okay to use photo references for drawing hair. Yes, and nearly every working artist does, but use them for structure rather than surface, and if the work is going to be sold or published, use photos you shot, photos with a clear license that permits it, or your own drawn sheets. A traced photograph is a derivative of somebody else's image no matter how much graphite you put over it. Second, is studying another artist's drawing allowed. As practice, yes, and it is how most people learn, but keep those studies in the sketchbook and build published work from your own observation. The mistakes that cost me real time were smaller and more boring: saving thousands of pretty images with no structural value, saving them without noting the source so I could not credit anything later, and collecting references instead of drawing. A folder of fifteen sheets you understand beats two thousand pins you have never opened twice. Everything else you need is on the hair sketch board.
Frequently Asked Questions
Where can I find free hair drawing references?
Free reference libraries, stock photo sites and artist-run reference packs all work, and Pinterest is fine for browsing structure. The most reliable source, though, is your own phone: photograph the same head from four angles under one fixed light. It is free, unambiguous on rights, and gives you the multi-angle coverage almost no online reference offers.
Is it OK to use photo references for drawing hair?
Yes, and most artists work this way. Use references for structure: where the part sits, where the mass is widest, where the darkest values fall. Tracing is the line to avoid, especially for anything you plan to publish or sell. Study from photos you shot or that carry a license permitting it, and build the final work from observation rather than transcription.
What are the best hair sketch references for beginners?
Start with three. A three-quarter head with the crown swirl marked, so your flow lines have an origin. A value scale from 2H to 6B on one hair mass, so flat hair stops happening. And a four-angle sheet of one hairstyle, so you learn how a silhouette changes as the head turns. Those three answer most beginner problems on their own.
How do you use a hair reference without copying it?
Ask the reference four questions, write the answers in your margin, then put the image away. Where is the crown swirl, how far outside the skull does the mass sit, where does the part run, and where is the darkest value. Block your silhouette from those answers alone and invent every decorative detail yourself. Only glance back during the final texture pass.
Why does my hair sketch look flat even with a good reference?
Because the value range is too narrow, not because the reference was wrong. Flat hair is almost always a single mid gray from root to tip. Put 6B dark cores where hair is deepest, under the top layer, behind the ears, inside overlaps and below any tie, then leave or lift a clean white highlight band across the curve of the skull.
Should I draw the head before adding hair?
Always. Draw the full skull first, including the cranium above the hairline that beginners tend to flatten, then place the hair as a mass sitting 5 to 15mm outside it. Skipping the skull is why drawn hair ends up too thin at the crown, or glued flat against the head with no room for volume anywhere.
How do you draw hair references for curly and coily textures?
Change the drawing unit. Curly hair is drawn as twisting ribbons with a lit face and a shadowed face, never as outlined coils. Coily hair is drawn as clustered value, tiny overlapping loops with 6B pushed into the gaps between clusters, in a shell only 10 to 20mm deep. Keep separate reference sheets for each so you do not misapply one unit to both.
What pencils do I need for hair sketch reference sheets?
Five grades cover everything on this list: 2H for erasable guide lines, HB for line work, 2B for the overall mid tone, 4B for deepened shadows, and 6B for the darkest cores. Add a kneaded eraser for lifting highlights, a hard vinyl eraser for edges, and smooth 90 to 120gsm cartridge paper. Roughly 15 to 30 dollars total.
How many hair references do I actually need?
Far fewer than you have saved. Fifteen sheets you understand and can rebuild from memory beat a folder of two thousand images you never open twice. Cover one sheet per texture, one per structural problem such as crown position or hairline shape, and one multi-angle turnaround. Redraw them every couple of months rather than looking them up.
Which hair sketch look are you saving?
What changed my hair drawing was not finding better images, it was narrowing what I asked a reference to do. Structure only: crown, mass, part, value. Everything decorative I invent myself, which is why nothing I make now looks traced. If you only build three of these sheets, build the crown swirl sheet, the four-angle sheet and the value-scale sheet, because between them they answer nearly every question a drawing throws at you. Redraw each one from scratch every couple of months rather than looking it up, since a reference you can rebuild from memory has actually taught you something. The hair sketch board has the tutorials and idea lists that go with them.