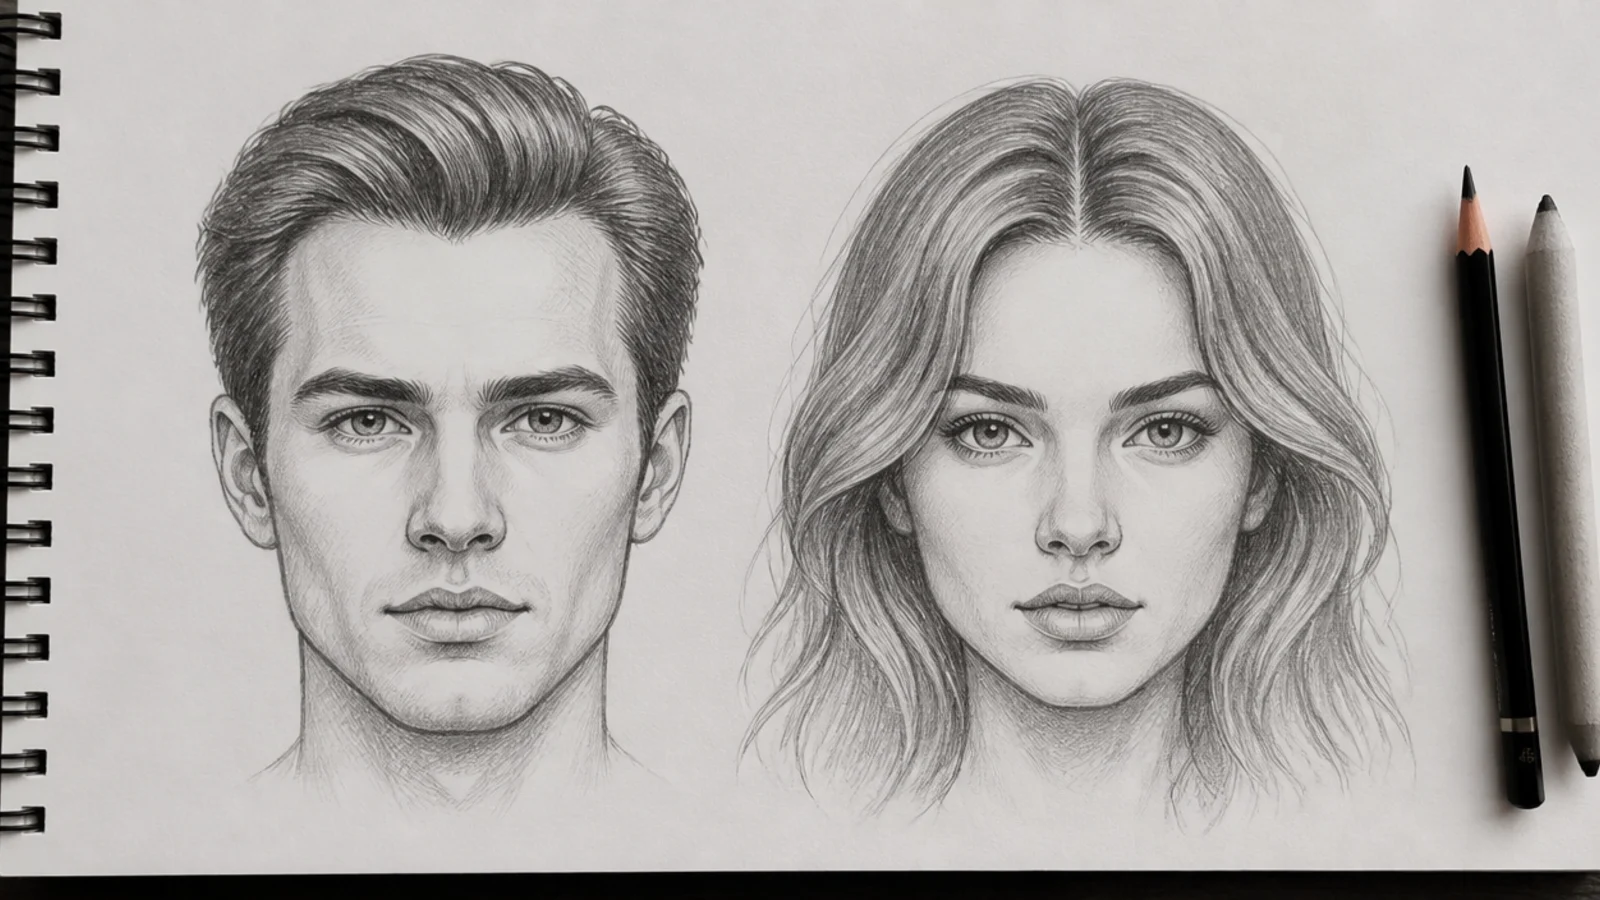
Quick Comparison
| Male Hair Sketch | Female Hair Sketch | |
|---|---|---|
| Hairline placement | Higher on the skull, roughly one finger-width above the top of the forehead mass | Lower, closer to the brow, which visually shortens the forehead |
| Hairline shape | Angular; recedes at the temples into a shallow M with an optional widow's peak | One continuous rounded curve with no sharp corner at the temple |
| Silhouette distance from skull | Close; the hair mass sits 2 to 5mm off the skull line so the cranium reads through | Far; the mass sits 10 to 30mm off the skull and becomes its own shape |
| Edge quality | Hard edges at the fade line, the part and the neckline; crisp 2B outline | Soft edges almost everywhere; broken outline with escaping strands |
| Flow lines per side | Two or three sections, usually crown to forehead and crown to nape | Four to six sections that overlap and cross in front of the shoulder |
| Value range | Wide and fast; bare paper to 6B within 10mm on a fade | Wide but gradual; the ramp from highlight to core shadow spans 30mm or more |
| Highlight placement | One small band on the top plane of the skull, often broken by texture | One long curved band across the crown plus secondary bands down the length |
| Neckline treatment | Drawn as a defined line; tapered, blocked or faded into the neck | Usually hidden under the hair mass and never drawn at all |
| Most common beginner error | Drawing the hairline too low, which reads female no matter what the cut is | Outlining every strand, which flattens the mass into a helmet |
1. Male M-Shaped Hairline vs Female Rounded Hairline
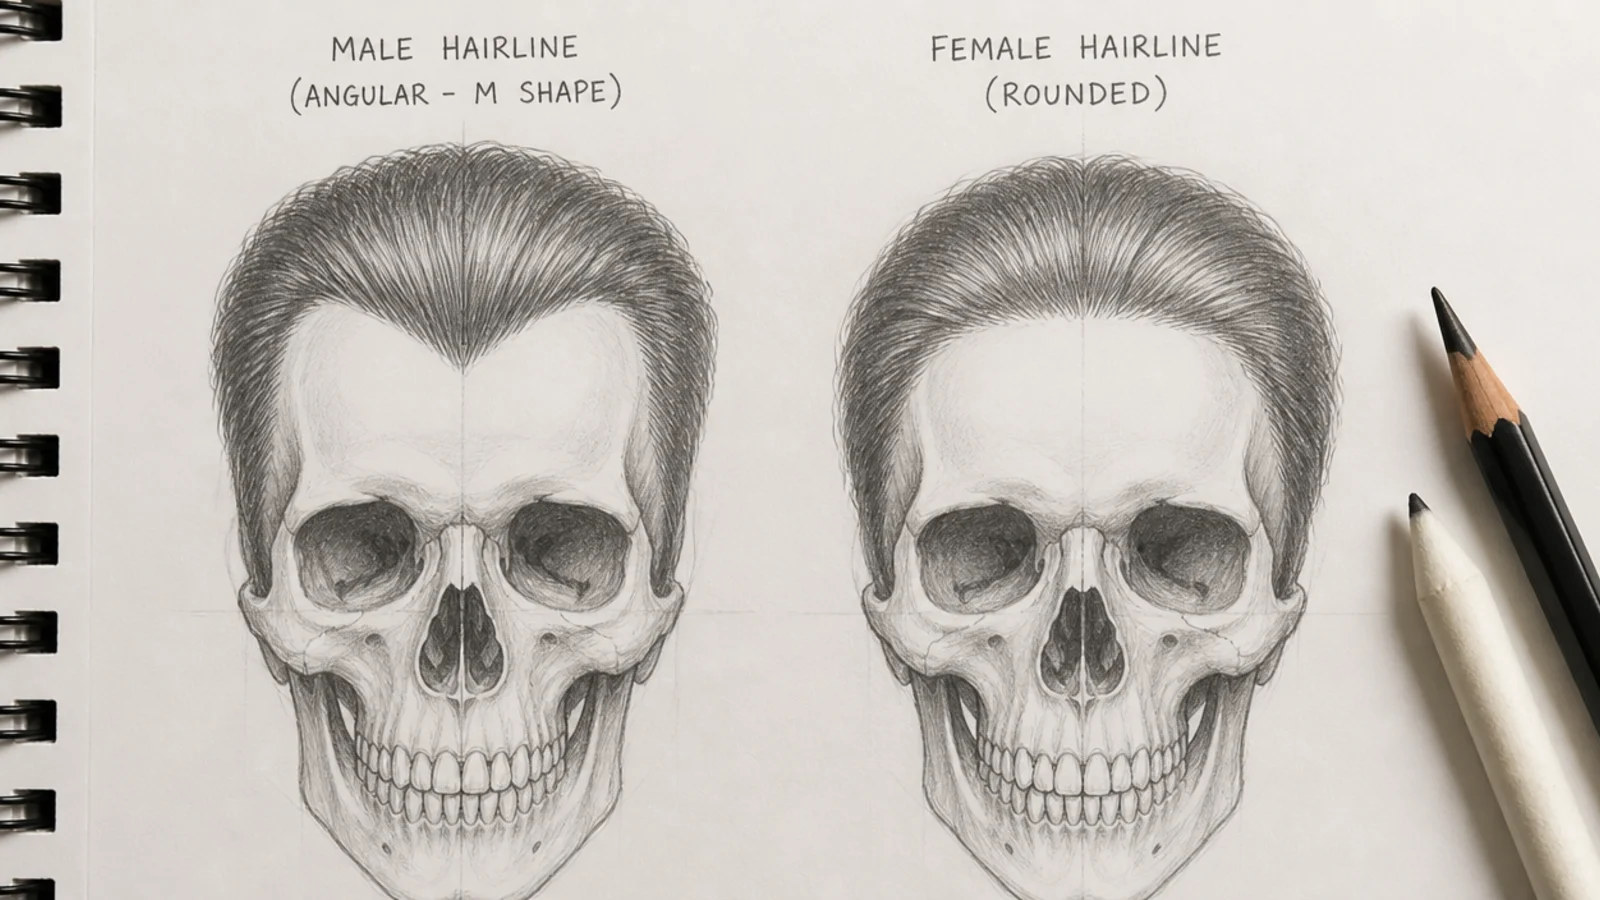
The foundation study. Draw one skull in 2H, trace it twice, and change only the hairline. The male version runs about one finger-width higher and steps back at each temple into a shallow M with two visible corners. The female version sits closer to the brow and travels in one rounded curve with no corner anywhere. Leave the face identical on both so you can see the hair doing all the work. Keep the line itself broken and slightly irregular rather than a clean stroke. Start every practice session with this before moving to a full hair sketch.
Who it suits: Beginners who can draw faces but cannot control the gender read.
Tip: Erase the hairline back 3mm at each temple on the male copy and the read flips instantly.
2. Male Buzz Cut Shaded as a Shadow, Not Strands
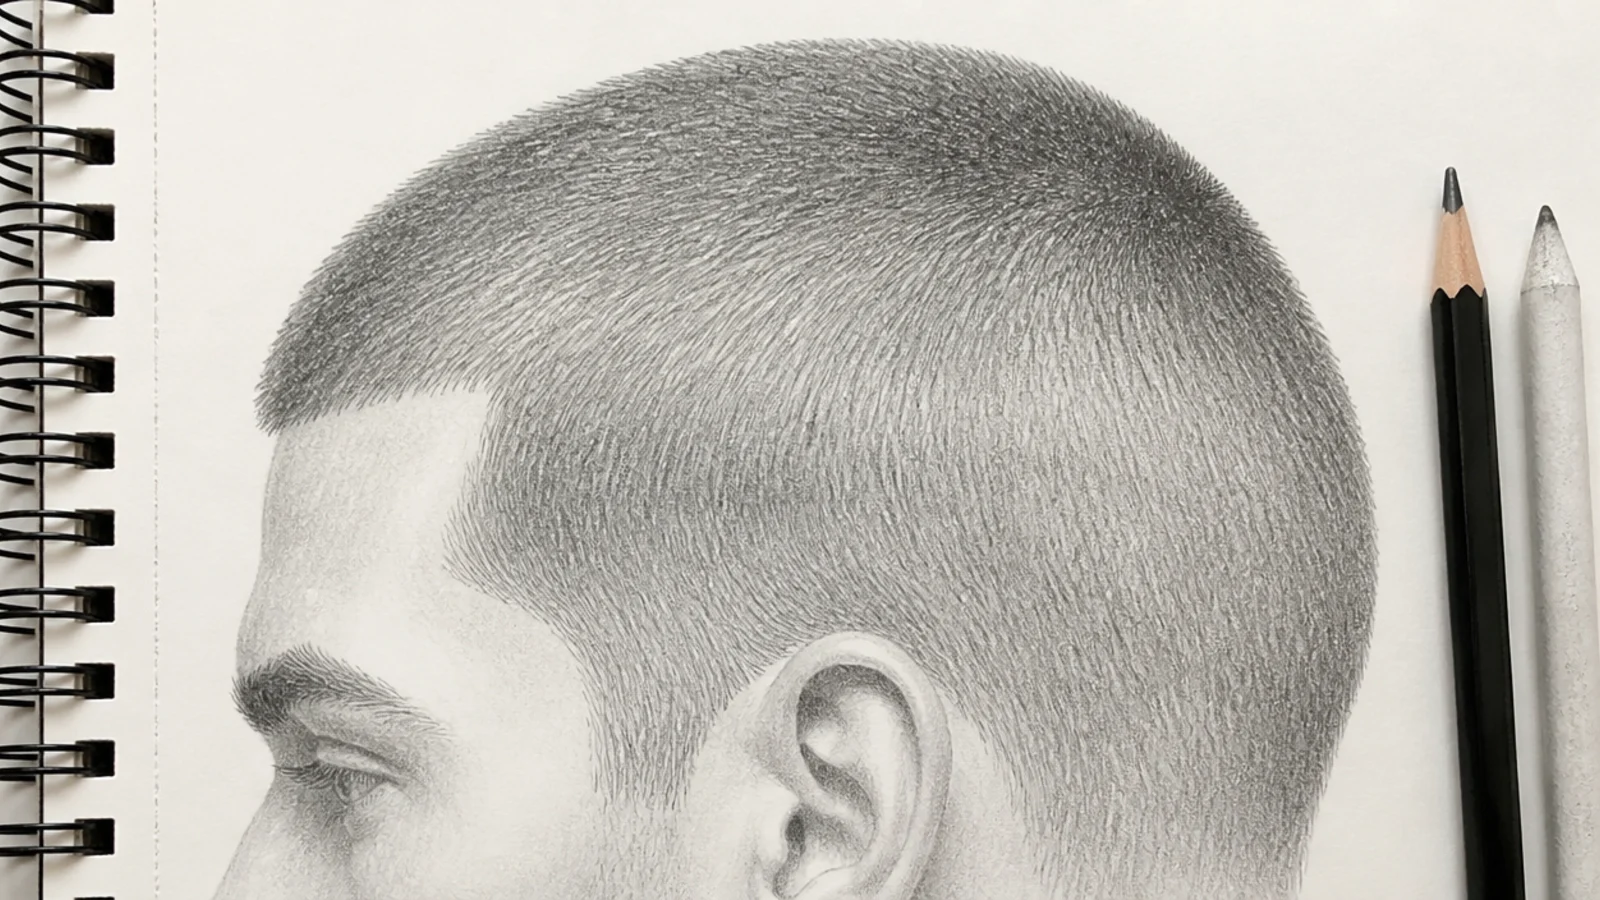
A number two buzz has almost no silhouette at all, so it is drawn entirely as value sitting on the skull. Lay a flat 2B tone over the whole hair area, then push 4B into the sides and the back of the crown where the form turns away. Add a fine stipple or short prickly flicks at the hairline edge so it feels like carpet rather than paint. Leave a bare paper band across the top plane of the skull. The whole thing takes about ten minutes and is the fastest way to practice reading skull form under hair, and it is the natural starting point in boy hair sketch.
Who it suits: Artists who over-render and need to practice restraint.
Tip: Stipple only at the outer 3mm edge; stippling the whole mass makes it look like stubble on a face.
3. Female Low Rounded Hairline with a Center Part
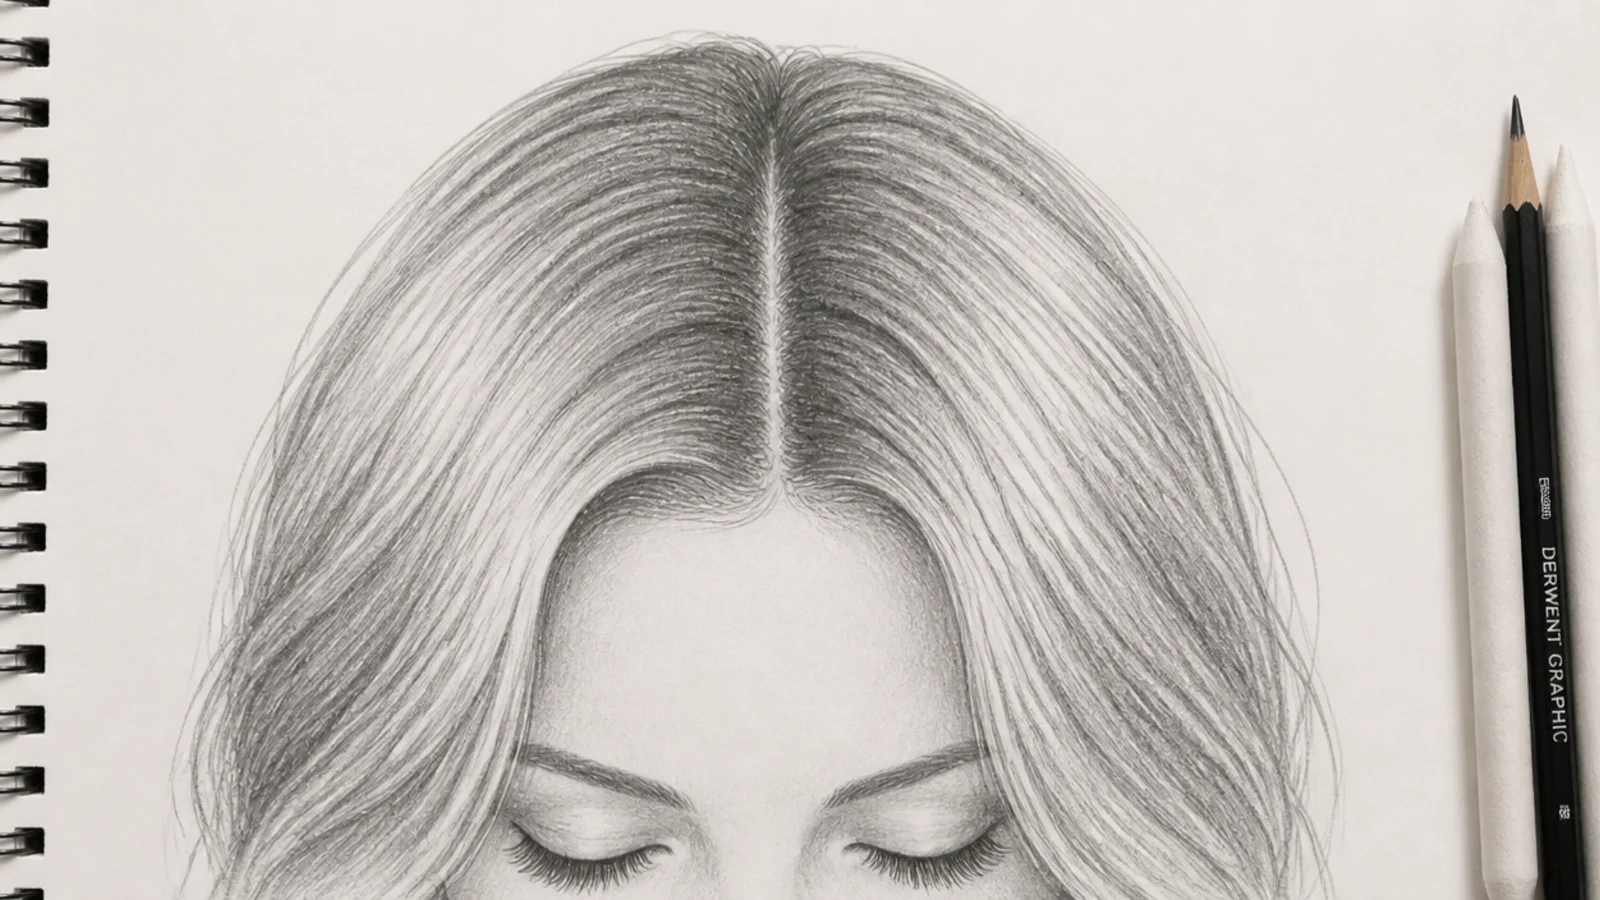
The direct counterpart to the buzz study. Same skull, but the hairline drops to roughly two centimeters above the brow and curves without corners, and a center part splits the crown into two masses that fall away on either side. The part itself is a 6B dark seam, not a white line, because you are seeing into the scalp gap. From that seam, every flow line radiates outward and downward. Keep the outer silhouette 15 to 25mm off the skull so the hair reads as having body rather than lying flat against bone.
Who it suits: Practicing the rounded hairline and radiating flow at the same time.
Tip: Darken the first 5mm either side of the part; that shadow is what sells the hair as three-dimensional.
4. Male Textured Crop with a Forward Flicked Fringe
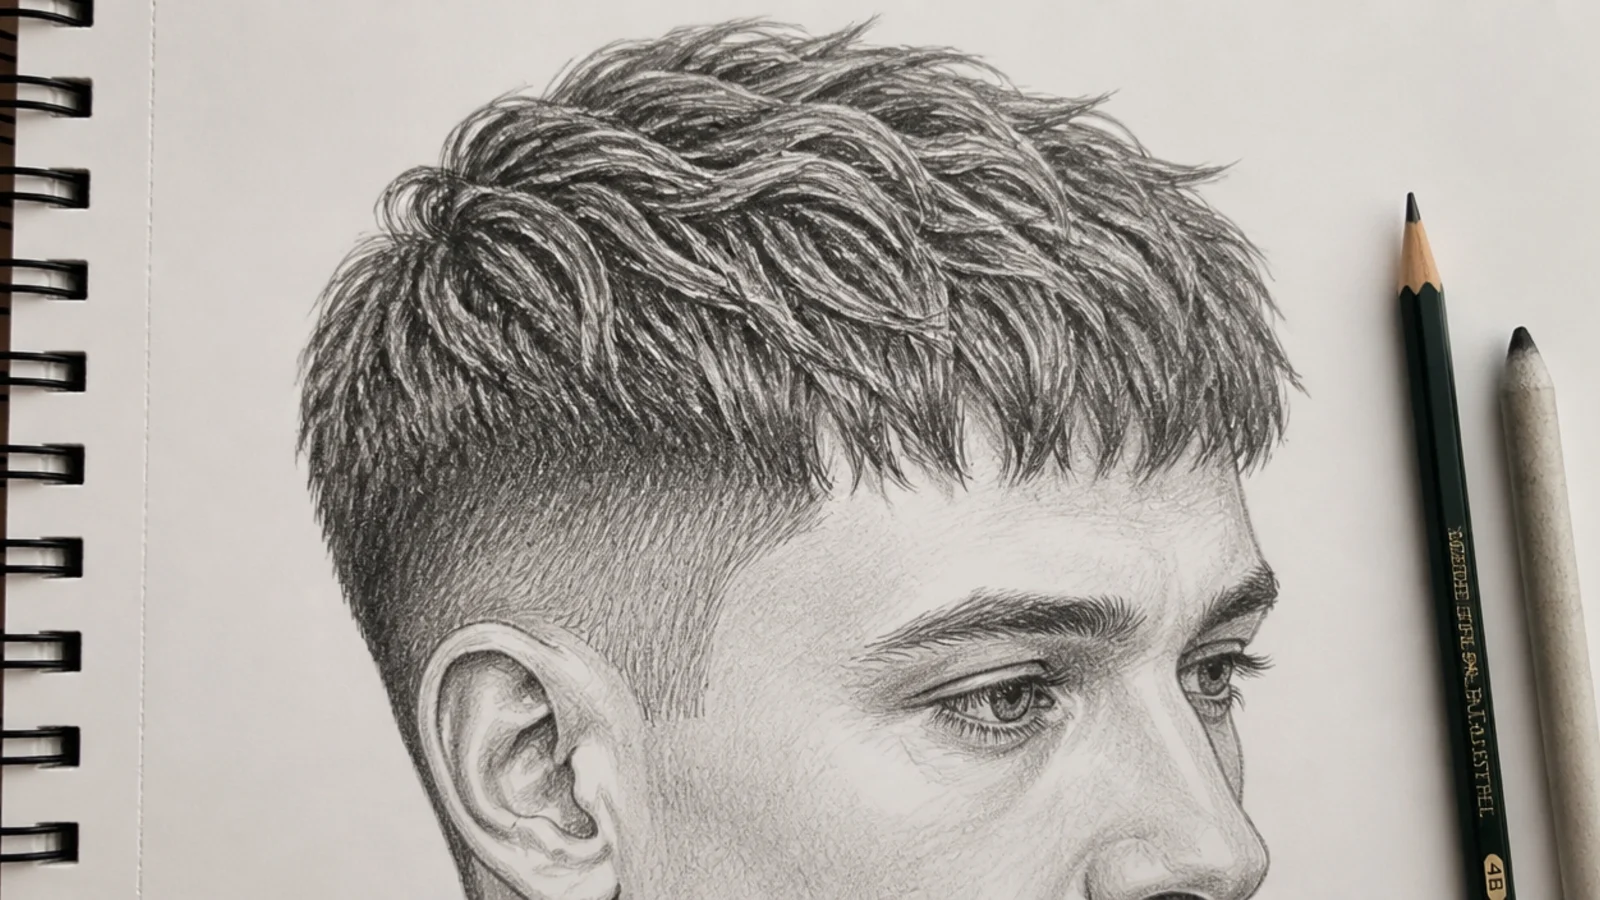
The most common modern male cut and a great flow exercise, because the hair moves forward from the crown instead of down. Block a silhouette that hugs the skull for about 5mm at the sides and lifts to 20mm at the front. Every stroke runs crown to forehead. Finish the fringe with short irregular flicks of different lengths, never a straight cut line, and drop a 6B shadow under the fringe where it overhangs the forehead. That shadow is the single detail that stops a crop looking pasted on. Simpler versions of the same cut appear in boy hair sketch.
Who it suits: Contemporary character design and quick portrait practice.
Tip: Vary flick length across the fringe by at least 4mm or it reads as a blunt fringe instead of textured.
5. Female Blowout Drawn in Three S-Curve Masses
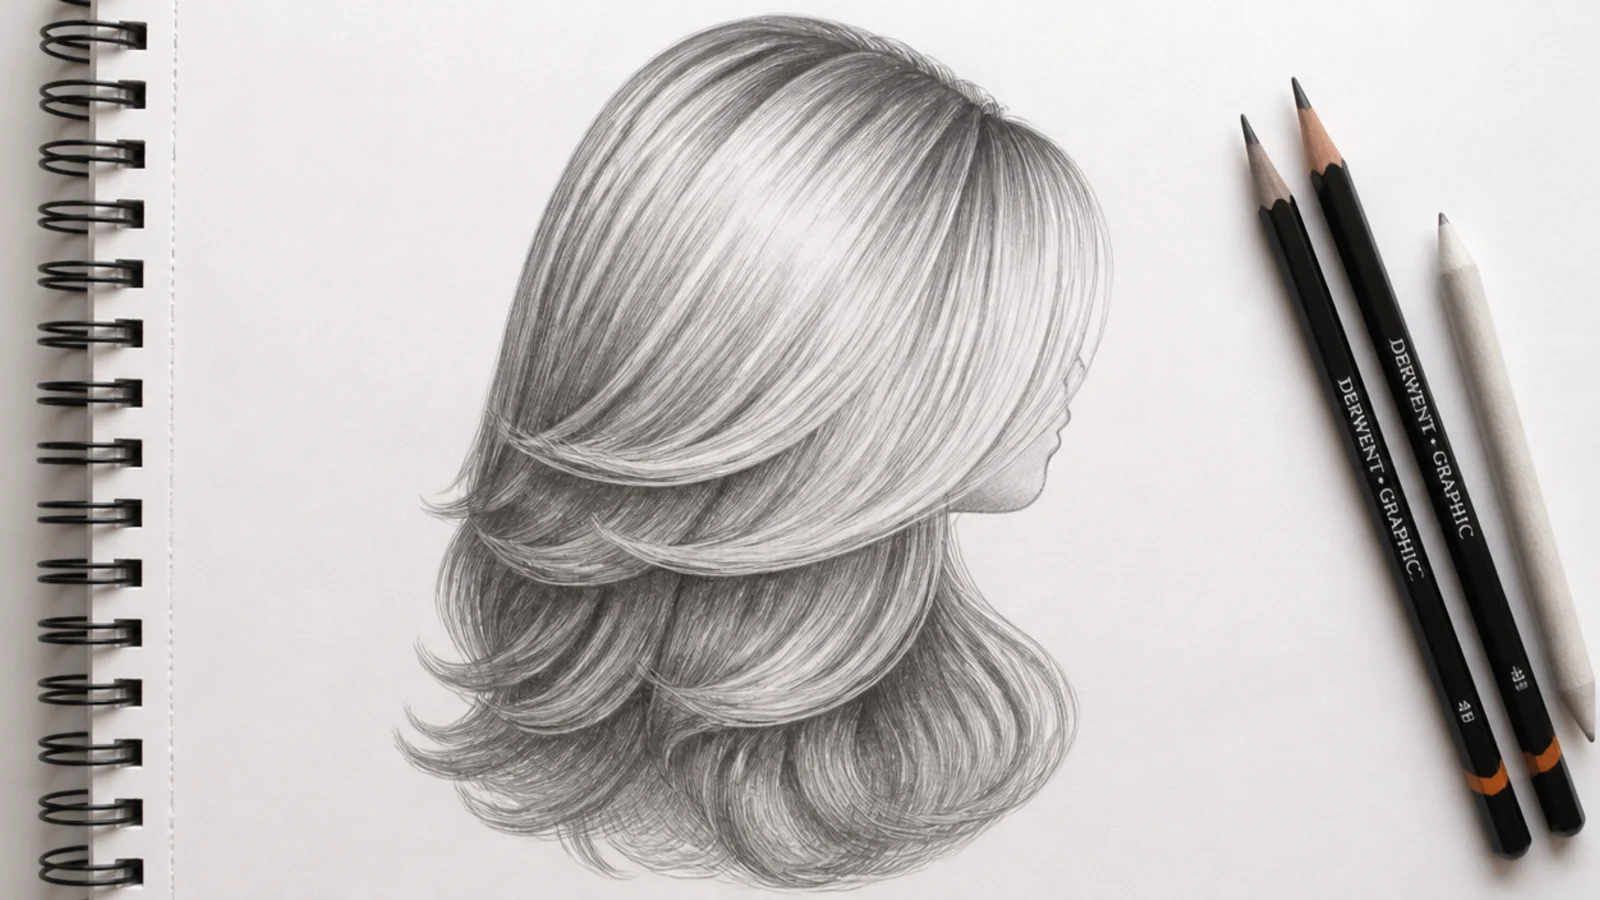
The female counterweight to the crop. Instead of two or three tight sections, block three large overlapping masses that each bend into a shallow S: one falling in front of the shoulder, one behind, one sweeping across the crown. The silhouette stands 25 to 30mm off the skull at the widest point. A long curved highlight band rides the crown, and each mass carries its own secondary highlight further down. Shadows sit in the belly of each S curve, never on the outer edge. Keep the outline broken so strands escape at the top.
Who it suits: Learning to build volume away from the skull.
Tip: Overlap the masses so one crosses in front of another; parallel masses always read flat.
6. Male Skin Fade Drawn as a Fast Value Gradient
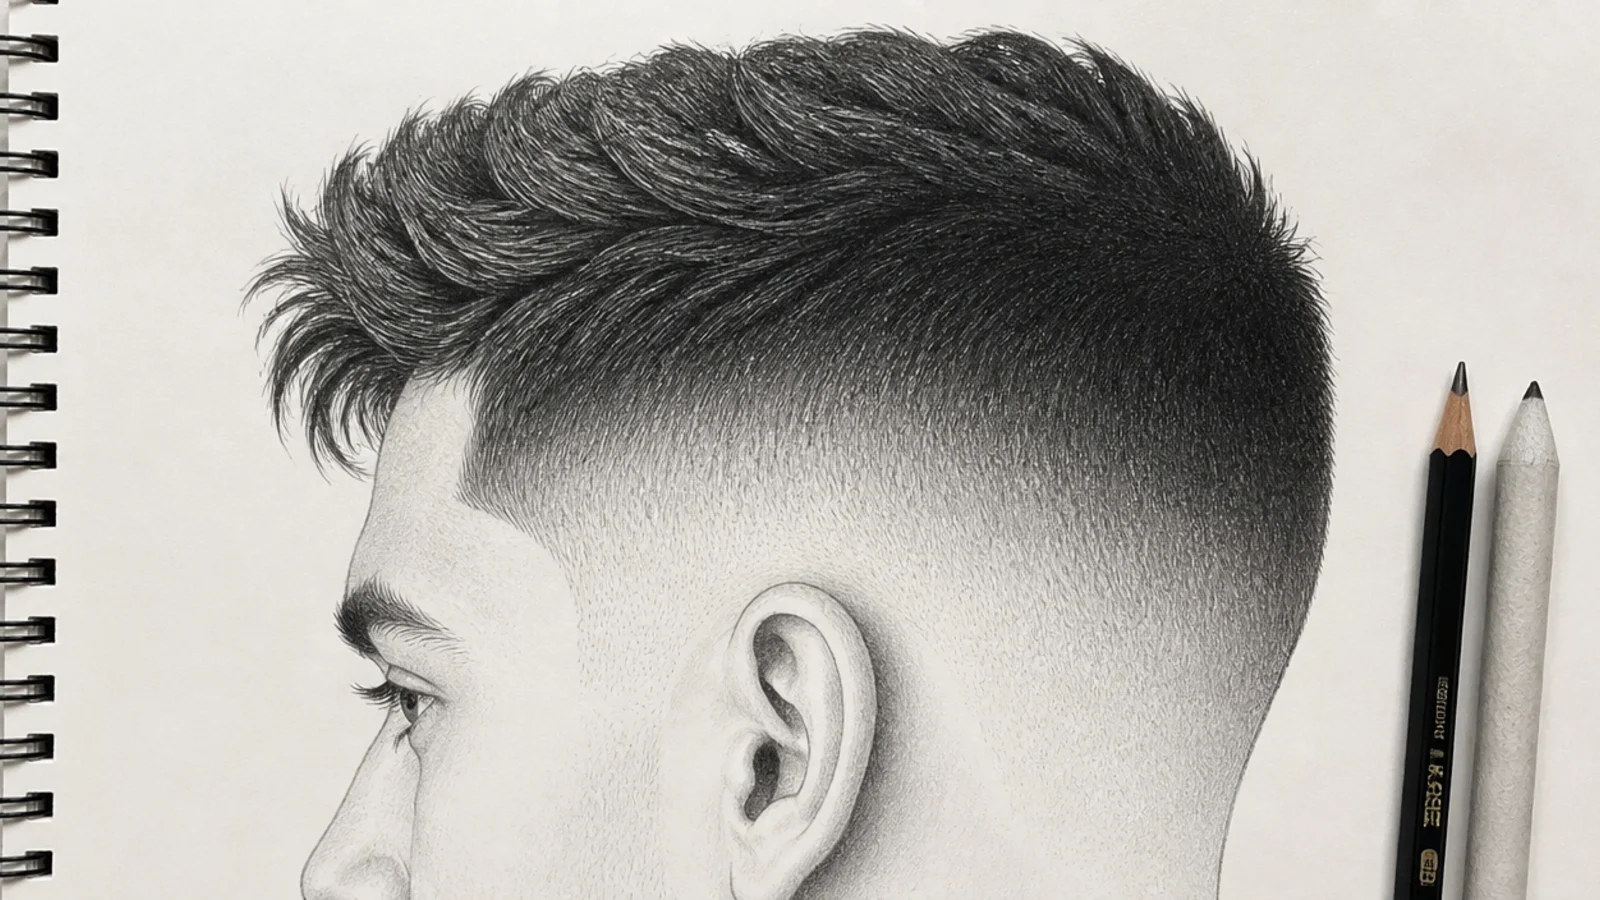
A fade is pure value control with no silhouette to lean on. Start at the ear with bare paper, then ramp through 2H, 2B, 4B and into 6B by the time you reach the top of the ear line, all within about ten millimeters of paper. Blend that ramp with a stump, then re-establish texture on top with short 4B flicks so it does not turn into smooth airbrush. Above the fade line, the hair on the top plane keeps its own texture and its own highlight band. The hard transition line, if the cut has one, gets a crisp 2B edge. The three-pass shading order behind this is set out in the hair sketch tutorial.
Who it suits: Anyone practicing tonal control in a small area.
Tip: Draw the fade line as a curve that follows the skull, not a straight horizontal band around the head.
7. Female Sleek Low Ponytail with a Crown Sheen
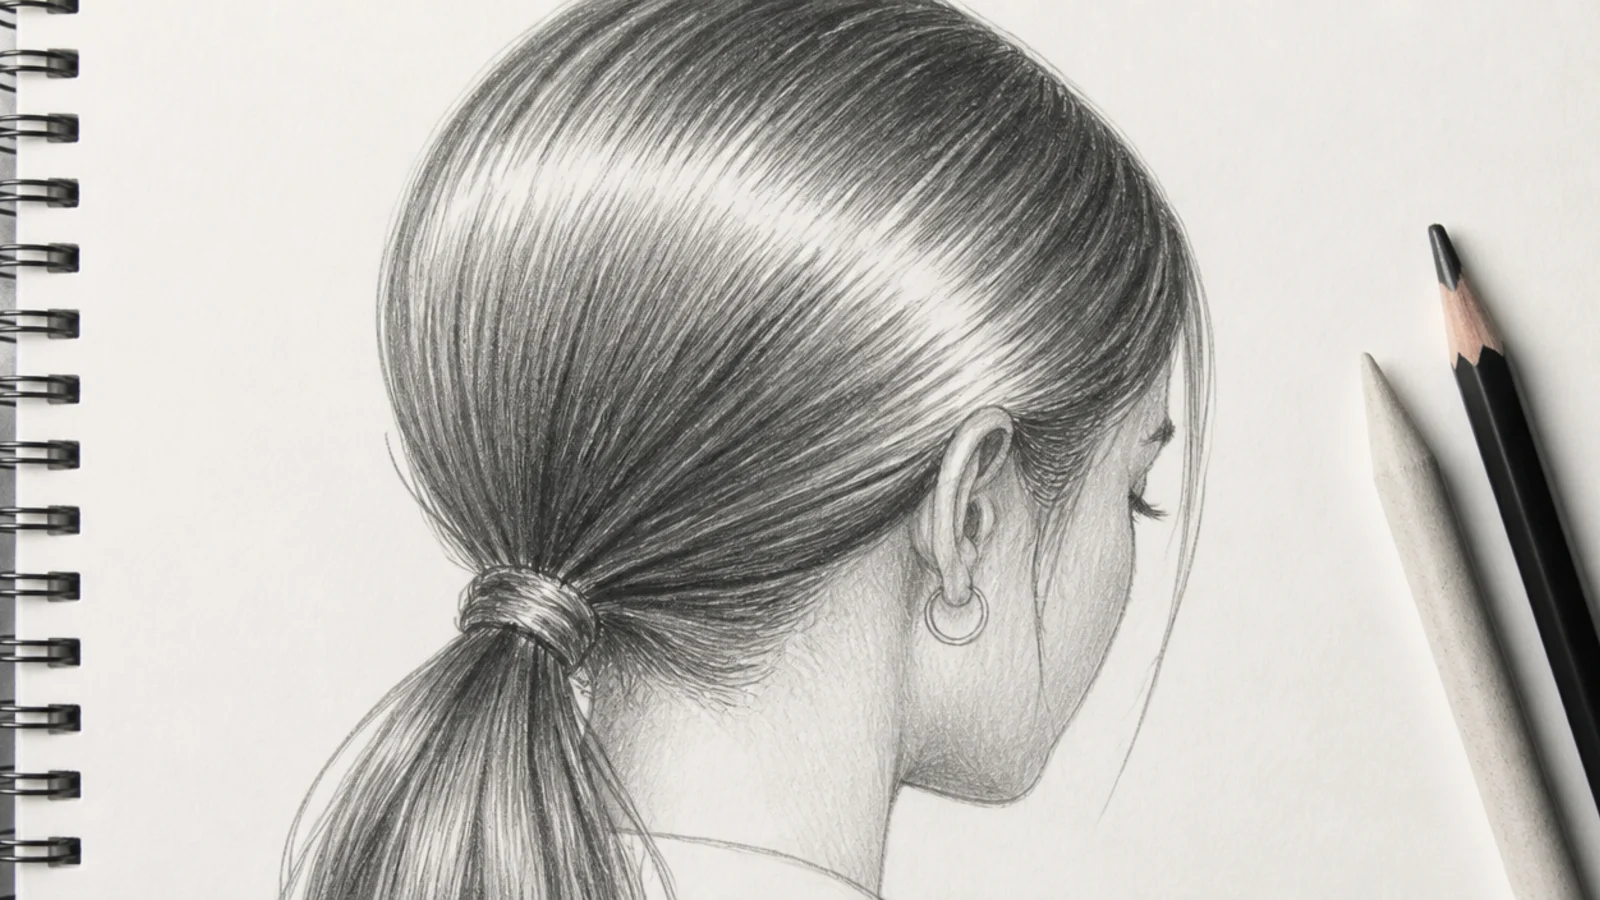
Every strand converges on one point at the nape, which makes this the best study for flow discipline. Draw the convergence point first, then run all your lines toward it, tightening the spacing as they approach. The crown carries a bright, almost bare-paper sheen band because the hair is pulled tight over the skull; that band is what makes sleek read as sleek. Below the tie the ponytail widens again and picks up its own soft highlight. Keep the outer silhouette very close to the skull, within 5mm, which is unusually male-like for a female style.
Who it suits: Practicing convergence and controlled highlight bands.
Tip: Squeeze line spacing to almost nothing 10mm before the tie so the gather reads as tension.
8. Male Slicked-Back Hair with Comb Groove Lines
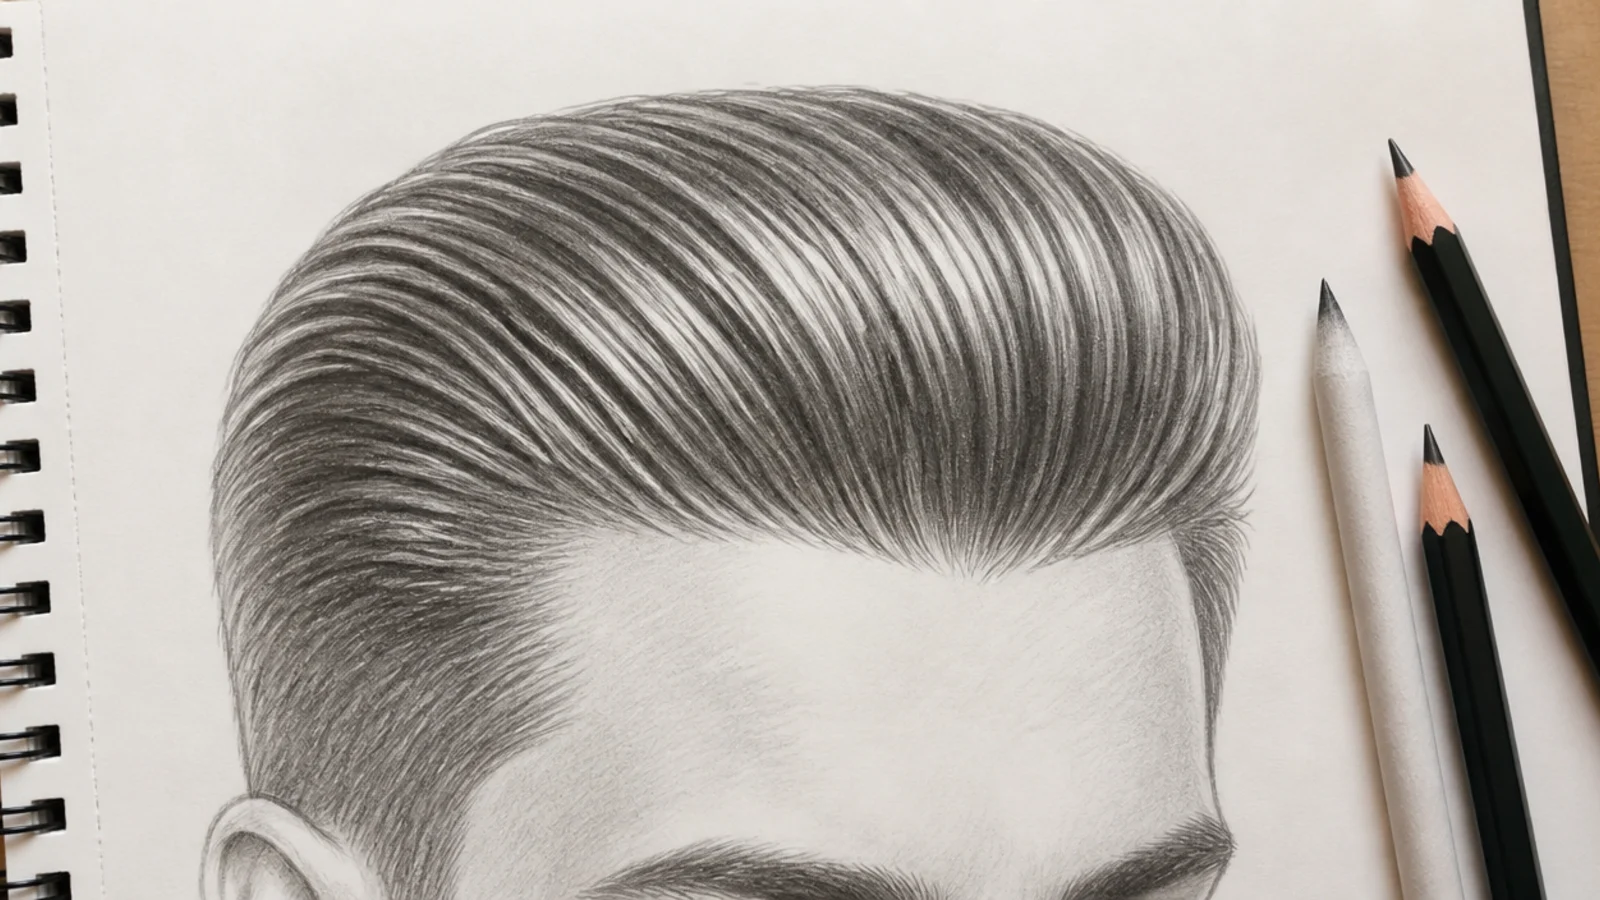
Product-heavy hair combed straight back from an exposed M-shaped hairline. The grooves are the whole design, and they are drawn as alternating light and dark ribbons that curve with the skull rather than running as straight parallel lines. Space them irregularly, roughly 2 to 5mm apart, and let some merge. Because the hair is wet-look, the value range is extreme: bare paper on the top of each groove and 6B in the trough. The exposed hairline and temple recession do most of the male signaling here. For more styled concepts to practice on, see hair sketch ideas.
Who it suits: Period characters, formal portraits and value-contrast practice.
Tip: Curve every groove around the skull in perspective; parallel straight grooves flatten the head instantly.
9. Female Long Straight Hair Past the Shoulder Blades
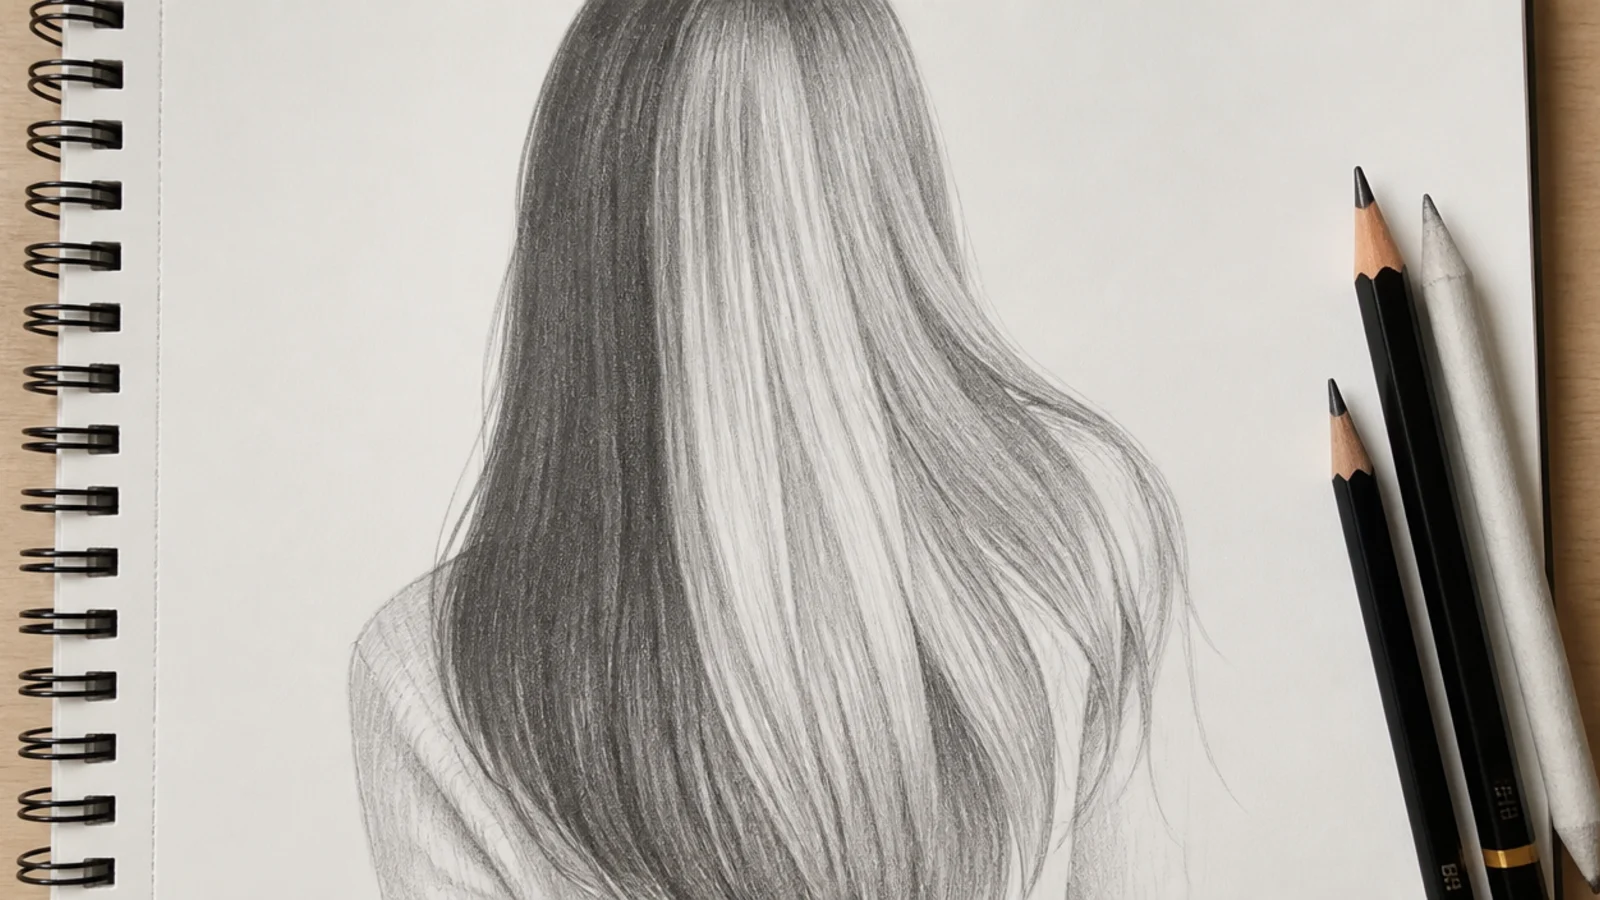
Length is built in one gesture from the crown, not stacked in segments. Block three masses that all originate at the crown and travel past the shoulder blades, then vary the stroke length long to short within each so the density changes. The mistake here is uniform line spacing down the full length, which turns hair into curtain fabric. Instead, cluster your 4B strokes into groups with lighter gaps between, and drop 6B only where one mass passes behind another. Leave the crown highlight unbroken. More length scenarios in long hair sketch.
Who it suits: Building confidence with long single-gesture strokes.
Tip: Draw the full length from the shoulder with your whole arm, not the wrist, so the line stays smooth.
10. Male Curtain Bangs at Chin Length, Center Split
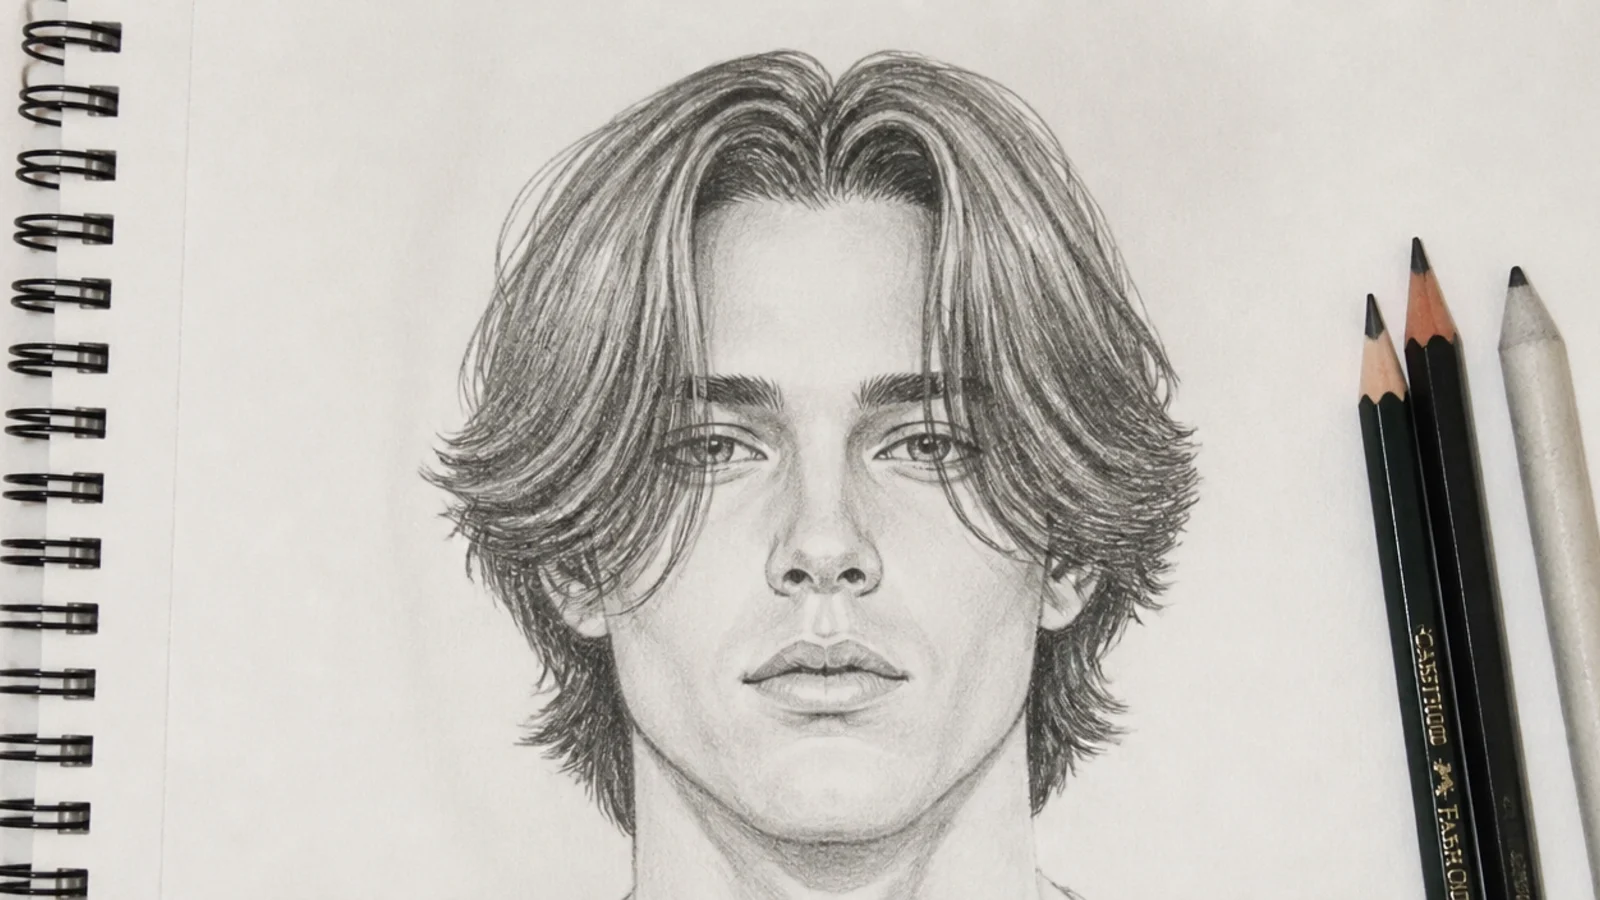
The same style on both heads is the clearest way to see what actually changes. On the male version the split starts higher, the hairline corners at the temples stay visible through the parted hair, and each curtain hangs in two or three chunky sections with defined, slightly angular ends. The silhouette stays within 10mm of the skull at the sides. Value contrast is high and local. Because the temple recession is still exposed, the cut reads male even at chin length, which is the whole lesson of this pair.
Who it suits: Character artists drawing longer male hair without losing the read.
Tip: Leave a small triangle of bare forehead at each temple; that is what keeps it male.
11. Female Curtain Bangs at Collarbone Length, Same Split
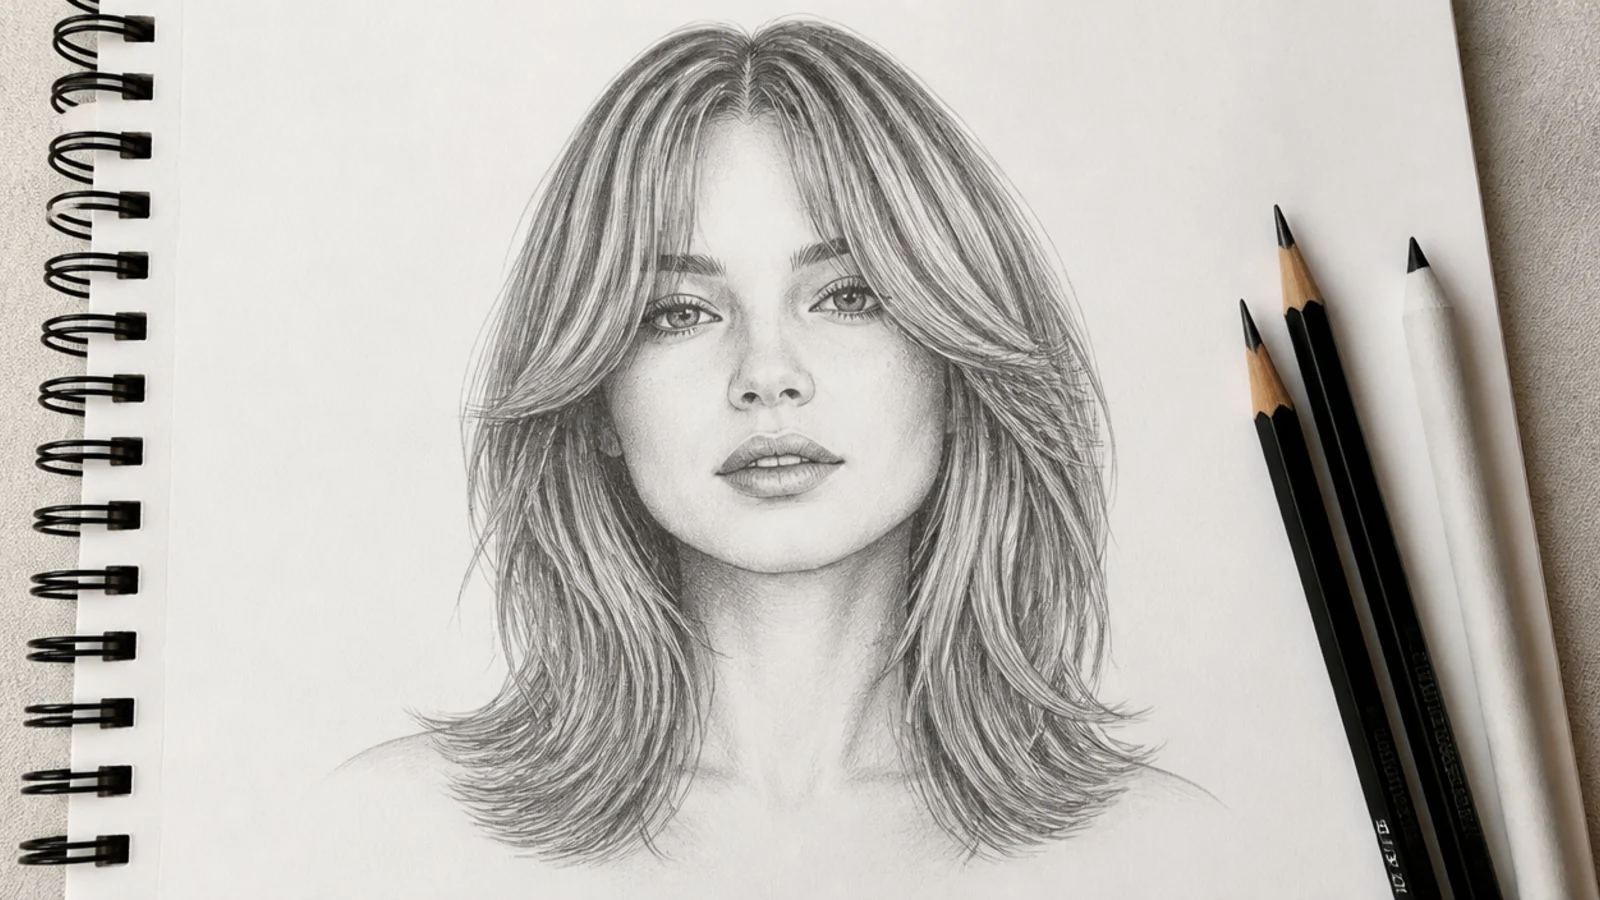
Same split, different everything else. The parting starts lower on a rounded hairline, no temple corners are exposed, and the curtains sweep back in one soft continuous arc rather than chunky sections. The ends are feathered with fine tapered flicks instead of blunt tips, and the outer silhouette stands 20mm or more off the skull. Shading is a long gradual ramp rather than the fast local contrast of the male version. Drawn side by side with idea ten, this pair isolates edge quality as a gender signal.
Who it suits: Practicing soft edges and long tonal ramps.
Tip: Taper each end flick to nothing over its last 8mm so the edge stays soft.
12. Male Top Knot Tied in the Top Third of the Skull
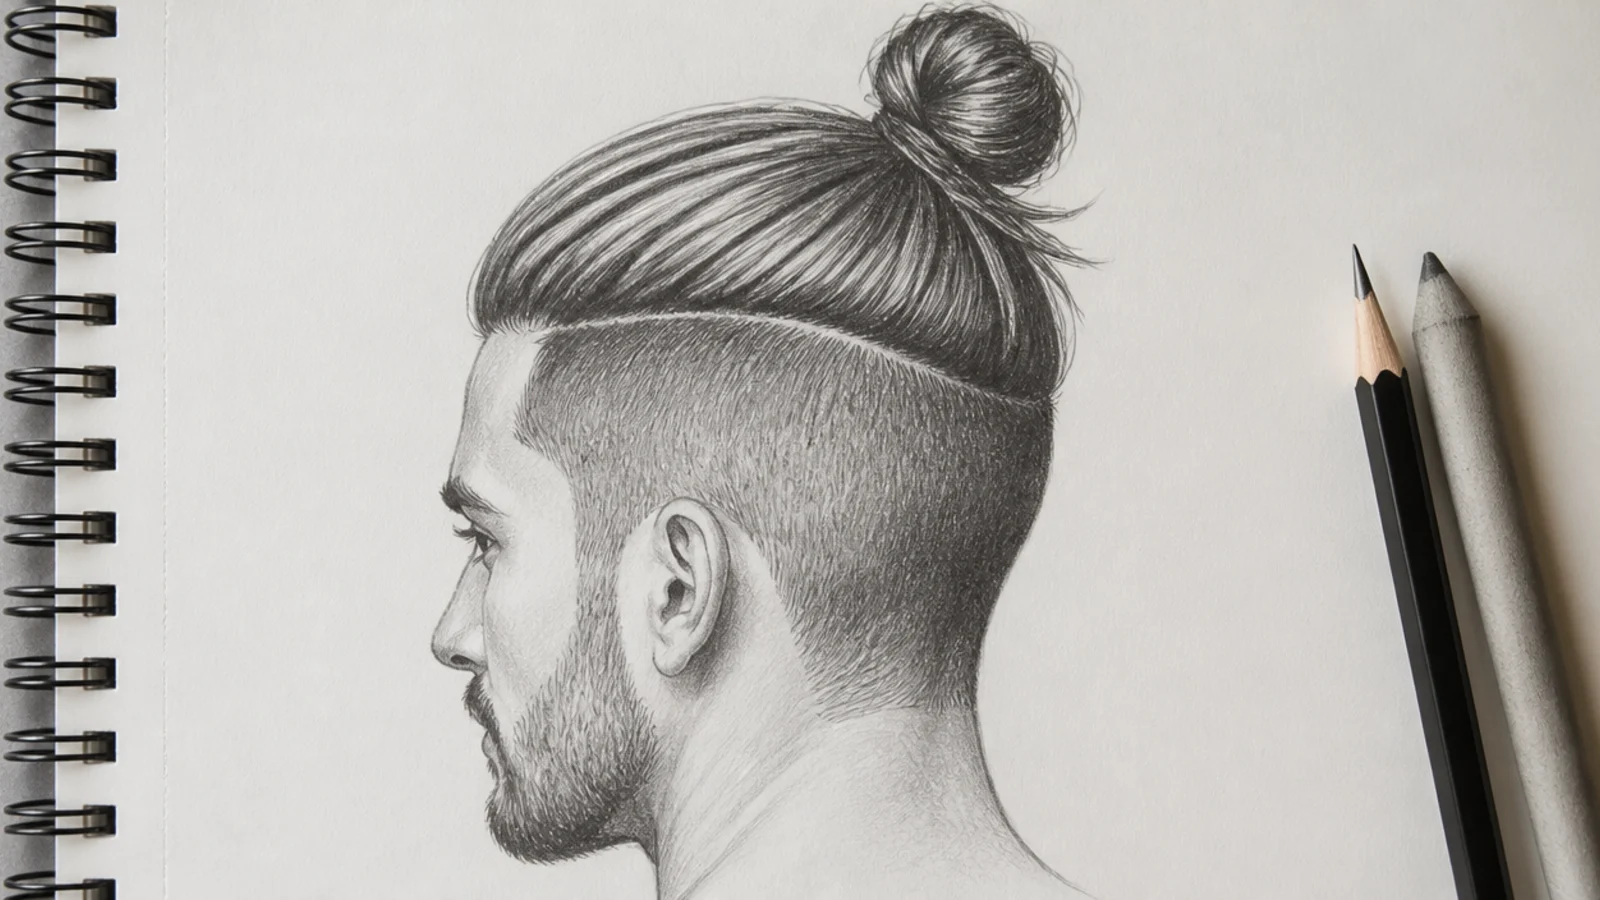
Male buns sit high, typically in the top third of the skull, with the sides either faded or slicked tight so the head silhouette stays narrow. Draw the knot as a compressed ball with wrapping lines that curve around its own form, then run all the gathered hair up toward it under tension, spacing tightening as it climbs. The neckline at the back gets a defined tapered line, which female versions almost never show. Keep the knot small relative to the head, roughly a quarter of the skull width. Other gathered styles worth studying are collected in hair sketch ideas.
Who it suits: Modern male character design and gathered-tension practice.
Tip: Place the knot behind the top of the skull, not on top of it, or the head reads egg-shaped.
13. Female Messy Bun Tied at the Nape
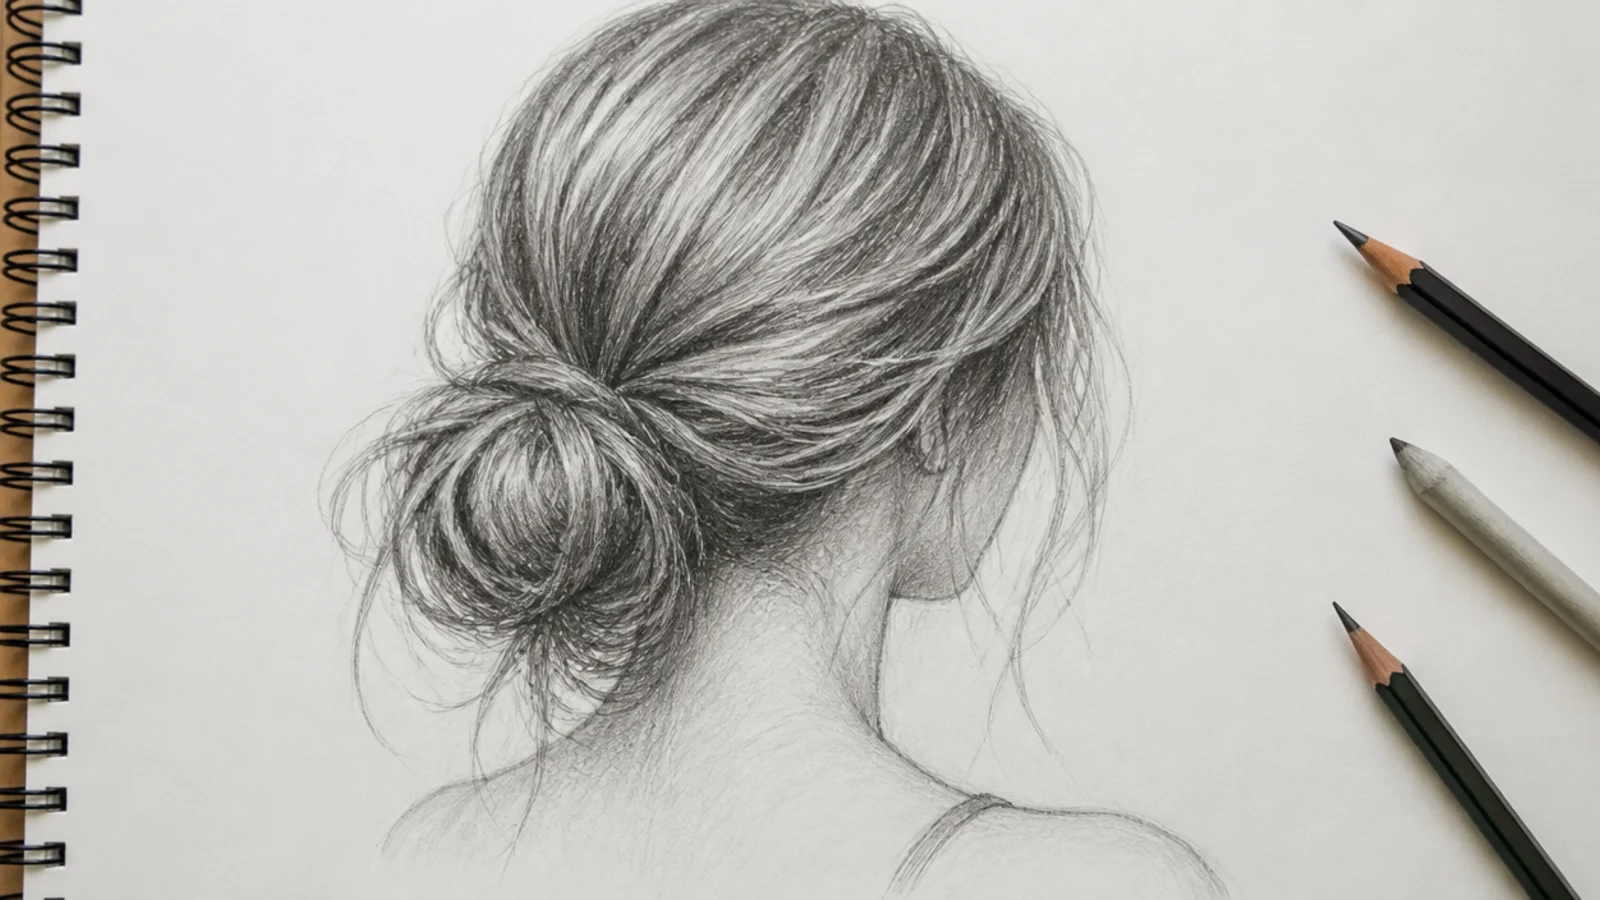
Tied low at the nape and deliberately loose, this is the softness counterpart to the male top knot. The gathered hair is not under tension, so the flow lines from the crown sag downward and outward before turning in. The bun itself is drawn as two or three overlapping loops rather than one ball. Six to eight strands escape the silhouette at the temples and nape, each tapering to nothing. No neckline is visible anywhere. Keep the value soft throughout, with 6B reserved only for the tunnel inside the bun loops.
Who it suits: Practicing broken silhouettes and escaping strands.
Tip: Draw escaping strands last and keep them under eight in total; more looks like frizz damage.
14. Male 4C Coils Drawn as Clumped Value Shapes
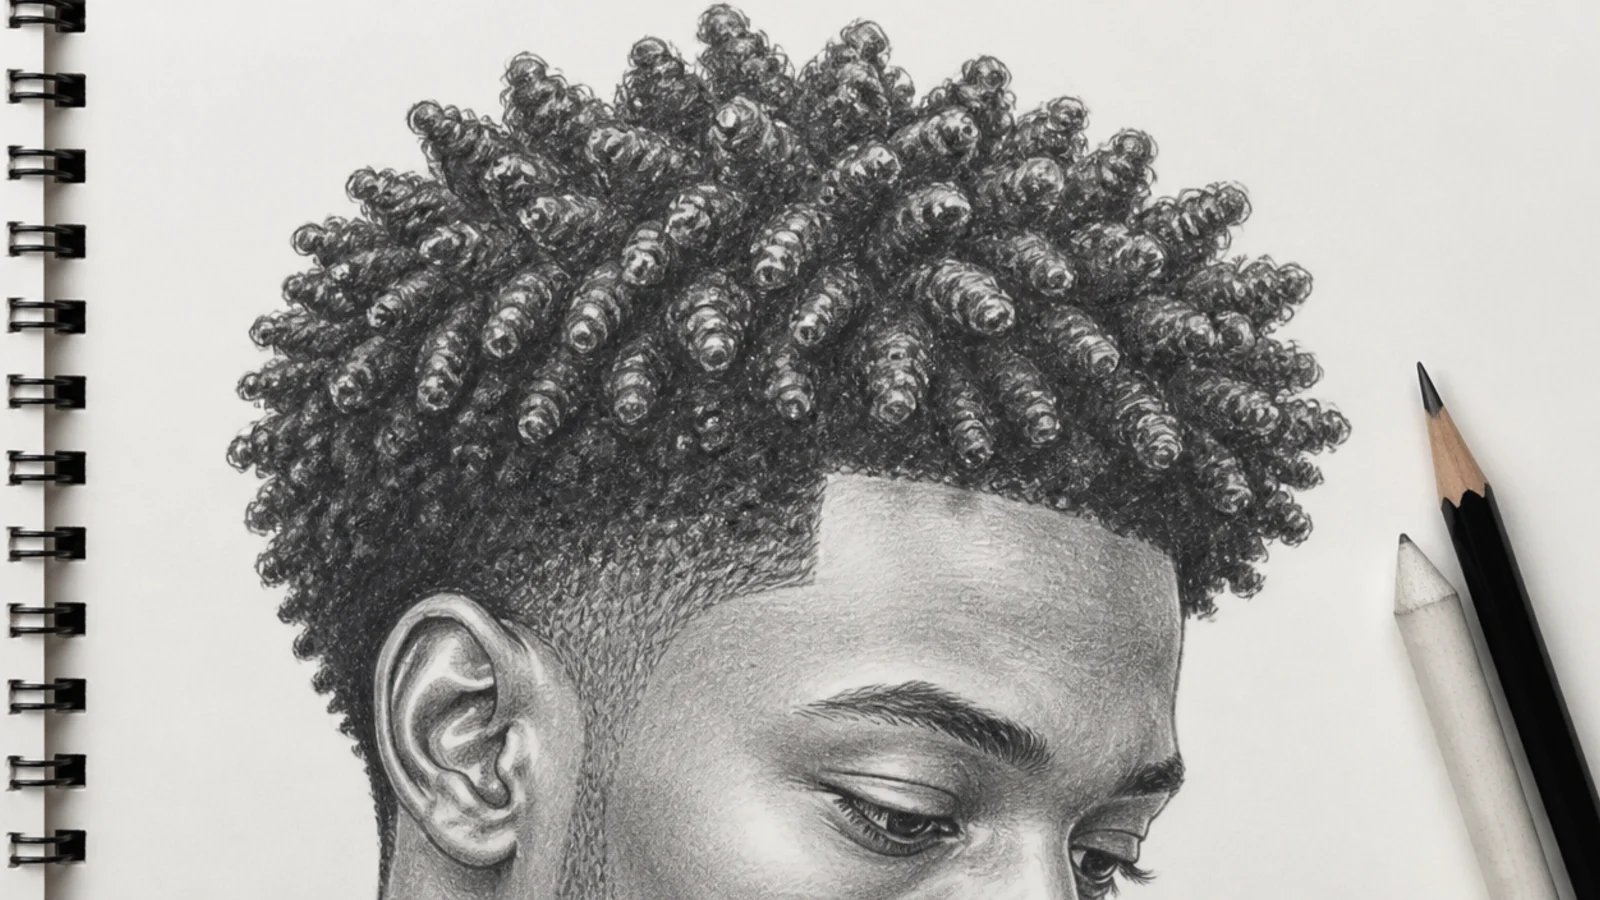
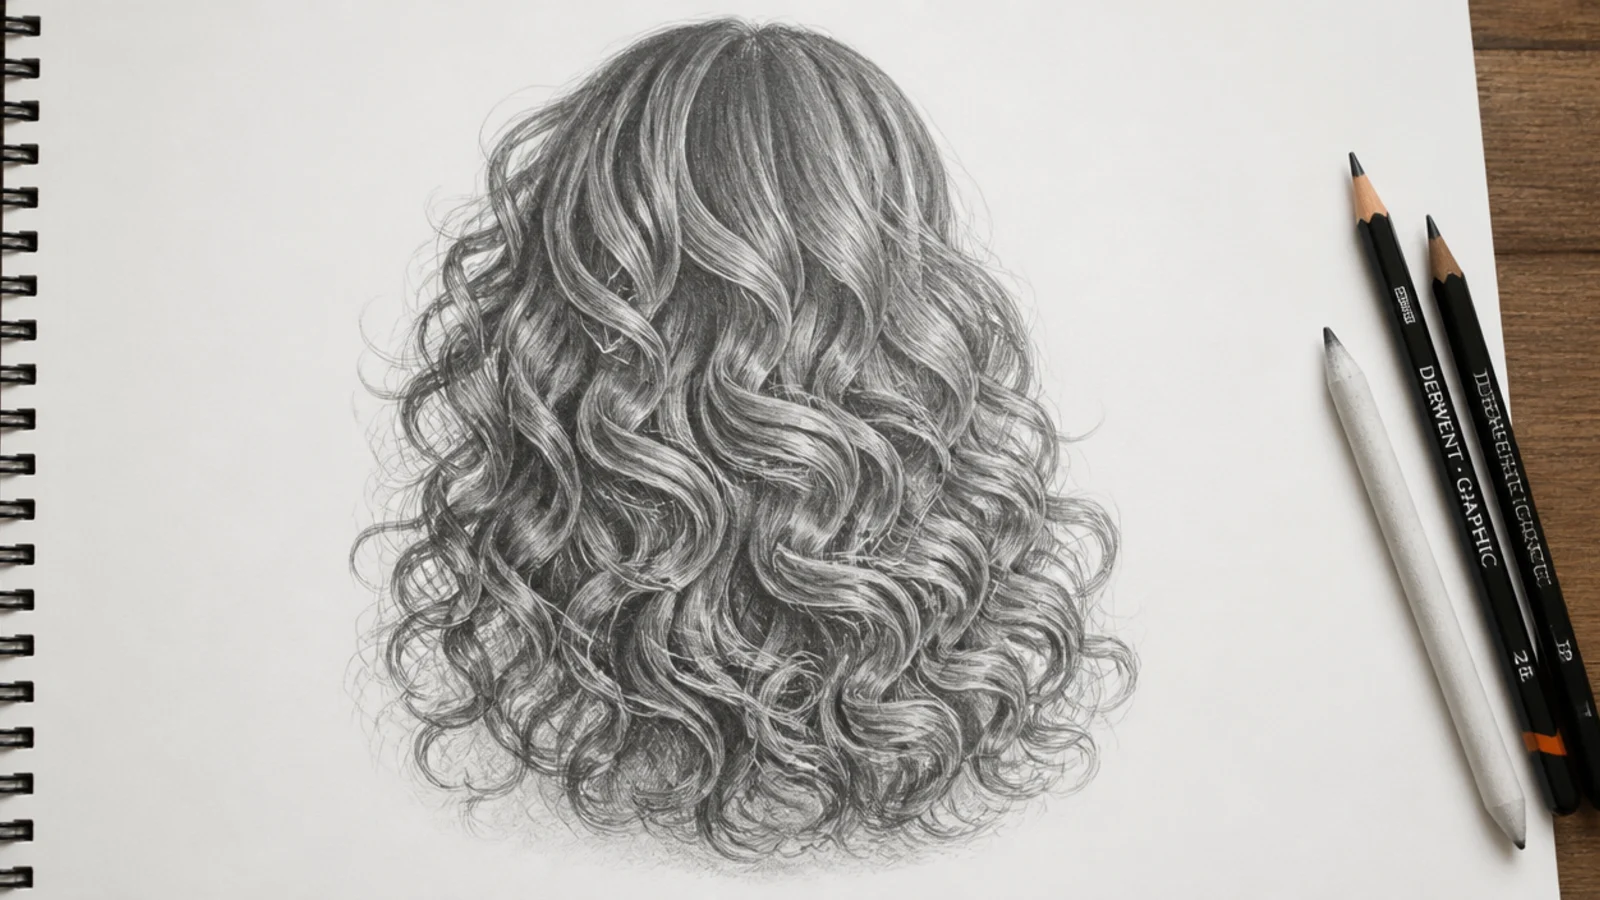
The most underserved texture in every hair drawing guide, and the technique is genuinely different. Stop looking for strands. Block the whole mass as a soft-edged silhouette, then divide it into clumps roughly 8 to 12mm across, each with a soft highlight riding its top and a 6B core sitting in the gap beneath it. The outer edge is drawn with tiny irregular bumps, never a smooth line. Contrast within each clump is high but the mass as a whole stays even. Texture comes from the clump rhythm, not from individual marks. The same clump logic scales up for longer textured hair in curly hair sketch.
Who it suits: Character artists drawing textured and Black hair properly.
Tip: Vary clump size across the mass; identical clumps read as a knitted hat, not hair.
15. Female Afro Puff Drawn as a Soft Halo Silhouette
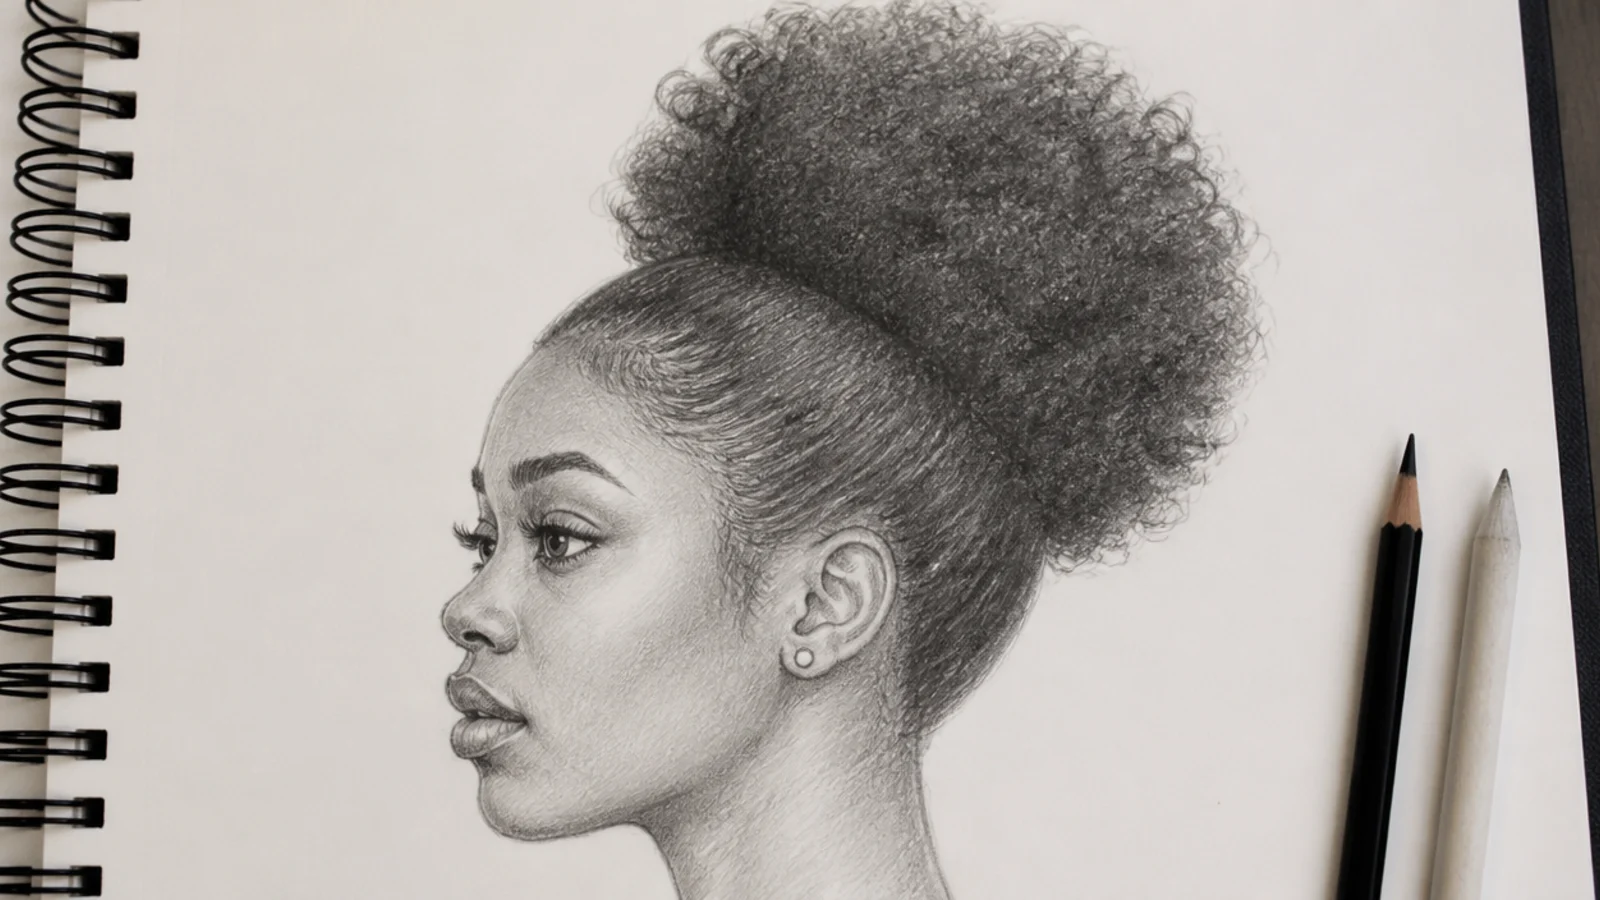
Same texture, opposite silhouette strategy. Where the male coil study hugs the skull, the puff becomes a large round shape gathered above and behind the crown, 40mm or more off the head. Draw it as a halo: darkest at the core near the gathering point, lightening toward the outer edge where light passes through the coils. That rim of light is what makes an afro puff read as soft rather than solid. Keep the outer edge fuzzy with tiny 2B ticks rather than any continuous outline. The gathered baby hairs at the hairline get their own fine curved strokes. Pair this with the coil studies in curly hair sketch.
Who it suits: Learning rim light and soft edges on textured hair.
Tip: Never outline the puff; the moment there is a continuous edge line it turns into a balloon.
16. Male Curly Undercut with a Hard Edge Line
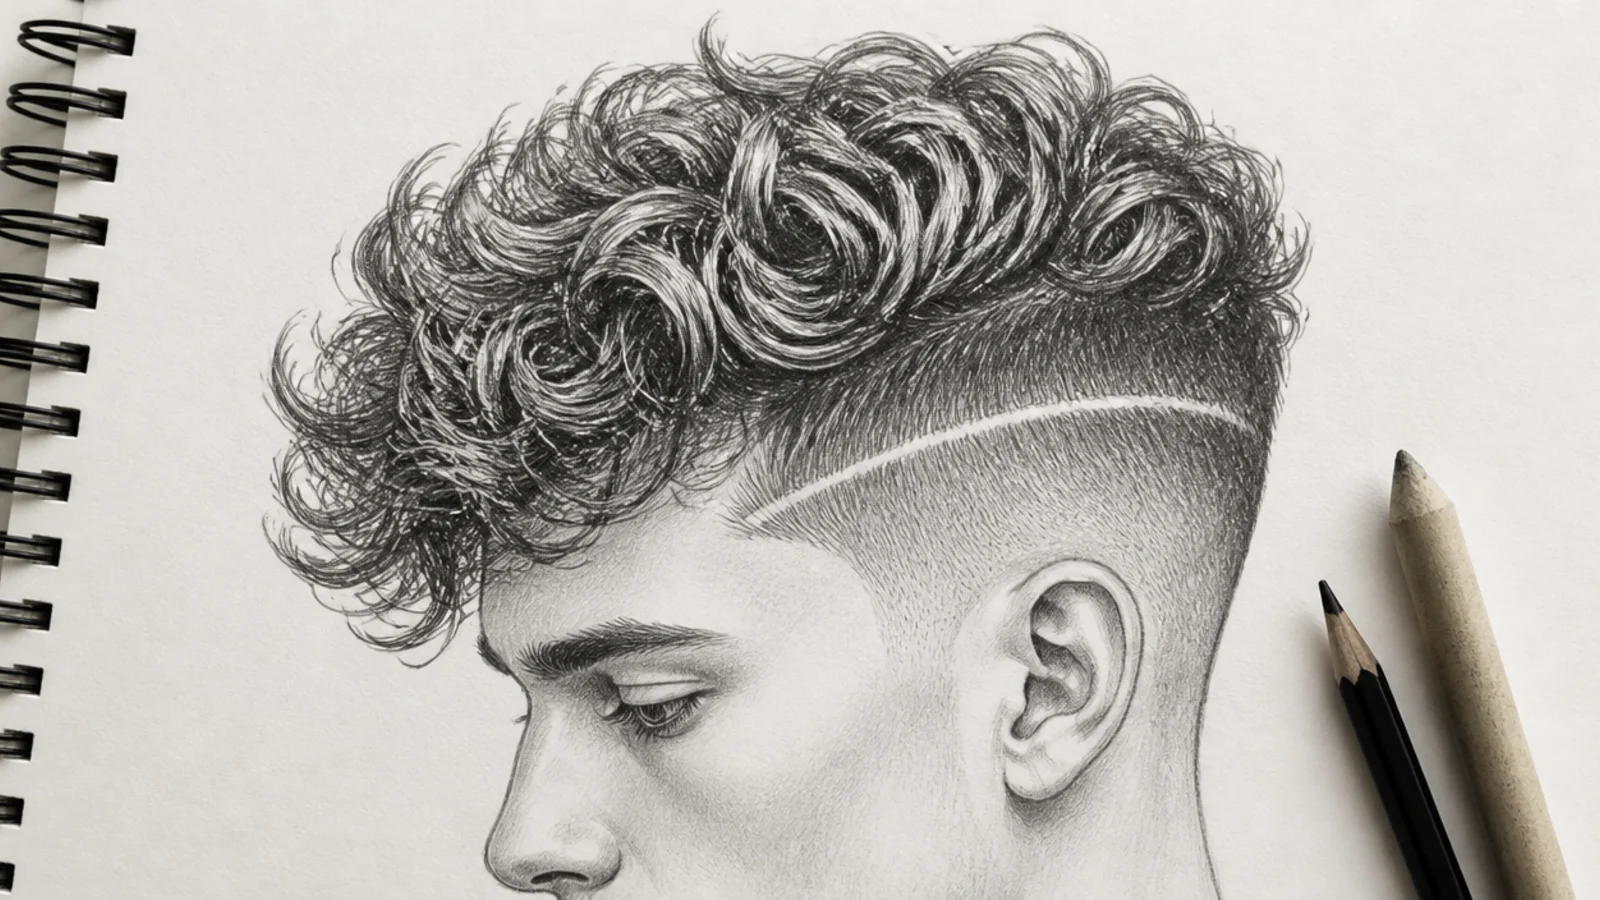
Two textures in one drawing, separated by a hard line. The sides are a flat 2B value with prickly edge texture; the top is a mass of ribbon curls sitting 25mm off the skull. The disconnect between them is drawn as a crisp 2B boundary, and that hard edge is a strongly male signal because female curly styles almost never have one. Draw each top curl as a ribbon, an S or a spiral with light on one side and shadow on the opposite side, never as an outlined circle. The ribbon method is broken down fully in curly hair sketch.
Who it suits: Character artists working with mixed-texture cuts.
Tip: Let three or four curls break past the hard line; a perfectly clean boundary looks like a wig.
17. Female Spiral Curls Ribboned Over One Shoulder
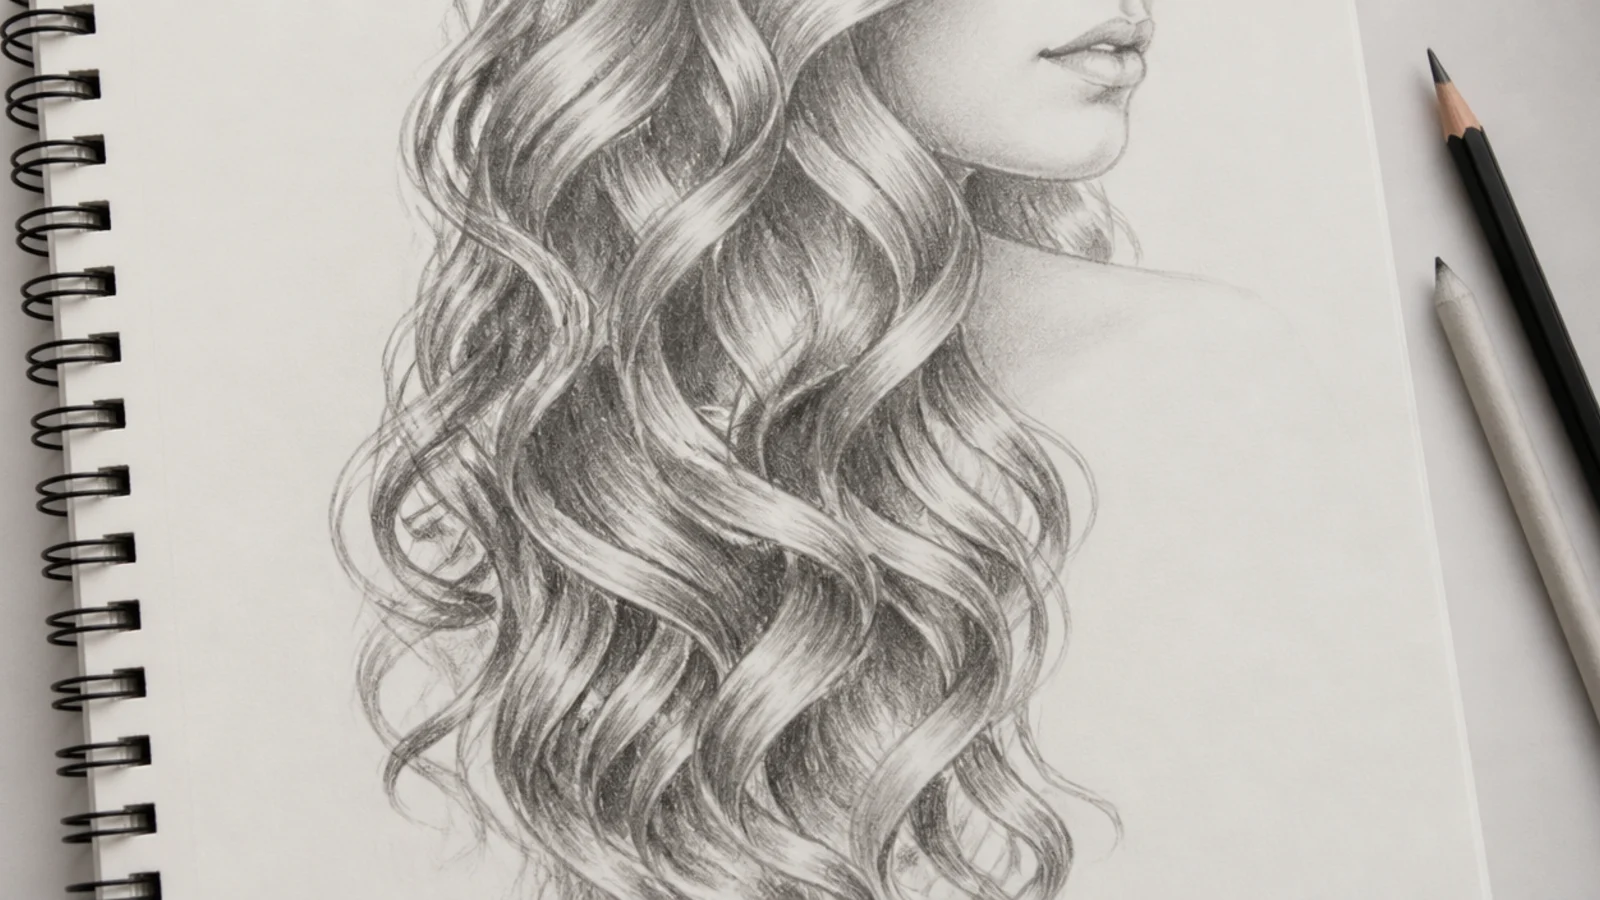
Long 3B spiral curls swept to one side, which forces you to draw curls in perspective as they twist toward and away from the viewer. Each curl is a ribbon that turns: where it faces you it is wide and carries a highlight, where it turns away it narrows to a line and goes 6B dark. That alternation down the length is the entire illusion. Group the curls into three or four clusters rather than drawing them evenly, and let the cluster nearest the face be the most detailed while the far side stays as soft value only.
Who it suits: Intermediate artists ready for curls in perspective.
Tip: Narrow each curl to a dark hairline every time it twists away; even-width ribbons look like noodles.
18. Male Mullet in Side View, Length Only at the Back
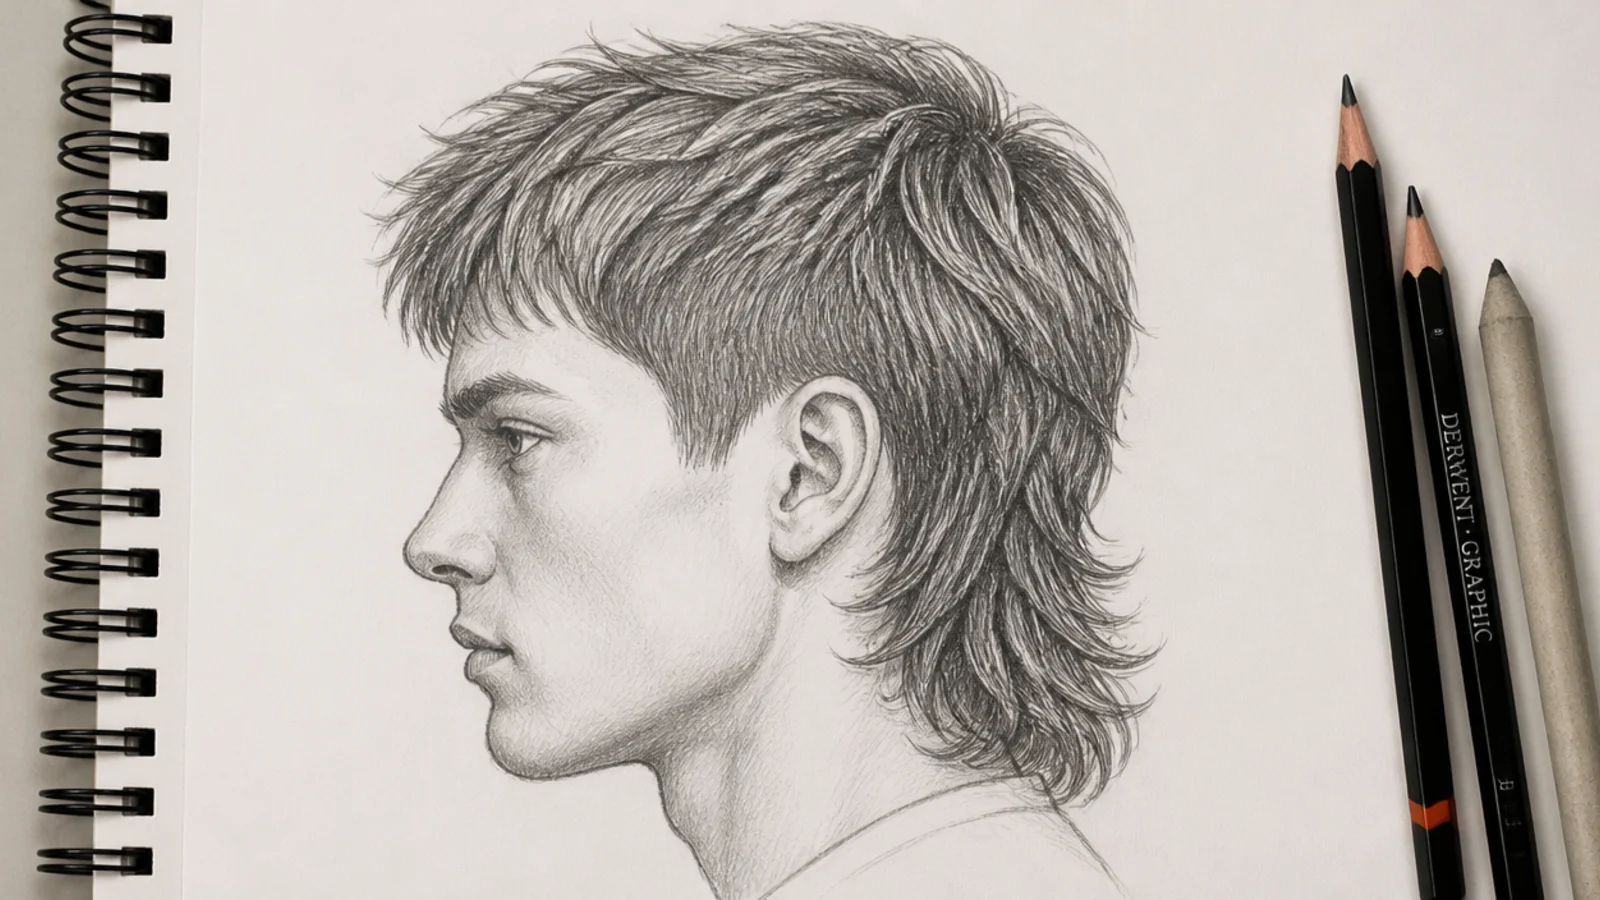
A useful silhouette exercise because the shape is doing something unusual: tight at the front and sides, then dropping into 60 to 80mm of length at the nape. Block that profile before anything else, since it is unreadable if the transition point sits in the wrong place. Put the change at the level of the top of the ear. The front section flows forward, the back section flows down, and where they meet there is a visible break with a 6B shadow in it. Finish the back length with heavy irregular flicks. Profile blocking is covered more slowly in the hair sketch guide.
Who it suits: Silhouette practice and profile views.
Tip: Exaggerate the front-to-back length difference; a timid mullet just reads as a bad bob.
19. Female Layered Shag in Side View with Stacked Ends
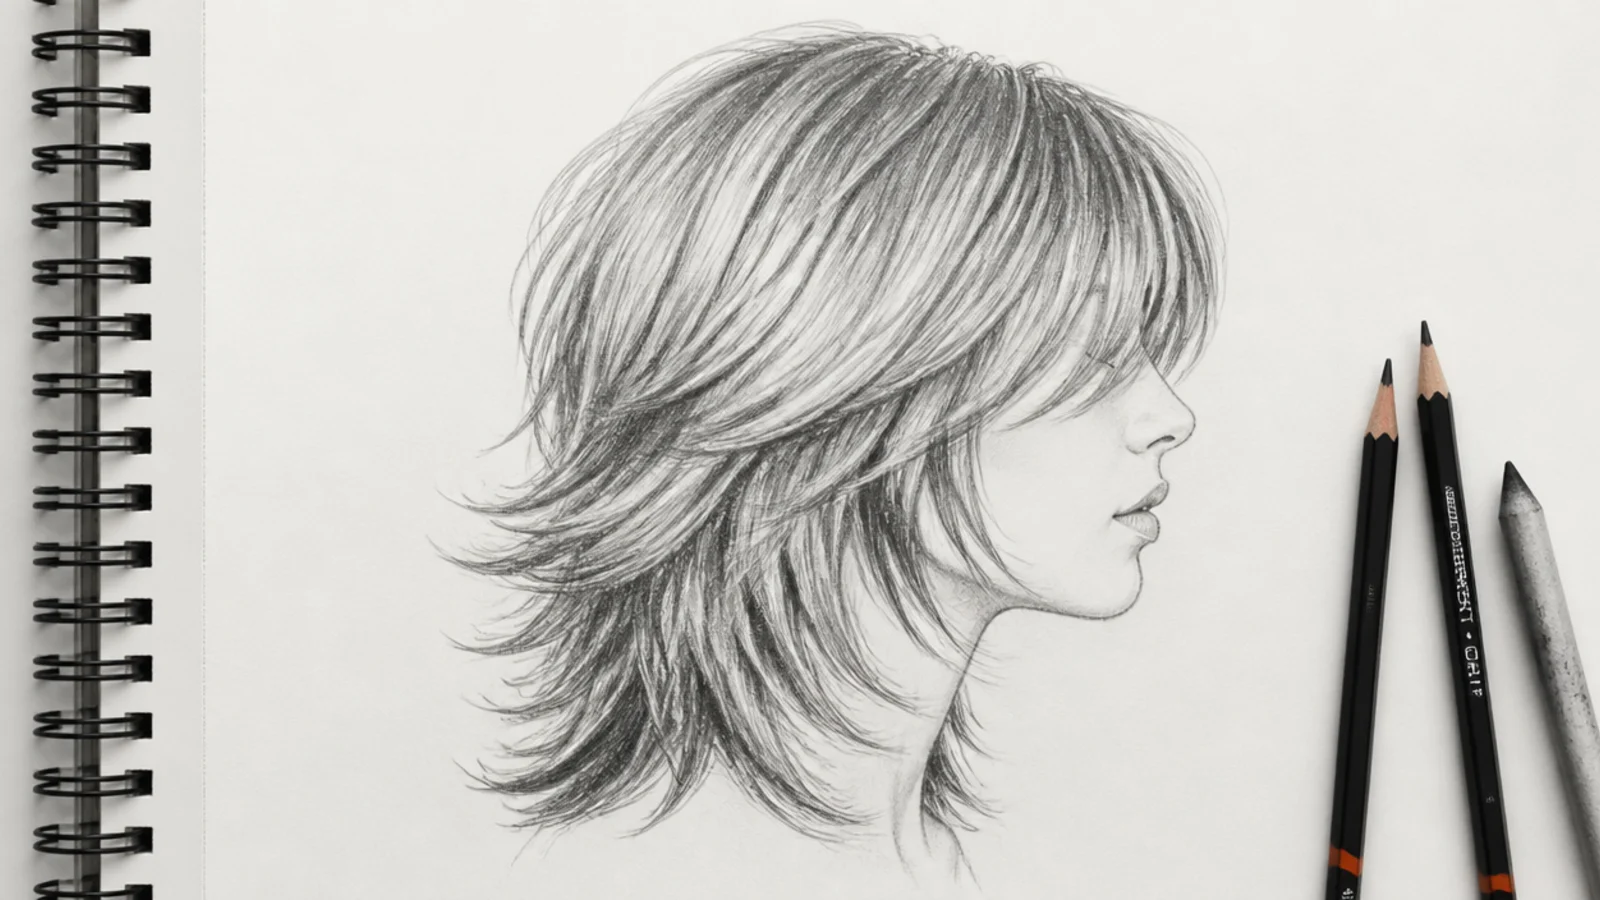
The female profile counterpart, and the difference is stacking. Instead of one break between two sections, the shag has four or five layers whose ends stack visibly down the silhouette, each ending in a soft feathered flick that curls slightly outward. Draw the layer ends first as a series of short arcs down the outline, then fill the flow between them. Shadow goes under each layer where it overlaps the one below, which builds depth without any outlining. The overall silhouette stays 20 to 25mm off the skull the whole way down.
Who it suits: Practicing overlapping layers and depth without outlines.
Tip: Stagger the layer ends by 10 to 15mm each; evenly spaced layers look like steps on a ladder.
20. Male vs Female Three-Quarter Back View of the Same Bob
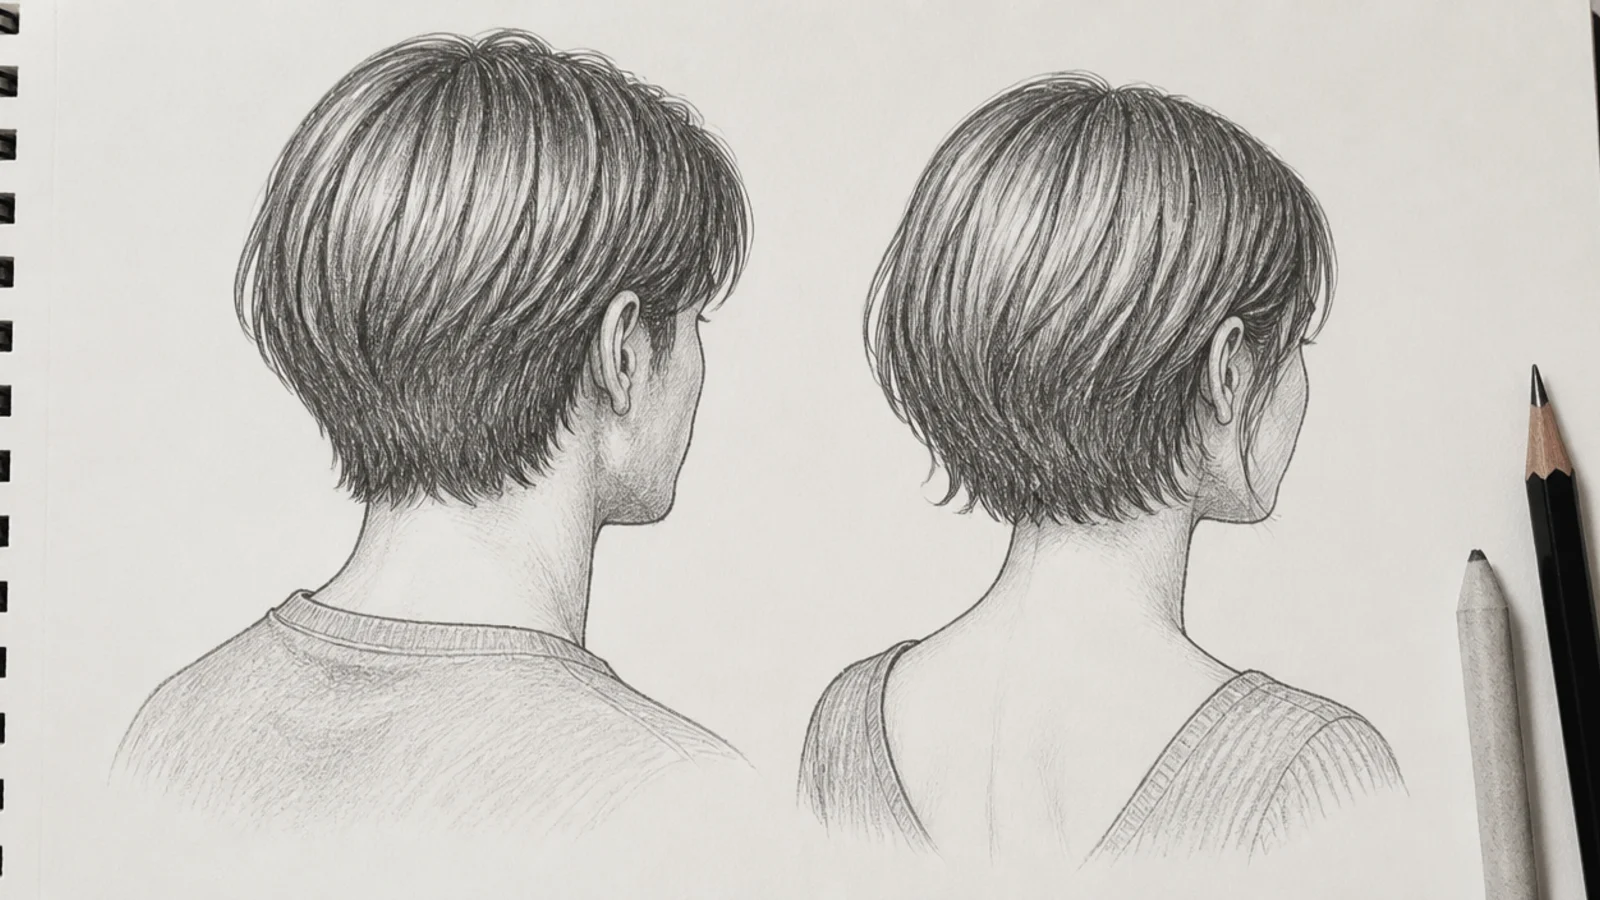
The hardest and most useful pair, because the face is gone and the hair has to carry everything. Same chin-length bob on both. On the male version the nape is cut into a defined tapered neckline with visible skin below it and the mass hugs the skull. On the female version the nape is fully covered, the silhouette flares wider at the jaw, and the ends feather rather than cut. The crown whorl, where the hair spirals out of the growth point, is visible on both and is the anchor for every flow line in the drawing. Browse more paired studies on the hair sketch hub.
Who it suits: Anyone whose character drawings fall apart from behind.
Tip: Find the crown whorl first and radiate every line from it; back views fail when the whorl is missing.
How to Start a Male Hair Sketch: Silhouette Before Strands
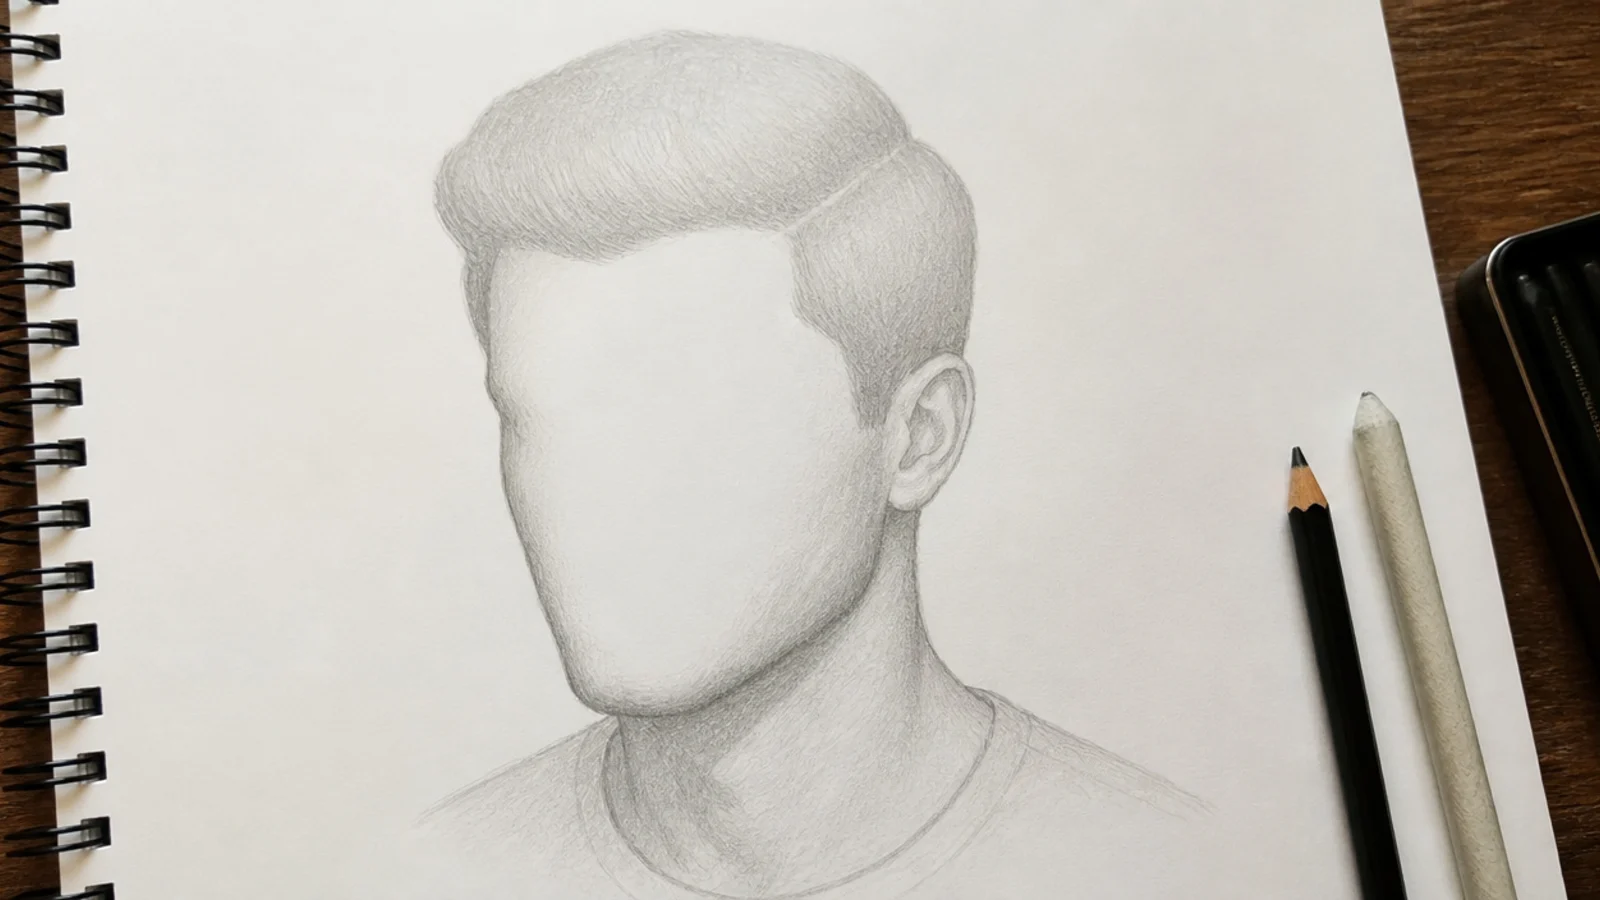
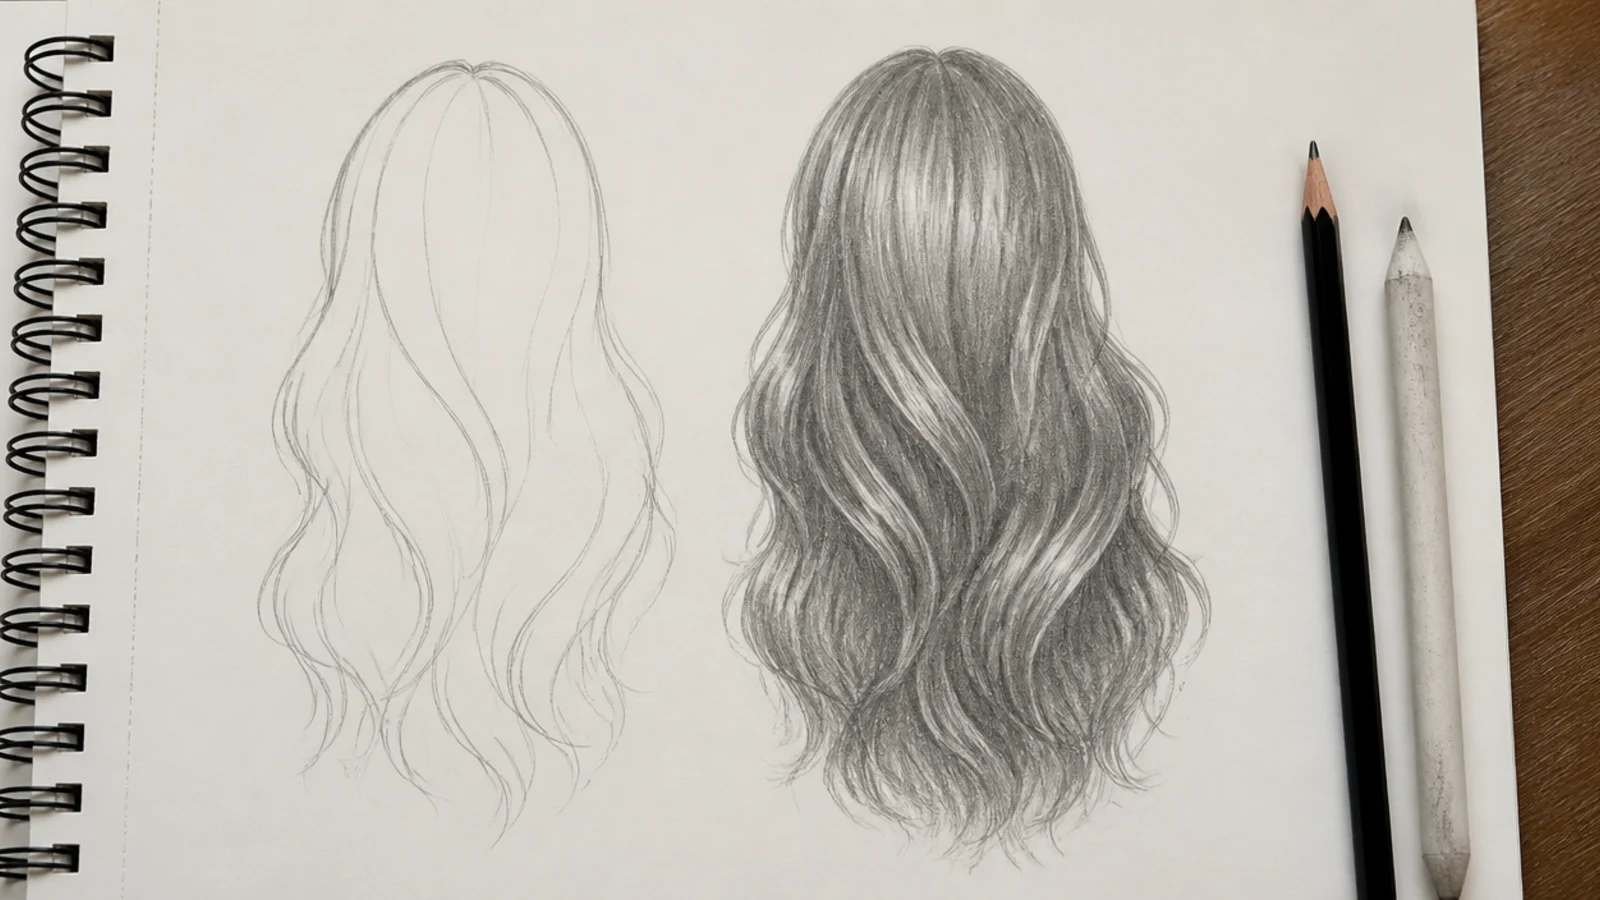
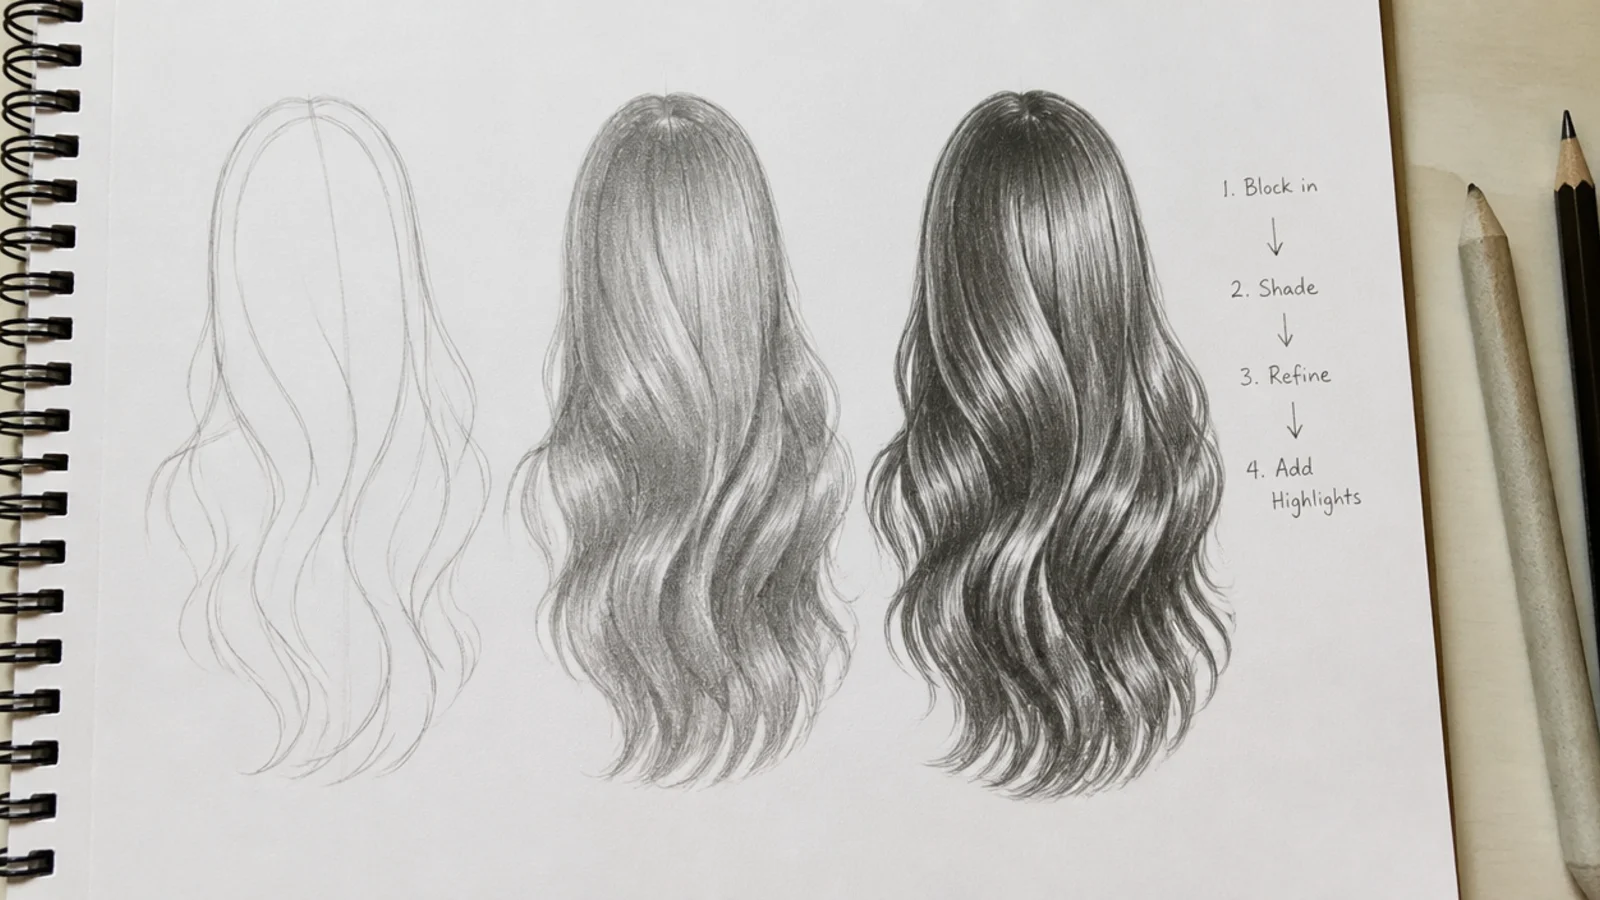
Start with the skull, not the hair. Draw the cranium as a ball with a jaw hanging off it, mark the brow line, and then place the hairline. On a male head that line sits roughly one finger-width above the top of the forehead mass and cuts back at the temples, so the front hairline reads as a shallow M rather than an arc. Only after that do you block the hair as one flat silhouette shape with a 2H pencil, drawn as a single outline with no interior detail at all. Drawing individual strands too early is the number-one beginner mistake and it is very hard to recover from, because once the paper is full of lines you can no longer see whether the overall shape is right. Squint at the silhouette. If it does not read as a specific haircut in pure black and white, more strands will not save it. The same blocking order applies to every style in this piece and is covered step by step in the hair sketch tutorial.
Male vs Female Hairline: Where the Line Actually Sits
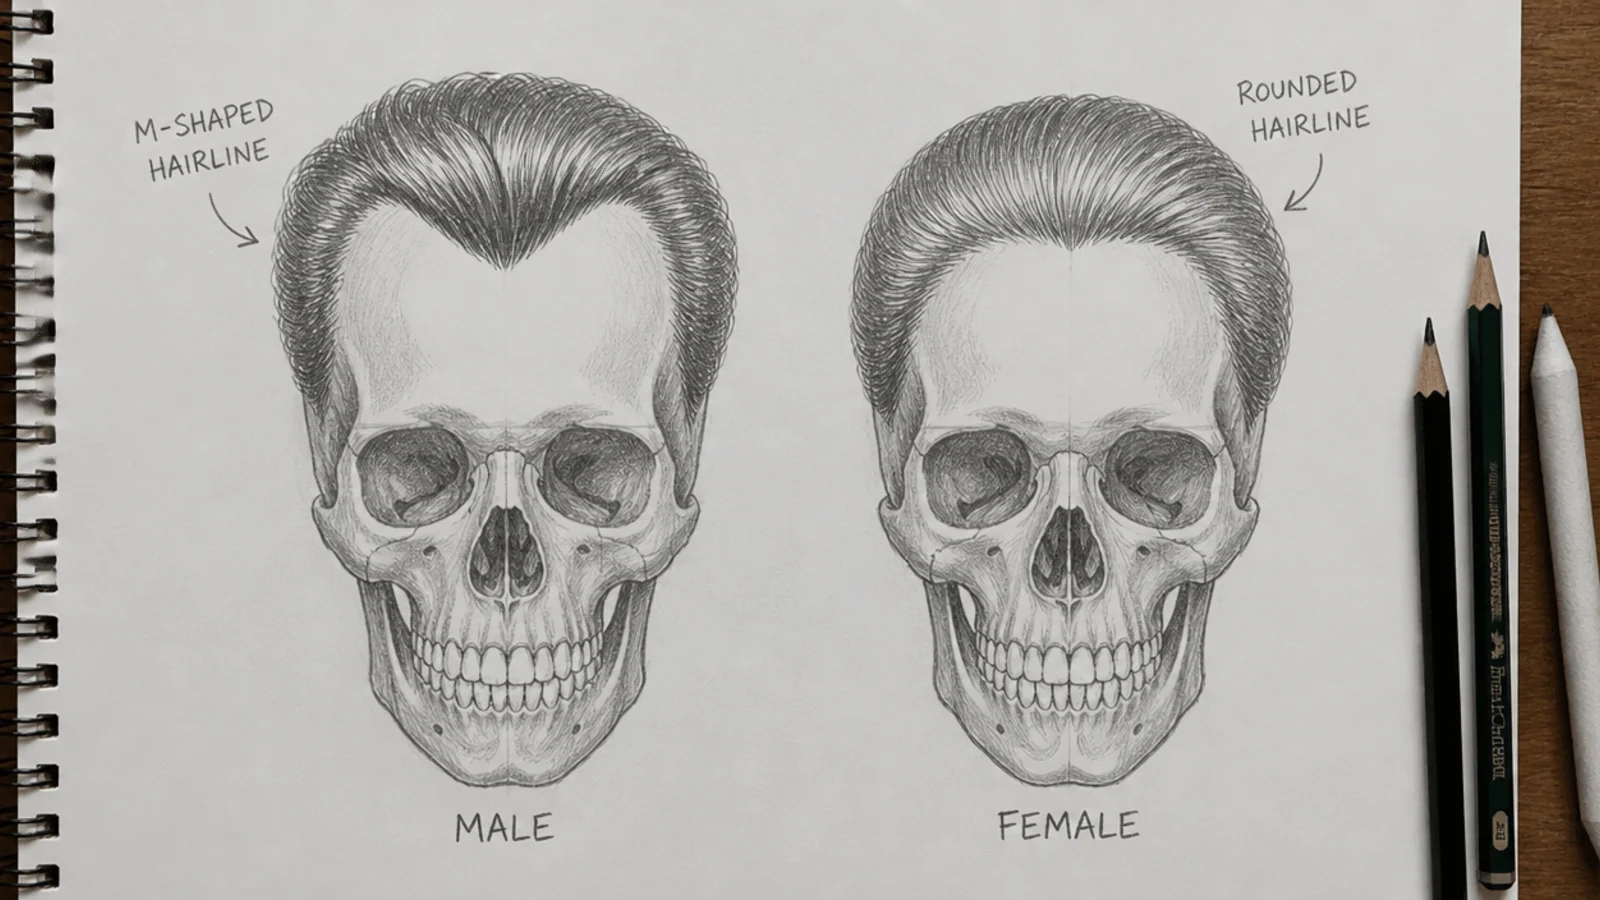
This is the single highest-value study in the whole article, and almost nobody teaches it for artists. Draw one skull in 2H, then trace it twice. On the first copy, run the hairline high and let it step back at each temple, leaving two angular corners and a shallow dip in the center. That is the male read. On the second, run the line lower and closer to the brow and carry it around in one unbroken rounded curve with no corner at all. That is the female read. Do not change the face underneath. When you compare the two, the male version looks like it has a taller forehead even though the skull is identical, because the temple recession opens up bare paper at the sides. A widow's peak is optional on either, but a peak plus temple recession reads strongly male, while a peak on a rounded hairline reads as a heart-shaped face instead. Keep the hairline itself irregular and slightly broken, never a hard clean line. Every other study on the hair sketch hub assumes you have done this one first.
Shading Male Hair for Volume: Pencil Grades and Value Bands
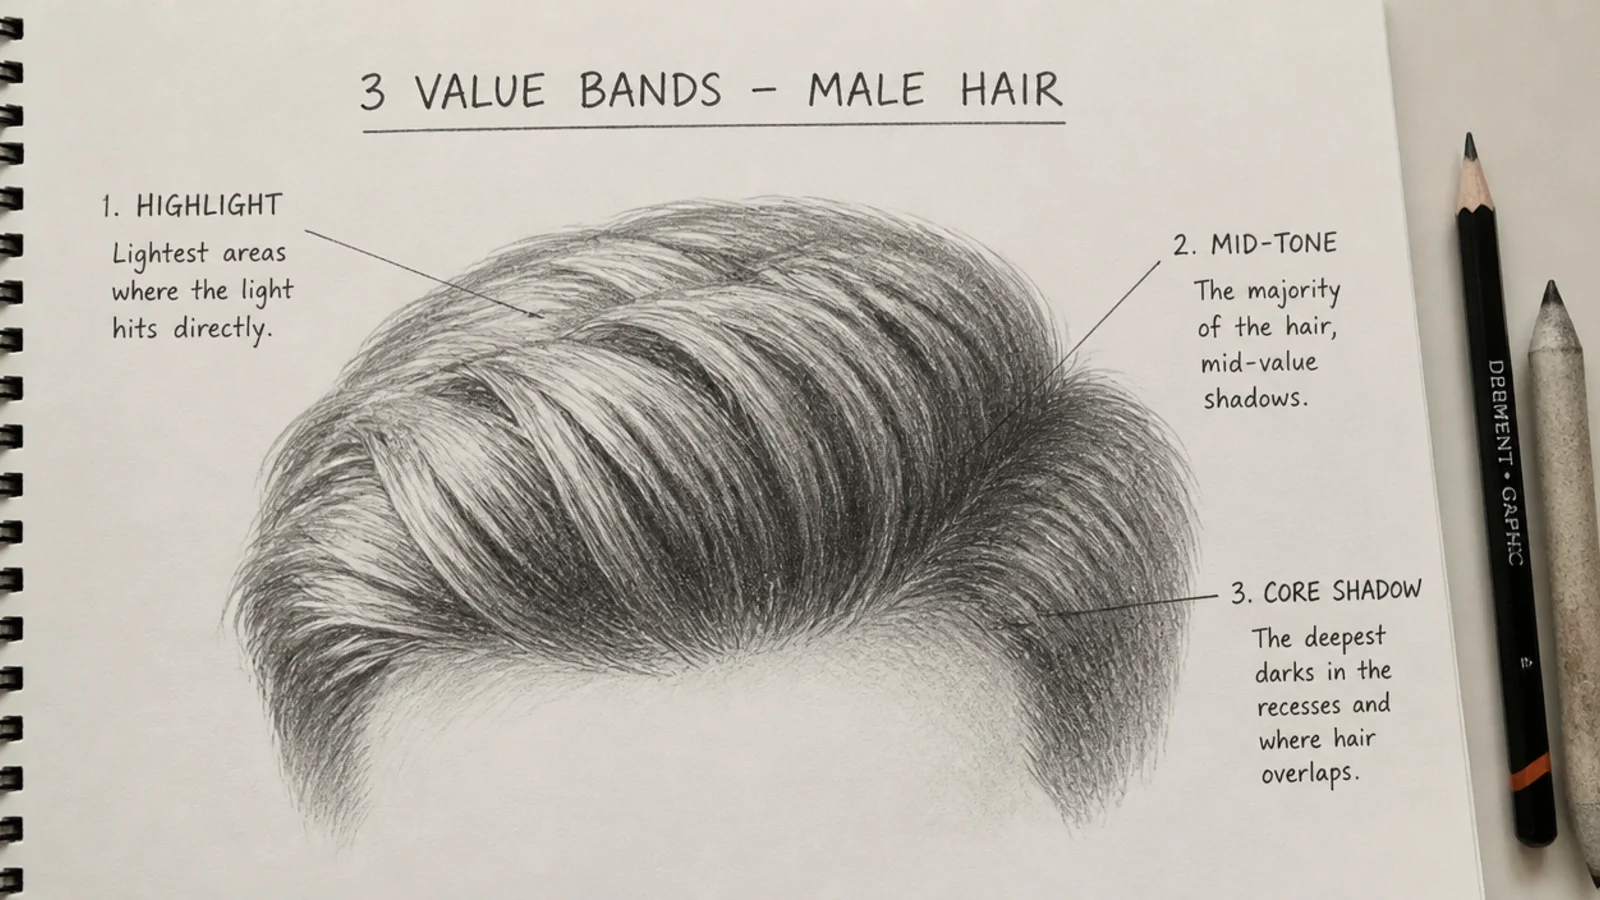
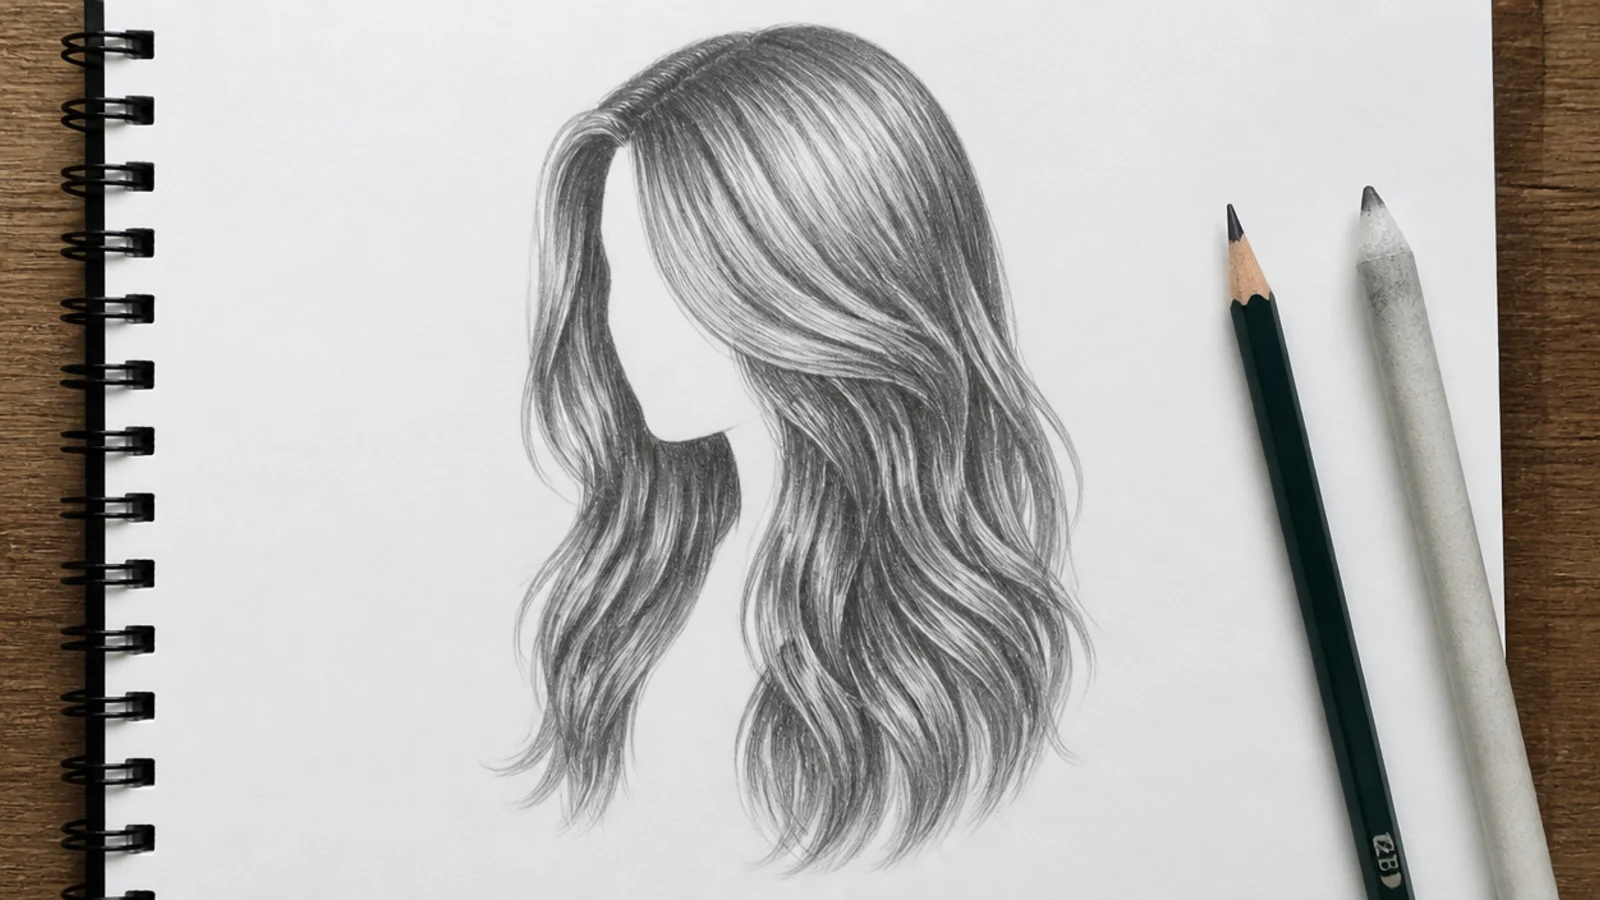
Work in three passes with three grades. A 2H pencil lays the guides and the section boundaries and should stay light enough to erase. A 2B to 4B pencil fills the mid shadows, which is where most of the drawing lives, laid in strokes that follow the direction the hair actually grows. A 6B pencil goes in last for the darkest cores only: the shadow where the hair meets the neck, the dark under the fringe, and the gap between two sections. Highlights are not drawn, they are left. Keep the paper white along the band that crosses the top plane of the skull, or lift it back out with a kneaded eraser rolled to a point. On male hair the ramp between those values is fast, especially on a fade, where you can go from bare paper to 6B across ten millimeters. On female hair the same range is spread over a much longer distance, which is why identical shading logic produces two completely different results.
Drawing Straight, Wavy, Curly and Coily Male Hair
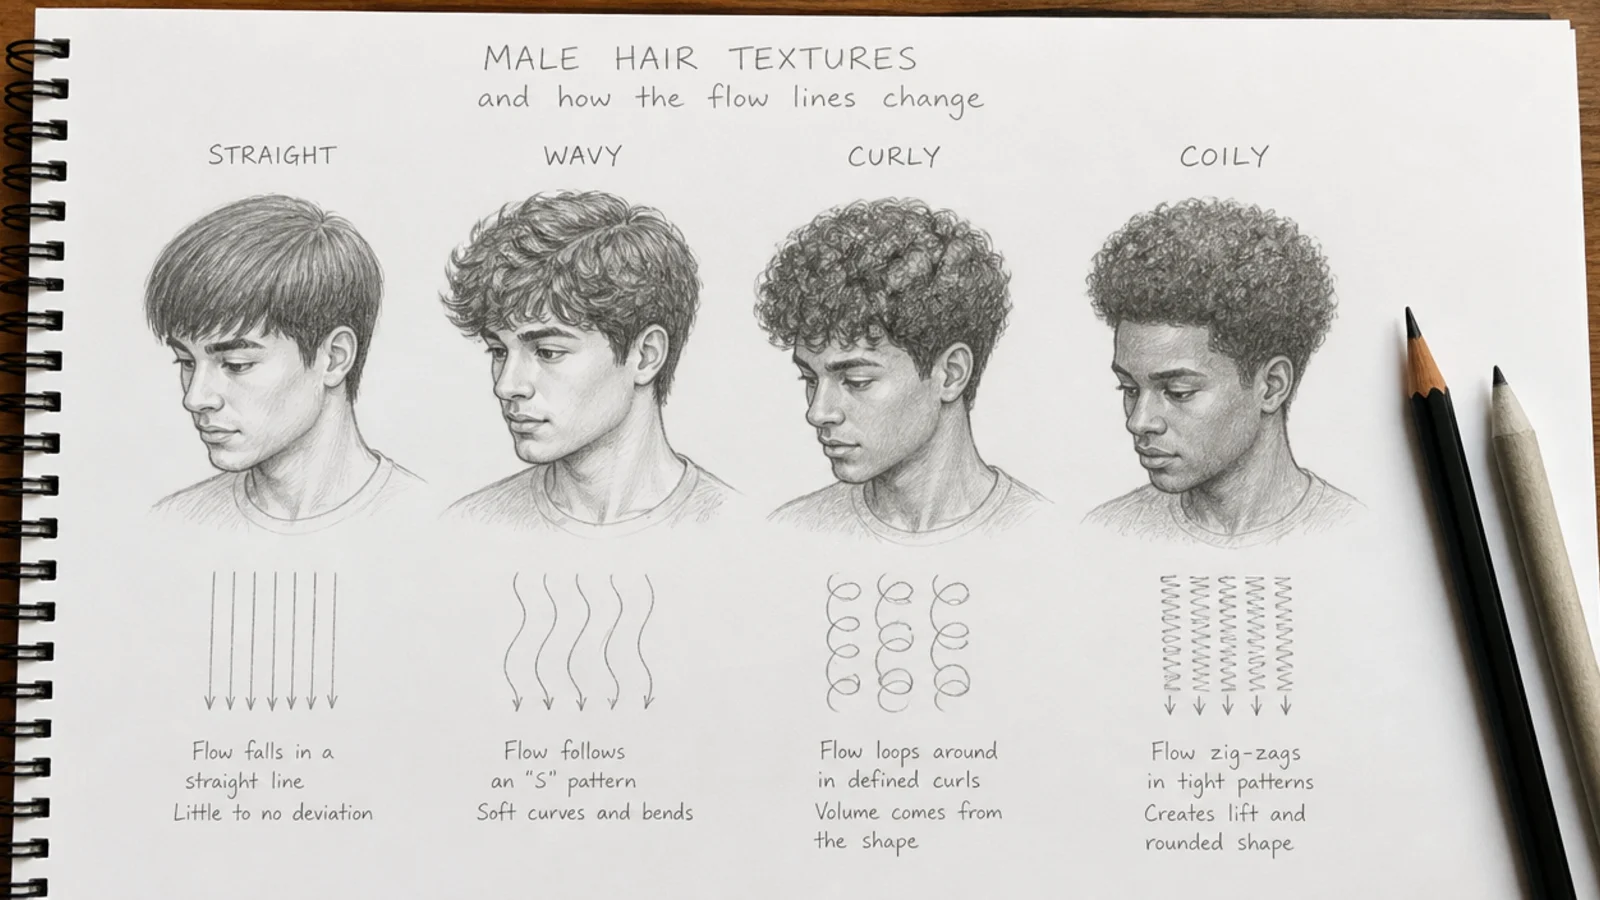
Texture changes the flow lines, not the blocking order. Straight hair takes long strokes that follow one continuous path from the crown outward, varying line weight so it never turns into parallel ruling. Wavy hair takes the same stroke bent into a shallow S, with the shadow sitting in the belly of each curve. Curly hair should be drawn as a ribbon, an S or a spiral, with light on one side and shadow on the opposite side; outlining coils as closed circles is what makes drawn curls look like springs instead of hair. Coily 4C hair is the most skipped texture in every guide on this topic, and the fix is to stop looking for strands entirely and draw clumped value shapes, letting a 6B core sit between them and a soft highlight ride the top of each clump. The full ribbon method with sizing per curl pattern is in curly hair sketch.
Common Mistakes in Male and Female Hair Sketches
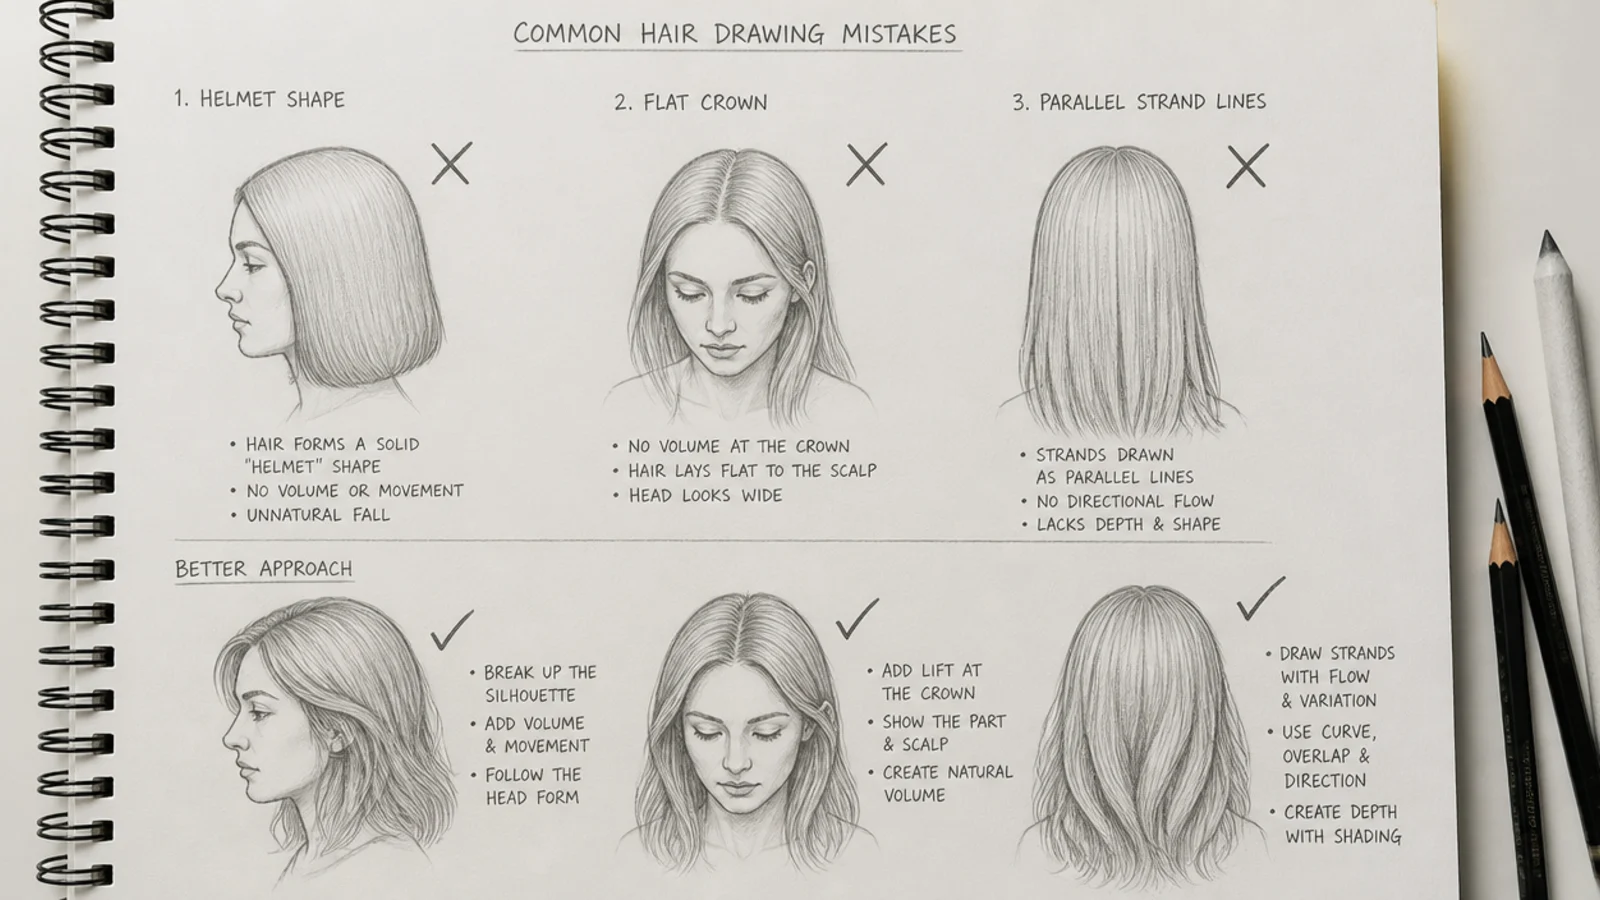
Five errors account for nearly every failed hair sketch. First, the helmet: an outlined mass with even interior shading and no broken edge, fixed by adding short flicks at the ends and letting a few strands escape the silhouette. Second, parallel lines, which happen when strokes are drawn as decoration rather than following the growth pattern out of the crown. Third, the flat skull, where beginners squash the top of the cranium and leave no room for hair volume to sit on. Fourth, the hairline drawn too low on a male head, which quietly reads female no matter how short the cut is. Fifth, uniform value, meaning everything sits at one mid gray with no 6B core and no bare paper. Fix that last one by picking your light source before you shade anything, then committing to one dark band and one bright band per mass. More failure modes and their corrections are collected in the hair sketch guide.
Pencils, Paper, Blending Tools and Using References
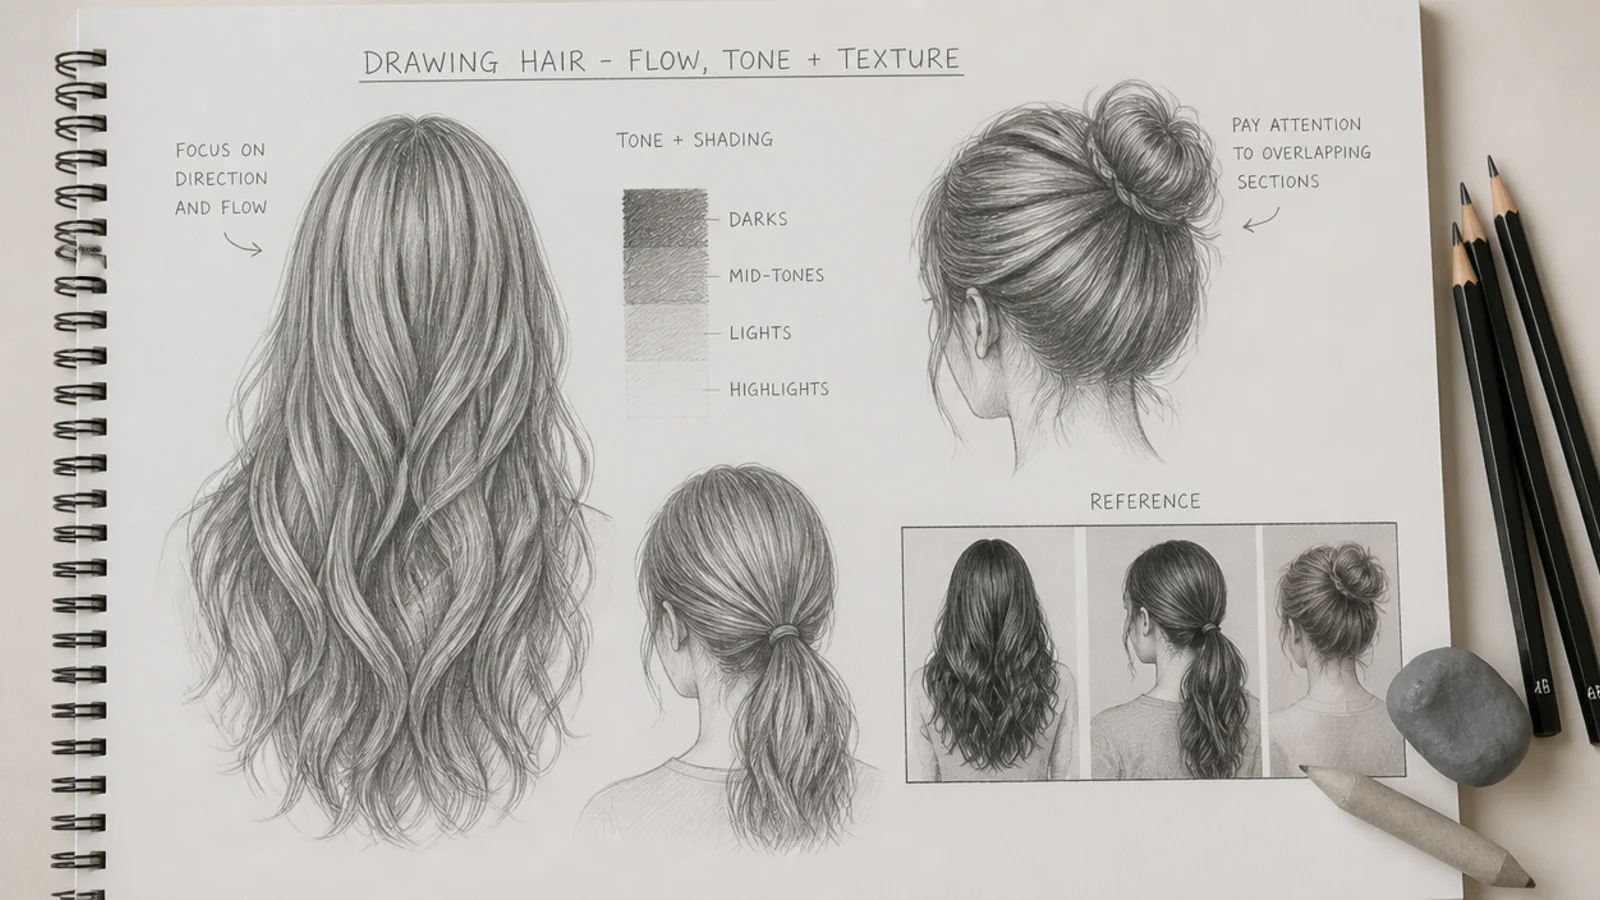
A three-pencil kit does everything here: 2H, 4B and 6B, plus a kneaded eraser and either a blending stump or a rolled paper tortillon. Smooth 160gsm paper holds graphite without the tooth breaking up your dark cores, which matters on short male cuts where the value has to shift fast in a small space. Blend sparingly. Over-blending kills the texture that makes hair read as hair, so use the stump only on the transition between mid shadow and core, never across the highlight. For references, gather front, side, back and three-quarter views of the same cut rather than one flattering photo, because the back of the head is where most character drawings fall apart. Use references to study the flow direction and where the hair breaks into sections, then draw from your blocked silhouette rather than copying line for line. Long styles need their own reference approach, covered in long hair sketch.
Frequently Asked Questions
What is the difference between a male and female hairline in drawing?
A male hairline sits higher on the skull and recedes at the temples, forming a shallow M with two visible corners and often a widow's peak. A female hairline sits lower, closer to the brow, and runs in one continuous rounded curve with no corner at all. Drawing the same face with each hairline flips the gender read without touching a single facial feature.
How do you make a hair drawing look more masculine or feminine?
Change three things: hairline shape, silhouette distance and edge quality. Masculine hair uses an angular M hairline, a mass that sits within about 5mm of the skull so the cranium reads through, and hard edges at the fade, part and neckline. Feminine hair uses a rounded low hairline, a mass standing 15 to 30mm off the skull, and soft broken edges with escaping strands.
How do you draw male hair for beginners step by step?
Draw the skull first, mark the brow, then place a high M-shaped hairline. Block the hair as one flat 2H silhouette with no interior detail and squint at it to check the cut reads. Add flow lines out of the crown, then shade in three passes: 2H guides, 2B to 4B mid shadows, 6B darkest cores. Finish with short irregular flicks at the ends.
What pencils do you use for drawing hair?
Three grades cover everything. Use 2H for guides and section boundaries, since it stays light enough to erase cleanly. Use 2B to 4B for mid shadows, which is the bulk of the drawing. Use 6B only for the darkest cores: under the fringe, where hair meets the neck, and in the gap between two sections. Add a kneaded eraser to lift highlights back out.
Why does my drawn hair look flat or like a helmet?
Almost always because the mass was outlined and then filled with even shading. Hair needs a broken outline, a genuine value range from bare paper to 6B, and short irregular flicks at the ends. Also check the skull underneath: beginners flatten the top of the cranium, which leaves no room for hair volume to sit on and makes any cut look pressed down.
Do you draw the head before the hair?
Yes, always. Draw the full cranium as if the person were bald, including the back of the skull, then place the hairline on it and sit the hair mass on top. Skipping this is why hair often looks pasted onto a head rather than growing from it, and it is also why the back of the head so often ends up too small in beginner drawings.
How do you draw curly and coily hair on a male character?
For curly hair, draw each curl as a ribbon, an S or a spiral, with light on one side and shadow on the opposite side rather than outlining closed coils. For coily 4C hair, stop looking for strands entirely: block the mass, divide it into clumps 8 to 12mm across, put a soft highlight on each clump top and a 6B core in the gap beneath it.
How do you draw short hair like a buzz cut or fade?
Short hair is drawn as value on the skull rather than as a silhouette. For a buzz, lay a flat 2B tone, deepen to 4B where the form turns, and stipple only the outer 3mm of the edge. For a fade, ramp from bare paper to 6B across about ten millimeters, blend with a stump, then re-add texture with short 4B flicks so it does not look airbrushed.
Where should I find male hair drawing references?
Collect front, side, back and three-quarter views of the same haircut rather than one flattering photo, because back views are where most character drawings fail. Study the flow direction and where the mass breaks into sections, then draw from your own blocked silhouette instead of copying line for line, which is what keeps the drawing yours rather than a traced photo.
Which hair sketch look are you saving?
If you only take one thing from these 20 pairs, take the overlay study: draw one skull, trace it twice, and put an M-shaped hairline on one and a rounded hairline on the other without touching the face underneath. That single exercise teaches more about male versus female hair than any amount of copying finished portraits, because it isolates the variable that actually carries the read. After that, work through the pairs in order of texture, since straight, wavy, curly and coily hair each need a different flow-line strategy before shading makes any sense. Keep your 2H for guides, your 4B for mid shadows and your 6B for the darkest cores, and leave the paper white where the light band sits. When you want more practice sets, work through the hair sketch tutorial or browse the rest of the hair sketch hub.