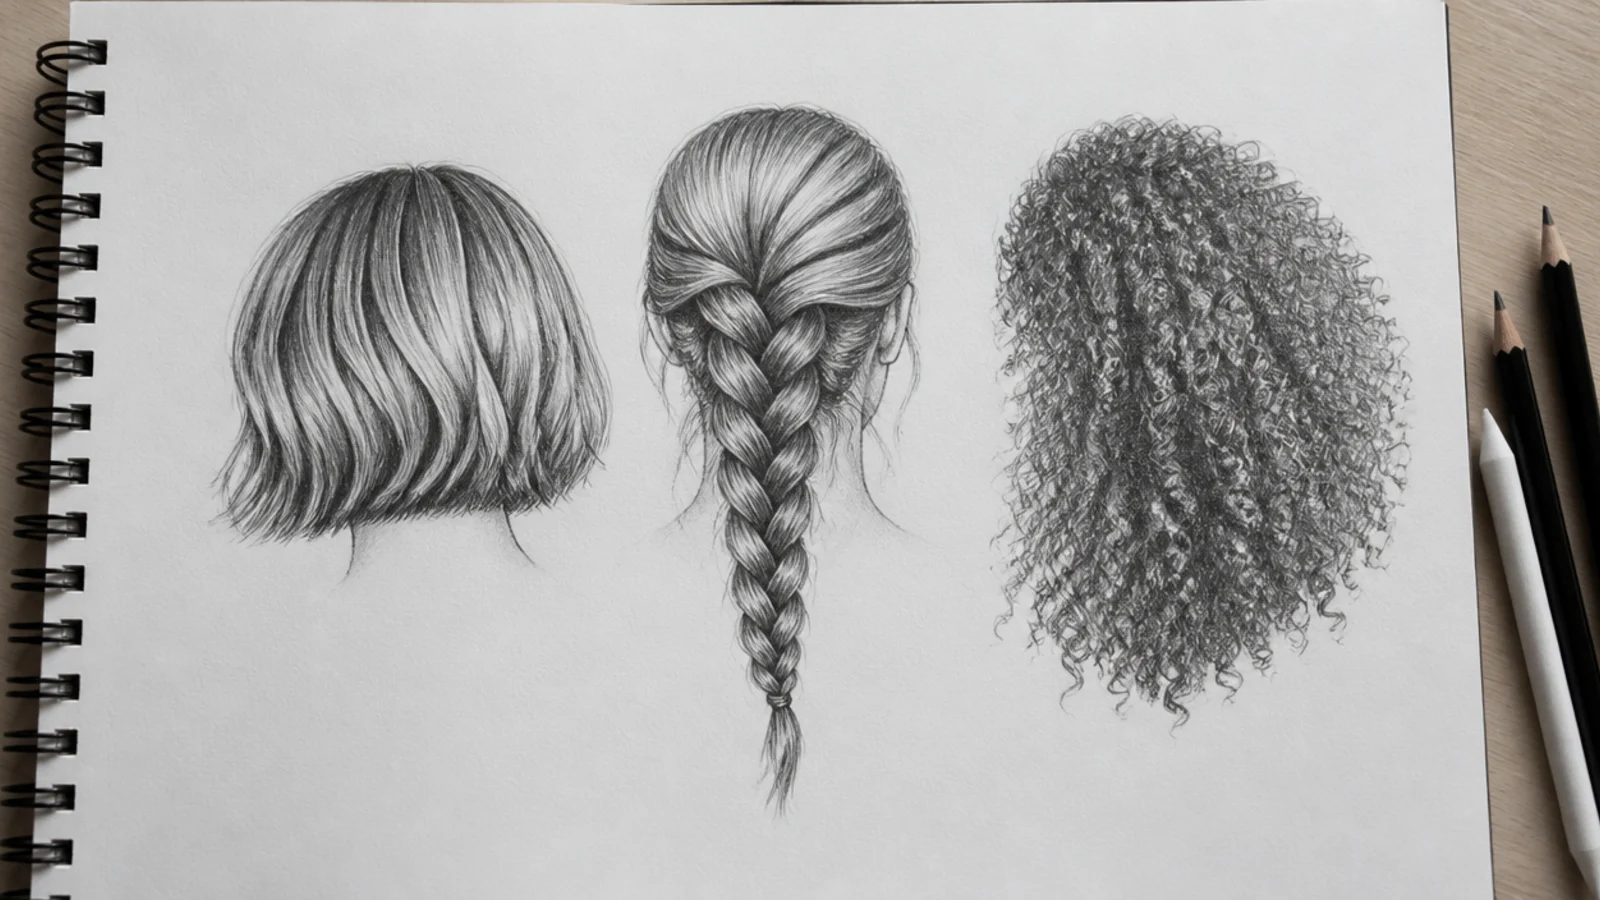
Quick Comparison
| Pencil Sketch on Paper | Digital Sketch on a Tablet | |
|---|---|---|
| Starting kit cost | About 15 to 30 dollars for a 2H to 6B set, paper and a kneaded eraser | 200 dollars and up for a tablet, plus a free or paid app |
| Blocking the silhouette | Light 2H pressure, easy to leave visible under the finished sketch | A separate low-opacity layer you can hide or delete entirely |
| Getting highlights back | Leave the paper white, or lift with a kneaded eraser | Erase on the shading layer, or paint white on a layer above |
| Fixing a wrong flow line | Erase and redraw; heavy 6B smudges and never fully lifts | Undo, unlimited and lossless |
| Value control | Pressure and pencil grade; hardest to keep blonde hair light | Opacity sliders and adjustment layers make value keying easier |
| Texture quality | Paper tooth adds natural grain to coily and buzzed hair | Needs a textured brush or the coils look plastic |
| Practicing long flow lines | Best; the arm movement transfers straight to drawing skill | Screen friction and stabilizer settings can mask a shaky line |
| Working small, around 2cm heads | Limited by lead sharpness; forces useful economy | Zoom lets you overdetail, which is a trap at small scale |
| Best for a 20 day sketchbook plan | Yes; dated pages show measurable progress side by side | Good for finished pieces, weaker as a visible practice record |
1. Blunt Chin-Length Bob, Front View
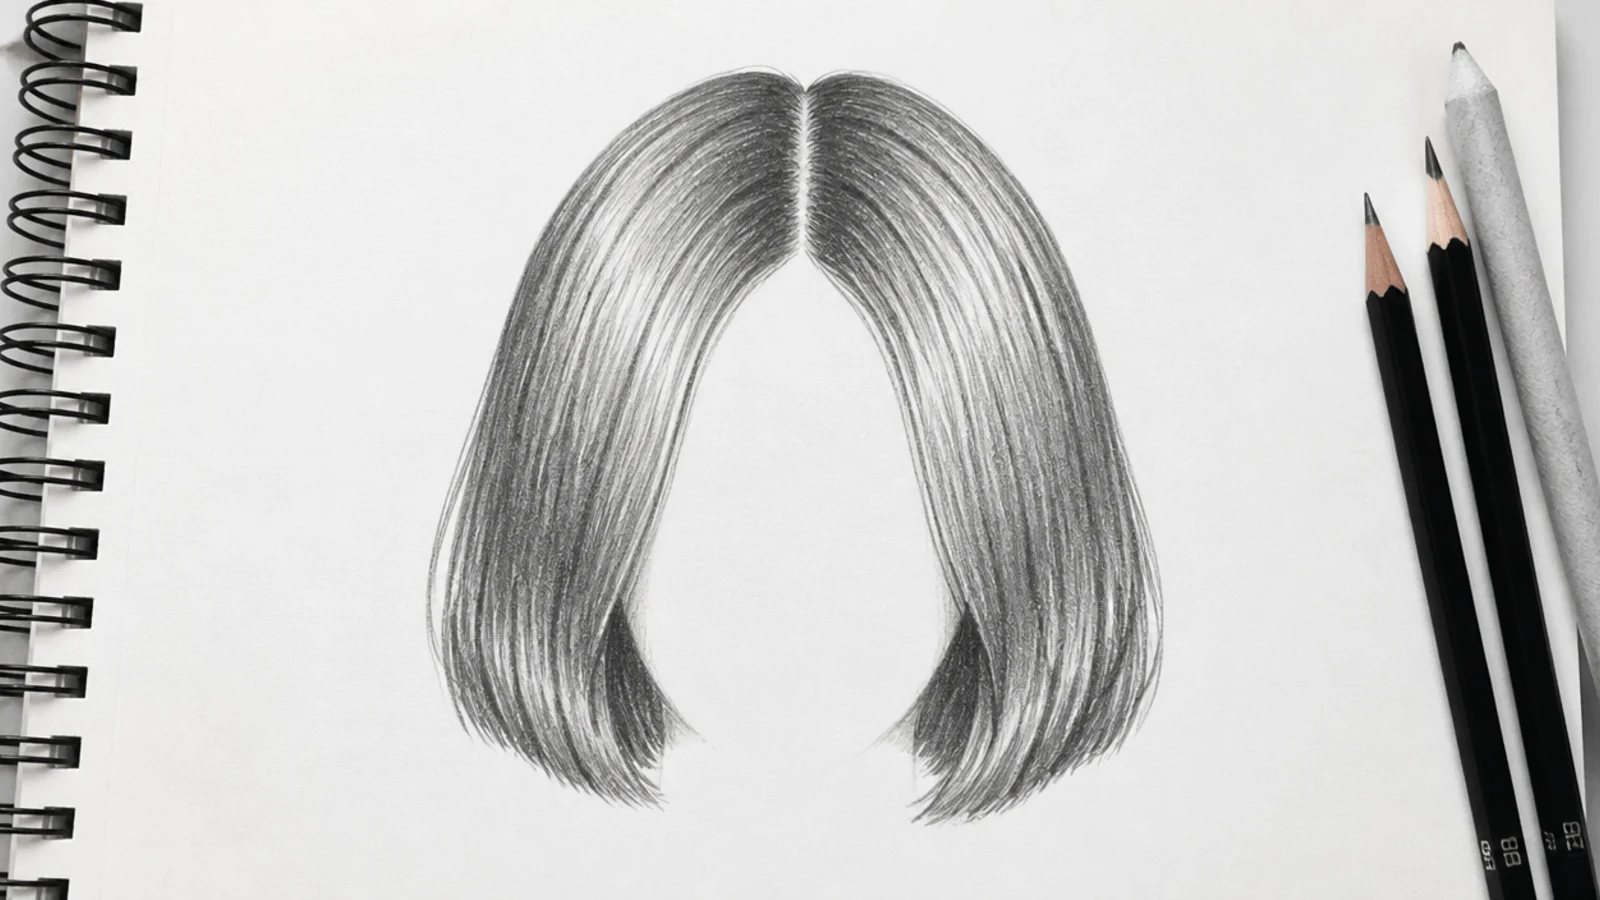
Start here because the bob is one closed shape. Draw the skull as a circle, add the jaw, then trace one continuous outline that sits about 1cm off the scalp at the crown and stops level with the chin. No strands at all in the first pass. Once the silhouette reads as a bob from across the room, add four or five 2H flow lines dropping from the part, and darken only where the hair tucks behind the ear. Ten minutes, HB pencil, nothing else.
Who it suits: Absolute beginners and anyone whose hair keeps coming out scribbled.
Tip: Skill trained: silhouette. Keep the outline slightly wider than the skull, or the bob reads as a swim cap.
2. Center-Part Long Straight Hair to the Waist
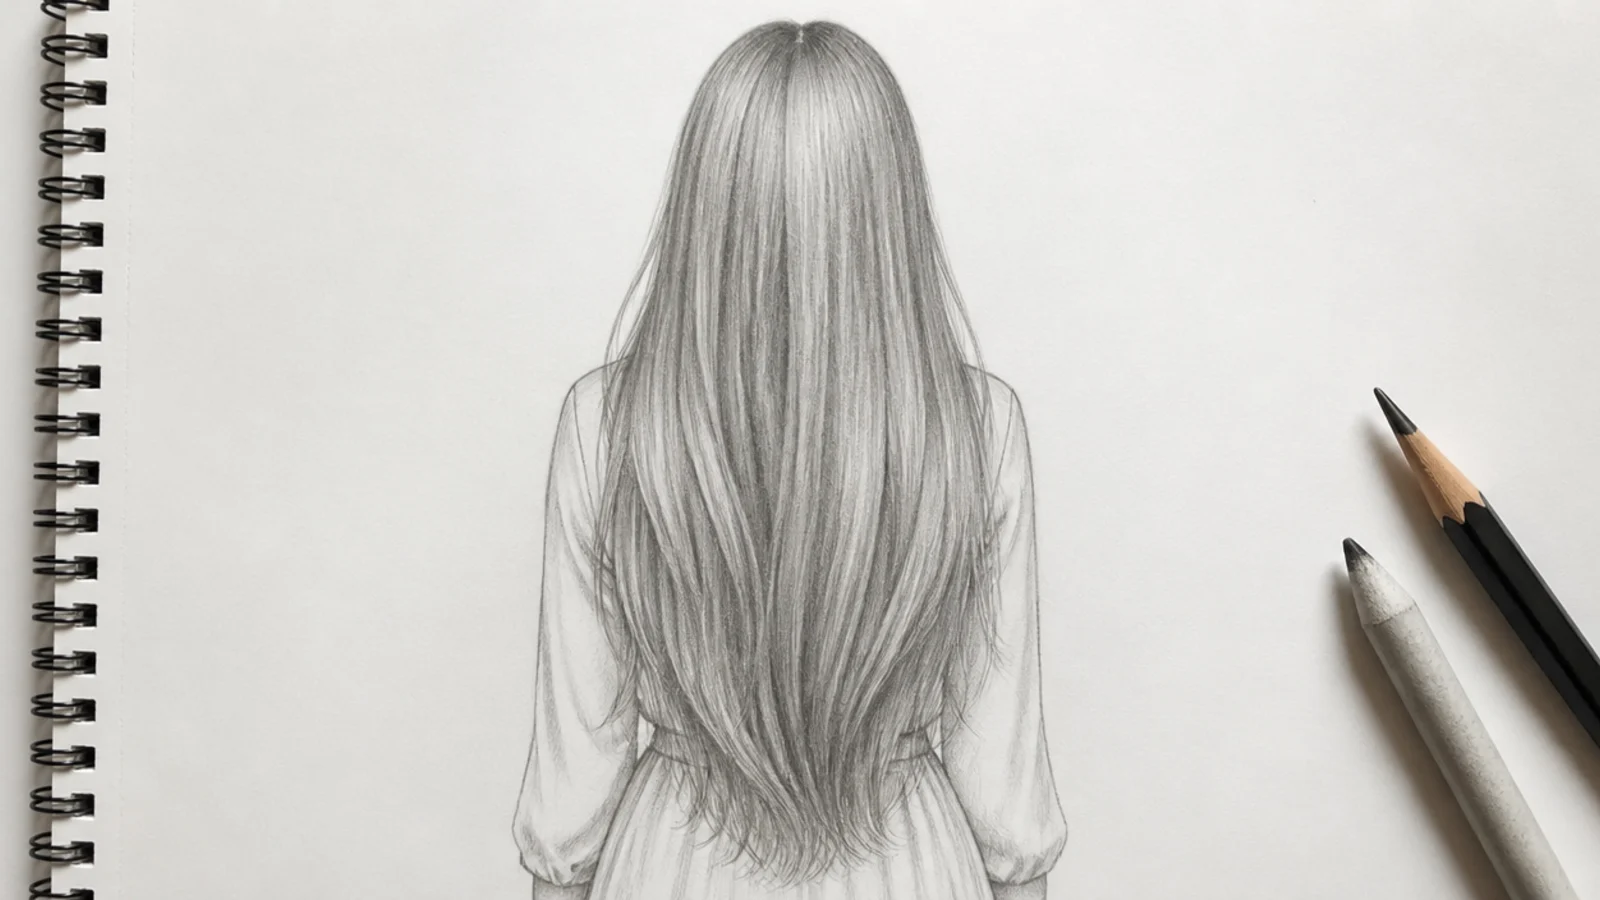
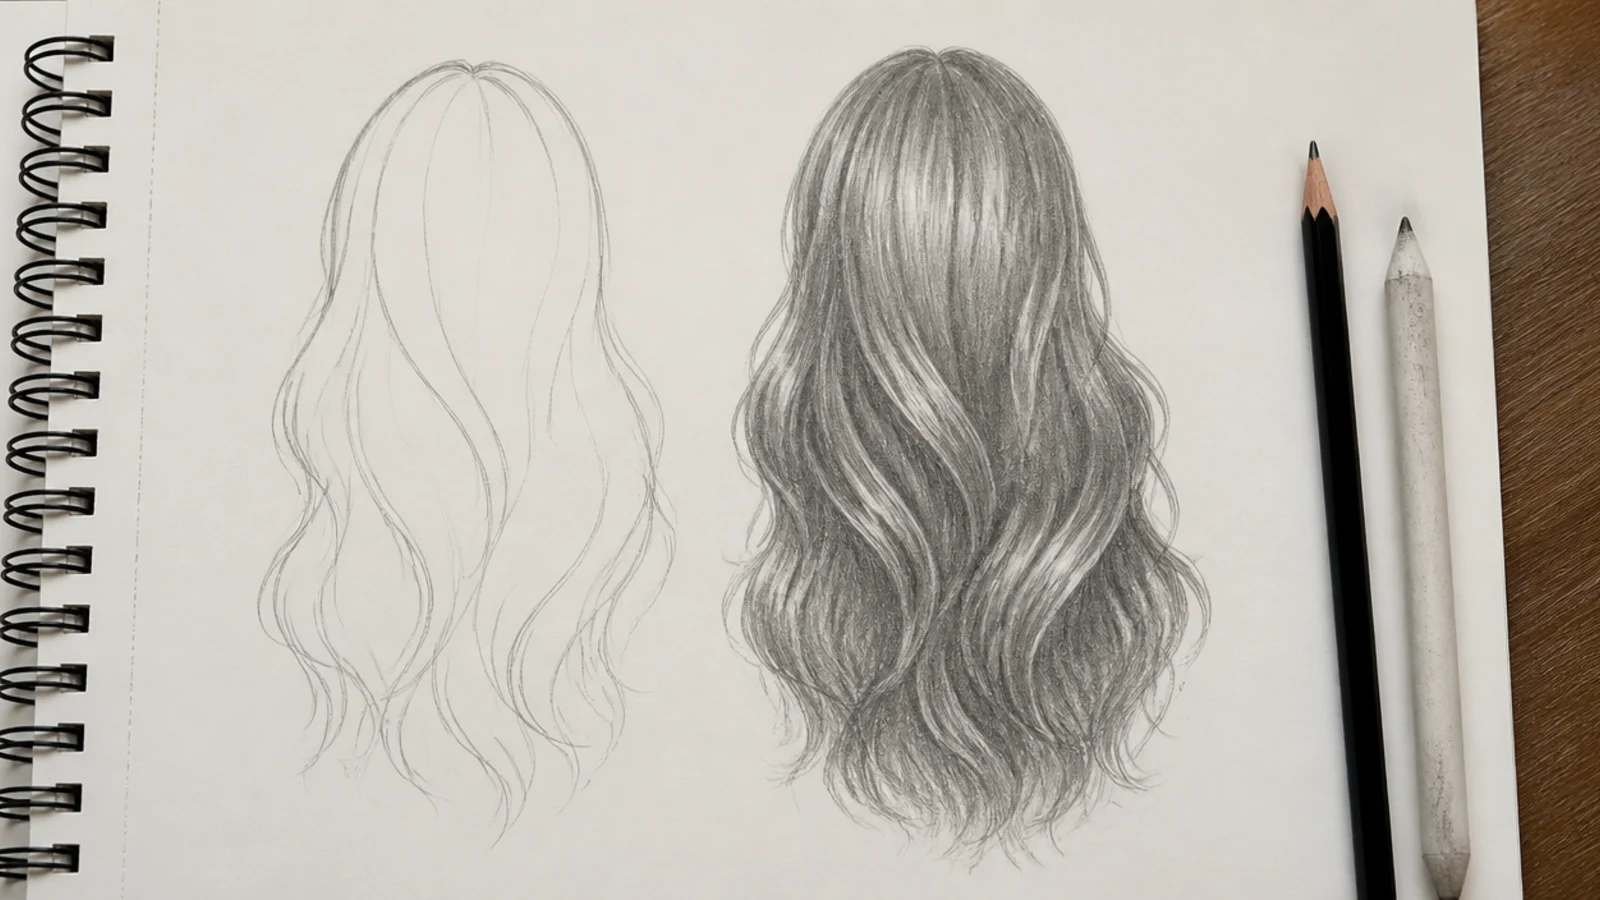
The classic test of flow. Mark the part at the crown, then draw two long sweeping edges from the part down past the shoulders to the waist in one arm movement, not short scratchy strokes. Fill the interior with grouped strand lines that all start at the part and fan slightly outward, never parallel. Vary line length long to short so the mass does not read as ruled paper. Fifteen minutes with HB and 2B. Full walkthrough in long hair sketch.
Who it suits: Anyone whose long hair drawings look like spaghetti.
Tip: Skill trained: flow. Draw from the shoulder, not the wrist, so the long lines stay smooth.
3. High Ponytail With a Visible Crown Bump
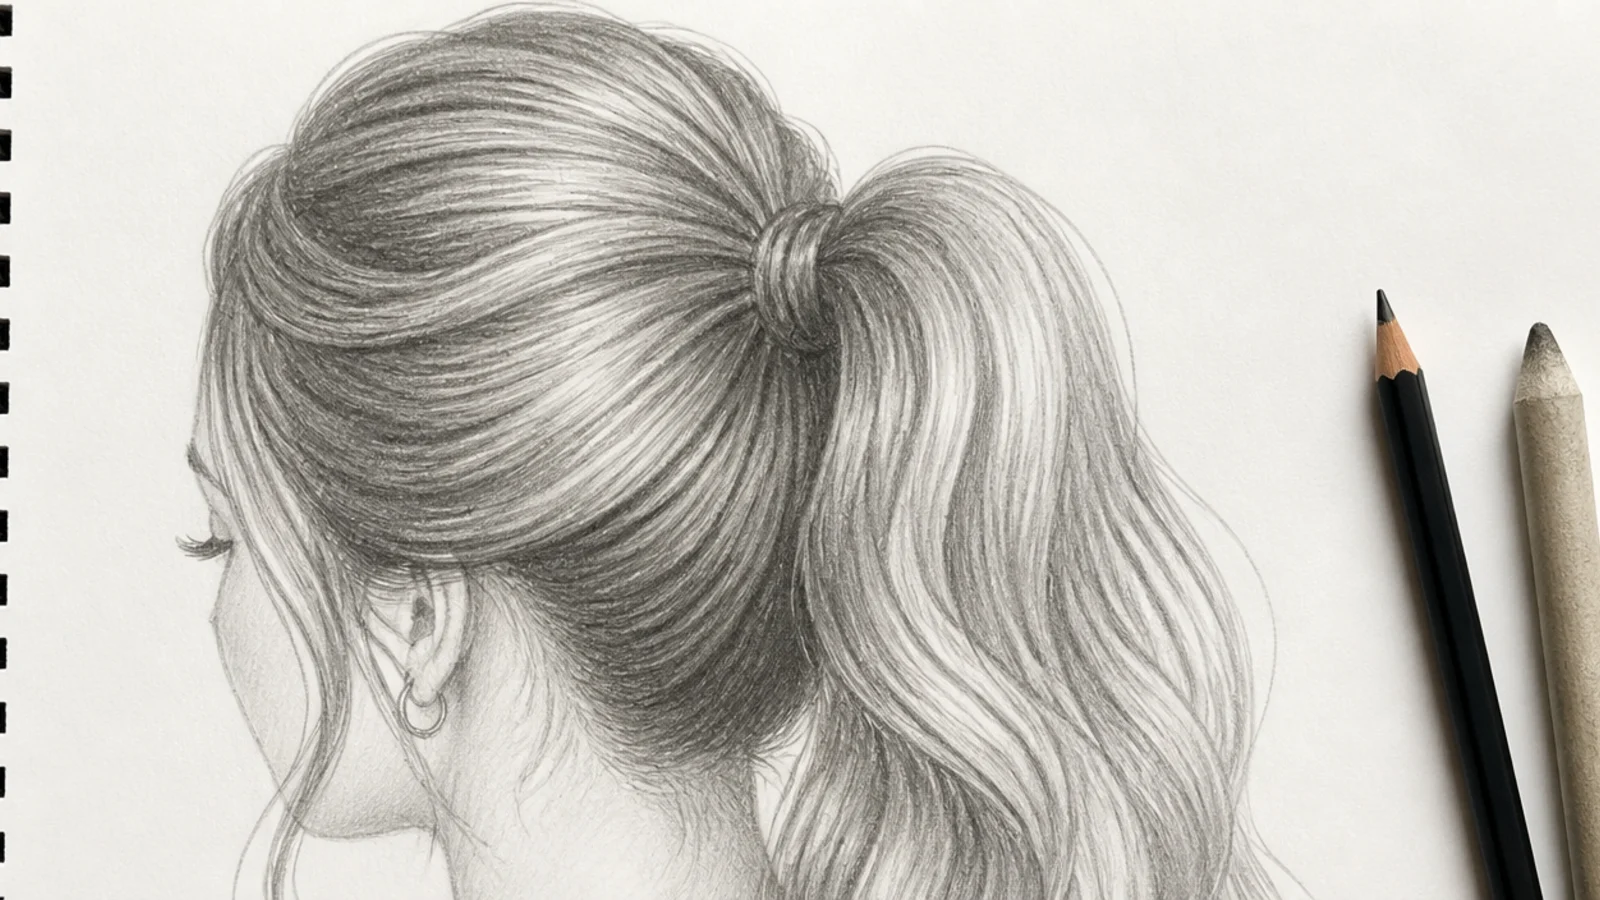
This is the first idea that teaches volume. The hair does not sit flat on the skull; it lifts about 5mm at the crown before sweeping back, and that small bump is what separates a drawn ponytail from a painted-on one. All the strand lines converge on one point at the elastic, then explode outward again below it. Darken hardest right under the elastic, where the gathered hair blocks the most light. Twelve minutes, HB with 4B under the tie.
Who it suits: Character artists drawing everyday and sporty poses.
Tip: Skill trained: convergence. If every line does not aim at the elastic, the ponytail looks glued on.
4. Low Messy Bun With Face-Framing Strands
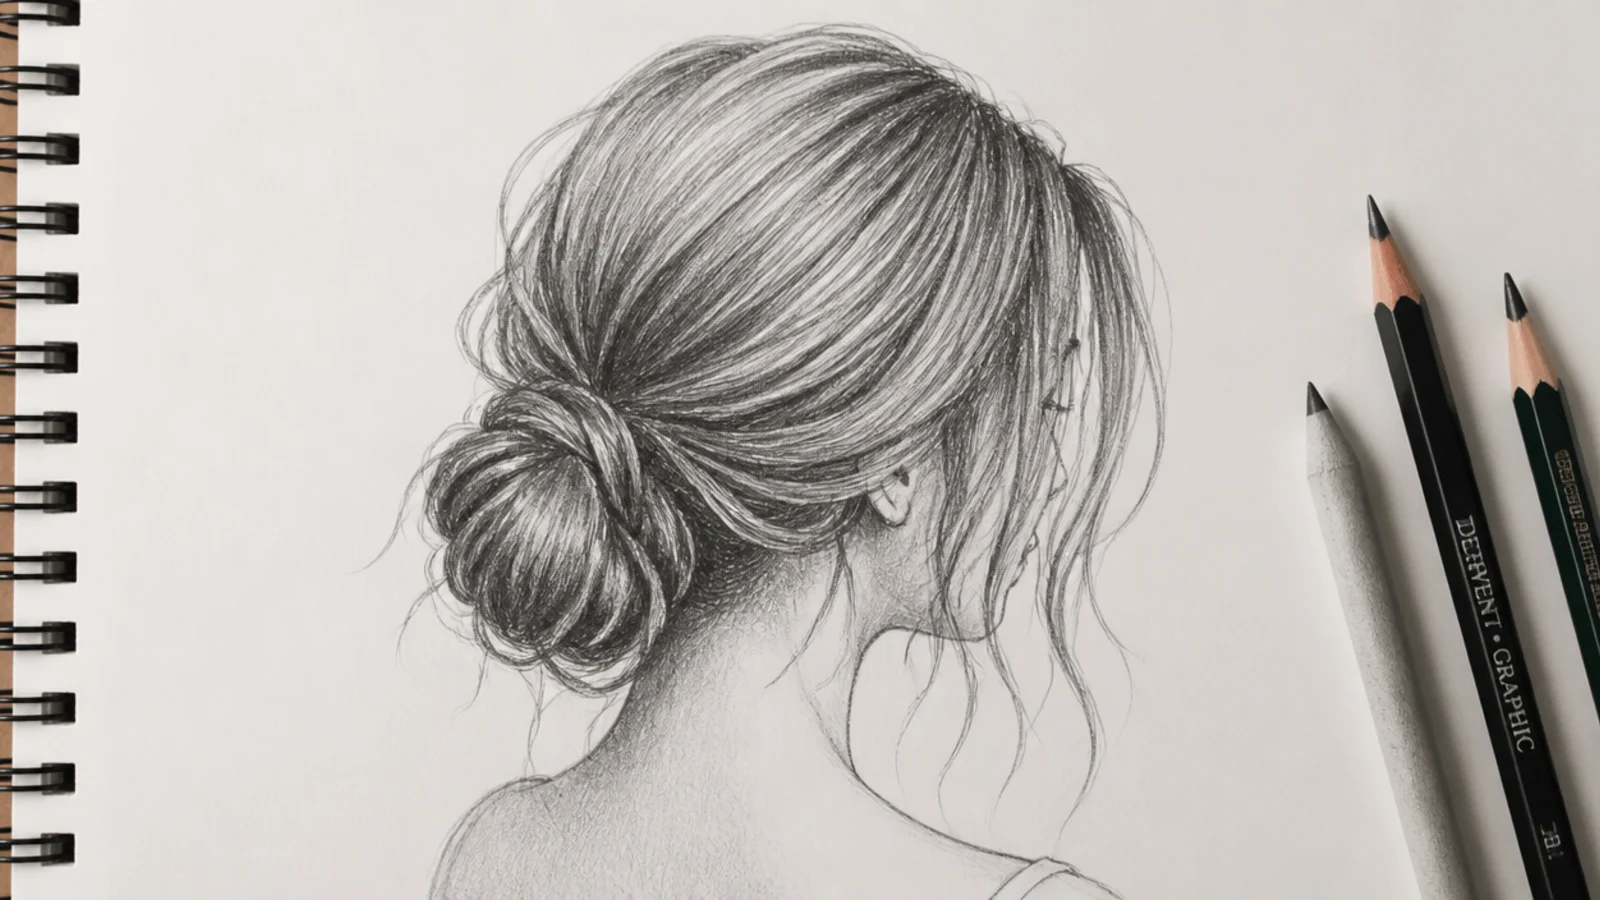
Draw the bun as a slightly lopsided oval at the nape, never a perfect circle, then wrap two or three ribbon-shaped loops around it so the twist is legible. The messiness comes from exactly three or four escaped strands, not twenty; more than that and it reads as damage rather than style. Add a soft 4B core inside the bun so it sits behind the head instead of floating on top. Fifteen minutes. Reference the real thing in messy ponytail.
Who it suits: Everyday character sketches and portrait warm-ups.
Tip: Skill trained: controlled irregularity. Count your escaped strands and stop at four.
5. Side-Swept Curtain Bangs, Three-Quarter View
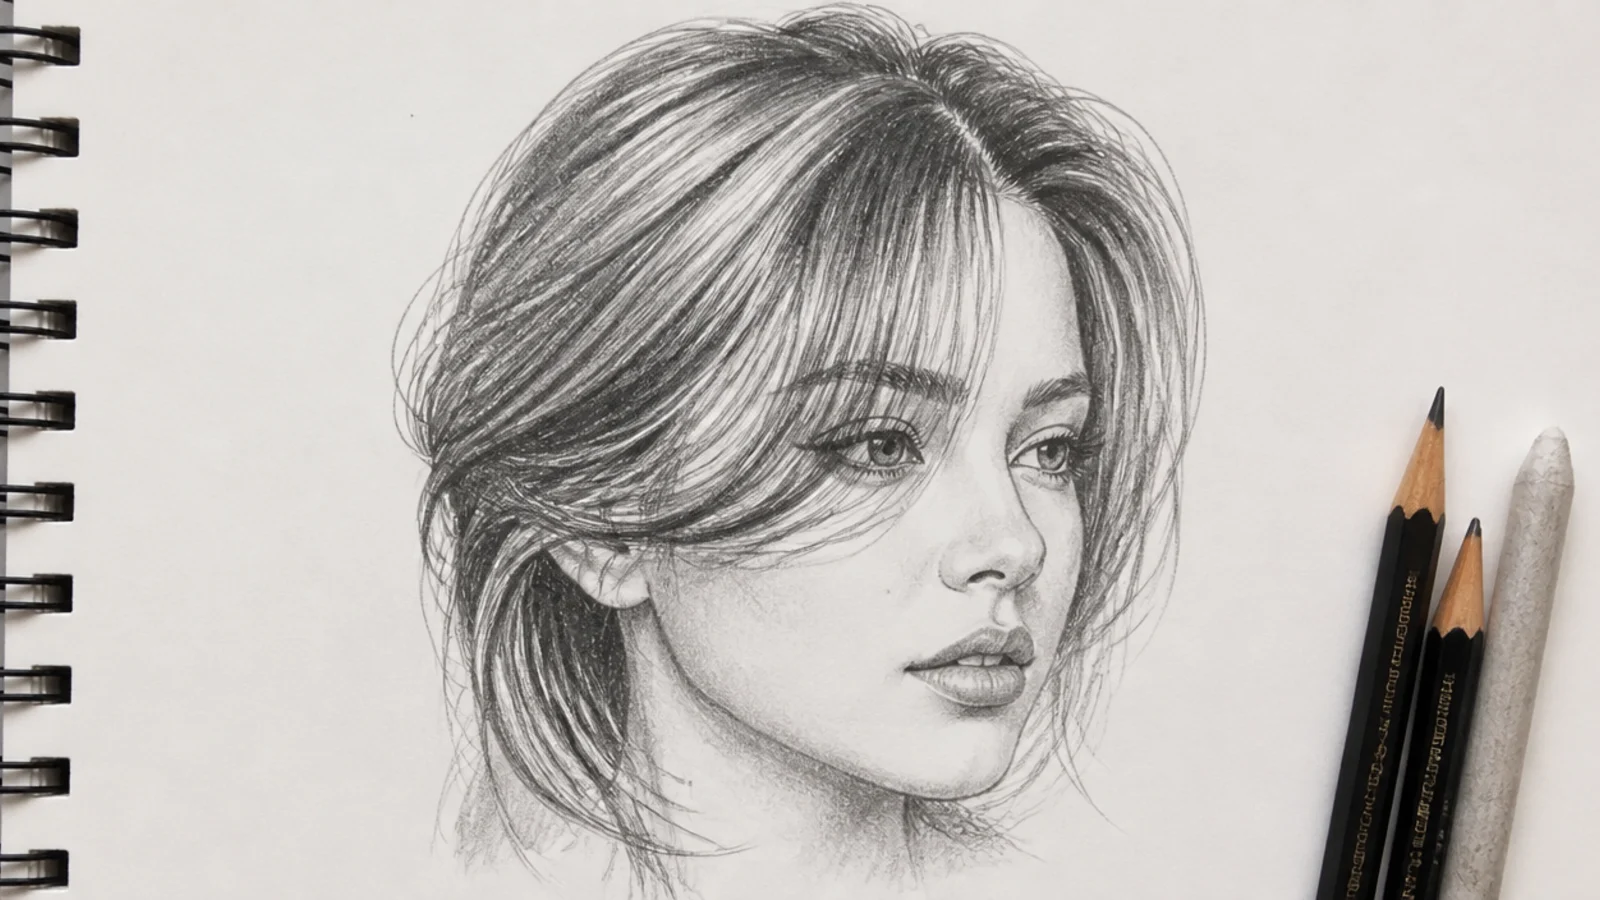
Bangs are where hairlines get taught. Mark the hairline first as an irregular soft line, never a hard clean curve, then split the fringe at the center and sweep each half outward so the shortest hair sits at the inner edge and the longest brushes the cheekbone. On a three-quarter head the far side compresses, so draw it about two thirds the width of the near side. Twelve minutes, HB. Style reference in short curtain bangs.
Who it suits: Portrait artists who keep drawing flat foreheads.
Tip: Skill trained: hairline. Break the hairline with three tiny stray hairs so it stops looking stamped on.
6. Short Pixie Cut From the Side
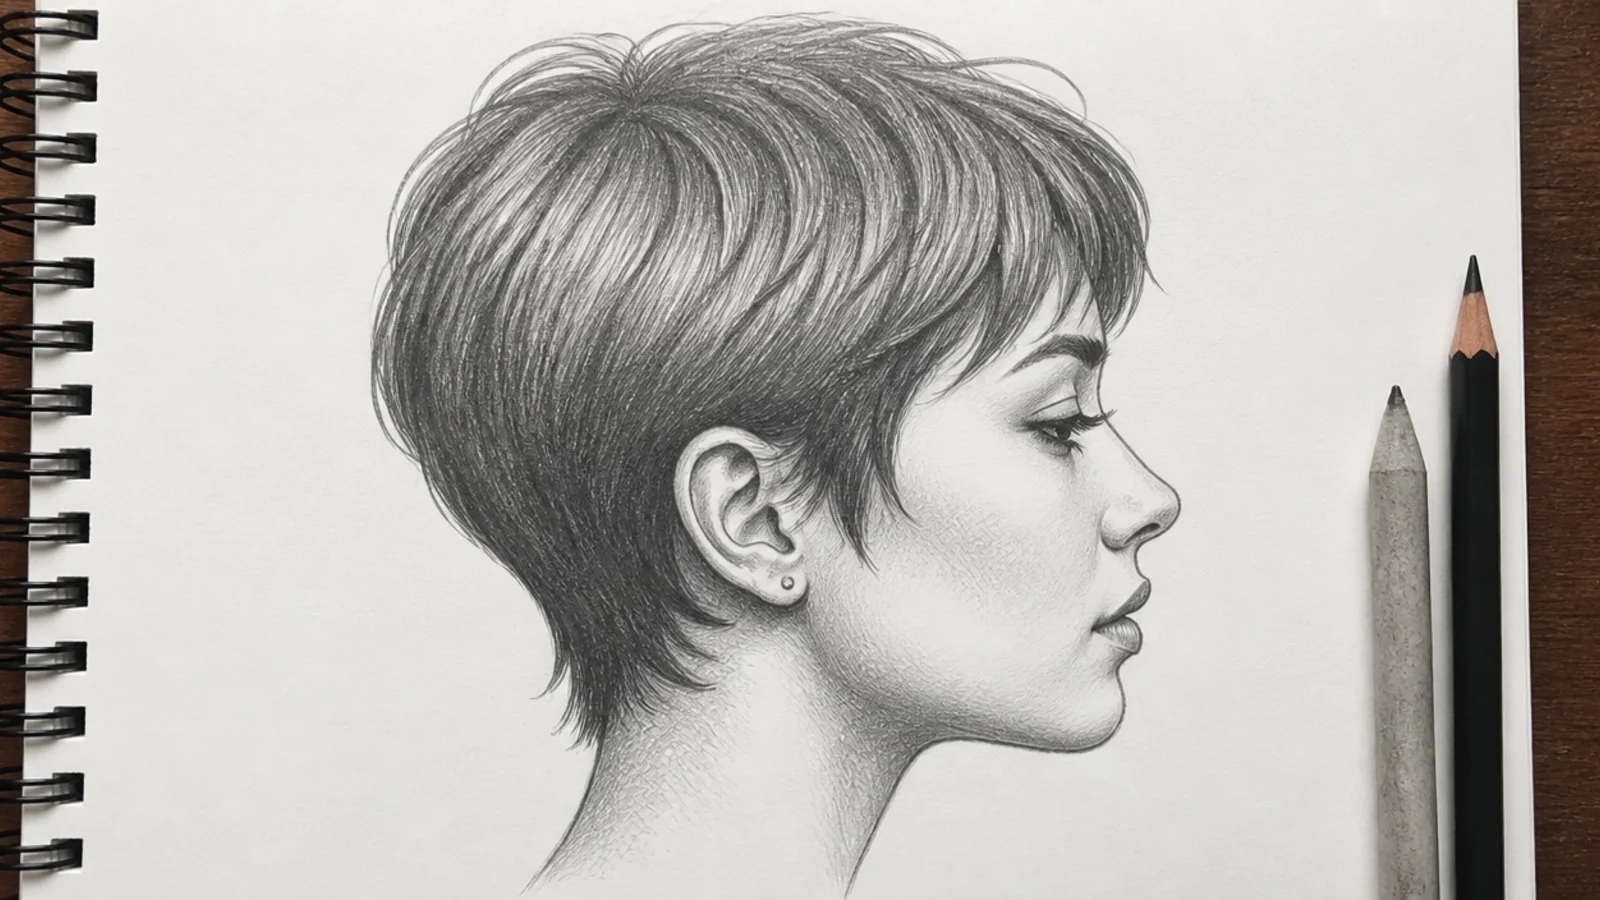
Short hair exposes the skull, which is why beginners avoid it and why you should not. Draw the head profile accurately first, then lay a thin hair mass about 3mm thick over the top and back, tapering to almost nothing at the nape. Everything after that is short flicks at the ends, each 4 to 8mm long, angled forward at the temple and down at the neck. Ten minutes, HB and 2B. More cuts in short hair sketch.
Who it suits: Anyone who has only ever drawn long hair.
Tip: Skill trained: mass thickness. Short flicks at the ends stop the pixie looking like a painted helmet.
7. Boy's Textured Crop With Spiky Ends
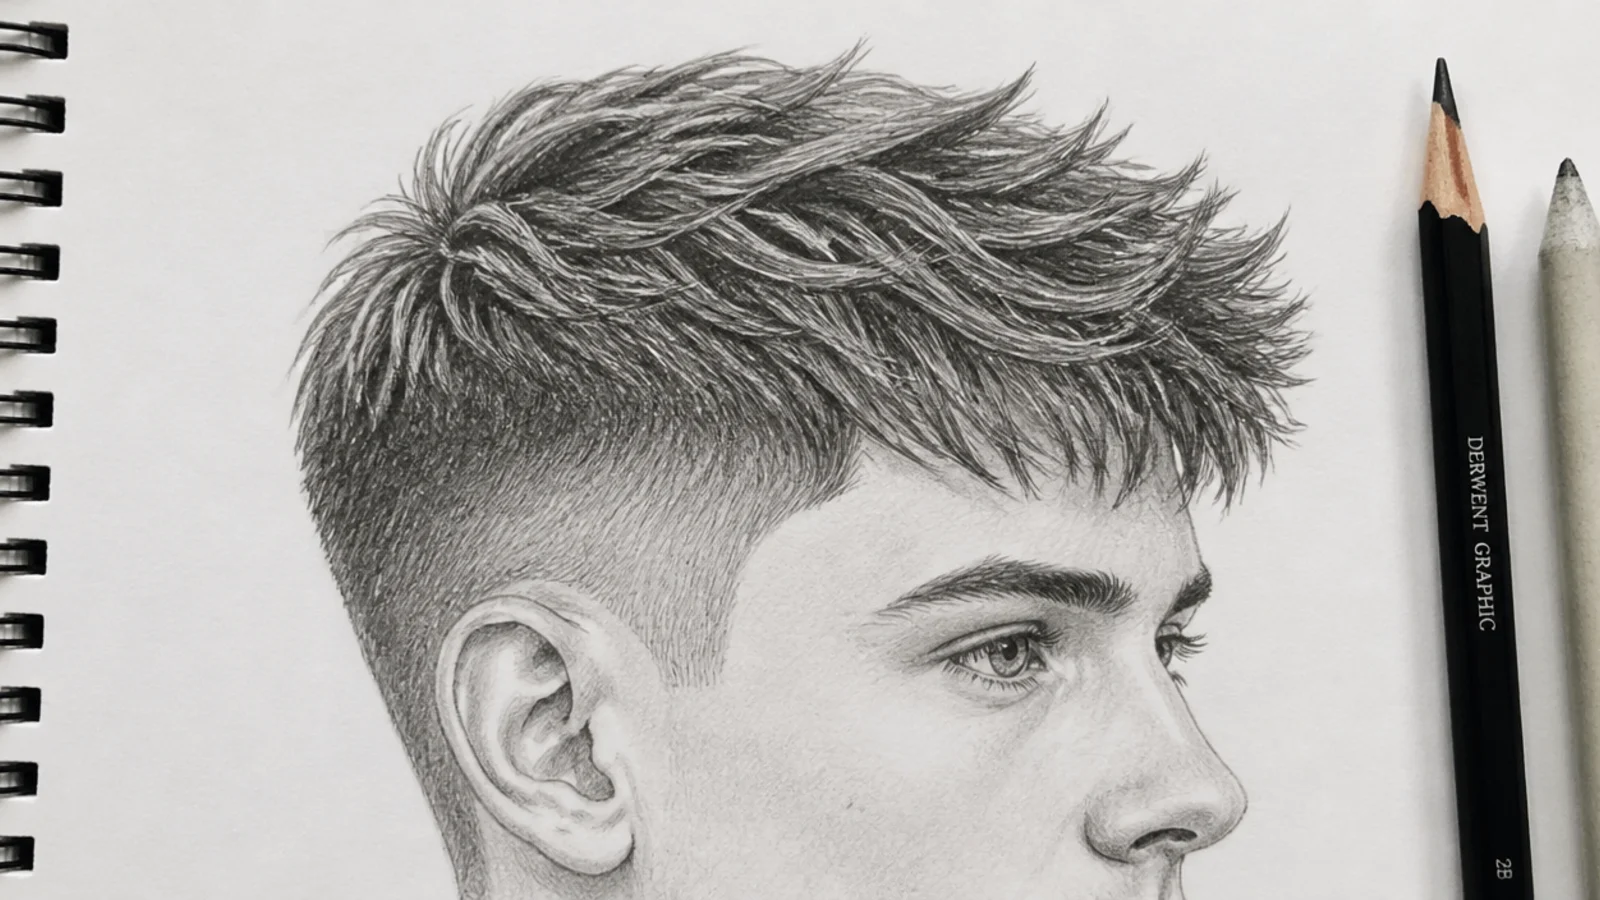
Block a rounded cap over the top third of the skull, keep the sides close, then break the top edge into six or seven irregular spikes pushed forward toward the forehead. The trick is that the spikes are clumps, not single hairs, so each one is a small wedge with two sides and a tip. Leave the paper white along the top of each clump for shine. Twelve minutes, HB with 4B in the gaps between clumps. Expanded in boy hair sketch.
Who it suits: Comic, manga and classroom character work.
Tip: Skill trained: clumping. Uneven spike heights read as texture; matched heights read as a crown.
8. Single Three-Strand Braid Over the Shoulder
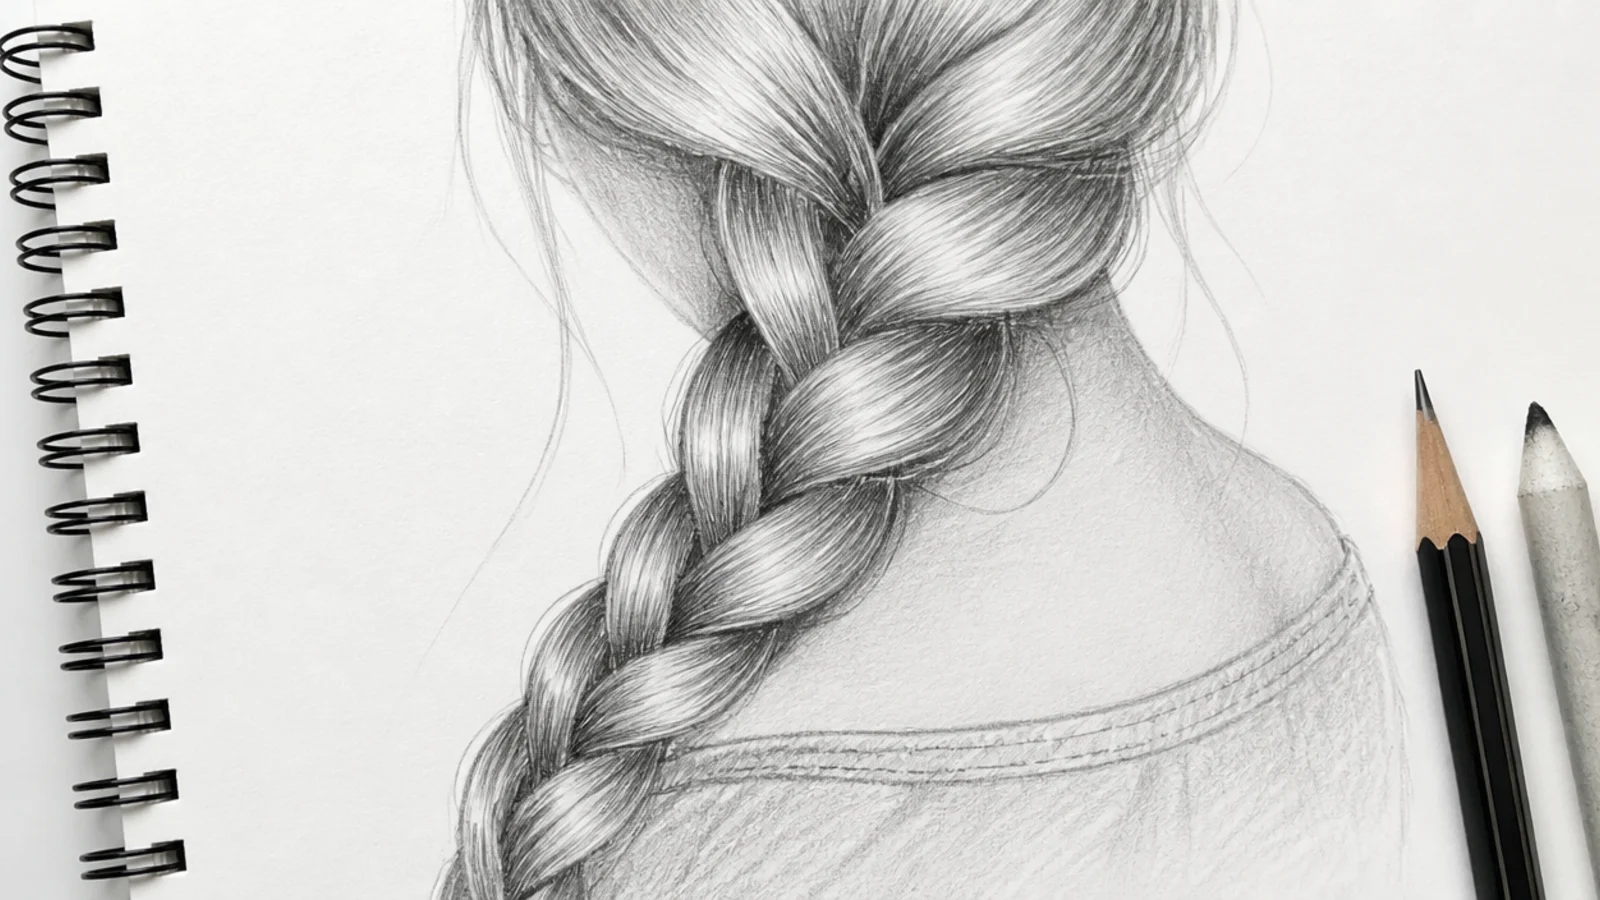
A braid is not woven, it is a stack of alternating chevrons that shrink as they travel down. Draw a tapering center line first, then place V shapes along it, alternating which side each V points, and let each one overlap the one below by about a third. Shade the underside of every chevron with 4B and leave the top edge white. Twenty minutes. This is the highest value-per-minute practice on the whole list.
Who it suits: Anyone who has been avoiding braids for years.
Tip: Skill trained: repeating overlap. Shrink each segment by roughly 10 percent as you move down.
9. Loose Beach Waves, Shoulder Length
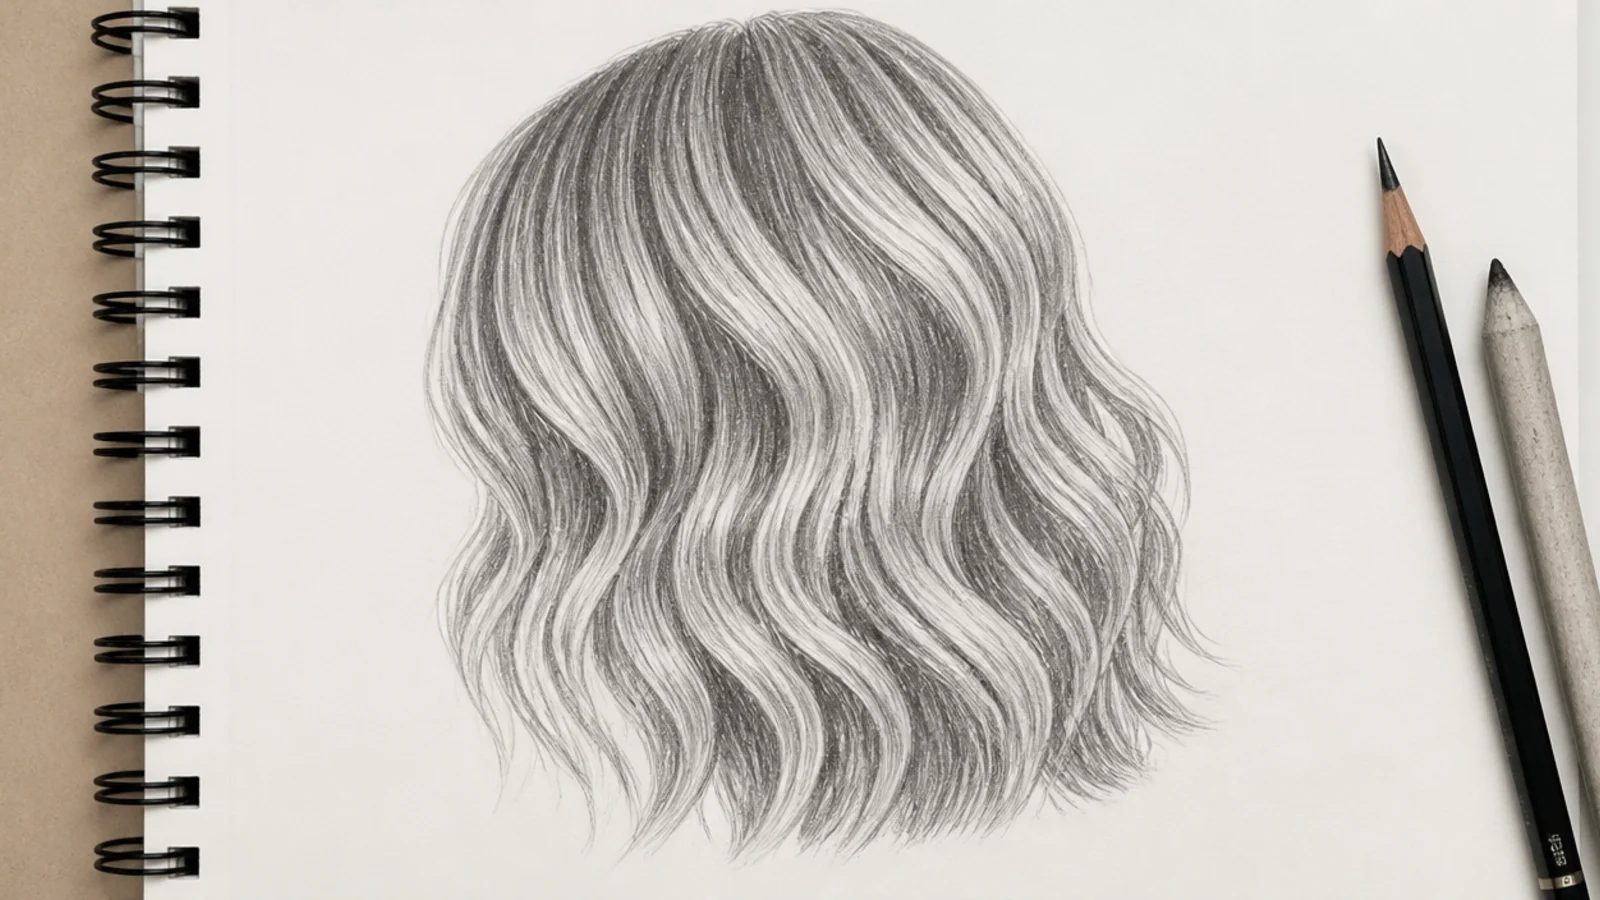
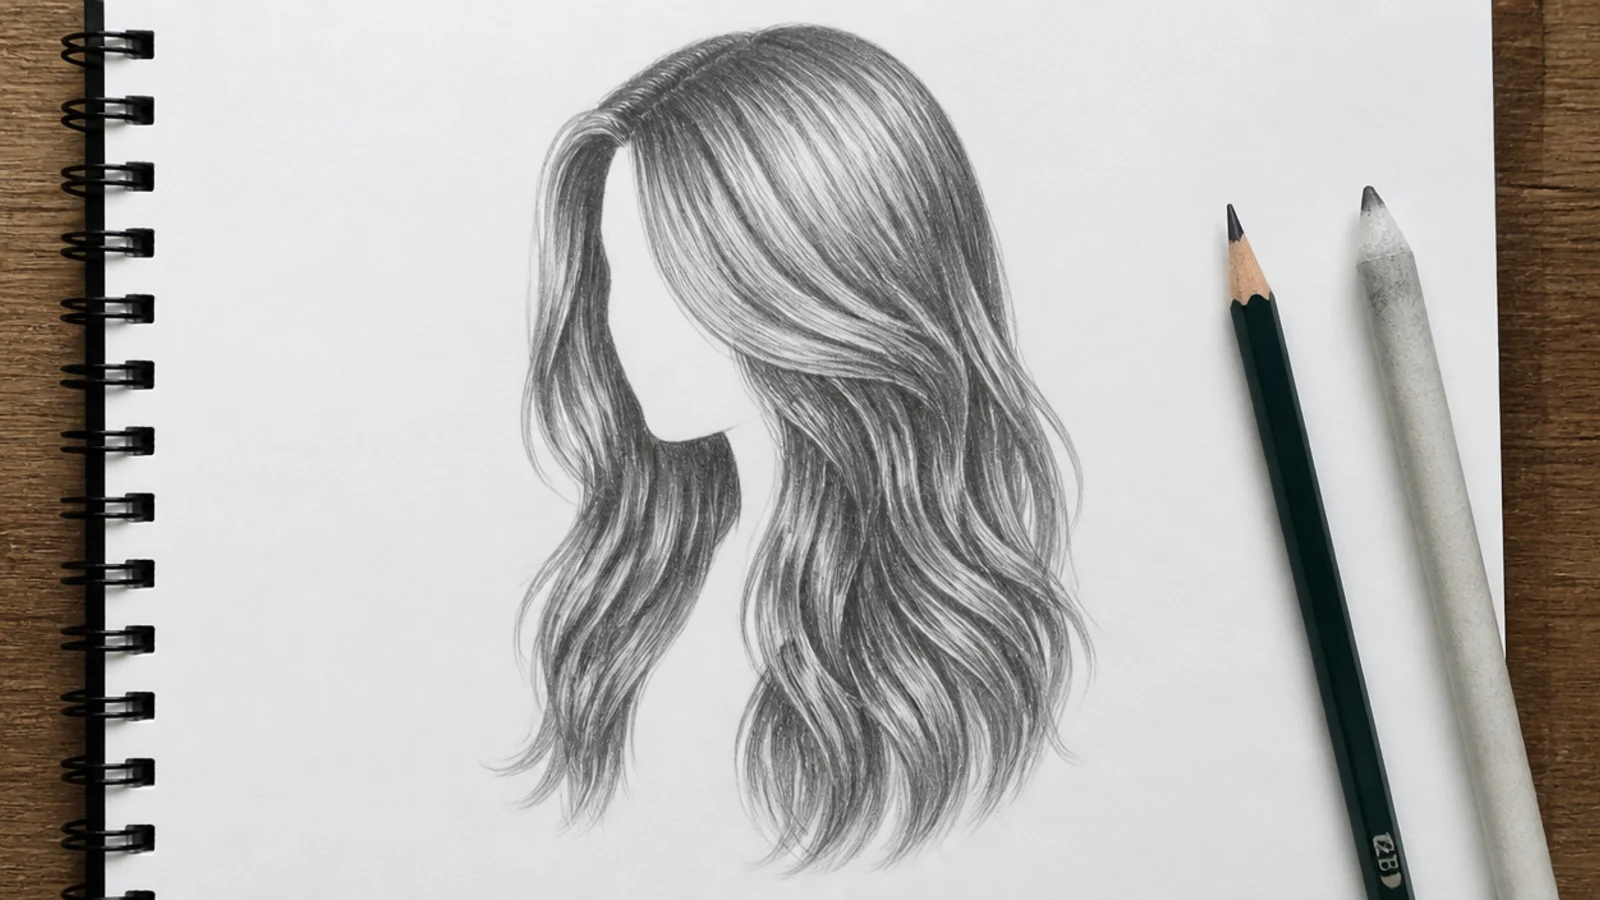
Waves are long lazy S curves, roughly 4cm from peak to peak at shoulder length, and the number one error is making every S identical. Draw three or four master waves first with 2H, then hang grouped strands off them so the smaller lines echo the big ones. Shade the inside of each curve where the hair turns away from the light and leave the outside of the curve bare paper. Eighteen minutes, 2H, HB and 2B.
Who it suits: Illustrators drawing summer and lifestyle scenes.
Tip: Skill trained: rhythm. Vary the wave depth so the hair does not look crimped.
10. Half-Up Half-Down With a Twisted Crown
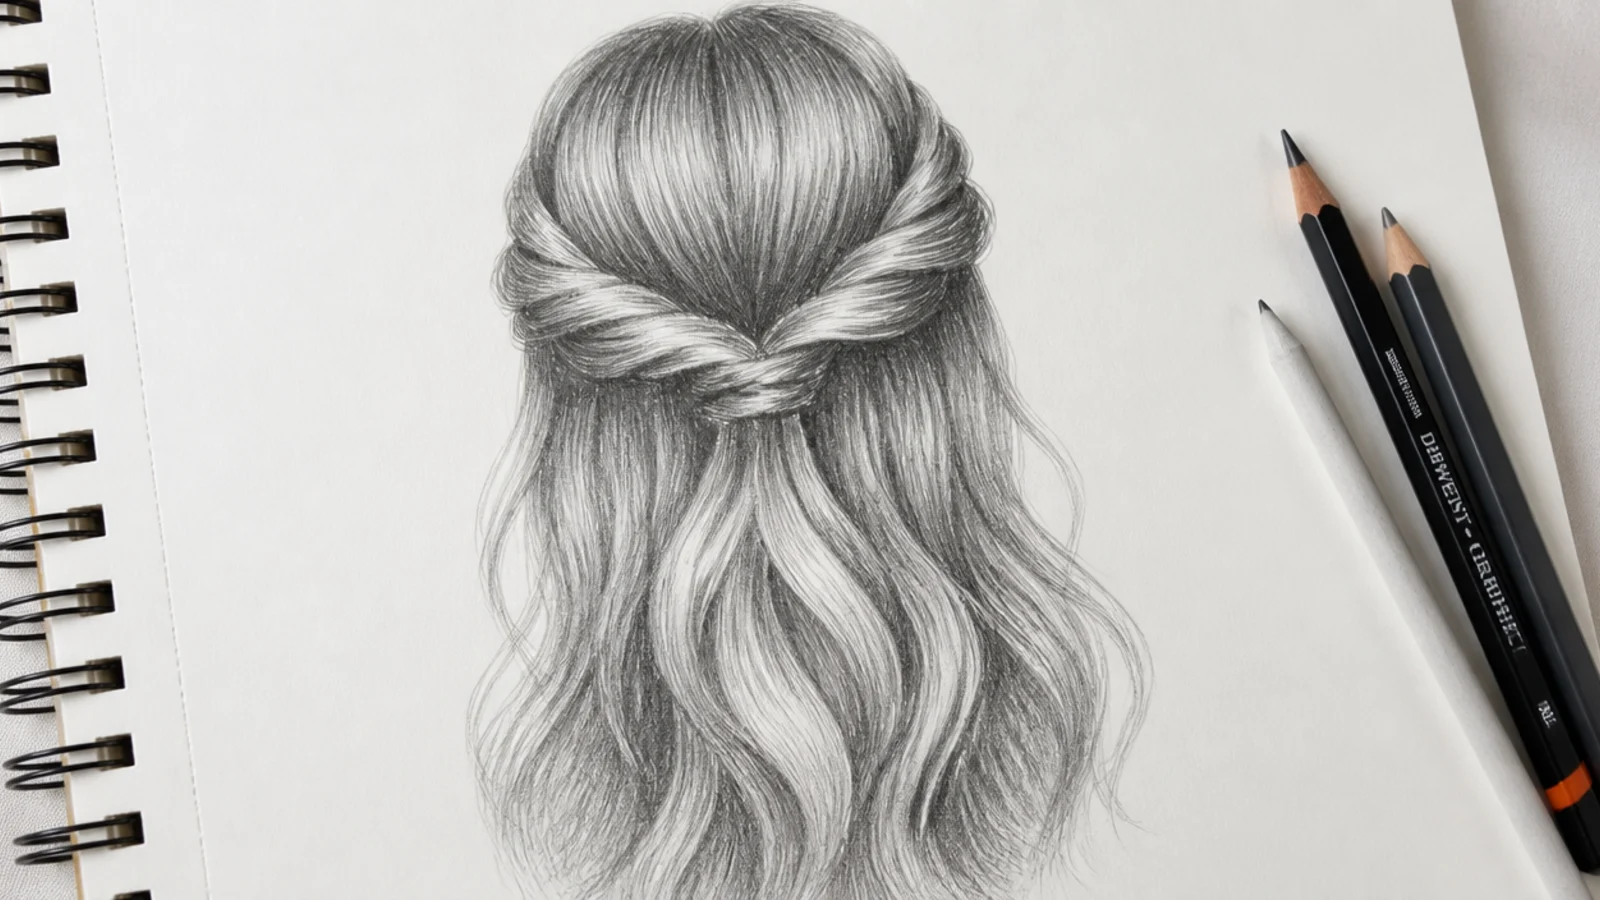
Two hair behaviors in one drawing: gathered and loose. The upper sections twist back from the temples and meet at the crown, so those lines are tight, ordered and convergent. Everything below stays loose and vertical. The seam where they meet is the hardest part, and the fix is to darken it with 4B so the loose hair clearly passes underneath the twist. Twenty minutes. See how the same seam behaves in mermaid braids.
Who it suits: Wedding, prom and fantasy character sketches.
Tip: Skill trained: layering. The darkest value in this drawing belongs under the twist, not at the ends.
11. Buzz Cut and Faded Sides, Front View
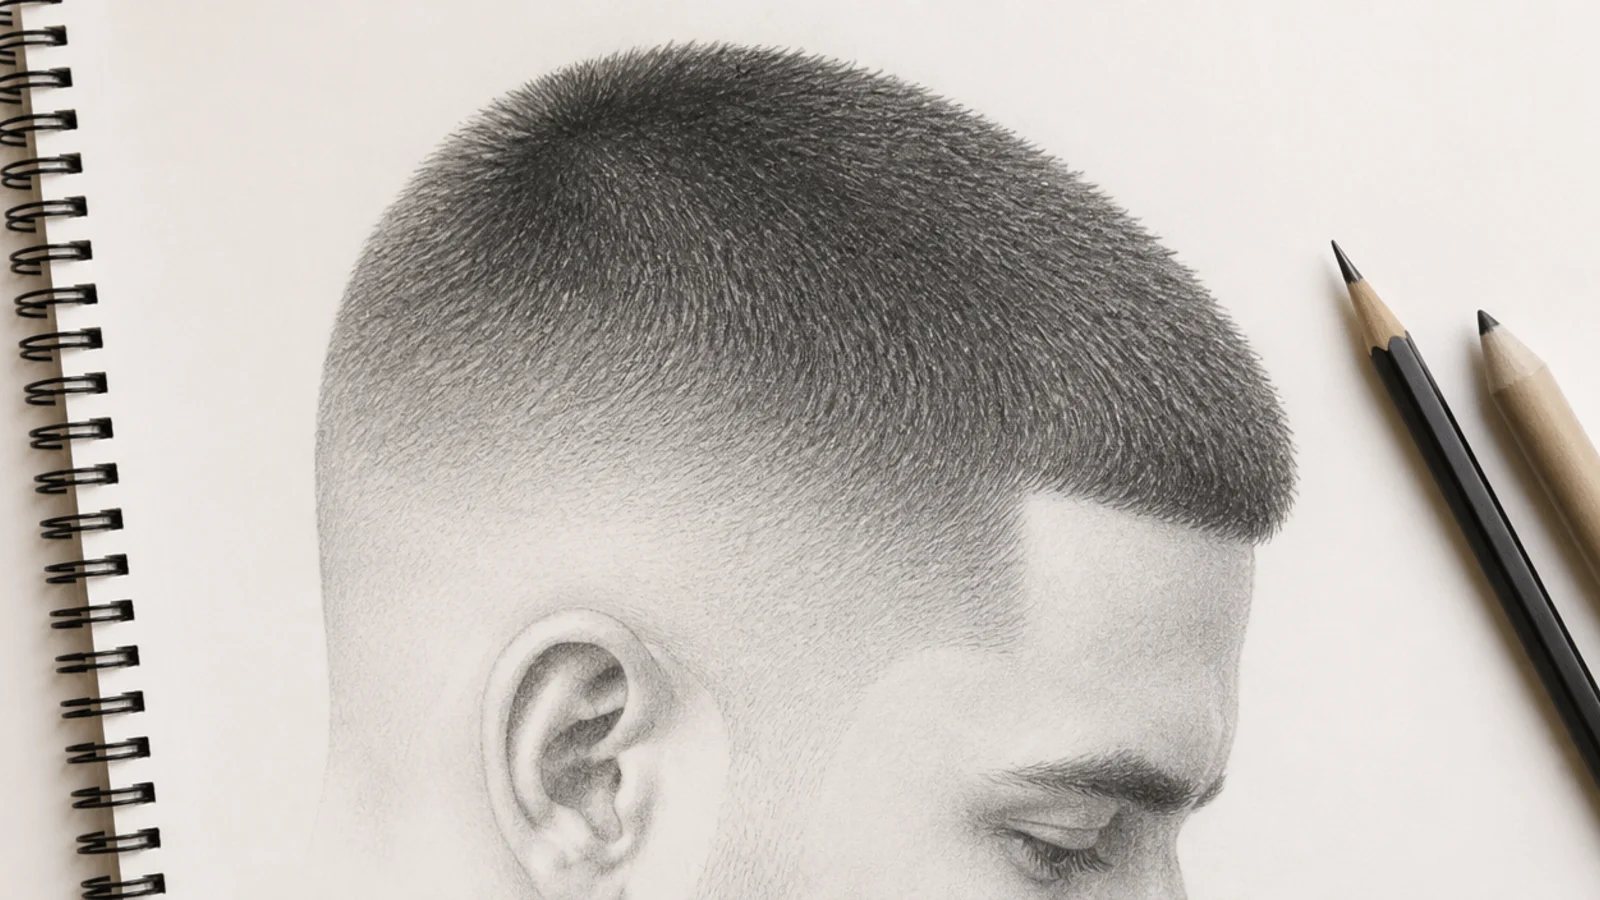
The only hairstyle on this list with no outline at all. Buzzed hair is pure value: a soft gray field that follows the skull, darkest at the crown swirl and fading to almost nothing where the fade meets the skin. Use the side of a 2B lead in tiny circular strokes, then dot in a light stipple with a sharp HB for the prickly quality. Never draw a hard edge at the hairline. Twelve minutes. More male styles in male hair sketch.
Who it suits: Portrait artists and anyone drawing very short textured hair.
Tip: Skill trained: value without line. If you outlined it, it will read as a swim cap every time.
12. Space Buns on a Chibi-Proportioned Head
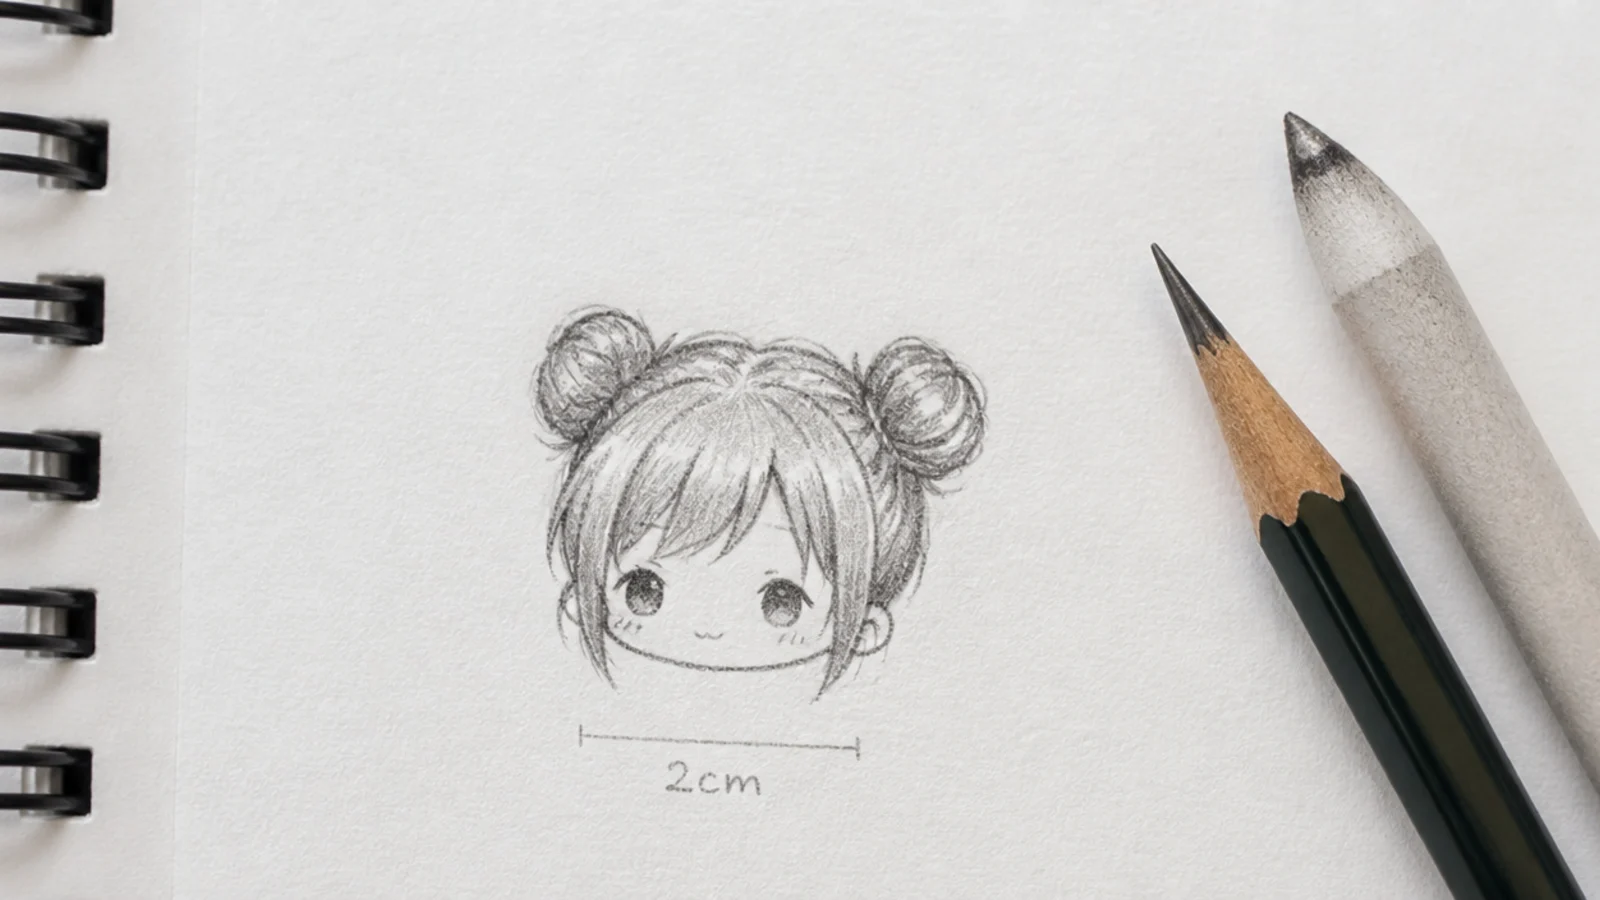
Draw this one deliberately small, about 2cm from chin to crown, because small-scale hair is what sketchbook pages are actually full of and nobody teaches it. At that size you get roughly four marks per bun: the outer circle, one wrap line, one shadow crescent and one white gap. Everything else is noise. Detail that survives at 2cm is the only detail worth drawing on a crowded page. Eight minutes, HB and 4B.
Who it suits: Sticker art, chibi work and anyone filling pages with small figures.
Tip: Skill trained: economy. If a mark disappears when you hold the page at arm's length, do not draw it.
13. Wet Hair Clinging to Forehead and Neck
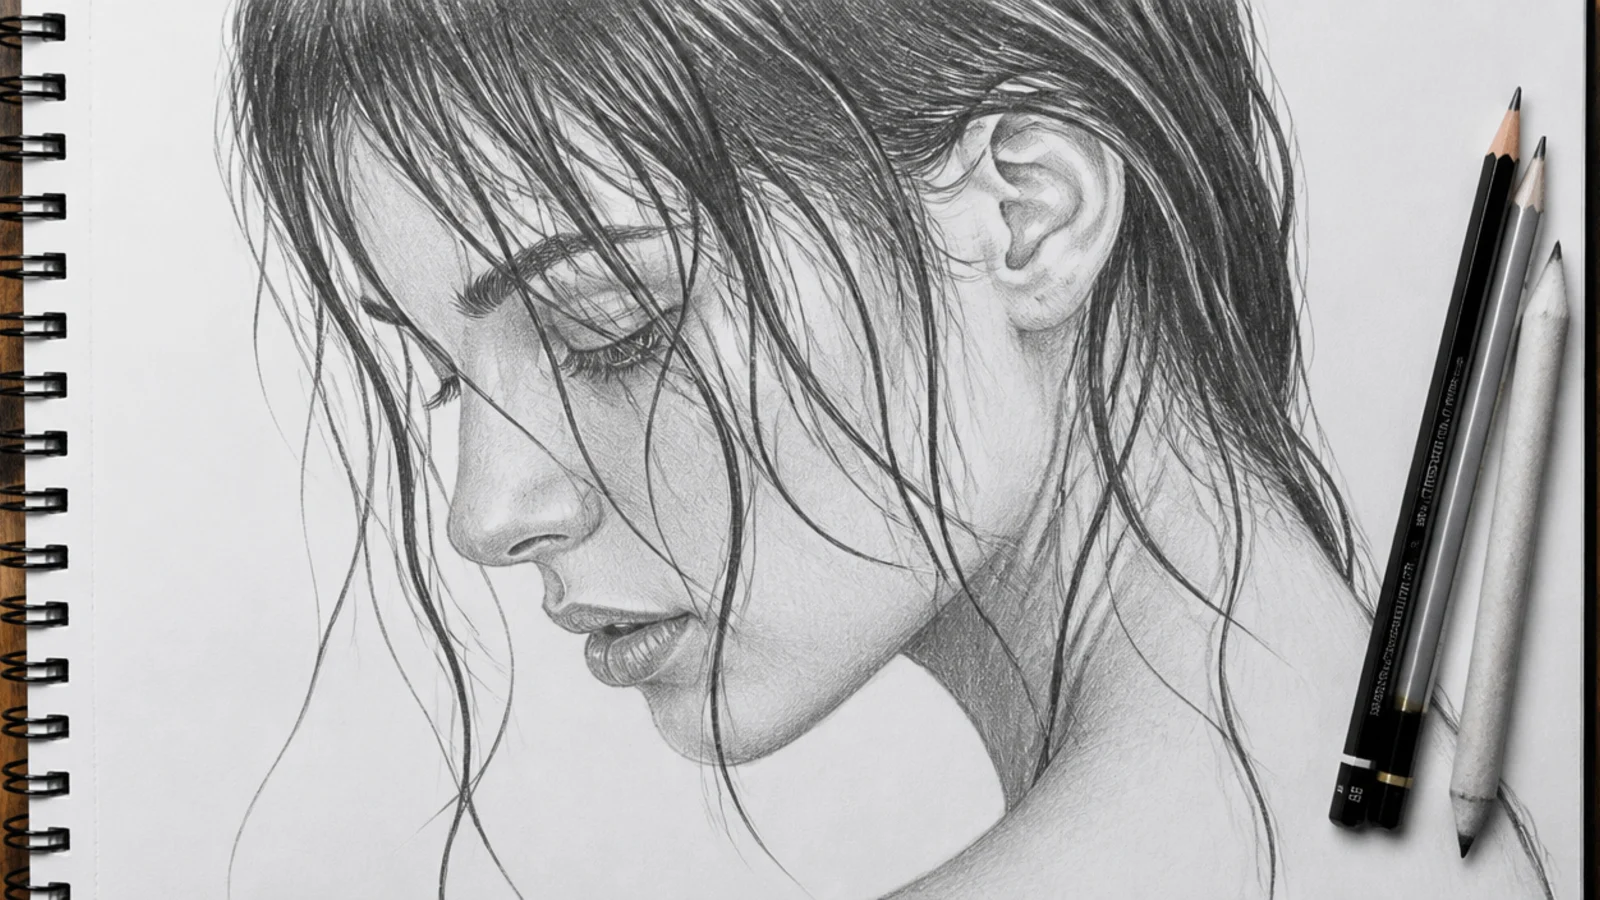
Wet hair follows the skull instead of floating off it, splits into fewer and fatter clumps, and has a much higher contrast range than dry hair. Drop the mass to about 3mm off the scalp, group the strands into six or seven thick ropes, then push the darks to 6B and leave hard-edged bare paper for the highlights. Dry hair has soft highlights; wet hair has sharp ones. Twenty minutes, HB, 4B and 6B.
Who it suits: Narrative illustration, pool and rain scenes.
Tip: Skill trained: contrast range. Soft blended highlights instantly make wet hair read as dry again.
14. Type 3B Spiral Curls at Shoulder Length
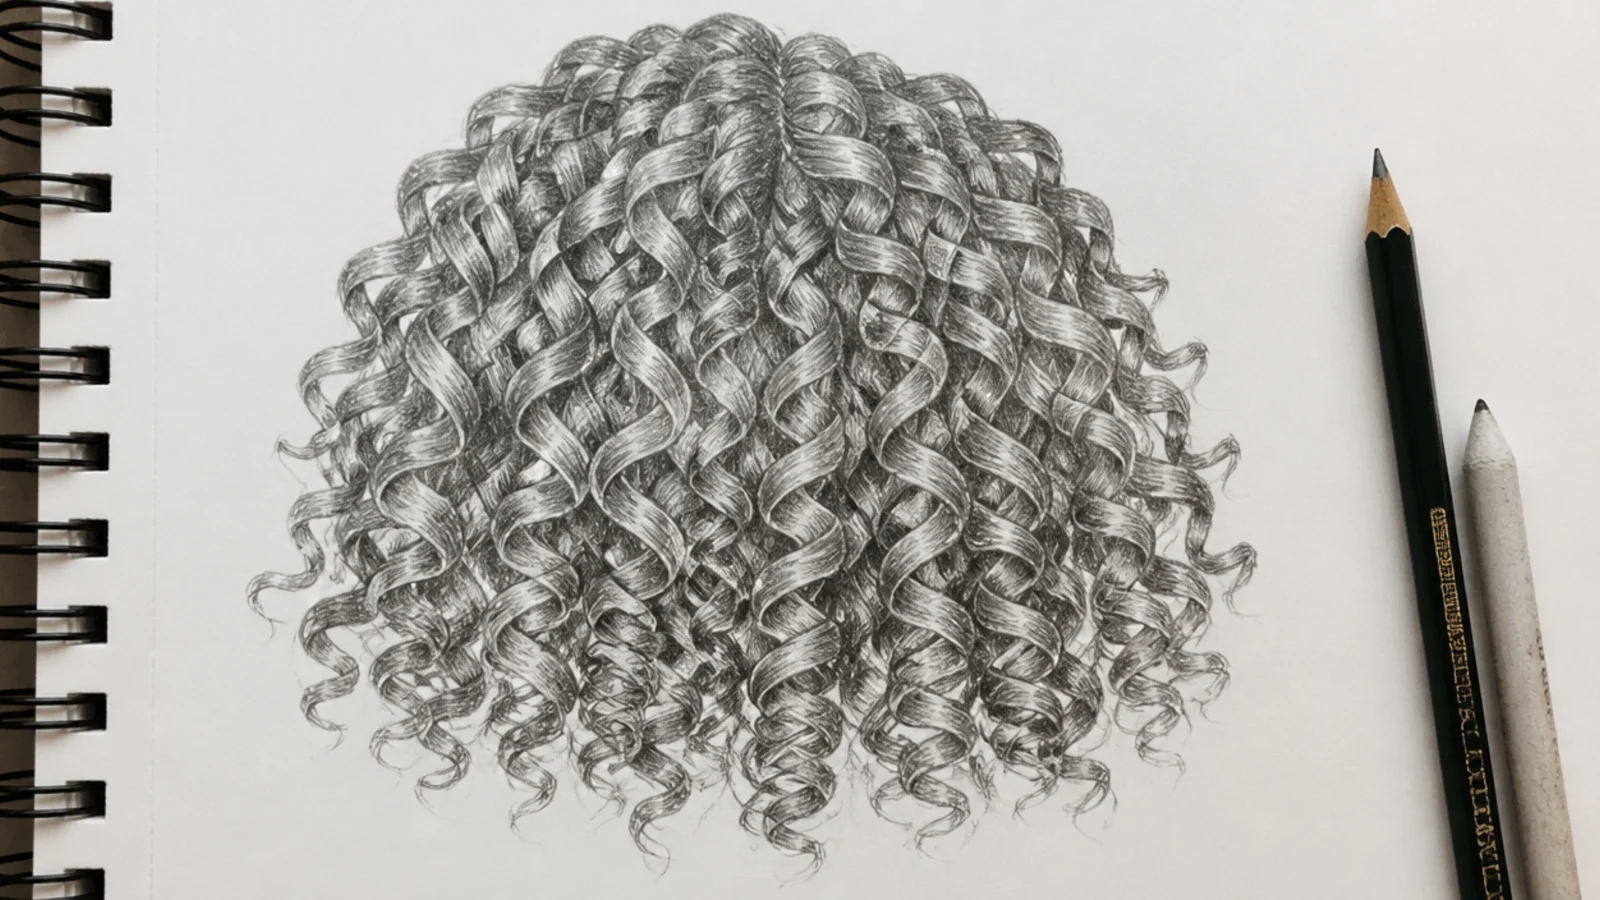
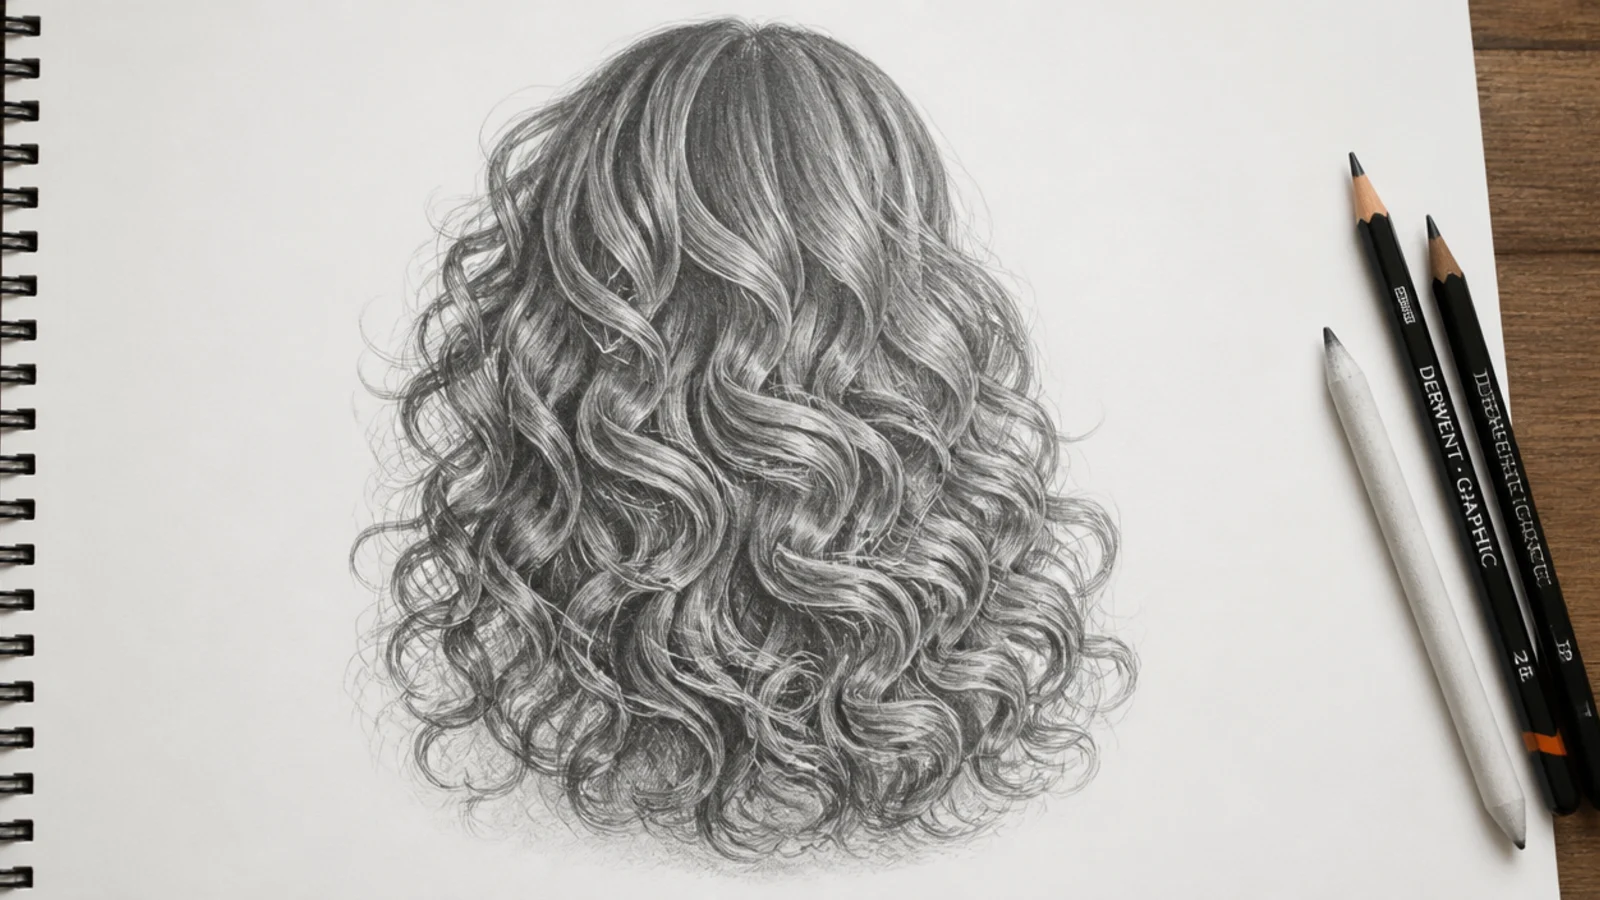
The single most important curl rule: draw each curl as a ribbon twisting in space, with light on one side and shadow on the other, never as an outlined coil. Sketch a zig-zag guideline first, roughly 2cm per zig for a 3B spiral, then wrap a ribbon around it. Where the ribbon turns away from you it goes 6B dark; where it faces the light it stays white paper. Twenty-five minutes. Full method in curly hair sketch.
Who it suits: Anyone whose curls come out looking like springs or sausages.
Tip: Skill trained: form on a curve. Bigger zig-zag equals bigger, easier curl, so start large.
15. Dutch Crown Braid Wrapping the Head
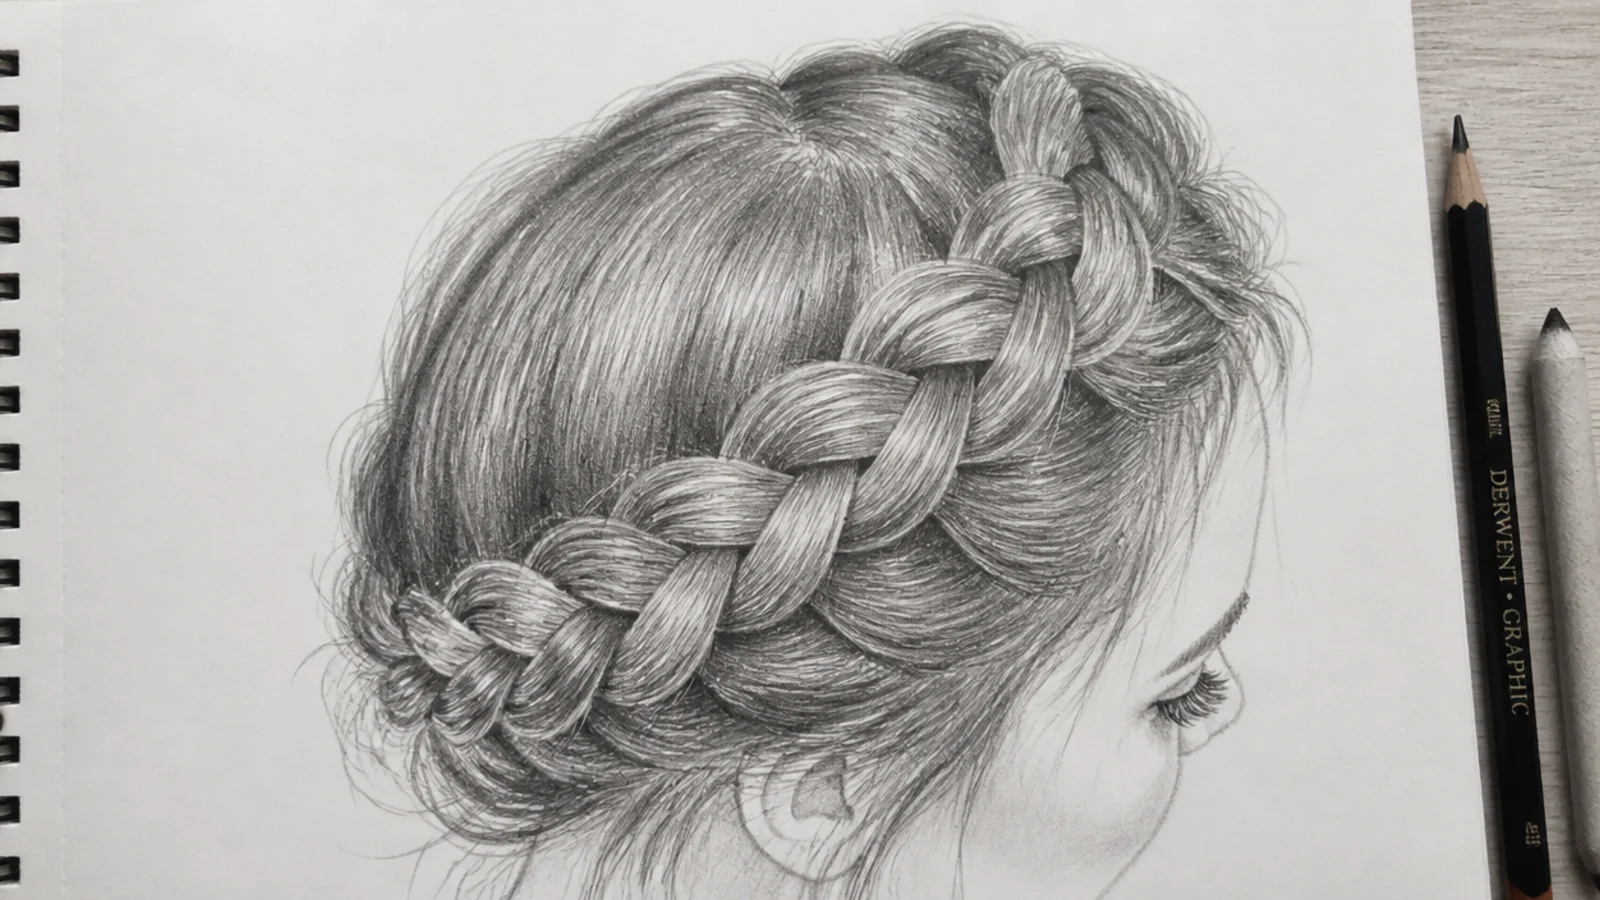
Everything you learned in idea 8, now bent around a sphere. The braid segments compress as they curve toward the far side of the head, so the chevrons that are 12mm wide at the front become 5mm wide at the temple. Draw a light 2H ellipse around the skull first as the path, then place the segments on it. This is the best single exercise for hair perspective anywhere in a sketchbook. Thirty minutes, 2H, HB and 4B.
Who it suits: Artists ready to combine braids with foreshortening.
Tip: Skill trained: overlap in perspective. Compress the far segments or the braid flattens into a headband.
16. Shoulder-Length Locs With Visible Roots
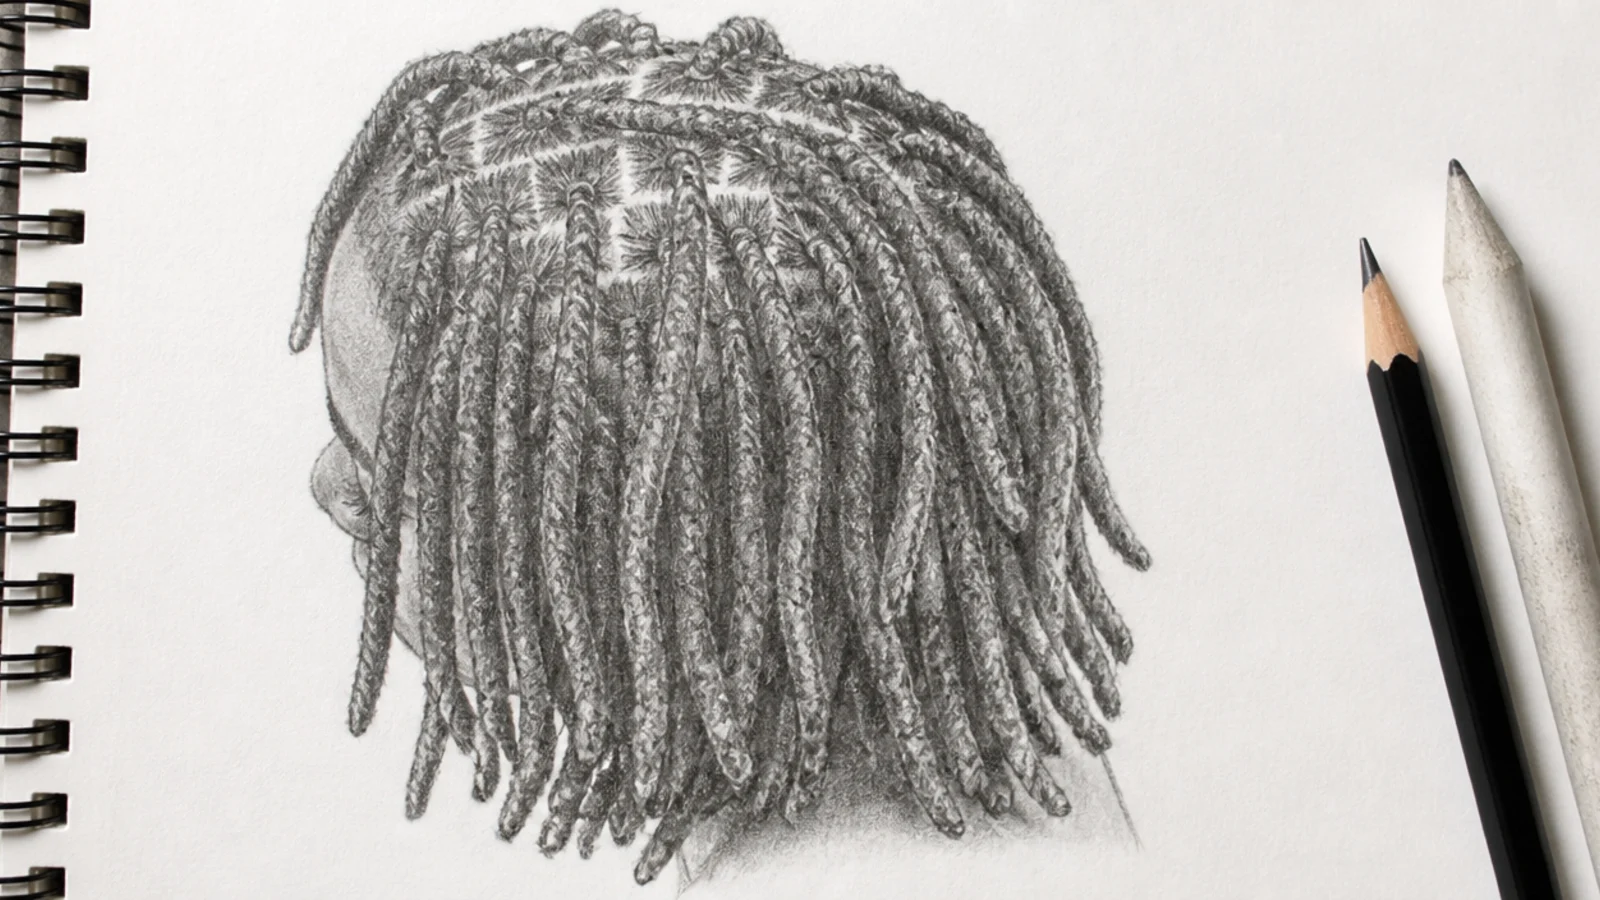
Locs are cylinders, so shade them as cylinders: a dark edge, a mid tone, a soft highlight band down one side. Start at the scalp, where the neat grid of parts is what sells the style, then let each loc drop with a slight independent kink rather than hanging perfectly straight. Texture comes from short cross-strokes every 8 to 10mm along the length, not from outlining. Thirty minutes, HB, 4B and 6B in the gaps between locs.
Who it suits: Character artists drawing textured hair properly for once.
Tip: Skill trained: cylindrical form. The gaps between locs are darker than any loc itself.
17. 4C Coily Afro, Three-Quarter View
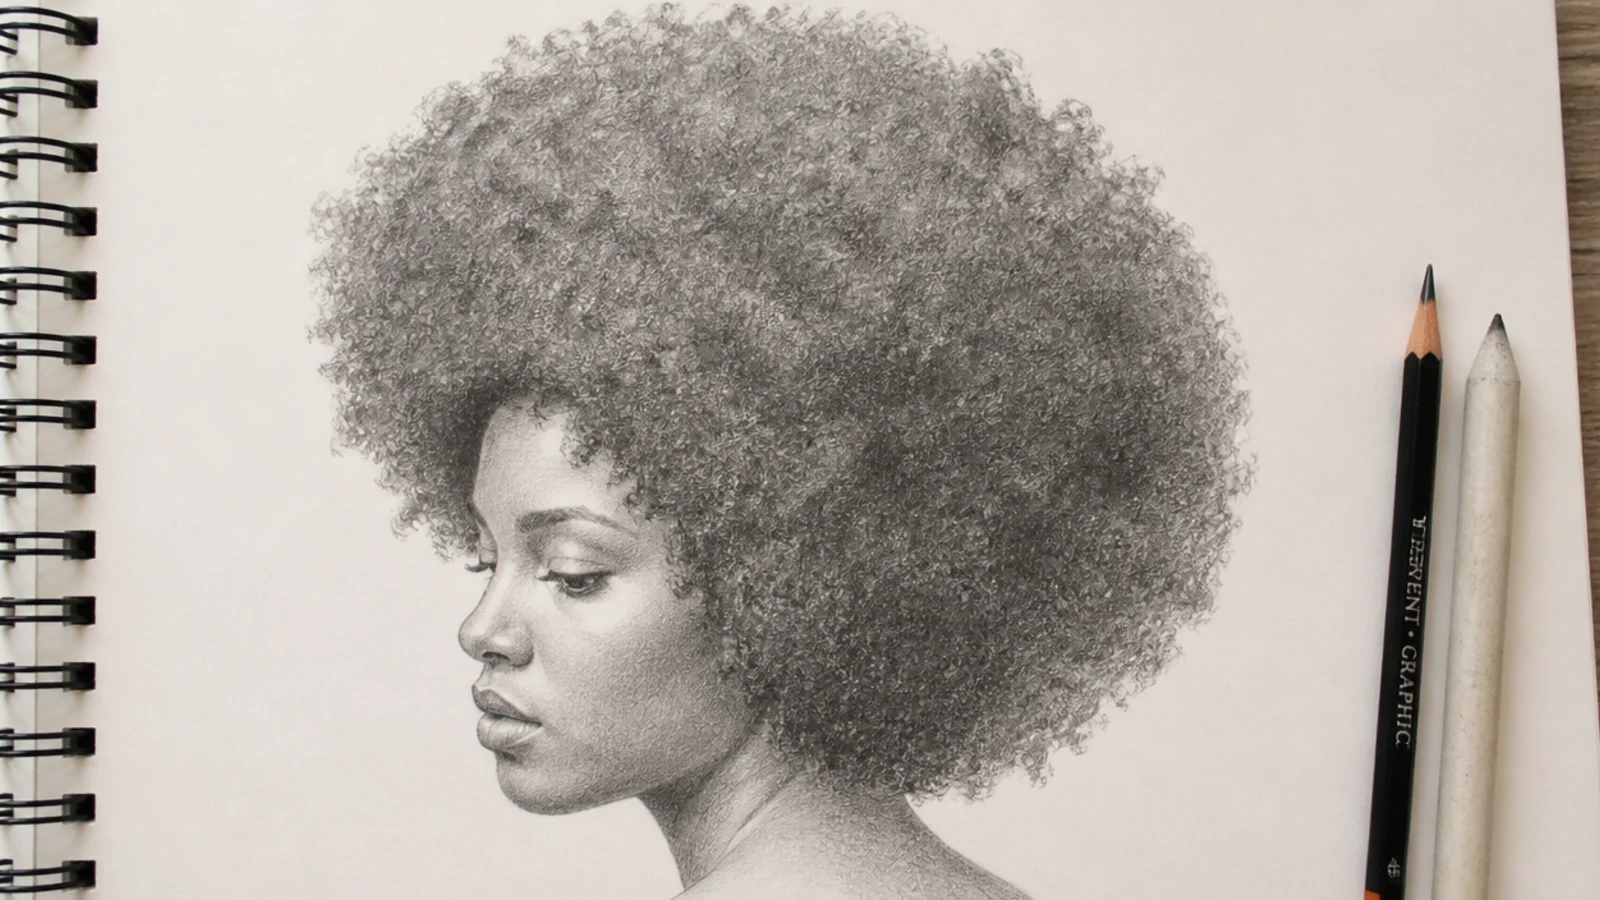
The most skipped texture in every hair tutorial online. A 4C afro is a soft-edged sphere of value, not a mass of drawn coils. Block a slightly irregular round silhouette with a broken, fuzzy edge, then build the interior with tiny overlapping circular strokes using the side of a 2B. Add a broad soft highlight band across the upper front where the sphere catches light, and push 6B into the underside and around the ears. Thirty minutes.
Who it suits: Anyone whose reference folder is missing textured hair.
Tip: Skill trained: soft-edge silhouette. Drawing individual coils here is the fastest way to ruin it.
18. Long Hair in Motion, Mid Head-Turn
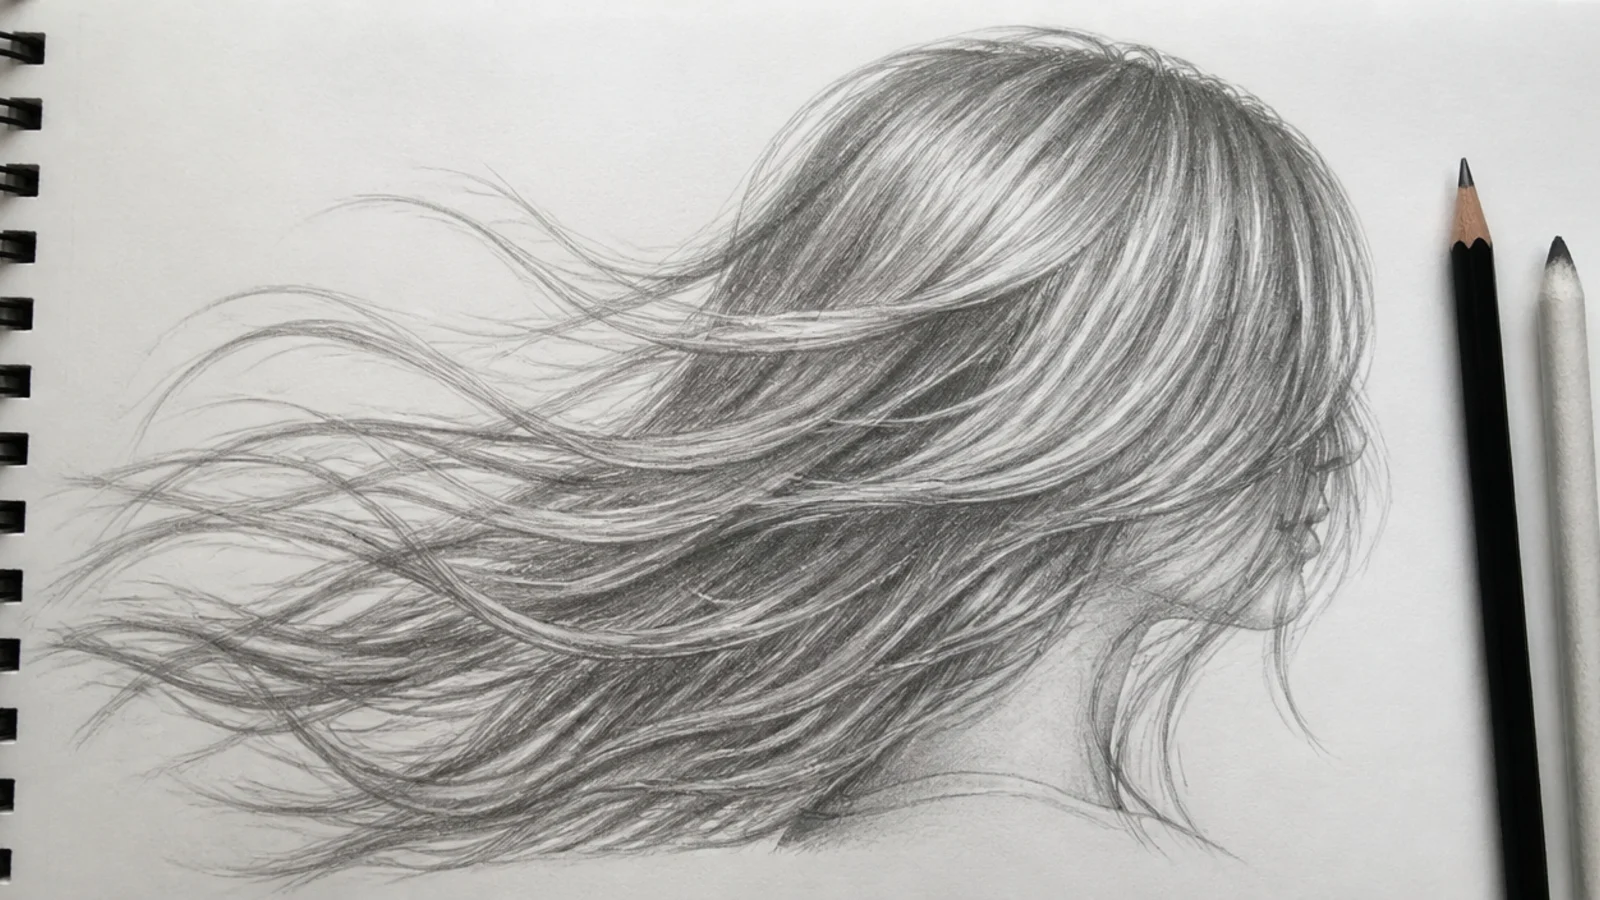
Hair lags behind the head. Draw the head at the end of the turn, then place the hair mass where the head was roughly a quarter second earlier, trailing on the opposite side of the direction of travel. The tips separate into fewer, wider fans; the roots stay tight to the scalp. Keep the outer contour open rather than closed, so air reads between the strands. Twenty-five minutes, HB and 2B. Pair with long hair sketch.
Who it suits: Comic panels, action scenes and dance illustration.
Tip: Skill trained: implied movement. If the hair is symmetrical around the head, the motion disappears.
19. Back View of a Fishtail Braid Down the Spine
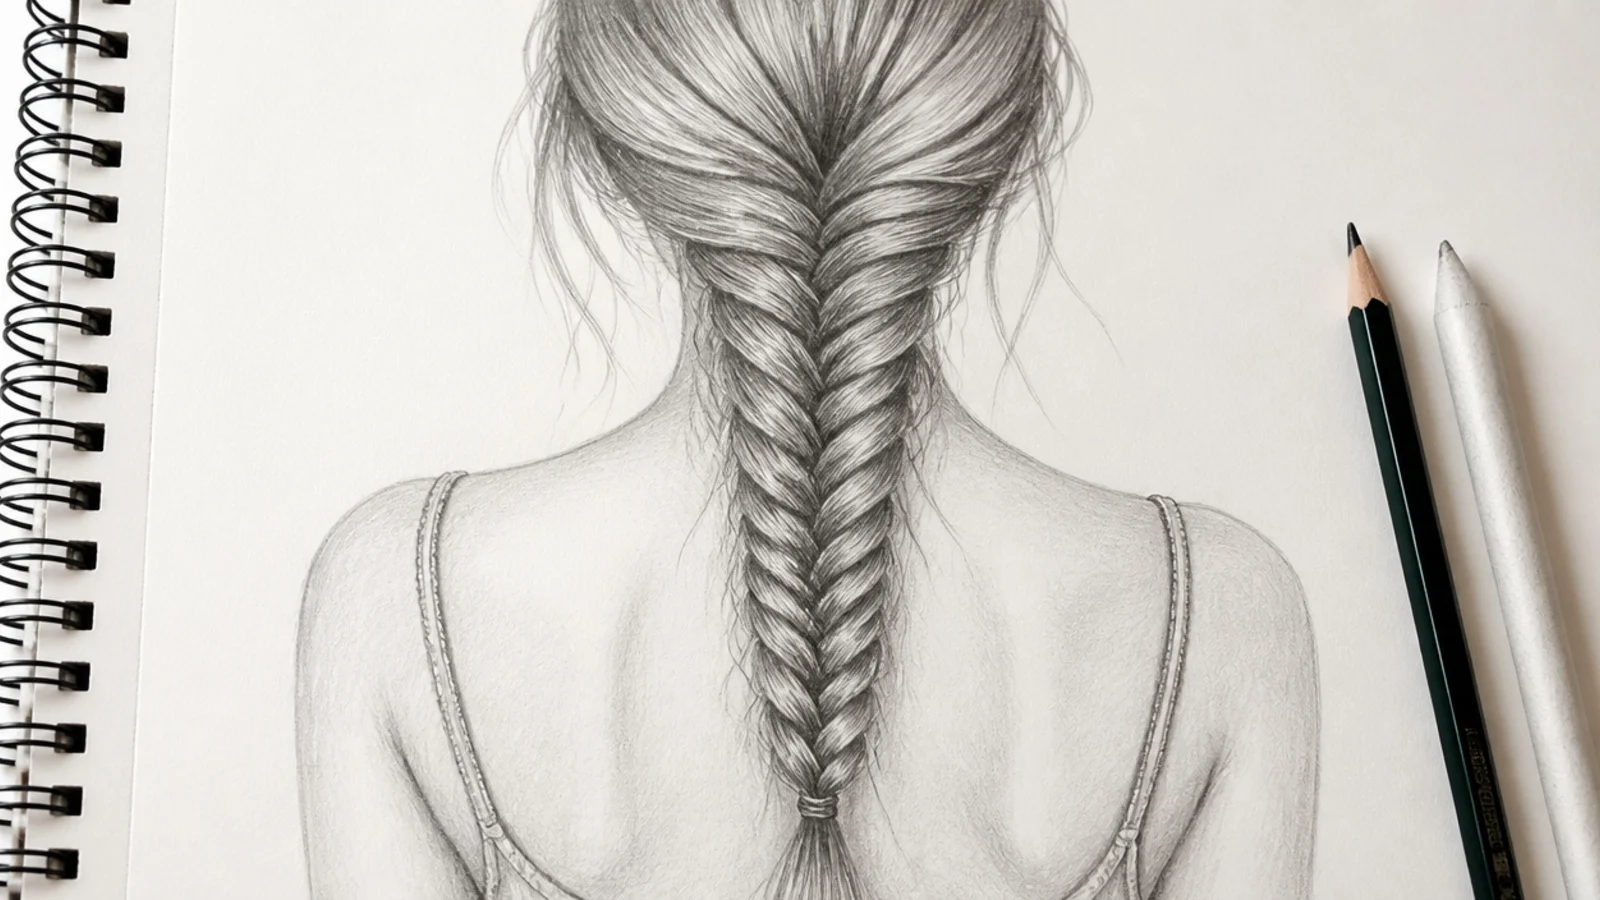
Back views are the biggest gap in every hair reference set, and this one adds the finest braid pattern. From behind you can see the whole crown swirl, so start there and radiate every line outward from that single point. The fishtail itself is a herringbone of narrow slanted segments about 6mm wide, alternating direction, much tighter than the three-strand braid in idea 8. Thirty-five minutes, 2H guides, HB pattern, 4B shadow between segments.
Who it suits: Anyone building a proper multi-angle reference page.
Tip: Skill trained: crown radiation. Every line on a back view starts at the crown swirl, no exceptions.
20. Blonde Hair Under Strong Side Light
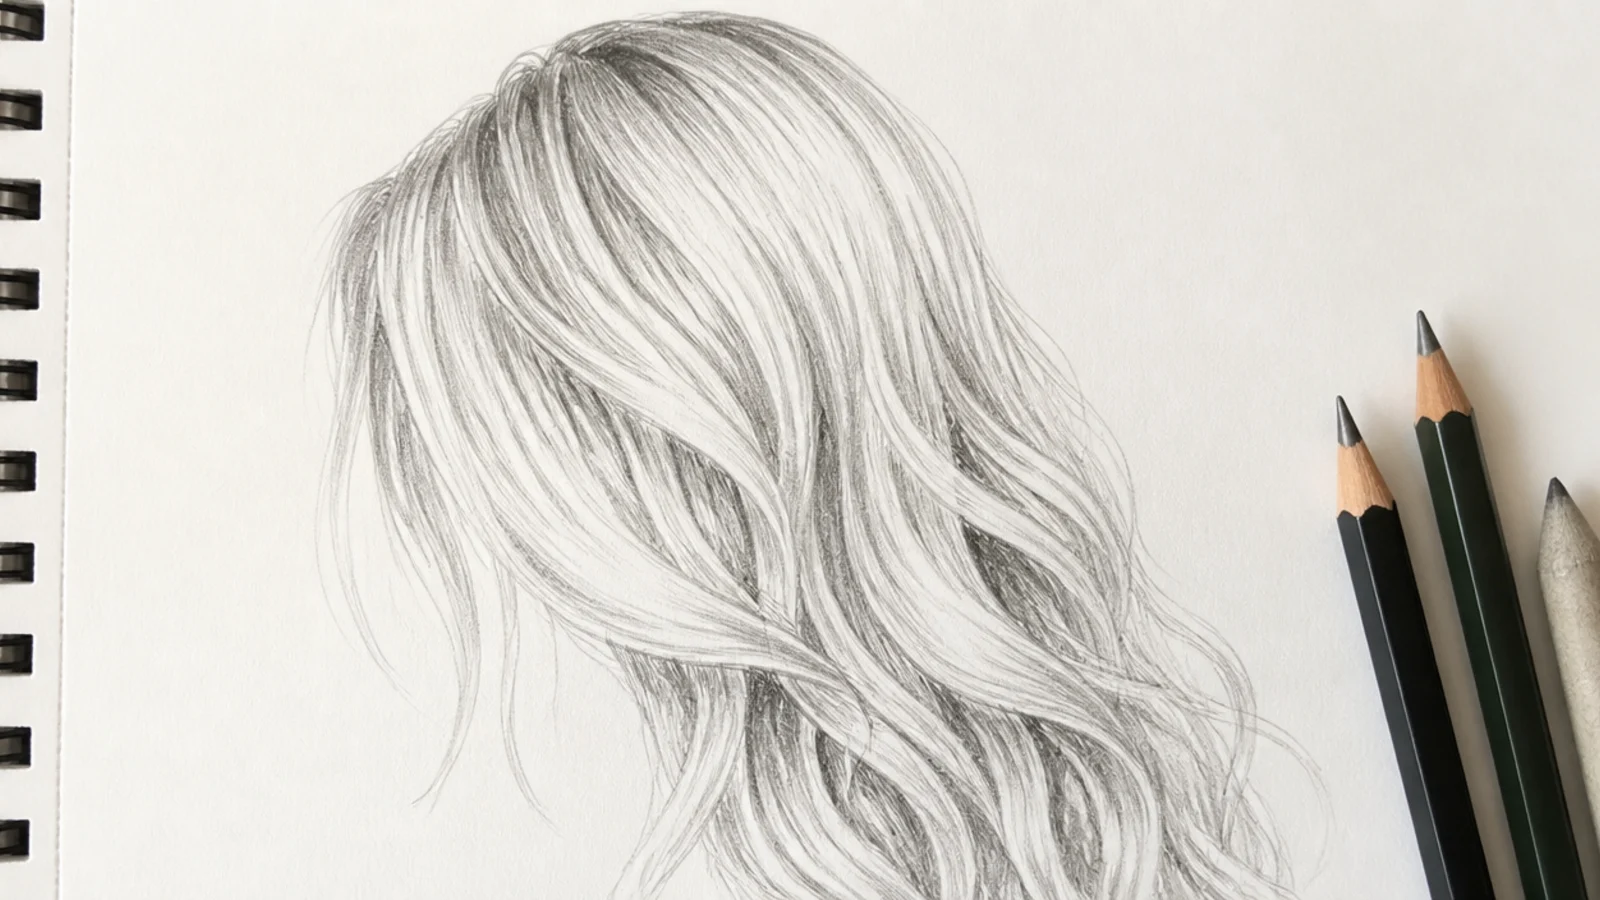
The hardest idea here, because the value range inverts. Dark hair is mostly 4B with white highlights; blonde is mostly bare paper with 2H and HB mid tones, and your darkest mark is a 2B reserved for the deepest core under the jaw. Beginners shade blonde hair the same weight as brown and it turns gray. Map the light band first, then place only three values total. Thirty minutes. The shading order is broken down in hair sketch tutorial.
Who it suits: Anyone whose blonde hair drawings come out muddy.
Tip: Skill trained: value keying. Put the 6B pencil away entirely before you start this one.
How to Start a Hair Sketch: Shape Before Strands
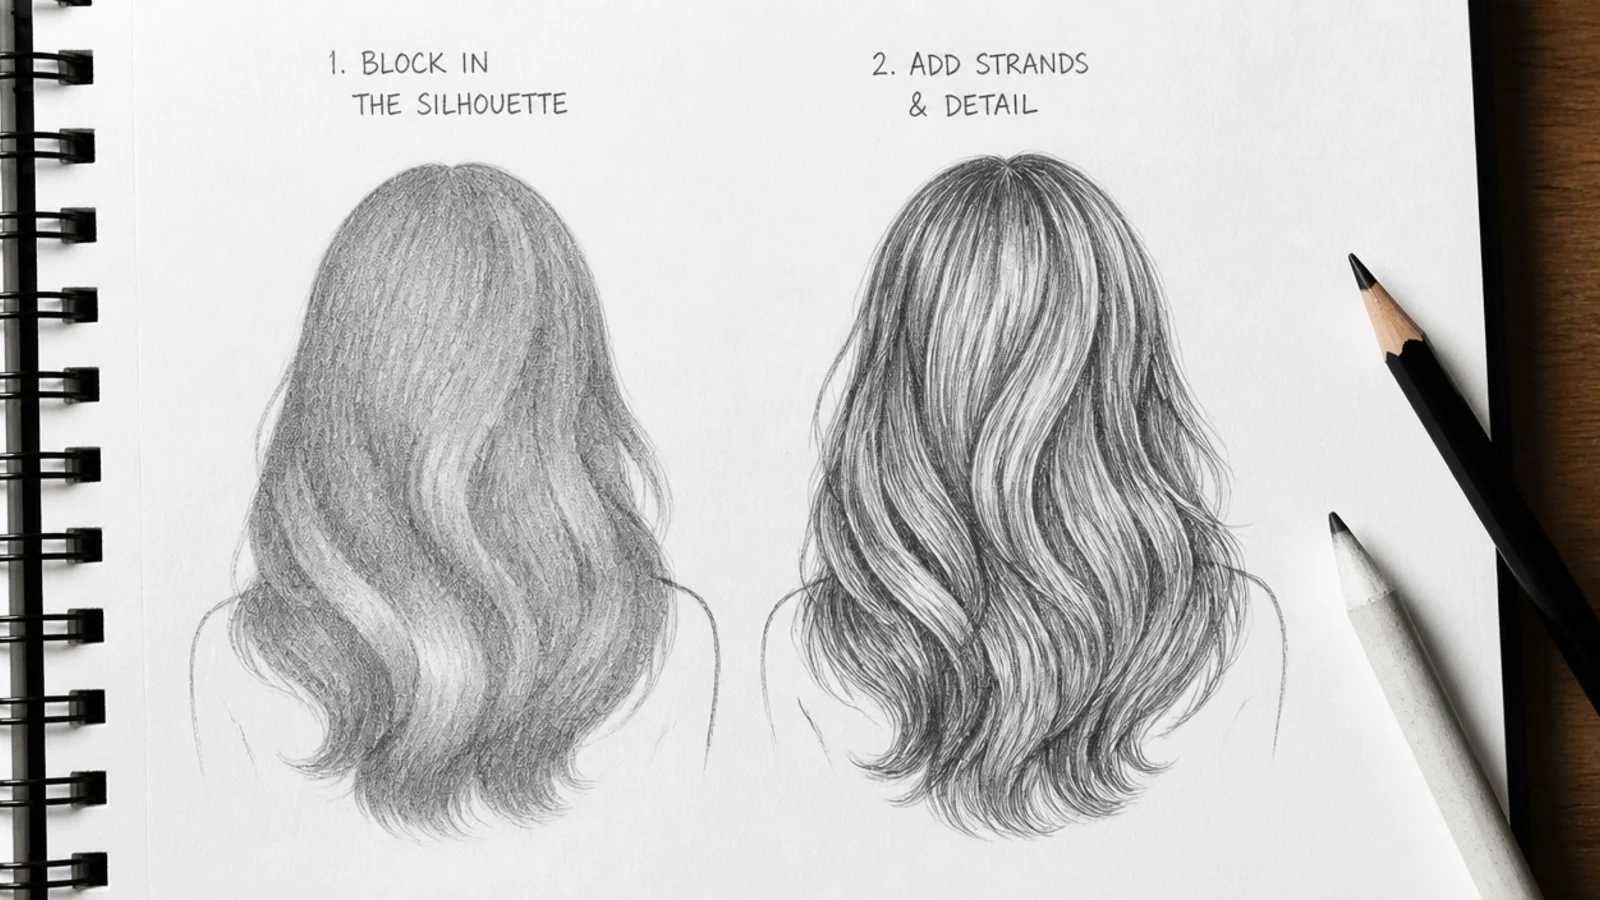
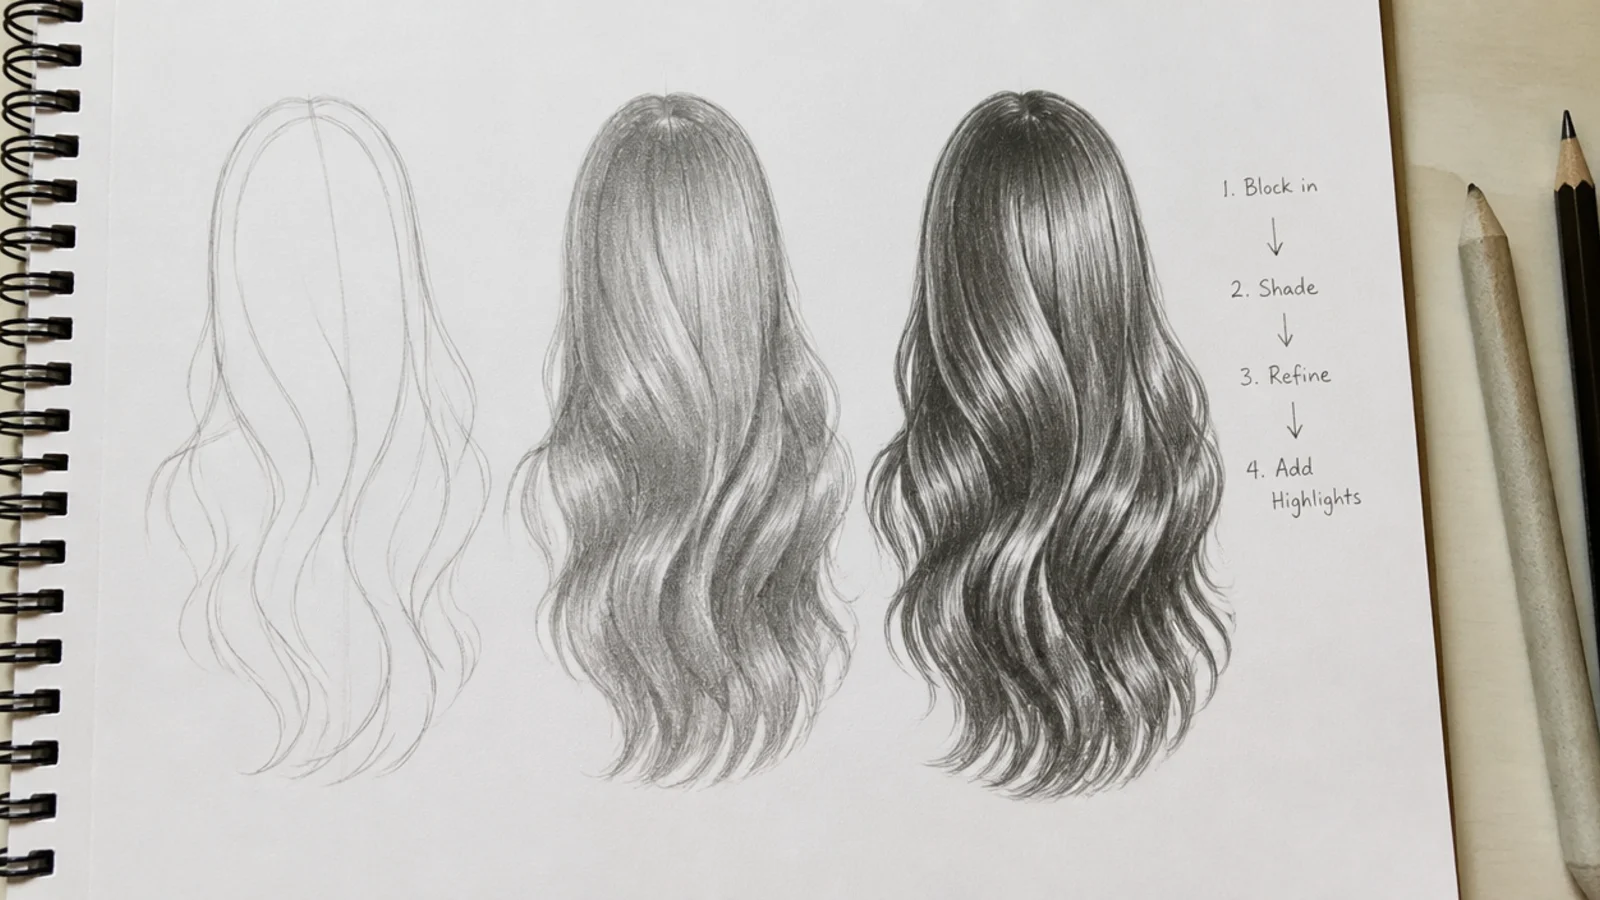
Every good hair sketch is built in the same five stages, in this order: skull, silhouette, flow lines, value, texture. Beginners skip straight to stage five and start drawing individual strands, which is the number one reason a hair drawing fails. Draw the skull first and make sure the cranium keeps its full height, because flattening the top of the head removes the room the hair needs to sit on. Then block the entire hair mass as one closed shape, held about 5mm to 15mm off the scalp depending on the texture. Only after that shape reads correctly from arm's length do you add flow lines. Hair grows in sections out of the crown, so mark the crown swirl and the parting first, then derive every section's direction from that one point. Lines that run parallel down the page are the giveaway that the flow was never established. Ideas 1 to 7 above are all silhouette practice for exactly this reason, and the hair sketch tutorial walks through the full sequence with a single hairstyle.
Shading Hair for Volume and Depth: The 2H, 4B and 6B Map
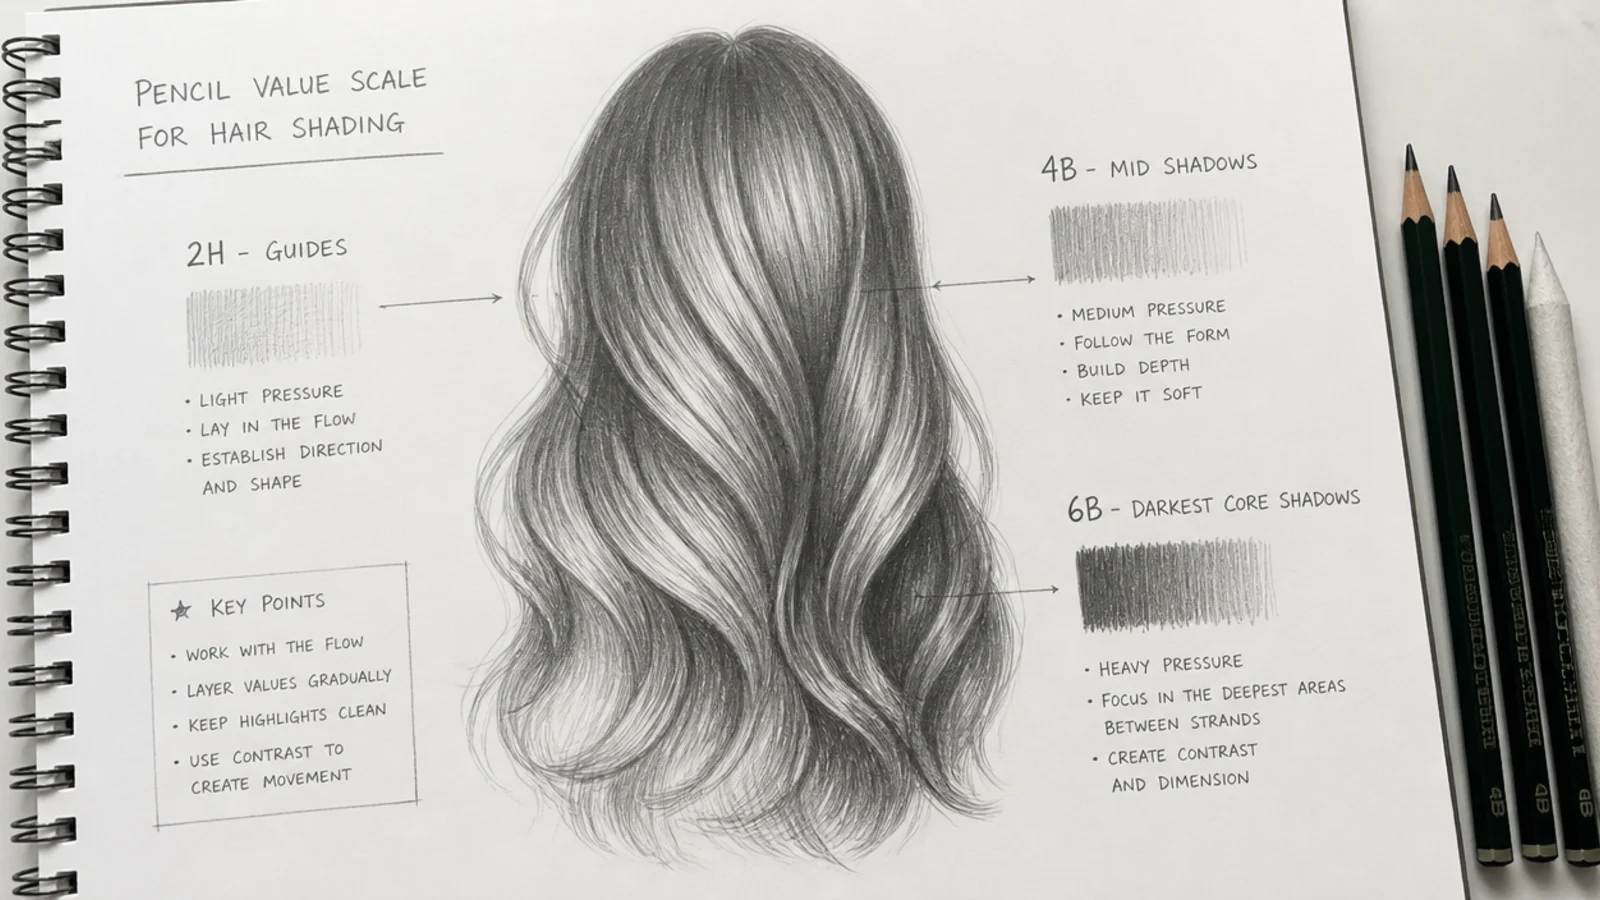
Hair looks flat for one reason: not enough range between the lightest and darkest marks. Use 2H for guides and construction, HB for the general strand lines, 2B to 4B for mid shadows, and 6B only for the darkest cores, which are the gaps between strand groups, the underside of the mass, and the area where hair meets the neck. Work light to dark and never start with the dark pencil, because graphite lifts poorly once it is burnished into the paper. Highlights are the other half of the job: leave the paper white in a broad band that wraps the crown following the curve of the skull, or lift the graphite back out with a kneaded eraser pressed and rolled, not rubbed. One band of light near the crown, one mid tone, one dark base is the formula that reads as volume in almost every style on this list. The exception is blonde and gray hair, where the whole range shifts up and your darkest mark should be 2B, as in idea 20.
Drawing Straight vs Wavy vs Curly vs Coily Hair
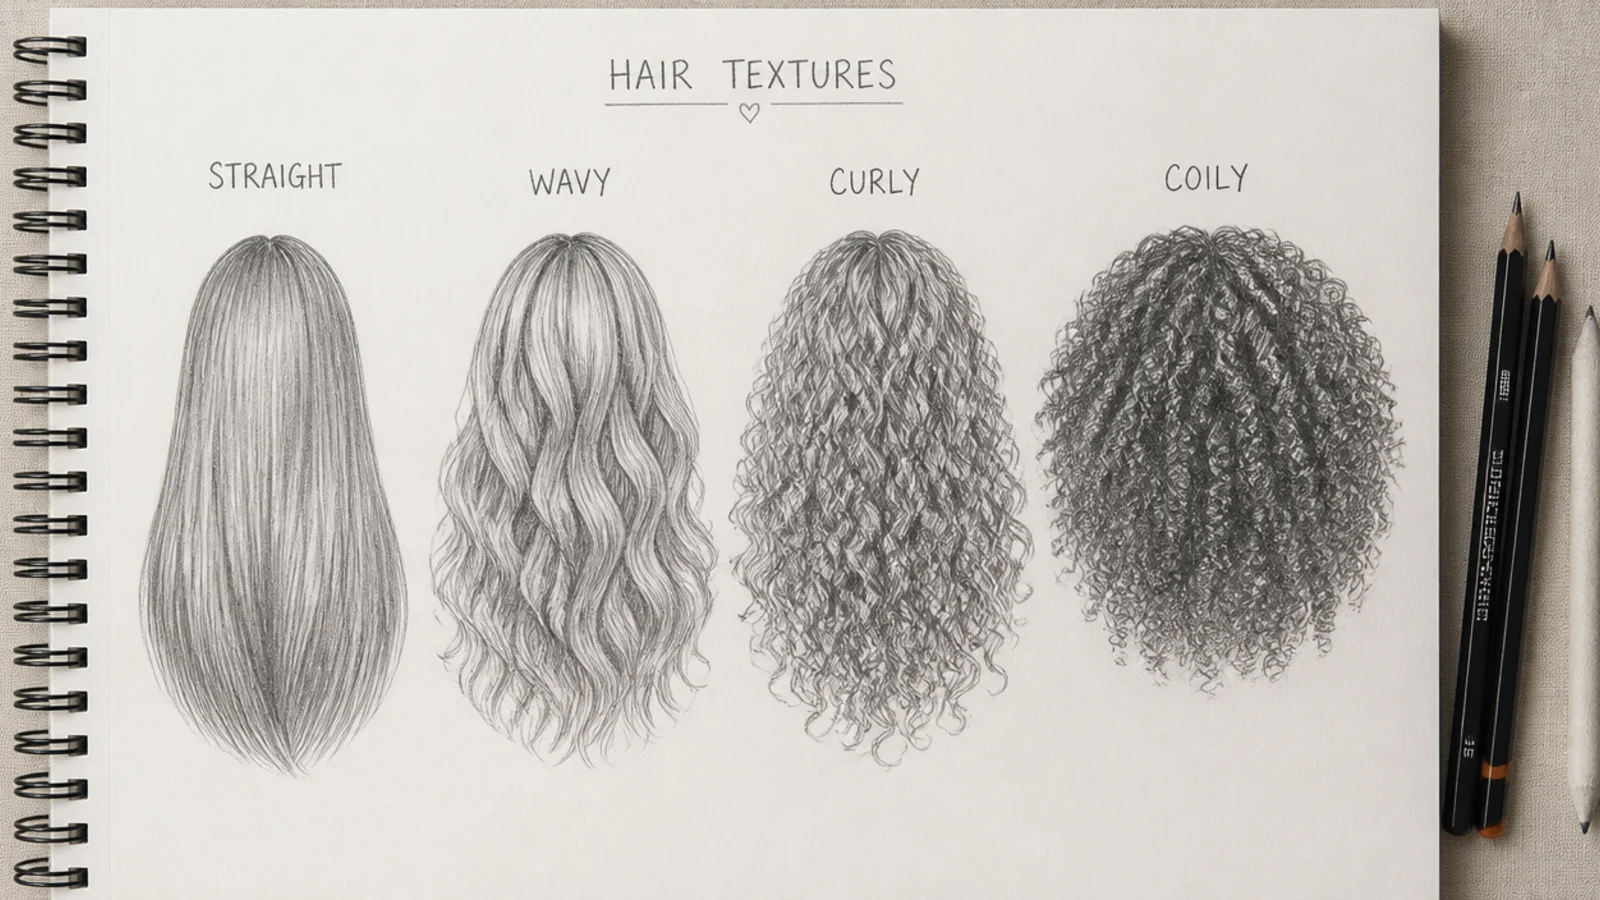
Each texture needs a different mark, and using the same mark for all four is why sketchbook pages look repetitive. Straight hair is long unbroken lines from root to tip, grouped into sections, with the shine band sitting as a soft horizontal ellipse across the crown. Wavy hair is long lazy S curves, about 4cm peak to peak at shoulder length, shaded on the inside of each turn. Curly hair is a ribbon: sketch a zig-zag guideline, wrap a twisting band around it, and put light and shadow on opposite sides so it turns in space instead of sitting flat, which is the method in curly hair sketch. Coily 4C hair is not drawn as coils at all; it is a soft-edged mass built from tiny overlapping circular strokes with a broken outer contour, and the value does all the work. As a rule of thumb, the tighter the texture, the fewer lines you draw and the more you shade. Short cuts across all four textures are covered in short hair sketch.
Six Common Hair Sketch Mistakes and How to Fix Them
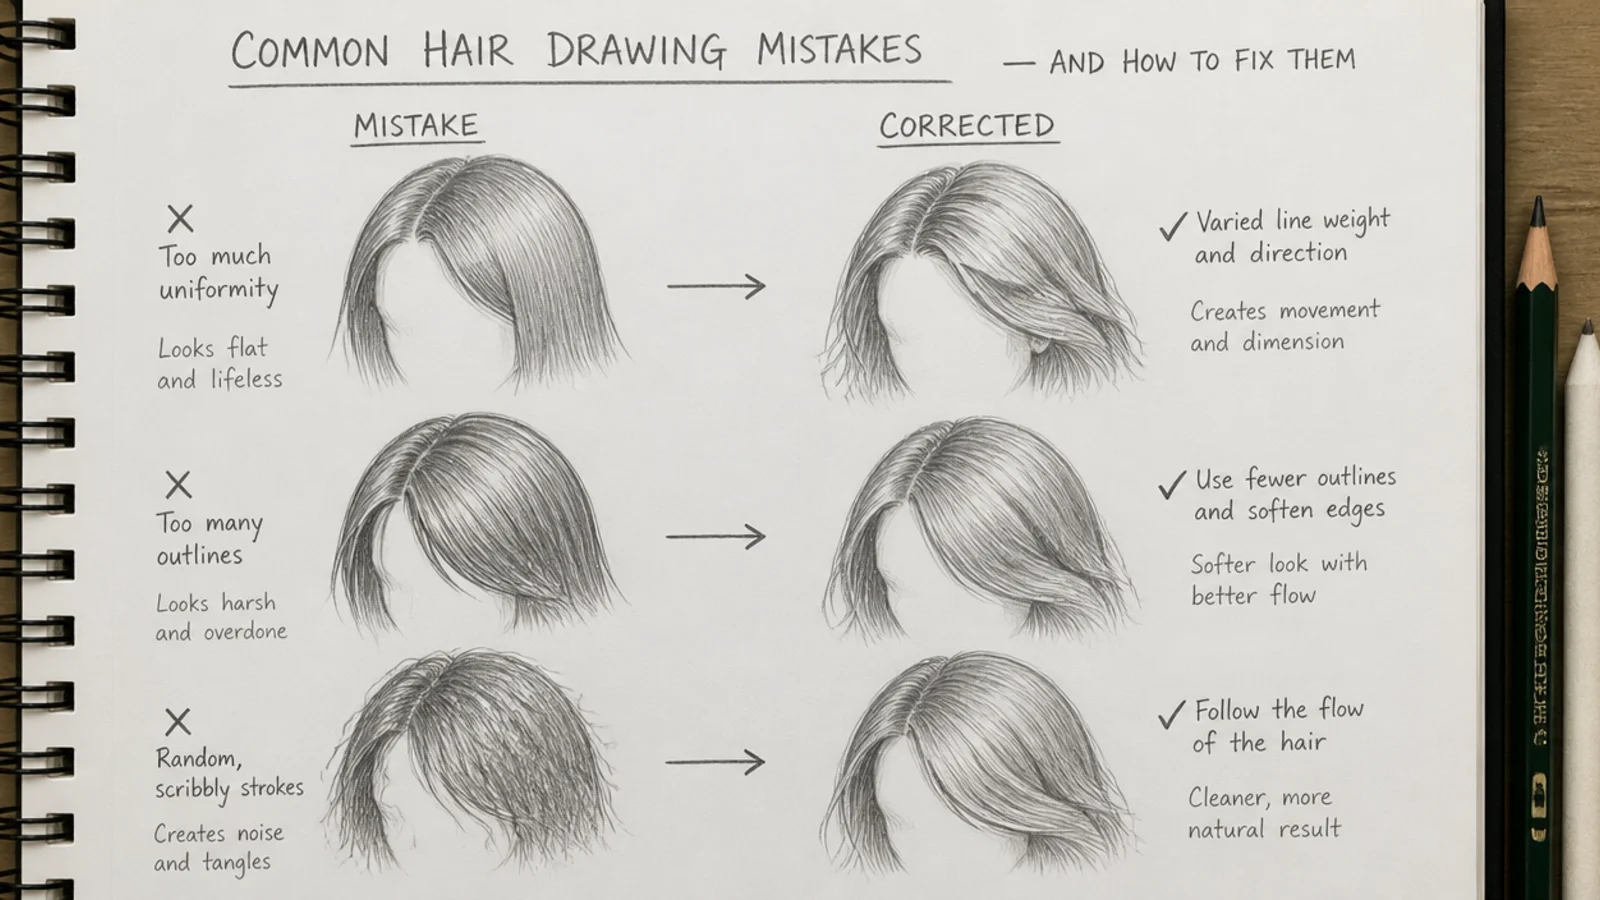
First, strands too early. If your sketch is a mess of lines with no shape, you skipped the silhouette; block the mass again on a fresh page. Second, the helmet, where the hair is one smooth closed outline with no broken edge. Fix it with short flicks at the ends, 4mm to 10mm long, angled with the flow. Third, parallel lines. Hair radiates from the crown, so if your lines run down the page like ruled paper, re-mark the crown and fan everything out from it. Fourth, gray mush, which means everything got shaded at one mid value; push the gaps between strand groups to 6B and reclaim white highlights with a kneaded eraser. Fifth, the stamped hairline, a hard clean curve across the forehead. Break it with three or four tiny stray hairs and vary the edge. Sixth, curls outlined as loops rather than drawn as ribbons, which reads as springs. Every one of these is visible from arm's length, so hold the page up before you commit to the dark pencil.
Pencils, Paper and Blending Tools for Sketchbook Hair Practice
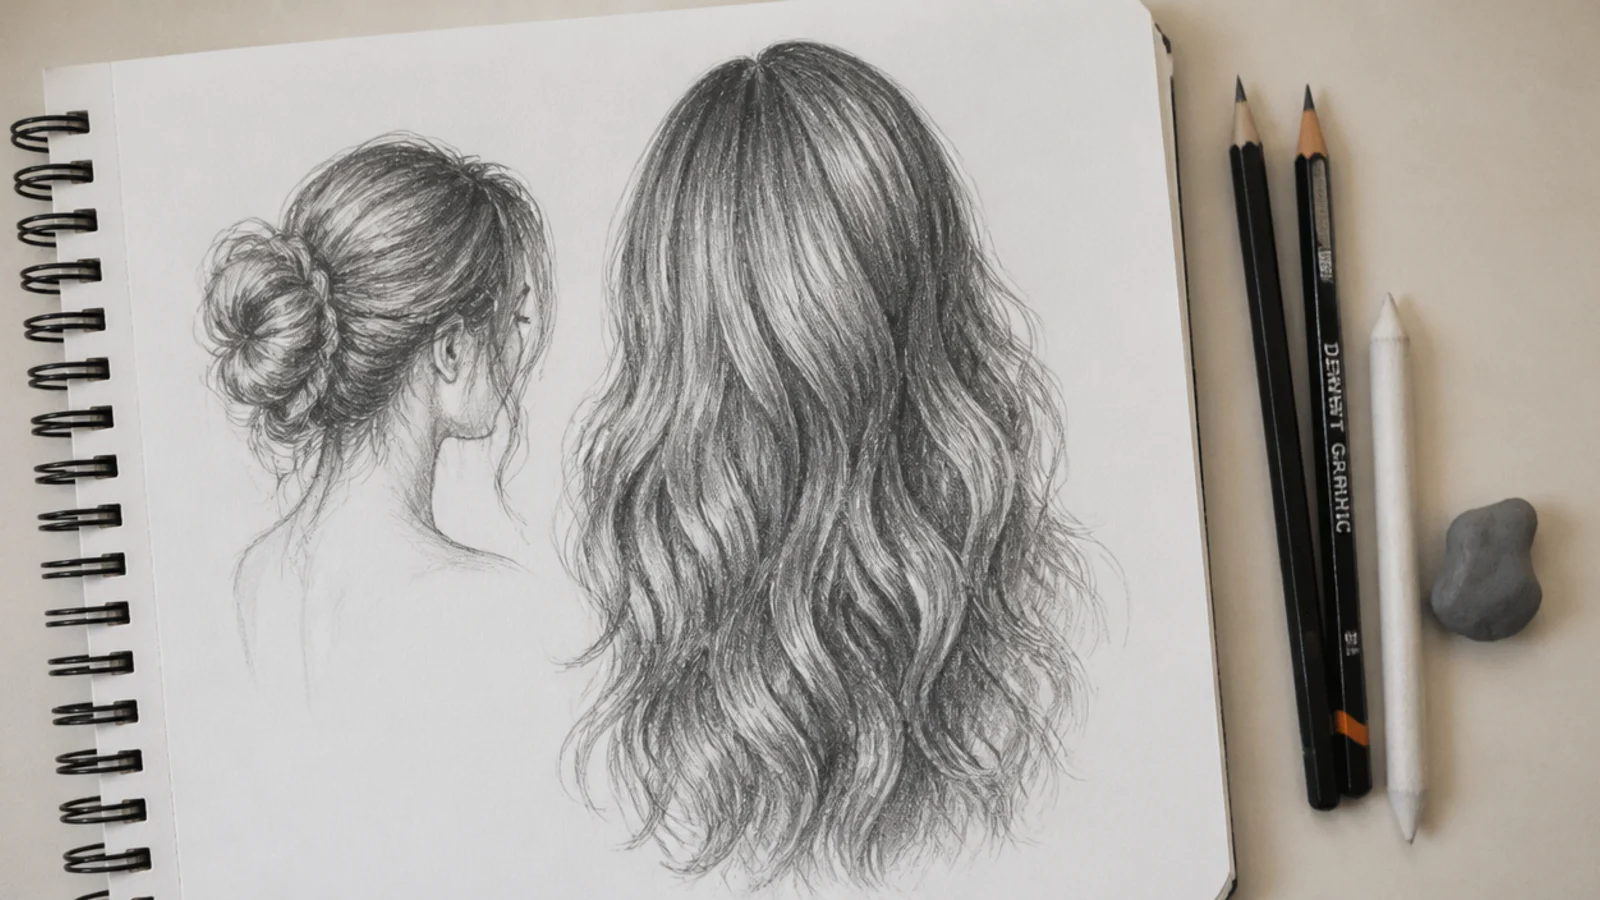
You need less than the art store suggests. A five pencil set covering 2H, HB, 2B, 4B and 6B handles every idea on this list, and 2H, 4B and 6B do most of the work. Smooth cartridge paper in the 100 to 120gsm range holds fine strand lines without the tooth breaking them up, while heavily textured paper fights you on straight hair and helps on coily hair. A kneaded eraser is the one tool worth insisting on, because it lifts graphite without abrading the paper, which is how you pull highlight bands back out of a shaded mass. A blending stump is optional and easy to overuse; blending everything is what turns hair into smoke. Keep a sharp point for strand lines and use the side of the lead for broad value, and rotate the pencil as you go so the tip stays chisel shaped. Map the grade to the hair color as well as the shadow: pale blonde tops out at 2B, mid brown lives at 4B, and black hair needs 6B to reach a believable core.
How to Use Hair References Without Copying Them
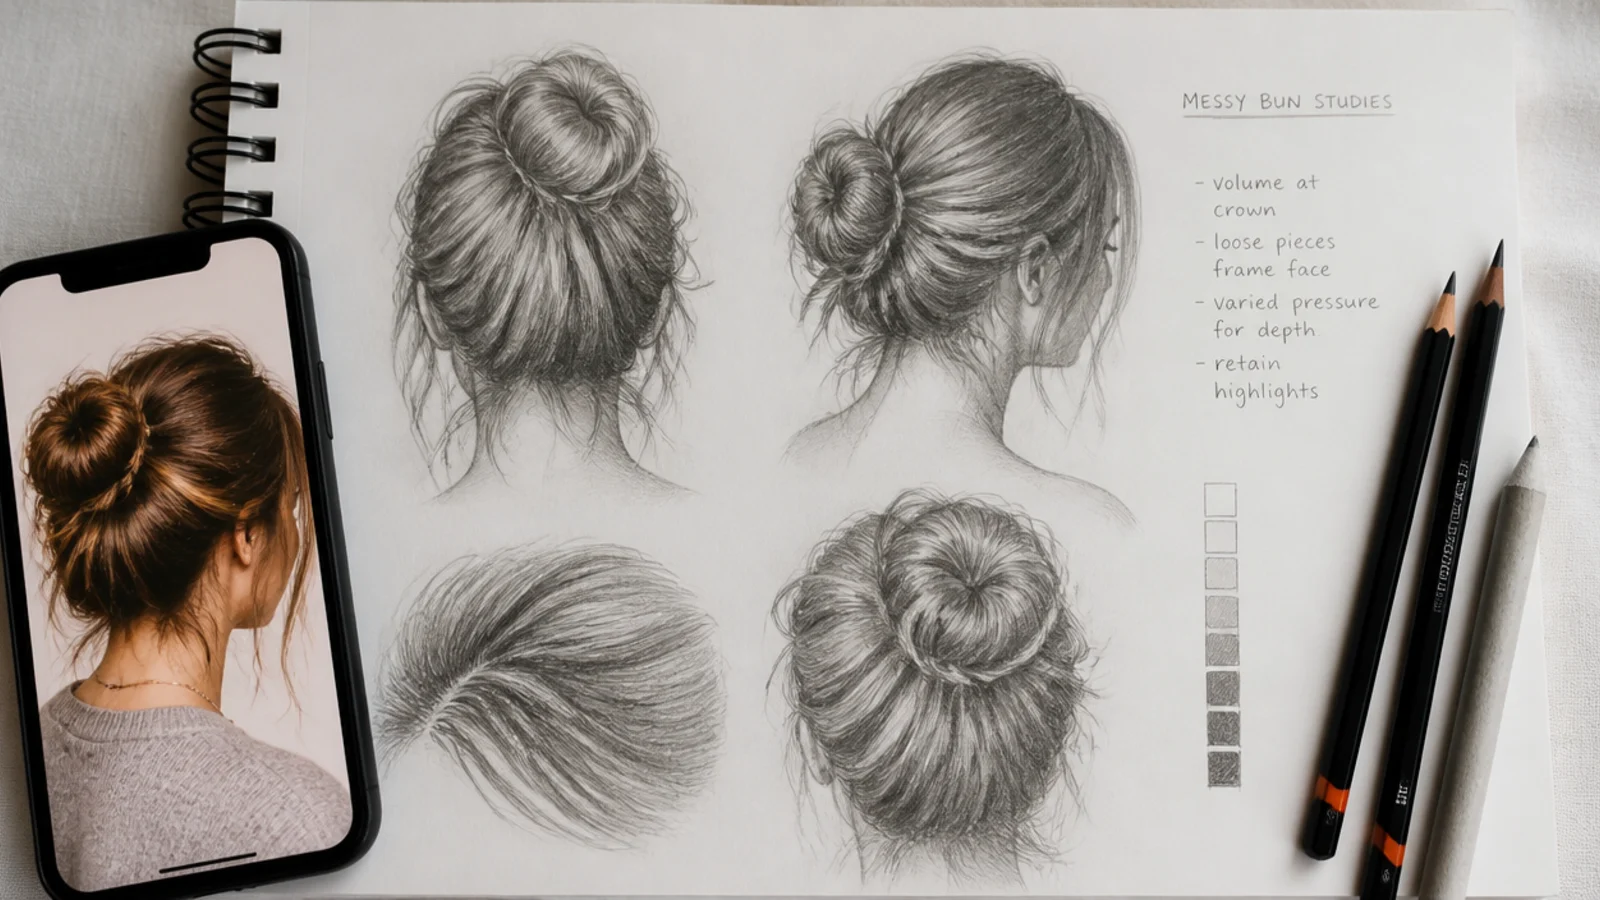
References are how you learn hair, but tracing a photo teaches your hand nothing. Use this method instead. Look at the reference for thirty seconds and identify only three things: where the crown swirl is, where the light band falls, and how many major strand groups exist. Put the reference away and draw those three things from memory. Then look again and correct. That loop builds the visual library that lets you draw hair without a photo in front of you, which is the actual goal. Build a reference page per hairstyle with front, side, back and three-quarter views, since one angle teaches you an outline while four angles teach you a form. On rights, photographs are copyrighted by the photographer, so use them for study freely, but for work you intend to sell, either shoot your own reference, use a licensed reference pack, or change enough that the result is your drawing rather than a redrawn photo. Browse the rest of the hair sketch board for more style-specific reference sets.
Frequently Asked Questions
What should I draw in my sketchbook to practice hair?
Work in order of difficulty rather than by mood. Start with closed-shape styles like a blunt bob and a pixie that train silhouette, move to ponytails and buns for convergence and volume, then braids for repeating overlap, then curls, locs and coils for form and value. Finish with back views and hair in motion. One style a day for 20 days covers the whole skill set.
What hairstyles are easiest to draw?
A blunt chin-length bob is the easiest, because it is a single closed silhouette with no strand detail required. A high ponytail, a short pixie and a textured crop come next. The hardest are 4C coils, fishtail braids from the back, blonde hair under strong light and hair in motion, all of which need value control rather than just outlines.
How do I make hair look more realistic in my drawings?
Widen the value range and follow the flow. Use 6B in the gaps between strand groups, keep a band of bare white paper across the crown, and make sure every line radiates from the crown swirl rather than running parallel. Then add texture last: a handful of stray hairs breaking the outer silhouette does more for realism than a hundred evenly drawn strands.
How do I avoid making hair look flat in my sketches?
Flatness comes from three causes. The hair mass is drawn too close to the skull, so lift it 5mm to 15mm at the crown. Everything is shaded at one mid value, so push the darkest gaps to 6B. And the highlight is missing, so leave a light band curving across the crown or lift it back with a kneaded eraser. Fixing the highlight alone usually solves half the problem.
Should I draw the head before adding hair?
Yes, always. Draw the full skull including the back of the cranium, then the jaw and hairline, then lay the hair over the top as a mass. Beginners who draw hair first flatten the top of the head and end up with hair that sits like a wig. The skull can be a light 2H construction line you erase later; it takes thirty seconds and fixes the proportions.
What pencils do you use for drawing hair?
A 2H for construction and guide lines, HB for general strand lines, 2B to 4B for mid shadows, and 6B for the darkest cores. Match the grade to the hair color too: pale blonde should top out around 2B, mid brown sits at 4B, and black hair needs 6B to look black rather than gray. A kneaded eraser is as important as any of the pencils.
How do you shade curly hair?
Treat each curl as a ribbon twisting in space rather than an outlined coil. Sketch a zig-zag guideline, wrap a band around it, then put the light on the side facing the source and 4B to 6B shadow on the side turning away. The gaps between curls are the darkest values in the drawing. Never shade a curl evenly, or it flattens into a circle.
How do you draw hair when the head is only 2cm tall?
Cut detail hard. At around 2cm you get roughly four to six marks per hairstyle: the silhouette, one or two flow lines, one shadow shape and one white gap. Anything more turns to mud at that scale. Test it by holding the page at arm's length; if a mark disappears, it was never worth drawing. Small-scale economy is the most transferable skill in a sketchbook.
Is it OK to use photo references for drawing hair?
For study and practice, yes, freely. For work you plan to sell or publish, photographs are owned by the photographer, so either shoot your own reference, use a licensed or free reference pack, or move far enough from the source that the drawing is yours. The safest habit is to study a reference, put it away, and draw from what you remember.
Which hair sketch look are you saving?
If you take one thing from these 20 hair styles sketch ideas, make it the order of operations: silhouette, then flow lines from the crown, then value, then texture, then a few stray strands at the very end. Beginners reverse that sequence and end up with a scribbled helmet every time. Work the list from idea 1 to idea 20 rather than jumping to the coils and the motion studies, because idea 17 only works once idea 6 has taught your hand to commit to a silhouette. Date each page so you can see the improvement across the 20 days. When you are ready to go deeper on one texture, read curly hair sketch or browse the whole hair sketch board.